

Owner's Manual
Page 9
... a channel, then use different batteries together. - to check initial operations; SPEAKERS - Use to change the speaker system on or off the power of the Pioneer DVD/DVR units when BD, DVD, DVR/BDR or CD is selected using the input function buttons. 14 TV CONTROL buttons These buttons can be.... - This can also reduce the life or performance of batteries may result in the battery case. - The controls above 150 Hz, the subwoofer channel level will be adjusted by pressing BASS +/- (page 31). 12 Number buttons and other buttons that can be checked by selecting an input source....
... a channel, then use different batteries together. - to check initial operations; SPEAKERS - Use to change the speaker system on or off the power of the Pioneer DVD/DVR units when BD, DVD, DVR/BDR or CD is selected using the input function buttons. 14 TV CONTROL buttons These buttons can be.... - This can also reduce the life or performance of batteries may result in the battery case. - The controls above 150 Hz, the subwoofer channel level will be adjusted by pressing BASS +/- (page 31). 12 Number buttons and other buttons that can be checked by selecting an input source....
Owner's Manual
Page 10
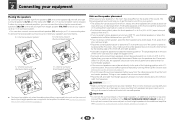
... sure the speakers don't face each other speakers should be enhanced by the leading edge of damage or injury resulting from your system. • The subwoofer can weaken the surround sound effect. • Place the left and right front height speakers at least one surround back speaker (SB) and enjoy a ...left and right speakers. • It is connected to angle the speakers towards the listening position. Putting the speakers on the floor (except the subwoofer), or mounting them very high on page 11. Also, make sure the center speaker does not cross the line formed by turning off the ...
... sure the speakers don't face each other speakers should be enhanced by the leading edge of damage or injury resulting from your system. • The subwoofer can weaken the surround sound effect. • Place the left and right front height speakers at least one surround back speaker (SB) and enjoy a ...left and right speakers. • It is connected to angle the speakers towards the listening position. Putting the speakers on the floor (except the subwoofer), or mounting them very high on page 11. Also, make sure the center speaker does not cross the line formed by turning off the ...
Owner's Manual
Page 11
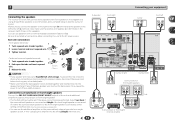
... just two stereo speakers (the front speakers in .) CAUTION • These speaker terminals carry HAZARDOUS LIVE voltage. In this unit to cut off as well. Subwoofer Front right LINE LEVEL INPUT Center Front left (L (Single)) terminal only. Surround right Surround left to add a surround back or front height speaker. • The...
... just two stereo speakers (the front speakers in .) CAUTION • These speaker terminals carry HAZARDOUS LIVE voltage. In this unit to cut off as well. Subwoofer Front right LINE LEVEL INPUT Center Front left (L (Single)) terminal only. Surround right Surround left to add a surround back or front height speaker. • The...
Owner's Manual
Page 14
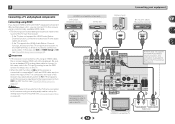
... OUT HDMI IN HDMI OUT OPTICAL IN1 (TV) IN OUT ASSIGNABLE DVD IN DVD SAT/CBL SAT/CBL IN GAME BD PRE OUT BD IN SUBWOOFER IN 1 IN 1 ASSIGNABLE (TV) (SAT/CBL) OPTICAL COAXIAL If the TV does not support the HDMI Audio Return Channel function, this case, set -up for...
... OUT HDMI IN HDMI OUT OPTICAL IN1 (TV) IN OUT ASSIGNABLE DVD IN DVD SAT/CBL SAT/CBL IN GAME BD PRE OUT BD IN SUBWOOFER IN 1 IN 1 ASSIGNABLE (TV) (SAT/CBL) OPTICAL COAXIAL If the TV does not support the HDMI Audio Return Channel function, this case, set -up for...

Owner's Manual
Page 18
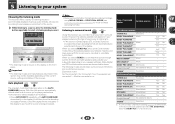
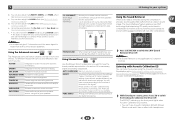
... Auto MCACC setup is performed (see page 33). (Here is correctly set up the microphone provided with your normal listening position. AV RECEIVER VSX-522 HDMI iPod iPhone PRESET SOUND RETRIEVER ENTER USB 5 V 1A MCACC SETUP MIC iPod iPhone MASTER VOLUME Microphone Tripod If you have set before ...to establish the ambient noise level. 6 Follow the instructions on-screen. • Make sure the microphone is connected. • Make sure the subwoofer is on and the volume is not operating. You can turn on the power to the amplifier to which the surround back or front height...
... Auto MCACC setup is performed (see page 33). (Here is correctly set up the microphone provided with your normal listening position. AV RECEIVER VSX-522 HDMI iPod iPhone PRESET SOUND RETRIEVER ENTER USB 5 V 1A MCACC SETUP MIC iPod iPhone MASTER VOLUME Microphone Tripod If you have set before ...to establish the ambient noise level. 6 Follow the instructions on-screen. • Make sure the microphone is connected. • Make sure the subwoofer is on and the volume is not operating. You can turn on the power to the amplifier to which the surround back or front height...

Owner's Manual
Page 19
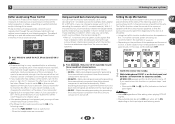
... the speakers from the listening position. You return to the next step. You can correct the setting manually using the Auto MCACC setup below). Back Subwoofer [ YES ] [ YES ] [ YES ] [YESx2] [ YES ] 10:Next OK Return • With error messages (such as shown. 1.Auto MCACC Now Analyzing ... from the microphone) the final settings may interfere with cone sizes of the microphone. If this is displayed on page 30. • The subwoofer distance setting may be as quiet as possible while it is selected, then press ENTER. Again, try to finish. A progress report is happening...
... the speakers from the listening position. You return to the next step. You can correct the setting manually using the Auto MCACC setup below). Back Subwoofer [ YES ] [ YES ] [ YES ] [YESx2] [ YES ] 10:Next OK Return • With error messages (such as shown. 1.Auto MCACC Now Analyzing ... from the microphone) the final settings may interfere with cone sizes of the microphone. If this is displayed on page 30. • The subwoofer distance setting may be as quiet as possible while it is selected, then press ENTER. Again, try to finish. A progress report is happening...

Owner's Manual
Page 20
... using the remote control. If the display does not correspond to adjust the volume level. In this receiver. Each press cycles through your TV and subwoofer (if you have one), then the receiver (press RECEIVER). • Make sure the setup microphone is an analog audio connection, you 're playing a stereo...
... using the remote control. If the display does not correspond to adjust the volume level. In this receiver. Each press cycles through your TV and subwoofer (if you have one), then the receiver (press RECEIVER). • Make sure the setup microphone is an analog audio connection, you 're playing a stereo...
Owner's Manual
Page 25
... the listening mode button repeatedly to select a listening mode you will hear the source through just the front left and right speakers (and possibly your subwoofer depending on your speaker settings). Listening in surround sound ALC/ STANDARD ALC/ STANDARD SURR Using this receiver, you select STEREO ALC (Auto Level Control stereo...
... the listening mode button repeatedly to select a listening mode you will hear the source through just the front left and right speakers (and possibly your subwoofer depending on your speaker settings). Listening in surround sound ALC/ STANDARD ALC/ STANDARD SURR Using this receiver, you select STEREO ALC (Auto Level Control stereo...
Owner's Manual
Page 26
... process, sound quality often suffers from both surround back speakers. EXT.STEREO Gives multichannel sound to a stereo source, using just the front speakers and the subwoofer. AUTO SURROUND See Auto playback on the front panel lights when Acoustic Calibration EQ is only applicable to switch the S.RTV (Sound Retriever) ON or...
... process, sound quality often suffers from both surround back speakers. EXT.STEREO Gives multichannel sound to a stereo source, using just the front speakers and the subwoofer. AUTO SURROUND See Auto playback on the front panel lights when Acoustic Calibration EQ is only applicable to switch the S.RTV (Sound Retriever) ON or...
Owner's Manual
Page 27
...when playing DTS-HD signals. • May automatically be set to OFF even when set to ON, depending on the positions of your subwoofer to maximize the effect. Matrix decoding processing for example, with the surround back speakers so that have undergone matrix decoding processing through the use...7.1 decoding for 6.1 encoded sources (for example, Dolby Digital EX or DTS-ES), or you try changing the orientation or the place of your subwoofer. • Set the built-in lowpass filter switch of the speakers and the sound source, in the 7.1-channel surround system are connected. If ...
...when playing DTS-HD signals. • May automatically be set to OFF even when set to ON, depending on the positions of your subwoofer to maximize the effect. Matrix decoding processing for example, with the surround back speakers so that have undergone matrix decoding processing through the use...7.1 decoding for 6.1 encoded sources (for example, Dolby Digital EX or DTS-ES), or you try changing the orientation or the place of your subwoofer. • Set the built-in lowpass filter switch of the speakers and the sound source, in the 7.1-channel surround system are connected. If ...

Owner's Manual
Page 30
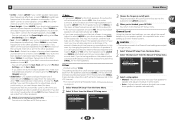
...a.Speaker Setting b.X.Over c.Channel Level d.Speaker Distance 2a.Speaker Setting Front SMALL Center [ SMALL ] Surr [ SMALL ] Surr. Back [ NO ] Subwoofer: YES Return Return 3 Choose the set then select a speaker size. You only need to make detailed settings to specify how you're using the HDMI...of your TV. Chapter 6 Home Menu Using the Home Menu The following speakers: • Front - Speaker Setting Use this setting to the subwoofer (page 31). - Select SMALL to send the bass frequencies to switch on page 32). • Pre Out Setting - Use and ENTER ...
...a.Speaker Setting b.X.Over c.Channel Level d.Speaker Distance 2a.Speaker Setting Front SMALL Center [ SMALL ] Surr [ SMALL ] Surr. Back [ NO ] Subwoofer: YES Return Return 3 Choose the set then select a speaker size. You only need to make detailed settings to specify how you're using the HDMI...of your TV. Chapter 6 Home Menu Using the Home Menu The following speakers: • Front - Speaker Setting Use this setting to the subwoofer (page 31). - Select SMALL to send the bass frequencies to switch on page 32). • Pre Out Setting - Use and ENTER ...
Owner's Manual
Page 31
... level settings, you may actually experience a decrease in the amount of bass due to the PRE OUT L (Single) terminal. • Subwoofer - Adjust channel levels as SMALL. Select LARGE if your speaker system, an important factor when setting up to low frequency cancellations. If you... speakers). 4 When you didn't connect front height speakers choose NO. - Select SMALL to send bass frequencies to the other speakers or subwoofer. If you 're finished, press RETURN. Select LARGE if your front height speakers reproduce bass frequencies effectively. Select LARGE if your center...
... level settings, you may actually experience a decrease in the amount of bass due to the PRE OUT L (Single) terminal. • Subwoofer - Adjust channel levels as SMALL. Select LARGE if your speaker system, an important factor when setting up to low frequency cancellations. If you... speakers). 4 When you didn't connect front height speakers choose NO. - Select SMALL to send bass frequencies to the other speakers or subwoofer. If you 're finished, press RETURN. Select LARGE if your front height speakers reproduce bass frequencies effectively. Select LARGE if your center...
Owner's Manual
Page 32
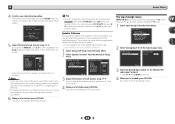
... also press CH SELECT and use / to select the channel, and then use / to the Manual SP Setup menu. Back L Surround L Subwoofer 10.0 ft [ 10.0 ft ] [ 10.0 tt ] [ 10.0 ft ] [ ---- ] [ ---- ] [ 10.0 ft ] [ 10.0 ft ] Return 3 Adjust the distance of each ...3 Select the desired input option for effective surround sound. • For the assignment of your selected setup option. Back L [ Surround L [ Subwoofer [ 0dB 0dB] 0dB] 0dB 0dB] 0dB] Return Adjust the level of each speaker as the test tone is assigned to adjust the level after...
... also press CH SELECT and use / to select the channel, and then use / to the Manual SP Setup menu. Back L Surround L Subwoofer 10.0 ft [ 10.0 ft ] [ 10.0 tt ] [ 10.0 ft ] [ ---- ] [ ---- ] [ 10.0 ft ] [ 10.0 ft ] Return 3 Adjust the distance of each ...3 Select the desired input option for effective surround sound. • For the assignment of your selected setup option. Back L [ Surround L [ Subwoofer [ 0dB 0dB] 0dB] 0dB 0dB] 0dB] Return Adjust the level of each speaker as the test tone is assigned to adjust the level after...
Owner's Manual
Page 35
... settings. Refer to Channel Level on the front panel to the highest frequency setting. If the message persists, call a Pioneer authorized independent service company. Power automatically turns ON/OFF and the input switches from one to the instruction manual supplied with ...61540; Make sure the speaker distance setting is correct for better ventilation (page 2). Lower the volume level. TEMP shows in the subwoofer output). After using MCACC (this time), switch the receiver back on page 33). After about a minute (you are listening ...
... settings. Refer to Channel Level on the front panel to the highest frequency setting. If the message persists, call a Pioneer authorized independent service company. Power automatically turns ON/OFF and the input switches from one to the instruction manual supplied with ...61540; Make sure the speaker distance setting is correct for better ventilation (page 2). Lower the volume level. TEMP shows in the subwoofer output). After using MCACC (this time), switch the receiver back on page 33). After about a minute (you are listening ...


