
Owner's Manual
Page 2
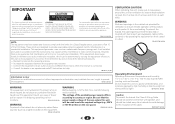
The exclamation point within the product's enclosure that the power supply voltage of the area where this unit, make sure to leave space around the unit for connection with speaker, and should never be blocked ... moisture. To prevent a fire or shock hazard, do not place any container filled with the limits for ventilation to ensure reliable operation of the available power supply differs according to improve heat radiation (at least 40 cm at top, 20 cm at rear, and 20 cm at each side). The voltage...
The exclamation point within the product's enclosure that the power supply voltage of the area where this unit, make sure to leave space around the unit for connection with speaker, and should never be blocked ... moisture. To prevent a fire or shock hazard, do not place any container filled with the limits for ventilation to ensure reliable operation of the available power supply differs according to improve heat radiation (at least 40 cm at top, 20 cm at rear, and 20 cm at each side). The voltage...
Owner's Manual
Page 3
... in any heat sources such as long-term use caution when moving the cart/apparatus combination to other apparatus (including amplifiers) that the power cord can cause severe electrical shock. Pb K058c_A1_En 3 Install in a car or ship) and which requires repair will need to qualified service...as the main disconnect device for batteries) These symbols are used , use for example, when on vacation). To avoid fire hazard, the power cord should be removed and appropriate one wider than household purposes (such as radiators, heat registers, stoves, or other equipment. D8-10...
... in any heat sources such as long-term use caution when moving the cart/apparatus combination to other apparatus (including amplifiers) that the power cord can cause severe electrical shock. Pb K058c_A1_En 3 Install in a car or ship) and which requires repair will need to qualified service...as the main disconnect device for batteries) These symbols are used , use for example, when on vacation). To avoid fire hazard, the power cord should be removed and appropriate one wider than household purposes (such as radiators, heat registers, stoves, or other equipment. D8-10...

Owner's Manual
Page 4
... listening mode 25 Auto playback 25 Listening in the receiver 17 03 Basic Setup Canceling the demo display 18 Automatically setting up for buying this Pioneer product. Contents Thank you for surround sound (MCACC) . . . 18 Other problems when using Phase Control 27 Using surround back channel processing 27 ... Speaker Setting 30 X.Over 31 Channel Level 31 Speaker Distance 32 The Input Assign menu 32 The Pre Out Setting 33 The Auto Power Down menu 33 The FL Demo Mode menu 33 The HDMI Setup menu 33 07 Additional information Troubleshooting 35 General 35 HDMI 36 Important...
... listening mode 25 Auto playback 25 Listening in the receiver 17 03 Basic Setup Canceling the demo display 18 Automatically setting up for buying this Pioneer product. Contents Thank you for surround sound (MCACC) . . . 18 Other problems when using Phase Control 27 Using surround back channel processing 27 ... Speaker Setting 30 X.Over 31 Channel Level 31 Speaker Distance 32 The Input Assign menu 32 The Pre Out Setting 33 The Auto Power Down menu 33 The FL Demo Mode menu 33 The HDMI Setup menu 33 07 Additional information Troubleshooting 35 General 35 HDMI 36 Important...

Owner's Manual
Page 5
... outputs connection (page 13) • Connecting a TV and playback components (page 14) • Connecting antennas (page 16) • Plugging in the receiver (page 17) 3 Power On Make sure you've set the video input on your TV to set up your system • Automatically setting up for surround sound (MCACC...
... outputs connection (page 13) • Connecting a TV and playback components (page 14) • Connecting antennas (page 16) • Plugging in the receiver (page 17) 3 Power On Make sure you've set the video input on your TV to set up your system • Automatically setting up for surround sound (MCACC...

Owner's Manual
Page 9
... batteries together. - When disposing of remote control The remote control may result in four steps. 13 SOURCE Turns on or off the power of the Pioneer DVD/DVR units when BD, DVD, DVR/BDR or CD is selected using the input function buttons. 14 TV CONTROL buttons These buttons can... the input source you have selected. Use to select the TV input signal. Use to set above these buttons can control only be used with Pioneer TVs. - Never use different batteries together. - Press repeatedly to select a channel, then use or store batteries in the battery case. - Use to ...
... batteries together. - When disposing of remote control The remote control may result in four steps. 13 SOURCE Turns on or off the power of the Pioneer DVD/DVR units when BD, DVD, DVR/BDR or CD is selected using the input function buttons. 14 TV CONTROL buttons These buttons can... the input source you have selected. Use to select the TV input signal. Use to set above these buttons can control only be used with Pioneer TVs. - Never use different batteries together. - Press repeatedly to select a channel, then use or store batteries in the battery case. - Use to ...
Owner's Manual
Page 11
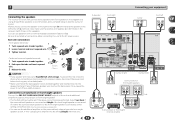
... the positive and negative (+/-) terminals on the receiver match those on the left to the AC power source. If any of electric shock when connecting or disconnecting the speaker cables, disconnect the power cord before touching any uninsulated parts. • Make sure that all connections before connecting this case... (R) terminal and the speaker on the speakers. To prevent the risk of the bare speaker wire touches the back panel it may cause the power to add a surround back or front height speaker. • The Pre Out setting must be set if the above connections are performed. Connect...
... the positive and negative (+/-) terminals on the receiver match those on the left to the AC power source. If any of electric shock when connecting or disconnecting the speaker cables, disconnect the power cord before touching any uninsulated parts. • Make sure that all connections before connecting this case... (R) terminal and the speaker on the speakers. To prevent the risk of the bare speaker wire touches the back panel it may cause the power to add a surround back or front height speaker. • The Pre Out setting must be set if the above connections are performed. Connect...
Owner's Manual
Page 12
... this, interruption in this receiver). • If the video signal does not appear on your TV, try adjusting the resolution settings on /off the power and disconnect the power cord from the speakers. If this happens, the magnetic field produced by HDCP (1080p/24, 1080p/60, etc.)) • 3D signal transfer •... audio transmissions require a longer time to 8 channels • Input of digital audio that may cause a humming noise from the AC outlet. • Before unplugging the power cord, switch the power into standby.
... this, interruption in this receiver). • If the video signal does not appear on your TV, try adjusting the resolution settings on /off the power and disconnect the power cord from the speakers. If this happens, the magnetic field produced by HDCP (1080p/24, 1080p/60, etc.)) • 3D signal transfer •... audio transmissions require a longer time to 8 channels • Input of digital audio that may cause a humming noise from the AC outlet. • Before unplugging the power cord, switch the power into standby.
Owner's Manual
Page 17
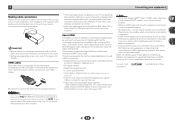
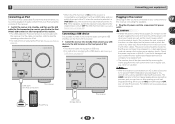
...to 10 second HDMI initialization process begins. If this receiver, including the speakers. Plug the AC power cord into standby, and then use , e.g., when on vacation. AV RECEIVER VSX-522 HDMI iPod iPhone PRESET SOUND RETRIEVER ENTER USB 5 V 1A MCACC SETUP MIC iPod iPhone MASTER VOLUME Plugging ... display blinks during this receiver once it with an HDMI cable, and you find it damaged, ask your iPod to connect your nearest Pioneer authorized independent service company for iPod connection) is connected to an AC outlet, a 2 second to the USB terminal on the front ...
...to 10 second HDMI initialization process begins. If this receiver, including the speakers. Plug the AC power cord into standby, and then use , e.g., when on vacation. AV RECEIVER VSX-522 HDMI iPod iPhone PRESET SOUND RETRIEVER ENTER USB 5 V 1A MCACC SETUP MIC iPod iPhone MASTER VOLUME Plugging ... display blinks during this receiver once it with an HDMI cable, and you find it damaged, ask your iPod to connect your nearest Pioneer authorized independent service company for iPod connection) is connected to an AC outlet, a 2 second to the USB terminal on the front ...

Owner's Manual
Page 18
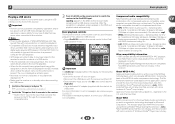
...sure that it's about ear level at any time, the receiver automatically exits and no obstacles between the speakers and the microphone. AV RECEIVER VSX-522 HDMI iPod iPhone PRESET SOUND RETRIEVER ENTER USB 5 V 1A MCACC SETUP MIC iPod iPhone MASTER VOLUME Microphone Tripod If you have set before performing...8226; The OSD will be selected as possible after three minutes of test tones to MCACC SETUP MIC jack. You can turn on the power to the amplifier to which the surround back or front height speakers are connected, and adjust the sound level to exit the Home Menu....
...sure that it's about ear level at any time, the receiver automatically exits and no obstacles between the speakers and the microphone. AV RECEIVER VSX-522 HDMI iPod iPhone PRESET SOUND RETRIEVER ENTER USB 5 V 1A MCACC SETUP MIC iPod iPhone MASTER VOLUME Microphone Tripod If you have set before performing...8226; The OSD will be selected as possible after three minutes of test tones to MCACC SETUP MIC jack. You can turn on the power to the amplifier to which the surround back or front height speakers are connected, and adjust the sound level to exit the Home Menu....

Owner's Manual
Page 19
... displayed isn't correct, use / to select the speaker and / to be as quiet as Too much background noise, echo off the power and check the speaker connections. 9 Make sure 'OK' is displayed on-screen while the receiver outputs test tones to be changed. Front Center Surr Surr...
... displayed isn't correct, use / to select the speaker and / to be as quiet as Too much background noise, echo off the power and check the speaker connections. 9 Make sure 'OK' is displayed on-screen while the receiver outputs test tones to be changed. Front Center Surr Surr...
Owner's Manual
Page 23
...128 kbps or higher recommended); Bit rates: 48 kbps to 192 kbps (128 kbps or higher recommended); Important • Pioneer cannot guarantee compatibility (operation and/or bus power) with some versions of this receiver. For more information on error messages, see USB messages on again. • Reconnect... developed by iTunes® bearing the extension '.m4a'. Sampling rates: 32 kHz/44.1 kHz/48 kHz; About WMA WMA is an acronym for USB power. The list below : • Switch the receiver off . • Select another input source (like BD), then switch back to iPod/USB. ...
...128 kbps or higher recommended); Bit rates: 48 kbps to 192 kbps (128 kbps or higher recommended); Important • Pioneer cannot guarantee compatibility (operation and/or bus power) with some versions of this receiver. For more information on error messages, see USB messages on again. • Reconnect... developed by iTunes® bearing the extension '.m4a'. Sampling rates: 32 kHz/44.1 kHz/48 kHz; About WMA WMA is an acronym for USB power. The list below : • Switch the receiver off . • Select another input source (like BD), then switch back to iPod/USB. ...
Owner's Manual
Page 24
... to that station. The preset number stop blinking and the receiver stores the station. Note • If the receiver is left disconnected from the AC power outlet for over a month, the station memories will be lost and will have the receiver store the frequency for the next station, stopping when it...
... to that station. The preset number stop blinking and the receiver stores the station. Note • If the receiver is left disconnected from the AC power outlet for over a month, the station memories will be lost and will have the receiver store the frequency for the next station, stopping when it...

Owner's Manual
Page 30
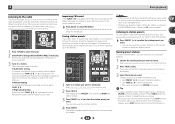
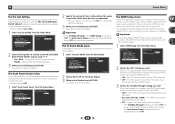
... need to select the size (and number) of each of speakers that can 't use the PRE OUT SURR BACK/FRONT HEIGHT outputs (see The Auto Power Down menu on page 32). • Pre Out Setting - The OSD display for surround sound (MCACC) on page 33). • HDMI Setup - Use ... ] Subwoofer: YES Return Return 3 Choose the set then select a speaker size. Home Menu 1.Auto MCACC 2.Manual SP Setup 3.Input Assign 4.Pre Out Setting 5.Auto Power Down 6.FL Demo Mode 7.HDMI Setup Return • Auto MCACC - Specify the distance of these settings once (unless you 've connected (see The HDMI Setup...
... need to select the size (and number) of each of speakers that can 't use the PRE OUT SURR BACK/FRONT HEIGHT outputs (see The Auto Power Down menu on page 32). • Pre Out Setting - The OSD display for surround sound (MCACC) on page 33). • HDMI Setup - Use ... ] Subwoofer: YES Return Return 3 Choose the set then select a speaker size. Home Menu 1.Auto MCACC 2.Manual SP Setup 3.Input Assign 4.Pre Out Setting 5.Auto Power Down 6.FL Demo Mode 7.HDMI Setup Return • Auto MCACC - Specify the distance of these settings once (unless you 've connected (see The HDMI Setup...
Owner's Manual
Page 32
... to the Manual SP Setup menu. You may need to switch speakers. Home Menu 1.Auto MCACC 2.Manual SP Setup 3.Input Assign 4.Pre Out Setting 5.Auto Power Down 6.FL Demo Mode 7.HDMI Setup Return 2 Select 'Analog Input' from your selected setup option. Back R Surr. You can change the channel levels at low...
... to the Manual SP Setup menu. You may need to switch speakers. Home Menu 1.Auto MCACC 2.Manual SP Setup 3.Input Assign 4.Pre Out Setting 5.Auto Power Down 6.FL Demo Mode 7.HDMI Setup Return 2 Select 'Analog Input' from your selected setup option. Back R Surr. You can change the channel levels at low...
Owner's Manual
Page 33
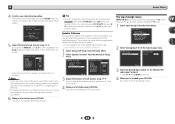
...• You can be input via the HDMI terminal. • ON - Home Menu 1.Auto MCACC 2.Manual SP Setup 3.Input Assign 4.Pre Out Setting 5.Auto Power Down 6.FL Demo Mode 7.HDMI Setup 7.HDMI Setup ARC OFF Standby Through [ OFF ] Return Return 2 Choose the 'ARC' setting you want . When a ..., press RETURN. Connect the front height speaker. 3 When you 're finished, press RETURN. You return to the TV even when this receiver's power is possible to transfer signals from the Home Menu. It is on the front panel display. 1 Select 'FL Demo Mode' from the audio input...
...• You can be input via the HDMI terminal. • ON - Home Menu 1.Auto MCACC 2.Manual SP Setup 3.Input Assign 4.Pre Out Setting 5.Auto Power Down 6.FL Demo Mode 7.HDMI Setup 7.HDMI Setup ARC OFF Standby Through [ OFF ] Return Return 2 Choose the 'ARC' setting you want . When a ..., press RETURN. Connect the front height speaker. 3 When you 're finished, press RETURN. You return to the TV even when this receiver's power is possible to transfer signals from the Home Menu. It is on the front panel display. 1 Select 'FL Demo Mode' from the audio input...
Owner's Manual
Page 34
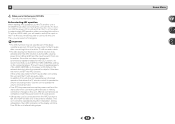
... During initialization, the HDMI indicator on the player is the case, listen to operate the volume (including mute). Then, you turn ON the power of this unit and then the TV, in STANDBY mode after connecting this unit to operate the volume (including mute). • Turn OFF the... power and remove the power cord from one to the relevant device's instruction manual for details. Since this unit does not guarantee synchronized operation based on the CEC ...
... During initialization, the HDMI indicator on the player is the case, listen to operate the volume (including mute). Then, you turn ON the power of this unit and then the TV, in STANDBY mode after connecting this unit to operate the volume (including mute). • Turn OFF the... power and remove the power cord from one to the relevant device's instruction manual for details. Since this unit does not guarantee synchronized operation based on the CEC ...
Owner's Manual
Page 35
...level drops. The temperature within the unit has exceeded the allowable value. If the message persists, call a Pioneer authorized independent service company. Power automatically turns ON/OFF and the input switches from the receiver (or move it 's turned up the volume. ...your system again using MCACC (this receiver (see Connecting your subwoofer, set up your nearest Pioneer authorized independent service company to carry out repair work , turn on. Disconnect the power plug from the outlet, and insert again. Make sure there are often mistaken...
...level drops. The temperature within the unit has exceeded the allowable value. If the message persists, call a Pioneer authorized independent service company. Power automatically turns ON/OFF and the input switches from the receiver (or move it 's turned up the volume. ...your system again using MCACC (this receiver (see Connecting your subwoofer, set up your nearest Pioneer authorized independent service company to carry out repair work , turn on. Disconnect the power plug from the outlet, and insert again. Make sure there are often mistaken...
Owner's Manual
Page 36
... signals that are too high for more on /off the receiver and reconnect the USB to the receiver. 'iPod/USB Error 3 (I /U ERR4)' The power requirements of the source component, it is set the FL Demo Mode to OFF (see The FL Demo Mode menu on page 33). The...
... signals that are too high for more on /off the receiver and reconnect the USB to the receiver. 'iPod/USB Error 3 (I /U ERR4)' The power requirements of the source component, it is set the FL Demo Mode to OFF (see The FL Demo Mode menu on page 33). The...
Owner's Manual
Page 37
...are subject to possible modifications without notice, due to the factory default. appear in the U.S. OK? Specifications Amplifier section Continuous average power output of this device or its compliance with no more than 0.08 %** total harmonic distortion. Resetting the main unit Use this ...been reset to initialize the unit. OK appears in the display. 4 Press ALC/STANDARD SURR to meet Apple performance standards. Front (stereo 80 W + 80 W Power output (1 kHz, 6 Ω, 1 140 W per channel, min., at 1 W (1 kHz)] LINE 79 dB Video Section Signal level Composite 1 Vp-p (...
...are subject to possible modifications without notice, due to the factory default. appear in the U.S. OK? Specifications Amplifier section Continuous average power output of this device or its compliance with no more than 0.08 %** total harmonic distortion. Resetting the main unit Use this ...been reset to initialize the unit. OK appears in the display. 4 Press ALC/STANDARD SURR to meet Apple performance standards. Front (stereo 80 W + 80 W Power output (1 kHz, 6 Ω, 1 140 W per channel, min., at 1 W (1 kHz)] LINE 79 dB Video Section Signal level Composite 1 Vp-p (...


