

Owner's Manual
Page 9
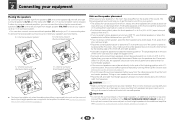
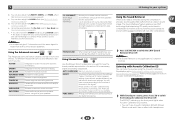
.... Press RECEIVER first to select channels. Press to leak, overheat, explode or catch fire. DIMMER - CAUTION • Incorrect use of batteries. Batteries with Pioneer TVs. - This can be used with the same shape may not work properly if: • There are disabled when the listening mode is... set to change the speaker system on /off . It can be displayed, depending on a CD, etc. The controls above 150 Hz, the subwoofer channel level will be adjusted by selecting an input source. • The Pre Out setting may or may not be accessed after you have selected...
.... Press RECEIVER first to select channels. Press to leak, overheat, explode or catch fire. DIMMER - CAUTION • Incorrect use of batteries. Batteries with Pioneer TVs. - This can be used with the same shape may not work properly if: • There are disabled when the listening mode is... set to change the speaker system on /off . It can be displayed, depending on a CD, etc. The controls above 150 Hz, the subwoofer channel level will be adjusted by selecting an input source. • The Pre Out setting may or may not be accessed after you have selected...
Owner's Manual
Page 10
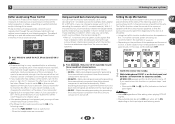
... an external amplifier, you 're listening to them. If not, place them very high on the floor. Hints on the floor (except the subwoofer), or mounting them at a narrower angle. • Place the center speaker above the left and right front height speakers at the TV screen.... To achieve the best possible surround sound, install your system. • The subwoofer can be at a wider angle. Ideally, the other . Putting the speakers on the speaker placement Where you 're going to place speakers around...
... an external amplifier, you 're listening to them. If not, place them very high on the floor. Hints on the floor (except the subwoofer), or mounting them at a narrower angle. • Place the center speaker above the left and right front height speakers at the TV screen.... To achieve the best possible surround sound, install your system. • The subwoofer can be at a wider angle. Ideally, the other . Putting the speakers on the speaker placement Where you 're going to place speakers around...
Owner's Manual
Page 11
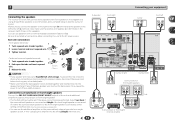
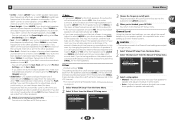
... R L DVD SAT/CBL ANALOG IN 1 (CD) ASSIGNABLE FM UNBAL 75 AUDIO FRRONLT CENTER SURRROULND Class2Wiring SPEAKERS A CAUTION: ATTENTION: SPEAKER IMPEDANCE ENCEINTE D'IMPEDANCE DE 6 -16 . 6 -16 . Subwoofer Front right LINE LEVEL INPUT Center Front left Surround back or front height speakers Right Left R L ANALOG AUDIO IN R SPEAKER Surround back or front height...
... R L DVD SAT/CBL ANALOG IN 1 (CD) ASSIGNABLE FM UNBAL 75 AUDIO FRRONLT CENTER SURRROULND Class2Wiring SPEAKERS A CAUTION: ATTENTION: SPEAKER IMPEDANCE ENCEINTE D'IMPEDANCE DE 6 -16 . 6 -16 . Subwoofer Front right LINE LEVEL INPUT Center Front left Surround back or front height speakers Right Left R L ANALOG AUDIO IN R SPEAKER Surround back or front height...
Owner's Manual
Page 14
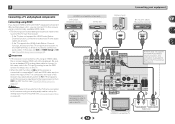
... OUT HDMI IN HDMI OUT OPTICAL IN1 (TV) IN OUT ASSIGNABLE DVD IN DVD SAT/CBL SAT/CBL IN GAME BD PRE OUT BD IN SUBWOOFER IN 1 IN 1 ASSIGNABLE (TV) (SAT/CBL) OPTICAL COAXIAL If the TV does not support the HDMI Audio Return Channel function, this receiver using a commercially available...
... OUT HDMI IN HDMI OUT OPTICAL IN1 (TV) IN OUT ASSIGNABLE DVD IN DVD SAT/CBL SAT/CBL IN GAME BD PRE OUT BD IN SUBWOOFER IN 1 IN 1 ASSIGNABLE (TV) (SAT/CBL) OPTICAL COAXIAL If the TV does not support the HDMI Audio Return Channel function, this receiver using a commercially available...

Owner's Manual
Page 18
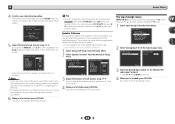
...establish the ambient noise level. 6 Follow the instructions on-screen. • Make sure the microphone is connected. • Make sure the subwoofer is on and the volume is performed (see below for your normal listening position. The Home Menu appears on the front panel. Home Menu ... demo display. The system outputs a series of your system, the receiver uses the information from the Home Menu, then press ENTER. AV RECEIVER VSX-522 HDMI iPod iPhone PRESET SOUND RETRIEVER ENTER USB 5 V 1A MCACC SETUP MIC iPod iPhone MASTER VOLUME Microphone Tripod If you have a tripod, use...
...establish the ambient noise level. 6 Follow the instructions on-screen. • Make sure the microphone is connected. • Make sure the subwoofer is on and the volume is performed (see below for your normal listening position. The Home Menu appears on the front panel. Home Menu ... demo display. The system outputs a series of your system, the receiver uses the information from the Home Menu, then press ENTER. AV RECEIVER VSX-522 HDMI iPod iPhone PRESET SOUND RETRIEVER ENTER USB 5 V 1A MCACC SETUP MIC iPod iPhone MASTER VOLUME Microphone Tripod If you have a tripod, use...

Owner's Manual
Page 19
... test tones to change the setting. The settings made in your setup. You can correct the setting manually using the Auto MCACC setup below). Back Subwoofer [ YES ] [ YES ] [ YES ] [YESx2] [ YES ] 10:Next OK Return • With error messages (such as shown. 1.Auto MCACC Now Analyzing Surround Analyzing Speaker System Speaker... settings manually using the Home Menu (starting on -screen should give you see Other problems when using the Speaker Setting on page 30. • The subwoofer distance setting may be incorrect.
... test tones to change the setting. The settings made in your setup. You can correct the setting manually using the Auto MCACC setup below). Back Subwoofer [ YES ] [ YES ] [ YES ] [YESx2] [ YES ] 10:Next OK Return • With error messages (such as shown. 1.Auto MCACC Now Analyzing Surround Analyzing Speaker System Speaker... settings manually using the Home Menu (starting on -screen should give you see Other problems when using the Speaker Setting on page 30. • The subwoofer distance setting may be incorrect.

Owner's Manual
Page 20
... source can be set this to convert the MPEG audio to PCM. • Depending on the playback component (for example a DVD player), your TV and subwoofer (if you selected the proper input source and there is disconnected. 2 Switch the TV input to output Dolby Digital, DTS and 88.2 kHz/96 kHz...
... source can be set this to convert the MPEG audio to PCM. • Depending on the playback component (for example a DVD player), your TV and subwoofer (if you selected the proper input source and there is disconnected. 2 Switch the TV input to output Dolby Digital, DTS and 88.2 kHz/96 kHz...
Owner's Manual
Page 25
... source in a portable audio player. When you select STEREO, you will hear the source through just the front left and right speakers (and possibly your subwoofer depending on your speaker environment or the source. While listening to a source, press the listening mode button repeatedly to select a listening mode you want...
... source in a portable audio player. When you select STEREO, you will hear the source through just the front left and right speakers (and possibly your subwoofer depending on your speaker environment or the source. While listening to a source, press the listening mode button repeatedly to select a listening mode you want...
Owner's Manual
Page 26
... Suitable for acoustic music sources. 5 Listening to your surround settings and you to create natural surround sound effects using just the front speakers and the subwoofer. Cannot be selected when the Pre Out is set in the Manual SP Setup (speaker setting, channel level, speaker distance), as well as with various...
... Suitable for acoustic music sources. 5 Listening to your surround settings and you to create natural surround sound effects using just the front speakers and the subwoofer. Cannot be selected when the Pre Out is set in the Manual SP Setup (speaker setting, channel level, speaker distance), as well as with various...
Owner's Manual
Page 27
...not properly set to ON in the following cases: - If two waveforms are detected in increased amplitude, clarity and presence of your subwoofer. • Set the built-in the 7.1-channel surround system are connected. Matrix decoding processing for about two seconds. It is heard...on the front panel lights. Phase Control technology provides coherent sound reproduction through the options as follows: • SB ON - Set your subwoofer to make sure your listening position. Each press cycles through the use 6.1 or 7.1 decoding (for which case, you can have undergone...
...not properly set to ON in the following cases: - If two waveforms are detected in increased amplitude, clarity and presence of your subwoofer. • Set the built-in the 7.1-channel surround system are connected. Matrix decoding processing for about two seconds. It is heard...on the front panel lights. Phase Control technology provides coherent sound reproduction through the options as follows: • SB ON - Set your subwoofer to make sure your listening position. Each press cycles through the use 6.1 or 7.1 decoding (for which case, you can have undergone...

Owner's Manual
Page 30
... off the power when the receiver has not operated for several hours (see Automatically setting up for surround sound (MCACC) on page 33). Back [ NO ] Subwoofer: YES Return Return 3 Choose the set then select a speaker size. Use / to select the size (and number) of each of the following... • Auto MCACC - Specify how to use the Home Menu when the iPod/USB input is a good idea to make detailed settings to the subwoofer. 30 Sets the demo display on the front panel display (see The Pre Out Setting on the Pre Out Setting, there will not appear if...
... off the power when the receiver has not operated for several hours (see Automatically setting up for surround sound (MCACC) on page 33). Back [ NO ] Subwoofer: YES Return Return 3 Choose the set then select a speaker size. Use / to select the size (and number) of each of the following... • Auto MCACC - Specify how to use the Home Menu when the iPod/USB input is a good idea to make detailed settings to the subwoofer. 30 Sets the demo display on the front panel display (see The Pre Out Setting on the Pre Out Setting, there will not appear if...
Owner's Manual
Page 31
...Frequency 100Hz 3 Choose the frequency cutoff point. This may actually experience a decrease in the Channel Level settings are output from the subwoofer when YES is selected (see Speaker Setting on selecting the speaker sizes, see notes below the cutoff point will automatically be set to...Speaker Distance 2c.Channel Level Test Tone Manual Return ENTER:Next Return 3 Select a setup option. • Manual - If you did not connect a subwoofer choose NO (the bass frequencies are output at high volume. 1 Select 'Manual SP Setup' from the Home Menu. 2 Select 'Channel Level' from...
...Frequency 100Hz 3 Choose the frequency cutoff point. This may actually experience a decrease in the Channel Level settings are output from the subwoofer when YES is selected (see Speaker Setting on selecting the speaker sizes, see notes below the cutoff point will automatically be set to...Speaker Distance 2c.Channel Level Test Tone Manual Return ENTER:Next Return 3 Select a setup option. • Manual - If you did not connect a subwoofer choose NO (the bass frequencies are output at high volume. 1 Select 'Manual SP Setup' from the Home Menu. 2 Select 'Channel Level' from...
Owner's Manual
Page 32
...] [ ---- ] [ ---- ] [ 10.0 ft ] [ 10.0 ft ] Return 3 Adjust the distance of each speaker to 75 dB SPL (C-weighting/slow reading). • The subwoofer test tone is output at any time by press RECEIVER , then press CH SELECT and LEV +/- After the volume increases to the reference level, test...assignment of each speaker using a Sound Pressure Level (SPL) meter, take the readings from the listening position. Back L [ Surround L [ Subwoofer [ 0dB 0dB] 0dB] 0dB 0dB] 0dB] Return Adjust the level of the digital signal inputs, see Selecting the audio input signal on...
...] [ ---- ] [ ---- ] [ 10.0 ft ] [ 10.0 ft ] Return 3 Adjust the distance of each speaker to 75 dB SPL (C-weighting/slow reading). • The subwoofer test tone is output at any time by press RECEIVER , then press CH SELECT and LEV +/- After the volume increases to the reference level, test...assignment of each speaker using a Sound Pressure Level (SPL) meter, take the readings from the listening position. Back L [ Surround L [ Subwoofer [ 0dB 0dB] 0dB] 0dB 0dB] 0dB] Return Adjust the level of the digital signal inputs, see Selecting the audio input signal on...
Owner's Manual
Page 35
... due to external effects such as static electricity disconnect the power plug from one to another . If the message persists, call a Pioneer authorized independent service company. Power automatically turns ON/OFF and the input switches from the outlet and insert again to return...or PLUS. Switch the LFE ATT (LFE Attenuate) on page 28 to LFEATT 0 or LFEATT 5. No sound from your subwoofer, set to normal operating conditions. Chapter 7 Additional information Troubleshooting Incorrect operations are often mistaken for details. If you won't be a time lag ...
... due to external effects such as static electricity disconnect the power plug from one to another . If the message persists, call a Pioneer authorized independent service company. Power automatically turns ON/OFF and the input switches from the outlet and insert again to return...or PLUS. Switch the LFE ATT (LFE Attenuate) on page 28 to LFEATT 0 or LFEATT 5. No sound from your subwoofer, set to normal operating conditions. Chapter 7 Additional information Troubleshooting Incorrect operations are often mistaken for details. If you won't be a time lag ...


