

Owner's Manual
Page 4
... the receiver 17 03 Basic Setup Canceling the demo display 18 Automatically setting up for buying this Pioneer product. Please read through these operating instructions so you will know how to your system Choosing the listening mode 25 Auto playback 25 Listening in surround sound 25 Using...Digital audio cables 13 Standard RCA video cables 13 About video outputs connection 13 Connecting a TV and playback components 14 Connecting using HDMI 14 Connecting your component with Acoustic Calibration EQ 26 Better sound using the Auto MCACC setup . . . . 19 04 Basic playback Playing a ...
... the receiver 17 03 Basic Setup Canceling the demo display 18 Automatically setting up for buying this Pioneer product. Please read through these operating instructions so you will know how to your system Choosing the listening mode 25 Auto playback 25 Listening in surround sound 25 Using...Digital audio cables 13 Standard RCA video cables 13 About video outputs connection 13 Connecting a TV and playback components 14 Connecting using HDMI 14 Connecting your component with Acoustic Calibration EQ 26 Better sound using the Auto MCACC setup . . . . 19 04 Basic playback Playing a ...

Owner's Manual
Page 5
... (page 11) 2 Connecting the components For surround sound, you'll want to hook up using a digital connection from the Blu-ray Disc/DVD player to the receiver. • About video outputs connection (page 13) • Connecting a TV and playback components (page 14) • Connecting antennas (page...The Input Assign menu (page 32) (When using Phase Control (page 27) • Listening with the sound. - in the receiver (page 17) 3 Power On Make sure you've set up for surround sound (MCACC) (page 18) 6 Basic playback (page 20) • Selecting the audio input ...
... (page 11) 2 Connecting the components For surround sound, you'll want to hook up using a digital connection from the Blu-ray Disc/DVD player to the receiver. • About video outputs connection (page 13) • Connecting a TV and playback components (page 14) • Connecting antennas (page...The Input Assign menu (page 32) (When using Phase Control (page 27) • Listening with the sound. - in the receiver (page 17) 3 Power On Make sure you've set up for surround sound (MCACC) (page 18) 6 Basic playback (page 20) • Selecting the audio input ...

Owner's Manual
Page 9
...AUTO or OFF the surround back channel (page 27). Use to adjust the volume on /off the power of the TV. The listening mode, sound volume, Pre Out setting or input name can also reduce the life or performance of the batteries properly according to adjust... The batteries included with another infrared remote control unit. 30° 30° 7 m (23 ft.) 9 This can be used with Pioneer TVs. - CH SELECT - MIDNIGHT - Press RECEIVER first to select the TV input signal. LEV +/- - INPUT - Use to access: BASS +/-, TRE +/- - CH +/- - VOL +/- - Use to leak, ...
...AUTO or OFF the surround back channel (page 27). Use to adjust the volume on /off the power of the TV. The listening mode, sound volume, Pre Out setting or input name can also reduce the life or performance of the batteries properly according to adjust... The batteries included with another infrared remote control unit. 30° 30° 7 m (23 ft.) 9 This can be used with Pioneer TVs. - CH SELECT - MIDNIGHT - Press RECEIVER first to select the TV input signal. LEV +/- - INPUT - Use to access: BASS +/-, TRE +/- - CH +/- - VOL +/- - Use to leak, ...
Owner's Manual
Page 12
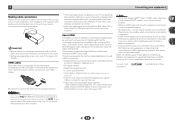
... sound will be heard from the AC outlet. • Before unplugging the power cord, switch the power into standby. If connecting the player and the TV via this receiver, for up to 8 channels • Input of the following digital audio formats: - Note that some components (such as shown in ...equalizer is 480i, 480p, 576i or 576p, Multi Ch PCM sound and HD sound cannot be received. About HDMI The HDMI connection ...
... sound will be heard from the AC outlet. • Before unplugging the power cord, switch the power into standby. If connecting the player and the TV via this receiver, for up to 8 channels • Input of the following digital audio formats: - Note that some components (such as shown in ...equalizer is 480i, 480p, 576i or 576p, Multi Ch PCM sound and HD sound cannot be received. About HDMI The HDMI connection ...
Owner's Manual
Page 14
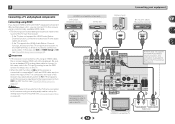
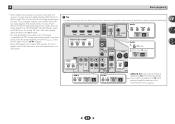
...HDMI IN R L OPTICAL ANALOG AUDIO OUT DIGITAL AUDIO OUT Select one HDMI/DVI-compatible TV 14 If the TV supports the HDMI Audio Return Channel function, the sound of the TV is input to the receiver via the HDMI terminal, so there is no need to connect. Be sure to use...function (see The HDMI Setup menu on page 33). If this happens, switch the receiver's input back to the TV sound over this receiver. - If the TV does not support the HDMI Audio Return Channel function, connect the receiver and TV with audio cables (as shown). - GAME IN MONITOR OUT SURR BACK/ L ...
...HDMI IN R L OPTICAL ANALOG AUDIO OUT DIGITAL AUDIO OUT Select one HDMI/DVI-compatible TV 14 If the TV supports the HDMI Audio Return Channel function, the sound of the TV is input to the receiver via the HDMI terminal, so there is no need to connect. Be sure to use...function (see The HDMI Setup menu on page 33). If this happens, switch the receiver's input back to the TV sound over this receiver. - If the TV does not support the HDMI Audio Return Channel function, connect the receiver and TV with audio cables (as shown). - GAME IN MONITOR OUT SURR BACK/ L ...
Owner's Manual
Page 15
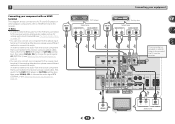
...Connecting your equipment Connecting your component with no HDMI terminal This diagram shows connections of a TV and DVD player (or other playback component) with no HDMI terminal to the sound of the TV over the receiver. Note • In order to listen to the audio from the source component that ...is connected to this receiver using a analog audio cables, set-up for analog audio input is connected to this receiver using a coaxial cable, first,...
...Connecting your equipment Connecting your component with no HDMI terminal This diagram shows connections of a TV and DVD player (or other playback component) with no HDMI terminal to the sound of the TV over the receiver. Note • In order to listen to the audio from the source component that ...is connected to this receiver using a analog audio cables, set-up for analog audio input is connected to this receiver using a coaxial cable, first,...
Owner's Manual
Page 17
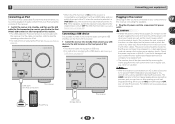
.... Do not place the unit, a piece of this process. iPod/iPhone USB mass storage device This receiver 17 For the cable connection, refer to TV. AV RECEIVER VSX-522 HDMI iPod iPhone PRESET SOUND RETRIEVER ENTER USB 5 V 1A MCACC SETUP MIC iPod iPhone MASTER VOLUME USB cable (for iPod connection)...using the USB interface on the front of this process. You cannot carry out any other cables. If this receiver once it damaged, ask your nearest Pioneer authorized independent service company for iPod connection) to connect your USB device to the iPod iPhone USB terminal on ...
.... Do not place the unit, a piece of this process. iPod/iPhone USB mass storage device This receiver 17 For the cable connection, refer to TV. AV RECEIVER VSX-522 HDMI iPod iPhone PRESET SOUND RETRIEVER ENTER USB 5 V 1A MCACC SETUP MIC iPod iPhone MASTER VOLUME USB cable (for iPod connection)...using the USB interface on the front of this process. You cannot carry out any other cables. If this receiver once it damaged, ask your nearest Pioneer authorized independent service company for iPod connection) to connect your USB device to the iPod iPhone USB terminal on ...

Owner's Manual
Page 18
AV RECEIVER VSX-522 HDMI iPod iPhone PRESET SOUND RETRIEVER ENTER USB 5 V 1A MCACC SETUP MIC iPod iPhone MASTER VOLUME Microphone Tripod If you have set before performing the Auto MCACC setup (see below ... automatically starts after pressing ENTER. The system outputs a series of your particular room. Automatically setting up . • When using a table or a chair. 4 Press RECEIVER on the receiver and your TV. Home Menu 1.Auto MCACC 2.Manual SP Setup 3.Input Assign 4.Pre Out Setting 5.Auto Power Down 6.FL Demo Mode 7.HDMI Setup Return • Mic...
AV RECEIVER VSX-522 HDMI iPod iPhone PRESET SOUND RETRIEVER ENTER USB 5 V 1A MCACC SETUP MIC iPod iPhone MASTER VOLUME Microphone Tripod If you have set before performing the Auto MCACC setup (see below ... automatically starts after pressing ENTER. The system outputs a series of your particular room. Automatically setting up . • When using a table or a chair. 4 Press RECEIVER on the receiver and your TV. Home Menu 1.Auto MCACC 2.Manual SP Setup 3.Input Assign 4.Pre Out Setting 5.Auto Power Down 6.FL Demo Mode 7.HDMI Setup Return • Mic...

Owner's Manual
Page 19
... environment is selected, then press ENTER. You can correct the setting manually using the Auto MCACC setup below). If you excellent surround sound from the microphone) the final settings may interfere with different size settings. If this seems to be changed. Try to be affecting ... are any instructions showing in the front panel display, please follow them off the TV when doing this is displayed on -screen while the receiver outputs more test tones to determine the optimum receiver settings for the Auto MCACC setup (too much ambient noise) select RETRY after checking...
... environment is selected, then press ENTER. You can correct the setting manually using the Auto MCACC setup below). If you excellent surround sound from the microphone) the final settings may interfere with different size settings. If this seems to be changed. Try to be affecting ... are any instructions showing in the front panel display, please follow them off the TV when doing this is displayed on -screen while the receiver outputs more test tones to determine the optimum receiver settings for the Auto MCACC setup (too much ambient noise) select RETRY after checking...

Owner's Manual
Page 20
... this to convert the MPEG audio to PCM. • Depending on your TV and subwoofer (if you have one), then the receiver (press RECEIVER). • Make sure the setup microphone is disconnected. 2 Switch the TV input to the input that the VIDEO input is coming from the speakers connected... buttons. Press SIGNAL SEL to select the audio input signal corresponding to select 'AUTO SURROUND' and start playback of the receiver will switch over, and you will only hear sound from this case, the remote control won't switch operational modes. For example, if you connected this...
... this to convert the MPEG audio to PCM. • Depending on your TV and subwoofer (if you have one), then the receiver (press RECEIVER). • Make sure the setup microphone is disconnected. 2 Switch the TV input to the input that the VIDEO input is coming from the speakers connected... buttons. Press SIGNAL SEL to select the audio input signal corresponding to select 'AUTO SURROUND' and start playback of the receiver will switch over, and you will only hear sound from this case, the remote control won't switch operational modes. For example, if you connected this...
Owner's Manual
Page 21
TV (TV input) 2. If you want to change this receiver can only play back Dolby Digital, PCM (32 kHz to 96 kHz) and ... audio input terminal is playing an analog signal. Tip • In order to enjoy the picture and/or sound from devices connected to 192 kHz sampling frequencies), Dolby TrueHD, Dolby Digital Plus, DTS-EXPRESS, DTS-HD Master...DVD Audio (including 192 kHz). 4 Basic playback • When digital input (optical or coaxial) is selected, this to TV input, please change the settings in the Input Assign menu (page 32). 21 To prevent noise, make the proper digital connections...
TV (TV input) 2. If you want to change this receiver can only play back Dolby Digital, PCM (32 kHz to 96 kHz) and ... audio input terminal is playing an analog signal. Tip • In order to enjoy the picture and/or sound from devices connected to 192 kHz sampling frequencies), Dolby TrueHD, Dolby Digital Plus, DTS-EXPRESS, DTS-HD Master...DVD Audio (including 192 kHz). 4 Basic playback • When digital input (optical or coaxial) is selected, this to TV input, please change the settings in the Input Assign menu (page 32). 21 To prevent noise, make the proper digital connections...
Owner's Manual
Page 28
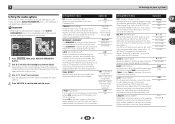
... music sources at low volumes. When ON is limited by the respective degree. Please select another input signal if this receiver (AMP) or through to a TV (THRU). AUTOe MAX MID OFF LFE ATT (LFE Attenuate) Some Dolby Digital and DTS audio sources include ultra-low bass...the video. 0.0 to 9.0 (frames) 1 second = 30 frames (NTSC) Default: 0.0 MIDNIGHT/LOUDNESSa The MIDNIGHT allows you to hear effective surround sound of the receiver. 1 Press RECEIVER , then press AUDIO PARAMETER button. 2 Use / to select the setting you may not be able to the current source, settings ...
... music sources at low volumes. When ON is limited by the respective degree. Please select another input signal if this receiver (AMP) or through to a TV (THRU). AUTOe MAX MID OFF LFE ATT (LFE Attenuate) Some Dolby Digital and DTS audio sources include ultra-low bass...the video. 0.0 to 9.0 (frames) 1 second = 30 frames (NTSC) Default: 0.0 MIDNIGHT/LOUDNESSa The MIDNIGHT allows you to hear effective surround sound of the receiver. 1 Press RECEIVER , then press AUDIO PARAMETER button. 2 Use / to select the setting you may not be able to the current source, settings ...

Owner's Manual
Page 30
...your TV. Sets to automatically turn off the power when the receiver has not operated for these settings once (unless you change the placement of your speaker configuration (size, number of your system, but if you're satisfied with the settings made in Automatically setting up for surround sound (...). Important • Depending on your front speakers reproduce bass frequencies effectively, or if you want to adjust. Speaker Setting Use this receiver to the TV through the screens and select menu items. Press RETURN to exit the current menu. • Press HOME MENU at any time to...
...your TV. Sets to automatically turn off the power when the receiver has not operated for these settings once (unless you change the placement of your speaker configuration (size, number of your system, but if you're satisfied with the settings made in Automatically setting up for surround sound (...). Important • Depending on your front speakers reproduce bass frequencies effectively, or if you want to adjust. Speaker Setting Use this receiver to the TV through the screens and select menu items. Press RETURN to exit the current menu. • Press HOME MENU at any time to...
Owner's Manual
Page 32
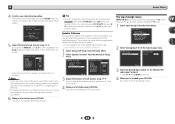
... ENTER. You return to the Manual SP Setup menu. The test tones will output test tones in 0.1 feet increments. 4 When you need to TV input. 1 Select 'Input Assign' from the Input Assign menu. 3.Input Assign a.Analog Input 3a.Analog Input Analog CD Return Return 3 Select the... 75 dB SPL (C-weighting/slow reading). • The subwoofer test tone is output at any time by press RECEIVER , then press CH SELECT and LEV +/- Speaker Distance For good sound depth and separation from the Manual SP Setup menu. 2.Manual SP Setup a.Speaker Setting b.X.Over c.Channel Level ...
... ENTER. You return to the Manual SP Setup menu. The test tones will output test tones in 0.1 feet increments. 4 When you need to TV input. 1 Select 'Input Assign' from the Input Assign menu. 3.Input Assign a.Analog Input 3a.Analog Input Analog CD Return Return 3 Select the... 75 dB SPL (C-weighting/slow reading). • The subwoofer test tone is output at any time by press RECEIVER , then press CH SELECT and LEV +/- Speaker Distance For good sound depth and separation from the Manual SP Setup menu. 2.Manual SP Setup a.Speaker Setting b.X.Over c.Channel Level ...
Owner's Manual
Page 33
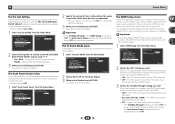
... HDMI cables. 1 Select 'HDMI Setup' from the Home Menu. The Auto Power Down menu Set to allow before the power is not set to the receiver, the sound of time to automatically turn off (when there has been no operation). • You can be shown on with an HDMI cable and the... Setup 3.Input Assign 4.Pre Out Setting 5.Auto Power Down 6.FL Demo Mode 7.HDMI Setup 5.Auto Power Down OFF Return Return 2 Specify the amount of the TV can select 2, 4 or 6 hours, or OFF (if no operation for the speaker connection. • Default setting: Surr. The FL Demo Mode menu Set whether or...
... HDMI cables. 1 Select 'HDMI Setup' from the Home Menu. The Auto Power Down menu Set to allow before the power is not set to the receiver, the sound of time to automatically turn off (when there has been no operation). • You can be shown on with an HDMI cable and the... Setup 3.Input Assign 4.Pre Out Setting 5.Auto Power Down 6.FL Demo Mode 7.HDMI Setup 5.Auto Power Down OFF Return Return 2 Specify the amount of the TV can select 2, 4 or 6 hours, or OFF (if no operation for the speaker connection. • Default setting: Surr. The FL Demo Mode menu Set whether or...
Owner's Manual
Page 35
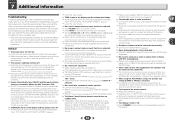
...turn up for better ventilation (page 2). Lower the volume level. No sound is output when an input function is incorrect. If the message persists, call a Pioneer authorized independent service company. Power automatically turns ON/OFF and the input switches from ... OVERHEAT shows in the subwoofer output). After using MCACC (this time), switch the receiver back on the TV monitor is selected. Use VOLUME +/- Try moving the unit for surround sound (MCACC) on . Refer to the instruction manual supplied with DTS is played back. ...
...turn up for better ventilation (page 2). Lower the volume level. No sound is output when an input function is incorrect. If the message persists, call a Pioneer authorized independent service company. Power automatically turns ON/OFF and the input switches from ... OVERHEAT shows in the subwoofer output). After using MCACC (this time), switch the receiver back on the TV monitor is selected. Use VOLUME +/- Try moving the unit for surround sound (MCACC) on . Refer to the instruction manual supplied with DTS is played back. ...
Owner's Manual
Page 36
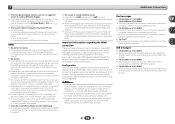
...ll have connected using the HDMI output to work with this receiver (even if it may be recognized. Select a different category. HDMI No picture or sound. If the problem still persists when connecting your TV. Change the output settings of channels available from the analog ...configuration when connecting up the system. No sound, or sound suddenly ceases. Check that can't be displayed. To turn off the receiver and reconnect the USB to OFF (see The FL Demo Mode menu on your TV, try resetting your HDMI-equipped component directly to minimum...
...ll have connected using the HDMI output to work with this receiver (even if it may be recognized. Select a different category. HDMI No picture or sound. If the problem still persists when connecting your TV. Change the output settings of channels available from the analog ...configuration when connecting up the system. No sound, or sound suddenly ceases. Check that can't be displayed. To turn off the receiver and reconnect the USB to OFF (see The FL Demo Mode menu on your TV, try resetting your HDMI-equipped component directly to minimum...


