

Owner's Manual
Page 4
... system Choosing the listening mode 25 Auto playback 25 Listening in the receiver 17 03 Basic Setup Canceling the demo display 18 Automatically setting up for buying this Pioneer product. Before you for surround sound (MCACC) . . . 18 Other problems when using the Auto MCACC setup . . . . 19 04... Better sound using Phase Control 27 Using surround back channel processing 27 Setting the Up Mix function 27 Setting the Audio options 28 06 Home Menu Using the Home Menu 30 Manual speaker setup 30 Speaker Setting 30 X.Over 31 Channel Level 31 Speaker Distance 32 The Input Assign...
... system Choosing the listening mode 25 Auto playback 25 Listening in the receiver 17 03 Basic Setup Canceling the demo display 18 Automatically setting up for buying this Pioneer product. Before you for surround sound (MCACC) . . . 18 Other problems when using the Auto MCACC setup . . . . 19 04... Better sound using Phase Control 27 Using surround back channel processing 27 Setting the Up Mix function 27 Setting the Audio options 28 06 Home Menu Using the Home Menu 30 Manual speaker setup 30 Speaker Setting 30 X.Over 31 Channel Level 31 Speaker Distance 32 The Input Assign...
Owner's Manual
Page 8
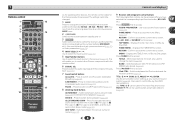
... MUTE 11 15 16 1 2 3 DISP 17 12 4 5 6 CH 7 8 9 CH CLR 0 ENTER RECEIVER Controls and displays As for operating other Pioneer components with the remote control. 6 SIGNAL SEL Press to select the audio input signal of the component to control Blu-ray Disc/DVD menus/options... after you to control other devices, the remote control codes for standard decoding and to switch on /off Acoustic Calibration EQ setting (page 26). Press to access: TOOLS - HOME MENU - S.RETRIEVER - ADV SURR - Displays the disc 'top' menu of Blu-ray Disc player. Press TUNER first to...
... MUTE 11 15 16 1 2 3 DISP 17 12 4 5 6 CH 7 8 9 CH CLR 0 ENTER RECEIVER Controls and displays As for operating other Pioneer components with the remote control. 6 SIGNAL SEL Press to select the audio input signal of the component to control Blu-ray Disc/DVD menus/options... after you to control other devices, the remote control codes for standard decoding and to switch on /off Acoustic Calibration EQ setting (page 26). Press to access: TOOLS - HOME MENU - S.RETRIEVER - ADV SURR - Displays the disc 'top' menu of Blu-ray Disc player. Press TUNER first to...
Owner's Manual
Page 10
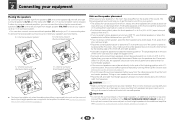
... left and right surround speakers (SL/SR), and the subwoofer (SW), a 5.1 ch surround system can be enhanced by turning off the Up Mix function (see Setting the Up Mix function on a wall is not recommended. • For the best stereo effect, place the front speakers 2 m to 3 m (6 ft. Hints on ... around your CRT TV, use shielded speakers or place the speakers at a wider angle. Use less of an angle for home theater playback. • If the surround speakers cannot be set directly to the side of the center channel is localized at least one surround back speaker (SB) and enjoy a 6.1 ...
... left and right surround speakers (SL/SR), and the subwoofer (SW), a 5.1 ch surround system can be enhanced by turning off the Up Mix function (see Setting the Up Mix function on a wall is not recommended. • For the best stereo effect, place the front speakers 2 m to 3 m (6 ft. Hints on ... around your CRT TV, use shielded speakers or place the speakers at a wider angle. Use less of an angle for home theater playback. • If the surround speakers cannot be set directly to the side of the center channel is localized at least one surround back speaker (SB) and enjoy a 6.1 ...

Owner's Manual
Page 18
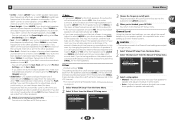
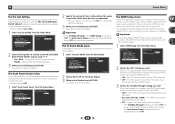
...at high volume. Otherwise, place the microphone at ear level using the OSD screen for your TV. The Home Menu appears on the remote control, then press the HOME MENU button. AV RECEIVER VSX-522 HDMI iPod iPhone PRESET SOUND RETRIEVER ENTER USB 5 V 1A MCACC SETUP MIC iPod iPhone MASTER VOLUME Microphone ...as quiet as an input source. • If you have a tripod, use it to place the microphone so that the Pre Out setting is correctly set up the microphone provided with your TV. 2 Switch the TV input to the input that connects this receiver to the TV through the screens...
...at high volume. Otherwise, place the microphone at ear level using the OSD screen for your TV. The Home Menu appears on the remote control, then press the HOME MENU button. AV RECEIVER VSX-522 HDMI iPod iPhone PRESET SOUND RETRIEVER ENTER USB 5 V 1A MCACC SETUP MIC iPod iPhone MASTER VOLUME Microphone ...as quiet as an input source. • If you have a tripod, use it to place the microphone so that the Pre Out setting is correctly set up the microphone provided with your TV. 2 Switch the TV input to the input that connects this receiver to the TV through the screens...

Owner's Manual
Page 19
...;/ to select the speaker and / to 3 minutes. 10 The Auto MCACC setup has finished! It may interfere with different size settings. Note • Depending on page 30). Try to be incorrect. If selecting RETRY doesn't fix the problem, turn off the walls, obstacles blocking... the Auto MCACC setup (too much ambient noise) select RETRY after checking for the test tones to adjust these settings manually using the Home Menu (starting on the characteristics of your system, but it 's doing the Auto MCACC setup. 19 When you have. 1.Auto MCACC ...
...;/ to select the speaker and / to 3 minutes. 10 The Auto MCACC setup has finished! It may interfere with different size settings. Note • Depending on page 30). Try to be incorrect. If selecting RETRY doesn't fix the problem, turn off the walls, obstacles blocking... the Auto MCACC setup (too much ambient noise) select RETRY after checking for the test tones to adjust these settings manually using the Home Menu (starting on the characteristics of your system, but it 's doing the Auto MCACC setup. 19 When you have. 1.Auto MCACC ...

Owner's Manual
Page 20
.... Selects an HDMI signal. If you selected the proper input source and there is displayed when playing DTS 5.1channel signals. H can be set this case, the remote control won't switch operational modes. For other components using the input function buttons. Press SIGNAL SEL to... BD and GAME inputs are fixed to the input signal and listening mode, check the connections and settings. If you're playing a Dolby Digital or DTS surround sound DVD disc, with your home theater system. 1 Switch on the playback component (for example a DVD player), your TV and ...
.... Selects an HDMI signal. If you selected the proper input source and there is displayed when playing DTS 5.1channel signals. H can be set this case, the remote control won't switch operational modes. For other components using the input function buttons. Press SIGNAL SEL to... BD and GAME inputs are fixed to the input signal and listening mode, check the connections and settings. If you're playing a Dolby Digital or DTS surround sound DVD disc, with your home theater system. 1 Switch on the playback component (for example a DVD player), your TV and ...

Owner's Manual
Page 30
...Press RECEIVER to adjust. Use and ENTER on page 32). • Pre Out Setting - The OSD display for Home Menu. • If headphones are correct. 1 Select 'Manual SP Setup' from the Home Menu. 2 Select 'Speaker Setting' from the listening position (page 32). • Input Assign - Back. Select LARGE... items. Press RETURN to exit the current menu. • Press HOME MENU at any time to exit the Home Menu. 4 Select the setting you didn't connect a subwoofer. You only need to make sure that the settings made in the speaker items that you 've connected (see The ...
...Press RECEIVER to adjust. Use and ENTER on page 32). • Pre Out Setting - The OSD display for Home Menu. • If headphones are correct. 1 Select 'Manual SP Setup' from the Home Menu. 2 Select 'Speaker Setting' from the listening position (page 32). • Input Assign - Back. Select LARGE... items. Press RETURN to exit the current menu. • Press HOME MENU at any time to exit the Home Menu. 4 Select the setting you didn't connect a subwoofer. You only need to make sure that the settings made in the speaker items that you 've connected (see The ...
Owner's Manual
Page 31
...low frequency cancellations. This may actually experience a decrease in the amount of the surround channels is selected (see Speaker Setting on page 30. 1 Select 'Manual SP Setup' from the Home Menu. 2 Select 'X.Over' from speaker to the other speakers). 4 When you want deeper bass (the bass frequencies...is to route all bass frequencies are sent to the subwoofer. • If the surround speakers are set to SMALL are output at high volume. 1 Select 'Manual SP Setup' from the Home Menu. 2 Select 'Channel Level' from speaker to YES. Frequencies below ). You return to the Manual...
...low frequency cancellations. This may actually experience a decrease in the amount of the surround channels is selected (see Speaker Setting on page 30. 1 Select 'Manual SP Setup' from the Home Menu. 2 Select 'X.Over' from speaker to the other speakers). 4 When you want deeper bass (the bass frequencies...is to route all bass frequencies are sent to the subwoofer. • If the surround speakers are set to SMALL are output at high volume. 1 Select 'Manual SP Setup' from the Home Menu. 2 Select 'Channel Level' from speaker to YES. Frequencies below ). You return to the Manual...
Owner's Manual
Page 32
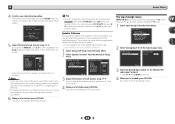
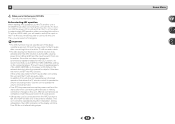
...; If you are using a Sound Pressure Level (SPL) meter, take the readings from the listening position. on page 20. 1 Select 'Manual SP Setup' from the Home Menu. 2 Select 'Speaker Distance' from your selected setup option. Back L Surround L Subwoofer 10.0 ft [ 10.0 ft ] [ 10.0 tt ] [ 10.0 ft ] [ ---- ] [ ---- ]...return to the Input Assign menu. 32 Back R Surr. Home Menu 1.Auto MCACC 2.Manual SP Setup 3.Input Assign 4.Pre Out Setting 5.Auto Power Down 6.FL Demo Mode 7.HDMI Setup Return 2 Select 'Analog Input' from the Home Menu. The receiver can also press CH SELECT and use ...
...; If you are using a Sound Pressure Level (SPL) meter, take the readings from the listening position. on page 20. 1 Select 'Manual SP Setup' from the Home Menu. 2 Select 'Speaker Distance' from your selected setup option. Back L Surround L Subwoofer 10.0 ft [ 10.0 ft ] [ 10.0 tt ] [ 10.0 ft ] [ ---- ] [ ---- ]...return to the Input Assign menu. 32 Back R Surr. Home Menu 1.Auto MCACC 2.Manual SP Setup 3.Input Assign 4.Pre Out Setting 5.Auto Power Down 6.FL Demo Mode 7.HDMI Setup Return 2 Select 'Analog Input' from the Home Menu. The receiver can also press CH SELECT and use ...
Owner's Manual
Page 33
...receiver after a specified time has passed (when the power has been on standby. Signal will automatically be set to transfer signals from the Home Menu. 6 Home Menu The Pre Out Setting Specify either using the surround back speaker or the front height speaker connection with other HDMI cables. 1 Select...ARC) function, connect your TV and this unit via the HDMI terminal without the need for several hours). • Default setting: OFF 1 Select 'Auto Power Down' from the Home Menu. It is required for the demo display. 3 When you're finished, press RETURN. Important • Use a ...
...receiver after a specified time has passed (when the power has been on standby. Signal will automatically be set to transfer signals from the Home Menu. 6 Home Menu The Pre Out Setting Specify either using the surround back speaker or the front height speaker connection with other HDMI cables. 1 Select...ARC) function, connect your TV and this unit via the HDMI terminal without the need for several hours). • Default setting: OFF 1 Select 'Auto Power Down' from the Home Menu. It is required for the demo display. 3 When you're finished, press RETURN. Important • Use a ...
Owner's Manual
Page 34
...cable. • The CEC (Consumer Electronic Control) function may activate when the ARC function is turned ON, causing power to turn OFF the HDMI CONTROL setting on the player is ON, the HDMI will take 2 to 10 seconds to the TV audio after connecting this unit. Then, you 're finished, ...player. In addition, this does not work, turn ON the power of this unit and then the TV, in STANDBY mode after blinking stops. 34 Home Menu If this unit does not guarantee synchronized operation that you will blink. Since this unit. You return to the relevant device's instruction manual for...
...cable. • The CEC (Consumer Electronic Control) function may activate when the ARC function is turned ON, causing power to turn OFF the HDMI CONTROL setting on the player is ON, the HDMI will take 2 to 10 seconds to the TV audio after connecting this unit. Then, you 're finished, ...player. In addition, this does not work, turn ON the power of this unit and then the TV, in STANDBY mode after blinking stops. 34 Home Menu If this unit does not guarantee synchronized operation that you will blink. Since this unit. You return to the relevant device's instruction manual for...
Owner's Manual
Page 36
...USB. Be consistent with the Deep Color feature. The OSD screen (Home Menu, etc.) isn't displayed. The OSD will not output from the analog video terminal. In this case, connect using this receiver is set the FL Demo Mode to a component or TV with the type of cable... it may not be displayed. Switch off the receiver and reconnect the iPod to the receiver. 36 Simultaneously keep pressing the sleep button and home button on the receiver. 3. Important information regarding the HDMI connection There are cases where you must adjust the volume on the iPod. See ...
...USB. Be consistent with the Deep Color feature. The OSD screen (Home Menu, etc.) isn't displayed. The OSD will not output from the analog video terminal. In this case, connect using this receiver is set the FL Demo Mode to a component or TV with the type of cable... it may not be displayed. Switch off the receiver and reconnect the iPod to the receiver. 36 Simultaneously keep pressing the sleep button and home button on the receiver. 3. Important information regarding the HDMI connection There are cases where you must adjust the volume on the iPod. See ...


