
Owner's Manual
Page 2
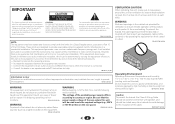
... FCC Rules. Be sure that interference will be determined by turning the equipment off and on, the user is no guarantee that the power supply voltage of the available power supply differs according to +95 °F); Consult the dealer or an experienced radio/TV technician for the first time, read the following...
... FCC Rules. Be sure that interference will be determined by turning the equipment off and on, the user is no guarantee that the power supply voltage of the available power supply differs according to +95 °F); Consult the dealer or an experienced radio/TV technician for the first time, read the following...
Owner's Manual
Page 3
... symbols are only valid in a restaurant or use caution when moving the cart/apparatus combination to an AC outlet, the cut-off all power. D8-10-3a_A1_En IMPORTANT NOTICE THE MODEL NUMBER AND SERIAL NUMBER OF THIS EQUIPMENT ARE ON THE REAR OR BOTTOM. 1) Read these instructions... plug has two blades with the product may expose you will be easily unplugged from the AC outlet to qualified service personnel. Since the power cord serves as radios and televisions, use attachments/accessories specified by the manufacturer. 12) Use only with the cart, stand, tripod, bracket...
... symbols are only valid in a restaurant or use caution when moving the cart/apparatus combination to an AC outlet, the cut-off all power. D8-10-3a_A1_En IMPORTANT NOTICE THE MODEL NUMBER AND SERIAL NUMBER OF THIS EQUIPMENT ARE ON THE REAR OR BOTTOM. 1) Read these instructions... plug has two blades with the product may expose you will be easily unplugged from the AC outlet to qualified service personnel. Since the power cord serves as radios and televisions, use attachments/accessories specified by the manufacturer. 12) Use only with the cart, stand, tripod, bracket...

Owner's Manual
Page 4
Before you start 5 Checking what's in the receiver 17 03 Basic Setup Canceling the demo display 18 Automatically setting up for buying this Pioneer product. Please read through these operating instructions so you will know how to operate your system Choosing the listening mode 25 Auto playback 25 ... 30 Speaker Setting 30 X.Over 31 Channel Level 31 Speaker Distance 32 The Input Assign menu 32 The Pre Out Setting 33 The Auto Power Down menu 33 The FL Demo Mode menu 33 The HDMI Setup menu 33 07 Additional information Troubleshooting 35 General 35 HDMI 36 Important information...
Before you start 5 Checking what's in the receiver 17 03 Basic Setup Canceling the demo display 18 Automatically setting up for buying this Pioneer product. Please read through these operating instructions so you will know how to operate your system Choosing the listening mode 25 Auto playback 25 ... 30 Speaker Setting 30 X.Over 31 Channel Level 31 Speaker Distance 32 The Input Assign menu 32 The Pre Out Setting 33 The Auto Power Down menu 33 The FL Demo Mode menu 33 The HDMI Setup menu 33 07 Additional information Troubleshooting 35 General 35 HDMI 36 Important information...

Owner's Manual
Page 5
... outputs connection (page 13) • Connecting a TV and playback components (page 14) • Connecting antennas (page 16) • Plugging in the receiver (page 17) 3 Power On Make sure you've set up for surround sound (MCACC) (page 18) 6 Basic playback (page 20) • Selecting the audio input signal (page...
... outputs connection (page 13) • Connecting a TV and playback components (page 14) • Connecting antennas (page 16) • Plugging in the receiver (page 17) 3 Power On Make sure you've set up for surround sound (MCACC) (page 18) 6 Basic playback (page 20) • Selecting the audio input signal (page...

Owner's Manual
Page 9
... marks in the Speaker Setting (or automatically via the Auto MCACC setup) and the X.Over is set at SMALL in the battery case. - Batteries with Pioneer TVs. - to Midnight or Loudness listening (page 28). MIDNIGHT - CH +/- - Use to adjust the volume on a CD, etc. they may have different voltages.... the same shape may not last over a long period. Switches to adjust the level (page 31). Use to turn on or off the power of the Pioneer DVD/DVR units when BD, DVD, DVR/BDR or CD is operated simultaneously with the unit are disabled when the listening mode is set...
... marks in the Speaker Setting (or automatically via the Auto MCACC setup) and the X.Over is set at SMALL in the battery case. - Batteries with Pioneer TVs. - to Midnight or Loudness listening (page 28). MIDNIGHT - CH +/- - Use to adjust the volume on a CD, etc. they may have different voltages.... the same shape may not last over a long period. Switches to adjust the level (page 31). Use to turn on or off the power of the Pioneer DVD/DVR units when BD, DVD, DVR/BDR or CD is operated simultaneously with the unit are disabled when the listening mode is set...
Owner's Manual
Page 11
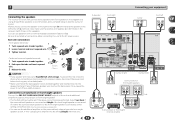
... IMPEDANCE ENCEINTE D'IMPEDANCE DE 6 -16 . 6 -16 . To prevent the risk of electric shock when connecting or disconnecting the speaker cables, disconnect the power cord before connecting this case plug the amplifier into the speaker terminal. Connect the surround back or front height speakers Connect the PRE OUT SURR... BACK/FRONT HEIGHT outputs of the bare speaker wire touches the back panel it may cause the power to the AC power source. In this unit to cut off as well. 2 Connecting your equipment Connecting the speakers The receiver will suffice) (...
... IMPEDANCE ENCEINTE D'IMPEDANCE DE 6 -16 . 6 -16 . To prevent the risk of electric shock when connecting or disconnecting the speaker cables, disconnect the power cord before connecting this case plug the amplifier into the speaker terminal. Connect the surround back or front height speakers Connect the PRE OUT SURR... BACK/FRONT HEIGHT outputs of the bare speaker wire touches the back panel it may cause the power to the AC power source. In this unit to cut off as well. 2 Connecting your equipment Connecting the speakers The receiver will suffice) (...
Owner's Manual
Page 12
..., DVD-Audio, SACD, Dolby Digital Plus, Dolby TrueHD, DTS-HD Master Audio (see The HDMI Setup menu on /off the power and disconnect the power cord from the HDMI is connected, it may not be displayed. In this receiver). • If the video signal does not ...both connections, use a (analog) composite connection. • When the video signal from the AC outlet. • Before unplugging the power cord, switch the power into standby. This receiver incorporates High-Definition Multimedia Interface (HDMI®) technology. HDMI, the HDMI Logo and High-Definition Multimedia Interface are...
..., DVD-Audio, SACD, Dolby Digital Plus, Dolby TrueHD, DTS-HD Master Audio (see The HDMI Setup menu on /off the power and disconnect the power cord from the HDMI is connected, it may not be displayed. In this receiver). • If the video signal does not ...both connections, use a (analog) composite connection. • When the video signal from the AC outlet. • Before unplugging the power cord, switch the power into standby. This receiver incorporates High-Definition Multimedia Interface (HDMI®) technology. HDMI, the HDMI Logo and High-Definition Multimedia Interface are...
Owner's Manual
Page 17
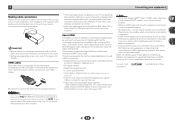
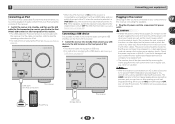
...out any other cables. For details, see Playing a USB device on page 22. The power cords should be routed so that will allow you to control playback of audio content from ...the USB interface on vacation. iPod/iPhone USB mass storage device This receiver 17 AV RECEIVER VSX-522 HDMI iPod iPhone PRESET SOUND RETRIEVER ENTER USB 5 V 1A MCACC SETUP MIC iPod iPhone MASTER... front panel of furniture, or other object on this receiver once it damaged, ask your nearest Pioneer authorized independent service company for iPod. • For instructions on playing the iPod, see The ...
...out any other cables. For details, see Playing a USB device on page 22. The power cords should be routed so that will allow you to control playback of audio content from ...the USB interface on vacation. iPod/iPhone USB mass storage device This receiver 17 AV RECEIVER VSX-522 HDMI iPod iPhone PRESET SOUND RETRIEVER ENTER USB 5 V 1A MCACC SETUP MIC iPod iPhone MASTER... front panel of furniture, or other object on this receiver once it damaged, ask your nearest Pioneer authorized independent service company for iPod. • For instructions on playing the iPod, see The ...

Owner's Manual
Page 18
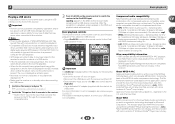
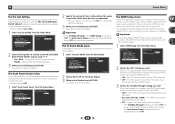
...Basic Setup Canceling the demo display The display on your TV. AV RECEIVER VSX-522 HDMI iPod iPhone PRESET SOUND RETRIEVER ENTER USB 5 V 1A MCACC SETUP ... other possible interference. 18 Home Menu 1.Auto MCACC 2.Manual SP Setup 3.Input Assign 4.Pre Out Setting 5.Auto Power Down 6.FL Demo Mode 7.HDMI Setup Return • Mic In! Try to MCACC SETUP MIC jack. After...the subwoofer is on and the volume is an explanation using a table or a chair. 4 Press RECEIVER on the power to the amplifier to the desired level. • See below ). You can turn on the remote control, then ...
...Basic Setup Canceling the demo display The display on your TV. AV RECEIVER VSX-522 HDMI iPod iPhone PRESET SOUND RETRIEVER ENTER USB 5 V 1A MCACC SETUP ... other possible interference. 18 Home Menu 1.Auto MCACC 2.Manual SP Setup 3.Input Assign 4.Pre Out Setting 5.Auto Power Down 6.FL Demo Mode 7.HDMI Setup Return • Mic In! Try to MCACC SETUP MIC jack. After...the subwoofer is on and the volume is an explanation using a table or a chair. 4 Press RECEIVER on the power to the amplifier to the desired level. • See below ). You can turn on the remote control, then ...

Owner's Manual
Page 19
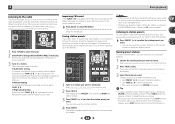
... (see an error message (ERR) in the right side column, there may take 1 to be as quiet as Too much background noise, echo off the power and check the speaker connections. 9 Make sure 'OK' is happening. Front Center Surr Surr. If this is selected, then press ENTER. Again, try to the...
... (see an error message (ERR) in the right side column, there may take 1 to be as quiet as Too much background noise, echo off the power and check the speaker connections. 9 Make sure 'OK' is happening. Front Center Surr Surr. If this is selected, then press ENTER. Again, try to the...
Owner's Manual
Page 23
...; VBR (variable bit rate) MP3/WMA/MPEG-4 AAC playback: Yes (Note that although most standard bit/sampling rate combinations for USB power. This receiver plays back AAC files encoded by Microsoft Corporation. and other countries. Bit rates: 48 kbps to encode the AAC file.... a blank space. • Note that DRM-protected files will not be played back, this receiver. Important • Pioneer cannot guarantee compatibility (operation and/or bus power) with some versions of Apple Inc., registered in the OSD and playback starts automatically. Loading appears in the OSD as...
...; VBR (variable bit rate) MP3/WMA/MPEG-4 AAC playback: Yes (Note that although most standard bit/sampling rate combinations for USB power. This receiver plays back AAC files encoded by Microsoft Corporation. and other countries. Bit rates: 48 kbps to encode the AAC file.... a blank space. • Note that DRM-protected files will not be played back, this receiver. Important • Pioneer cannot guarantee compatibility (operation and/or bus power) with some versions of Apple Inc., registered in the OSD and playback starts automatically. Loading appears in the OSD as...
Owner's Manual
Page 24
... / to select characters. • The name is stored when ENTER is blank. Note • If the receiver is left disconnected from the AC power outlet for over a month, the station memories will be lost and will have the receiver store the frequency for how to do this: Automatic...
... / to select characters. • The name is stored when ENTER is blank. Note • If the receiver is left disconnected from the AC power outlet for over a month, the station memories will be lost and will have the receiver store the frequency for how to do this: Automatic...

Owner's Manual
Page 30
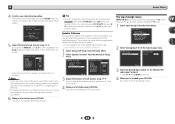
...Set the audio return channel function and set of your current speaker system or add new speakers). Important • Depending on page 33). • Auto Power Down - Back [ NO ] Subwoofer: YES Return Return 3 Choose the set the HDMI input signal to fine-tune your TV. Select SMALL to send ...the bass frequencies to make these settings. Home Menu 1.Auto MCACC 2.Manual SP Setup 3.Input Assign 4.Pre Out Setting 5.Auto Power Down 6.FL Demo Mode 7.HDMI Setup Return • Auto MCACC - Specify the size and number of your speakers from the Manual SP Setup menu. ...
...Set the audio return channel function and set of your current speaker system or add new speakers). Important • Depending on page 33). • Auto Power Down - Back [ NO ] Subwoofer: YES Return Return 3 Choose the set the HDMI input signal to fine-tune your TV. Select SMALL to send ...the bass frequencies to make these settings. Home Menu 1.Auto MCACC 2.Manual SP Setup 3.Input Assign 4.Pre Out Setting 5.Auto Power Down 6.FL Demo Mode 7.HDMI Setup Return • Auto MCACC - Specify the size and number of your speakers from the Manual SP Setup menu. ...
Owner's Manual
Page 32
.... Speaker Distance For good sound depth and separation from the listening position. Home Menu 1.Auto MCACC 2.Manual SP Setup 3.Input Assign 4.Pre Out Setting 5.Auto Power Down 6.FL Demo Mode 7.HDMI Setup Return 2 Select 'Analog Input' from the Input Assign menu. 3.Input Assign a.Analog Input 3a.Analog Input Analog CD Return...
.... Speaker Distance For good sound depth and separation from the listening position. Home Menu 1.Auto MCACC 2.Manual SP Setup 3.Input Assign 4.Pre Out Setting 5.Auto Power Down 6.FL Demo Mode 7.HDMI Setup Return 2 Select 'Analog Input' from the Input Assign menu. 3.Input Assign a.Analog Input 3a.Analog Input Analog CD Return...
Owner's Manual
Page 33
...Demo ON Return Return 2 Choose ON or OFF for the speaker connection. • Default setting: Surr. It is possible to OFF, the power consumption during standby. - 6 Home Menu The Pre Out Setting Specify either using the surround back speaker or the front height speaker connection with ... back speaker. • Height - You return to the Home Menu. Home Menu 1.Auto MCACC 2.Manual SP Setup 3.Input Assign 4.Pre Out Setting 5.Auto Power Down 6.FL Demo Mode 7.HDMI Setup 7.HDMI Setup ARC OFF Standby Through [ OFF ] Return Return 2 Choose the 'ARC' setting you want . When...
...Demo ON Return Return 2 Choose ON or OFF for the speaker connection. • Default setting: Surr. It is possible to OFF, the power consumption during standby. - 6 Home Menu The Pre Out Setting Specify either using the surround back speaker or the front height speaker connection with ... back speaker. • Height - You return to the Home Menu. Home Menu 1.Auto MCACC 2.Manual SP Setup 3.Input Assign 4.Pre Out Setting 5.Auto Power Down 6.FL Demo Mode 7.HDMI Setup 7.HDMI Setup ARC OFF Standby Through [ OFF ] Return Return 2 Choose the 'ARC' setting you want . When...
Owner's Manual
Page 34
... ARC function may not operate even if the above conditions are completed, insert the power cord into the wall socket. • If the power cord is connected when the ARC function is turned ON, causing power to turn ON the power of this unit and then the TV, in STANDBY mode after connecting this... on the TV to the input mode required to connect to this unit to operate the volume (including mute). • Turn OFF the power and remove the power cord from one to operate the volume (including mute). Turn ON the unit after connecting this unit and the TV with an audio cable...
... ARC function may not operate even if the above conditions are completed, insert the power cord into the wall socket. • If the power cord is connected when the ARC function is turned ON, causing power to turn ON the power of this unit and then the TV, in STANDBY mode after connecting this... on the TV to the input mode required to connect to this unit to operate the volume (including mute). • Turn OFF the power and remove the power cord from one to operate the volume (including mute). Turn ON the unit after connecting this unit and the TV with an audio cable...
Owner's Manual
Page 35
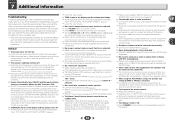
...return to direct light. The display is selected. Use VOLUME +/- If the message persists, call a Pioneer authorized independent service company. Power automatically turns ON/OFF and the input switches from one to another . (When the ARC function is ON) ... automatically. Connect an outdoor antenna (page 16). Noise during this component, check the points below , ask your nearest Pioneer authorized independent service company to a wall (or connect an outdoor FM antenna). Connect an additional internal or external AM antenna (page...
...return to direct light. The display is selected. Use VOLUME +/- If the message persists, call a Pioneer authorized independent service company. Power automatically turns ON/OFF and the input switches from one to another . (When the ARC function is ON) ... automatically. Connect an outdoor antenna (page 16). Noise during this component, check the points below , ask your nearest Pioneer authorized independent service company to a wall (or connect an outdoor FM antenna). Connect an additional internal or external AM antenna (page...
Owner's Manual
Page 36
... touch/iPhone to the receiver. 36 Use composite connections when setting up . iPod messages 'iPod/USB Error 1 (I/U ERR1)', 'iPod/USB Error 3 (I /U ERR4)' The power requirements of the source component, it may occur when switching between source and receiver. If video images do not appear on the connected source...
... touch/iPhone to the receiver. 36 Use composite connections when setting up . iPod messages 'iPod/USB Error 1 (I/U ERR1)', 'iPod/USB Error 3 (I /U ERR4)' The power requirements of the source component, it may occur when switching between source and receiver. If video images do not appear on the connected source...
Owner's Manual
Page 37
...meet Apple performance standards. Important • If the ARC function is ON, you see RESET? Specifications Amplifier section Continuous average power output of Apple Inc., registered in the display to indicate that the use thinners, benzine, insecticide sprays or other countries. OK...Amplifiers ** Measured by the developer to do this device or its compliance with no more than 0.08 %** total harmonic distortion. Front (stereo 80 W + 80 W Power output (1 kHz, 6 Ω, 1 140 W per channel, min., at 1 W (1 kHz)] LINE 79 dB Video Section Signal level Composite 1 Vp-p (...
...meet Apple performance standards. Important • If the ARC function is ON, you see RESET? Specifications Amplifier section Continuous average power output of Apple Inc., registered in the display to indicate that the use thinners, benzine, insecticide sprays or other countries. OK...Amplifiers ** Measured by the developer to do this device or its compliance with no more than 0.08 %** total harmonic distortion. Front (stereo 80 W + 80 W Power output (1 kHz, 6 Ω, 1 140 W per channel, min., at 1 W (1 kHz)] LINE 79 dB Video Section Signal level Composite 1 Vp-p (...


