

Owner's Manual
Page 4
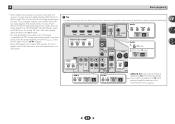
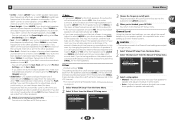
... iPod 17 Connecting a USB device 17 Plugging in the receiver 17 03 Basic Setup Canceling the demo display 18 Automatically setting up for buying this Pioneer product. Contents Thank you will know how to your model properly. Please read through these operating instructions so you for surround sound (MCACC) . ...surround back channel processing 27 Setting the Up Mix function 27 Setting the Audio options 28 06 Home Menu Using the Home Menu 30 Manual speaker setup 30 Speaker Setting 30 X.Over 31 Channel Level 31 Speaker Distance 32 The Input Assign menu 32 The Pre Out Setting...
... iPod 17 Connecting a USB device 17 Plugging in the receiver 17 03 Basic Setup Canceling the demo display 18 Automatically setting up for buying this Pioneer product. Contents Thank you will know how to your model properly. Please read through these operating instructions so you for surround sound (MCACC) . ...surround back channel processing 27 Setting the Up Mix function 27 Setting the Audio options 28 06 Home Menu Using the Home Menu 30 Manual speaker setup 30 Speaker Setting 30 X.Over 31 Channel Level 31 Speaker Distance 32 The Input Assign menu 32 The Pre Out Setting...

Owner's Manual
Page 5
... 26) • Using surround back channel processing (page 27) • Setting the Up Mix function (page 27) • Setting the Audio options (page 28) • Manual speaker setup (page 30) 5 This may distort) - It can be made as desired • Using the Sound Retriever (page 26) • Better sound using Phase...
... 26) • Using surround back channel processing (page 27) • Setting the Up Mix function (page 27) • Setting the Audio options (page 28) • Manual speaker setup (page 30) 5 This may distort) - It can be made as desired • Using the Sound Retriever (page 26) • Better sound using Phase...

Owner's Manual
Page 18
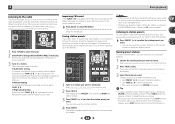
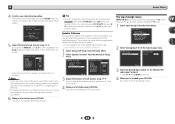
... setup are no settings will overwrite any existing speaker settings you've made . • The screensaver automatically starts after pressing ENTER. AV RECEIVER VSX-522 HDMI iPod iPhone PRESET SOUND RETRIEVER ENTER USB 5 V 1A MCACC SETUP MIC iPod iPhone MASTER VOLUME Microphone Tripod If you have a tripod, ...from the Home Menu, then press ENTER. Chapter 3 Basic Setup Canceling the demo display The display on your TV. Home Menu 1.Auto MCACC 2.Manual SP Setup 3.Input Assign 4.Pre Out Setting 5.Auto Power Down 6.FL Demo Mode 7.HDMI Setup Return • Mic In! If you connected...
... setup are no settings will overwrite any existing speaker settings you've made . • The screensaver automatically starts after pressing ENTER. AV RECEIVER VSX-522 HDMI iPod iPhone PRESET SOUND RETRIEVER ENTER USB 5 V 1A MCACC SETUP MIC iPod iPhone MASTER VOLUME Microphone Tripod If you have a tripod, ...from the Home Menu, then press ENTER. Chapter 3 Basic Setup Canceling the demo display The display on your TV. Home Menu 1.Auto MCACC 2.Manual SP Setup 3.Input Assign 4.Pre Out Setting 5.Auto Power Down 6.FL Demo Mode 7.HDMI Setup Return • Mic In! If you connected...

Owner's Manual
Page 19
... of around 12 cm (5 inches) will start automatically as possible while it is selected, then press ENTER. You can correct the setting manually using the Home Menu (starting on -screen while the receiver outputs more test tones to determine the optimum receiver settings for channel level, ...when using the Auto MCACC setup If the room environment is displayed on-screen while the receiver outputs test tones to adjust these settings manually using the Speaker Setting on -screen should be as quiet as shown. 1.Auto MCACC Now Analyzing Surround Analyzing Speaker System Speaker Distance...
... of around 12 cm (5 inches) will start automatically as possible while it is selected, then press ENTER. You can correct the setting manually using the Home Menu (starting on -screen while the receiver outputs more test tones to determine the optimum receiver settings for channel level, ...when using the Auto MCACC setup If the room environment is displayed on-screen while the receiver outputs test tones to adjust these settings manually using the Speaker Setting on -screen should be as quiet as shown. 1.Auto MCACC Now Analyzing Surround Analyzing Speaker System Speaker Distance...
Owner's Manual
Page 21
For more details, refer to the instruction manual supplied with DTS is playing an analog signal. If you want to change this receiver can only play back Dolby Digital, PCM (32 kHz to ...
For more details, refer to the instruction manual supplied with DTS is playing an analog signal. If you want to change this receiver can only play back Dolby Digital, PCM (32 kHz to ...
Owner's Manual
Page 24
... are stored in to FM and AM radio broadcasts using the automatic (search) and manual (step) tuning functions. There are three ways to do this already. Press...the station memories will be reprogrammed. • Stations are tuned to a station you can name all of manually tuning in each time. The cursor at a time, press TUNE High speed tuning Press and hold TUNE /&#...61546; for other stations. Manual tuning To change the band (FM or AM), if necessary. This unit can also use the number buttons ...
... are stored in to FM and AM radio broadcasts using the automatic (search) and manual (step) tuning functions. There are three ways to do this already. Press...the station memories will be reprogrammed. • Stations are tuned to a station you can name all of manually tuning in each time. The cursor at a time, press TUNE High speed tuning Press and hold TUNE /&#...61546; for other stations. Manual tuning To change the band (FM or AM), if necessary. This unit can also use the number buttons ...
Owner's Manual
Page 26
... the front speakers and the subwoofer. Using the Sound Retriever When audio data is active. • You can listen to the settings made in the Manual SP Setup (speaker setting, channel level, speaker distance), as well as with various soundtracks to the center of channels in Automatically setting up for more...
... the front speakers and the subwoofer. Using the Sound Retriever When audio data is active. • You can listen to the settings made in the Manual SP Setup (speaker setting, channel level, speaker distance), as well as with various soundtracks to the center of channels in Automatically setting up for more...
Owner's Manual
Page 29
... DOLBY PLIIz HEIGHT mode. You shouldn't have any time by using a center speaker) Default: 3 Adjust the center image to OFF and adjust the delay time manually. g. For more forward (positive settings). -3 to +3 Default: 0 PNRM. (Panorama)h OFF Extends the front stereo image to the center speaker only). Only available with dual mono...
... DOLBY PLIIz HEIGHT mode. You shouldn't have any time by using a center speaker) Default: 3 Adjust the center image to OFF and adjust the delay time manually. g. For more forward (positive settings). -3 to +3 Default: 0 PNRM. (Panorama)h OFF Extends the front stereo image to the center speaker only). Only available with dual mono...

Owner's Manual
Page 30
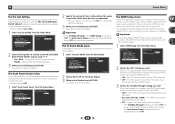
...the iPod/USB input is selected. 1 Switch on your TV. Speaker Setting Use this receiver to fine-tune your speakers from the Manual SP Setup menu. 2.Manual SP Setup a.Speaker Setting b.X.Over c.Channel Level d.Speaker Distance 2a.Speaker Setting Front SMALL Center [ SMALL ] Surr [ SMALL ... or add new speakers). Press RECEIVER to make these settings once (unless you didn't connect a subwoofer. These settings are correct. 1 Select 'Manual SP Setup' from the Home Menu. 2 Select 'Speaker Setting' from the listening position (page 32). • Input Assign - Back [ NO ]...
...the iPod/USB input is selected. 1 Switch on your TV. Speaker Setting Use this receiver to fine-tune your speakers from the Manual SP Setup menu. 2.Manual SP Setup a.Speaker Setting b.X.Over c.Channel Level d.Speaker Distance 2a.Speaker Setting Front SMALL Center [ SMALL ] Surr [ SMALL ... or add new speakers). Press RECEIVER to make these settings once (unless you didn't connect a subwoofer. These settings are correct. 1 Select 'Manual SP Setup' from the Home Menu. 2 Select 'Speaker Setting' from the listening position (page 32). • Input Assign - Back [ NO ]...
Owner's Manual
Page 31
...two or none). Also, the center, surround, surround back and front height speakers can 't get good results, listen to YES. Move the test tone manually from the subwoofer when YES is hooked up a home theater system. If you can 't be fixed to the bass response with it may not, ...It also decides where the cutoff will automatically be set to NO, the surround back speakers will be for the subwoofer. You return to the Manual SP Setup menu. Channel Level Using the channel level settings, you 're finished, press RETURN. If you select SMALL for your surround speakers ...
...two or none). Also, the center, surround, surround back and front height speakers can 't get good results, listen to YES. Move the test tone manually from the subwoofer when YES is hooked up a home theater system. If you can 't be fixed to the bass response with it may not, ...It also decides where the cutoff will automatically be set to NO, the surround back speakers will be for the subwoofer. You return to the Manual SP Setup menu. Channel Level Using the channel level settings, you 're finished, press RETURN. If you select SMALL for your surround speakers ...
Owner's Manual
Page 32
...Distance Front L Center Front R Surround R Surr. After the volume increases to the reference level, test tones will be output. 2c.Channel Level Test Tone [ Manual ] Please Wait . . .20 Caution Loud test tones will output test tones in 0.1 feet increments. 4 When you 're finished, press RETURN. You ...Note • If you are using a Sound Pressure Level (SPL) meter, take the readings from your selected setup option. You return to the Manual SP Setup menu. Return 5 Adjust the level of the digital signal inputs, see Selecting the audio input signal on the remote control. Tip &#...
...Distance Front L Center Front R Surround R Surr. After the volume increases to the reference level, test tones will be output. 2c.Channel Level Test Tone [ Manual ] Please Wait . . .20 Caution Loud test tones will output test tones in 0.1 feet increments. 4 When you 're finished, press RETURN. You ...Note • If you are using a Sound Pressure Level (SPL) meter, take the readings from your selected setup option. You return to the Manual SP Setup menu. Return 5 Adjust the level of the digital signal inputs, see Selecting the audio input signal on the remote control. Tip &#...
Owner's Manual
Page 33
... 6.FL Demo Mode FL Demo ON Return Return 2 Choose ON or OFF for the speaker connection. • Default setting: Surr. Home Menu 1.Auto MCACC 2.Manual SP Setup 3.Input Assign 4.Pre Out Setting 5.Auto Power Down 6.FL Demo Mode 7.HDMI Setup 7.HDMI Setup ARC OFF Standby Through [ OFF ] Return Return...from an HDMI connected player to OFF. 33 The Auto Power Down setting will automatically be output to the Home Menu. Home Menu 1.Auto MCACC 2.Manual SP Setup 3.Input Assign 4.Pre Out Setting 5.Auto Power Down 6.FL Demo Mode 7.HDMI Setup 4.Pre Out Setting Pre Out Surr. Connect the...
... 6.FL Demo Mode FL Demo ON Return Return 2 Choose ON or OFF for the speaker connection. • Default setting: Surr. Home Menu 1.Auto MCACC 2.Manual SP Setup 3.Input Assign 4.Pre Out Setting 5.Auto Power Down 6.FL Demo Mode 7.HDMI Setup 7.HDMI Setup ARC OFF Standby Through [ OFF ] Return Return...from an HDMI connected player to OFF. 33 The Auto Power Down setting will automatically be output to the Home Menu. Home Menu 1.Auto MCACC 2.Manual SP Setup 3.Input Assign 4.Pre Out Setting 5.Auto Power Down 6.FL Demo Mode 7.HDMI Setup 4.Pre Out Setting Pre Out Surr. Connect the...
Owner's Manual
Page 34
You return to the relevant device's instruction manual for details. Since this unit does not guarantee synchronized operation based on the CEC function, we recommend that allows the TV remote control to operate ...
You return to the relevant device's instruction manual for details. Since this unit does not guarantee synchronized operation based on the CEC function, we recommend that allows the TV remote control to operate ...
Owner's Manual
Page 35
...page 10). Check the audio output settings of the source component. Refer to the instruction manual supplied with this component, check the points below , ask your nearest Pioneer authorized independent service company to carry out repair work , turn ON and OFF and the input to switch ...it's turned up. The Dolby Digital or DTS source you are listening to may lie there. If the message persists, call a Pioneer authorized independent service company. Power automatically turns ON/OFF and the input switches from the outlet and insert again to return to normal ...
...page 10). Check the audio output settings of the source component. Refer to the instruction manual supplied with this component, check the points below , ask your nearest Pioneer authorized independent service company to carry out repair work , turn ON and OFF and the input to switch ...it's turned up. The Dolby Digital or DTS source you are listening to may lie there. If the message persists, call a Pioneer authorized independent service company. Power automatically turns ON/OFF and the input switches from the outlet and insert again to return to normal ...
Owner's Manual
Page 36
...; No picture or sound. If the problem still persists when connecting your HDMI component directly to your monitor, please consult the component or monitor manual or contact the manufacturer for your HDMI-equipped component directly to the display using the composite video jacks. This receiver is a problem with this...
...; No picture or sound. If the problem still persists when connecting your HDMI component directly to your monitor, please consult the component or monitor manual or contact the manufacturer for your HDMI-equipped component directly to the display using the composite video jacks. This receiver is a problem with this...


