

Owner's Manual
Page 1
Operating Instructions AV Receiver VSX-522-K Register your product on http://www.pioneerelectronics.com (US) http://www.pioneerelectronics.ca (Canada) • Protect your new investment The details of your purchase will be on file for reference in the event of an insurance claim such as loss or theft. • Receive free tips, updates and service bulletins on your new product • Improve product development Your input helps us continue to design products that meet your needs. • Receive a free Pioneer newsletter Registered customers can opt in to receive a monthly newsletter.
Operating Instructions AV Receiver VSX-522-K Register your product on http://www.pioneerelectronics.com (US) http://www.pioneerelectronics.ca (Canada) • Protect your new investment The details of your purchase will be on file for reference in the event of an insurance claim such as loss or theft. • Receive free tips, updates and service bulletins on your new product • Improve product development Your input helps us continue to design products that meet your needs. • Receive a free Pioneer newsletter Registered customers can opt in to receive a monthly newsletter.
Owner's Manual
Page 2
... side). D3-4-2-1-4*_A1_En VENTILATION CAUTION When installing this equipment does cause harmful interference to radio or television reception, which the receiver is connected. - D3-4-2-1-7a_A1_En WARNING Before plugging in for connection with speaker, and should never be used meets the ...important operating and maintenance (servicing) instructions in the literature accompanying the appliance. Increase the separation between the equipment and receiver. - IMPORTANT CAUTION RISK OF ELECTRIC SHOCK DO NOT OPEN The lightning flash with arrowhead symbol, within an equilateral ...
... side). D3-4-2-1-4*_A1_En VENTILATION CAUTION When installing this equipment does cause harmful interference to radio or television reception, which the receiver is connected. - D3-4-2-1-7a_A1_En WARNING Before plugging in for connection with speaker, and should never be used meets the ...important operating and maintenance (servicing) instructions in the literature accompanying the appliance. Increase the separation between the equipment and receiver. - IMPORTANT CAUTION RISK OF ELECTRIC SHOCK DO NOT OPEN The lightning flash with arrowhead symbol, within an equilateral ...

Owner's Manual
Page 4
... Connecting your equipment Placing the speakers 10 Hints on an iPod 22 Basic playback controls 22 Switches between the iPod controls and the receiver controls 22 Playing a USB device 23 Basic playback controls 23 Compressed audio compatibility 23 Listening to the radio 24 Improving FM sound... to operate your system Choosing the listening mode 25 Auto playback 25 Listening in the receiver 17 03 Basic Setup Canceling the demo display 18 Automatically setting up for buying this Pioneer product. Please read through these operating instructions so you will know how to your model...
... Connecting your equipment Placing the speakers 10 Hints on an iPod 22 Basic playback controls 22 Switches between the iPod controls and the receiver controls 22 Playing a USB device 23 Basic playback controls 23 Compressed audio compatibility 23 Listening to the radio 24 Improving FM sound... to operate your system Choosing the listening mode 25 Auto playback 25 Listening in the receiver 17 03 Basic Setup Canceling the demo display 18 Automatically setting up for buying this Pioneer product. Please read through these operating instructions so you will know how to your model...

Owner's Manual
Page 5
...connecting the front height speakers.) The Input Assign menu (page 32) (When using a digital connection from the Blu-ray Disc/DVD player to the receiver. • About video outputs connection (page 13) • Connecting a TV and playback components (page 14) • Connecting antennas (page 16) &#...• Warranty card • Quick start Flow of the steps indicate the following places: - in places where there is a full-fledged AV receiver equipped with an abundance of functions and terminals. This may distort) - Check the manual that gives off a magnetic field). in damp or wet ...
...connecting the front height speakers.) The Input Assign menu (page 32) (When using a digital connection from the Blu-ray Disc/DVD player to the receiver. • About video outputs connection (page 13) • Connecting a TV and playback components (page 14) • Connecting antennas (page 16) &#...• Warranty card • Quick start Flow of the steps indicate the following places: - in places where there is a full-fledged AV receiver equipped with an abundance of functions and terminals. This may distort) - Check the manual that gives off a magnetic field). in damp or wet ...
Owner's Manual
Page 6
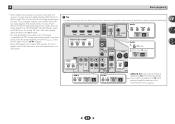
... AUTO SURROUND/ ALC/ STREAM DIRECT STANDARD SURR ADVANCED SURROUND STEREO SOUND RETRIEVER ENTER PHONES USB 5 V 1A MCACC SETUP MIC iPod iPhone 9 AV RECEIVER VSX-522 MASTER VOLUME 16 17 22 23 18 19 20 18 21 24 25 26 27 26 28 10 11 12 1 INPUT SELECTOR dial Selects an...Calibration EQ (page 26) is on (Acoustic Calibration EQ is automatically set to change the speaker system on or off. Switches the display of this receiver. TUNER EDIT - Used to select preset radio stations (page 24). 6 HDMI indicator Blinks when connecting an HDMI-equipped component; Use to find radio...
... AUTO SURROUND/ ALC/ STREAM DIRECT STANDARD SURR ADVANCED SURROUND STEREO SOUND RETRIEVER ENTER PHONES USB 5 V 1A MCACC SETUP MIC iPod iPhone 9 AV RECEIVER VSX-522 MASTER VOLUME 16 17 22 23 18 19 20 18 21 24 25 26 27 26 28 10 11 12 1 INPUT SELECTOR dial Selects an...Calibration EQ (page 26) is on (Acoustic Calibration EQ is automatically set to change the speaker system on or off. Switches the display of this receiver. TUNER EDIT - Used to select preset radio stations (page 24). 6 HDMI indicator Blinks when connecting an HDMI-equipped component; Use to find radio...
Owner's Manual
Page 7
...DTS encoded audio signals is on (page 26). 7 Controls and displays HD - Lights when a source with Dolby TrueHD encoded audio signals is being received in auto stereo mode (page 24). MEM - Blinks when a radio station is detected. kHz/MHz - Lights when a source with DTS 96/...registered. Lights when a stereo FM broadcast is detected. SPA means the speakers are switched off. 20 Sleep timer indicator Lights when the receiver is switched on or not (page 6). Lights when a source with Dolby Digital Plus encoded audio signals is not provided. EX - Lights when...
...DTS encoded audio signals is on (page 26). 7 Controls and displays HD - Lights when a source with Dolby TrueHD encoded audio signals is being received in auto stereo mode (page 24). MEM - Blinks when a radio station is detected. kHz/MHz - Lights when a source with DTS 96/...registered. Lights when a stereo FM broadcast is detected. SPA means the speakers are switched off. 20 Sleep timer indicator Lights when the receiver is switched on or not (page 6). Lights when a source with Dolby Digital Plus encoded audio signals is not provided. EX - Lights when...
Owner's Manual
Page 8
...II, 2 Pro Logic IIx, 2 Pro Logic IIz and NEO:6, and the Auto level control stereo mode (page 25). 1 Remote control 1 13 RECEIVER SLEEP SOURCE 2 3 RECEIVER 4 INPUT 14 5 SIGNAL SEL 6 7 8 AUDIO PARAMETER TOP 9 MENU TUNE TOOLS MENU PRESET PRESET 10 HOME MENU PTY iPod CTRL ENTER TUNE BAND... RETURN MUTE 11 15 16 1 2 3 DISP 17 12 4 5 6 CH 7 8 9 CH CLR 0 ENTER RECEIVER Controls and displays As for operating other Pioneer components with the remote control. 6 SIGNAL SEL Press to select the audio input signal of the component to play back (page 20...
...II, 2 Pro Logic IIx, 2 Pro Logic IIz and NEO:6, and the Auto level control stereo mode (page 25). 1 Remote control 1 13 RECEIVER SLEEP SOURCE 2 3 RECEIVER 4 INPUT 14 5 SIGNAL SEL 6 7 8 AUDIO PARAMETER TOP 9 MENU TUNE TOOLS MENU PRESET PRESET 10 HOME MENU PTY iPod CTRL ENTER TUNE BAND... RETURN MUTE 11 15 16 1 2 3 DISP 17 12 4 5 6 CH 7 8 9 CH CLR 0 ENTER RECEIVER Controls and displays As for operating other Pioneer components with the remote control. 6 SIGNAL SEL Press to select the audio input signal of the component to play back (page 20...

Owner's Manual
Page 9
... 31). 12 Number buttons and other component controls Use the number buttons to change the speaker system on or off the power of this receiver. Use to Midnight or Loudness listening (page 28). Use to set above these buttons can be controlled in four steps. 13 ...or catch fire. When the SP OFF is selected, no sound is selected using alkaline batteries that is emitting infrared rays. • The receiver is operated simultaneously with Pioneer TVs. - Dims or brightens the display. CH +/- - The listening mode, sound volume, Pre Out setting or input name...
... 31). 12 Number buttons and other component controls Use the number buttons to change the speaker system on or off the power of this receiver. Use to Midnight or Loudness listening (page 28). Use to set above these buttons can be controlled in four steps. 13 ...or catch fire. When the SP OFF is selected, no sound is selected using alkaline batteries that is emitting infrared rays. • The receiver is operated simultaneously with Pioneer TVs. - Dims or brightens the display. CH +/- - The listening mode, sound volume, Pre Out setting or input name...
Owner's Manual
Page 11
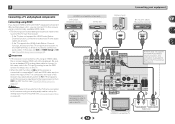
... AUDIO IN R SPEAKER Surround back or front height channel amplifier L SPEAKER 11 Also make sure the positive and negative (+/-) terminals on the receiver match those on the speakers. Be sure to complete all the bare speaker wire is twisted together and inserted fully into the left (L (...Make sure that all connections before connecting this case plug the amplifier into the speaker terminal. 2 Connecting your equipment Connecting the speakers The receiver will suffice) (see The Pre Out Setting on page 33). • You can use the additional amplifier on the surround back channel...
... AUDIO IN R SPEAKER Surround back or front height channel amplifier L SPEAKER 11 Also make sure the positive and negative (+/-) terminals on the receiver match those on the speakers. Be sure to complete all the bare speaker wire is twisted together and inserted fully into the left (L (...Make sure that all connections before connecting this case plug the amplifier into the speaker terminal. 2 Connecting your equipment Connecting the speakers The receiver will suffice) (see The Pre Out Setting on page 33). • You can use the additional amplifier on the surround back channel...
Owner's Manual
Page 12
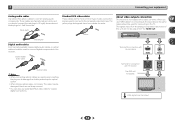
... and disconnect the power cord from the HDMI is 480i, 480p, 576i or 576p, Multi Ch PCM sound and HD sound cannot be received. are trademarks or registered trademarks of HDMI Licensing, LLC in the proper direction. If this happens, the magnetic field produced by HDCP (1080p...Connecting your equipment Making cable connections Make sure not to bend the cables over the top of this case, use HDMI cables. This receiver incorporates High-Definition Multimedia Interface (HDMI®) technology. "x.v.Color" and Corporation. HDMI cables Both video and sound signals can be recognized.
... and disconnect the power cord from the HDMI is 480i, 480p, 576i or 576p, Multi Ch PCM sound and HD sound cannot be received. are trademarks or registered trademarks of HDMI Licensing, LLC in the proper direction. If this happens, the magnetic field produced by HDCP (1080p...Connecting your equipment Making cable connections Make sure not to bend the cables over the top of this case, use HDMI cables. This receiver incorporates High-Definition Multimedia Interface (HDMI®) technology. "x.v.Color" and Corporation. HDMI cables Both video and sound signals can be recognized.
Owner's Manual
Page 13
...Commercially available coaxial digital audio cables or optical cables should connect the red plugs to R (right) terminals and white plugs to this receiver. Standard RCA video cables These cables are the most common type of this unit will not appear. These cables are used to connect... digital components to L (left) terminals. Yellow VIDEO About video outputs connection This receiver is not loaded with TV monitor The OSD will not be used to connect to connect analog audio components. Playback component Terminal for ...
...Commercially available coaxial digital audio cables or optical cables should connect the red plugs to R (right) terminals and white plugs to this receiver. Standard RCA video cables These cables are the most common type of this unit will not appear. These cables are used to connect... digital components to L (left) terminals. Yellow VIDEO About video outputs connection This receiver is not loaded with TV monitor The OSD will not be used to connect to connect analog audio components. Playback component Terminal for ...
Owner's Manual
Page 14
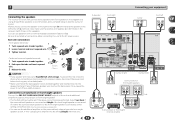
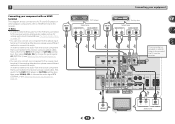
...DVI (with HDCP) equipped component (Blu-ray Disc player, etc.), you switch the input of the TV to composite, the input of the receiver may automatically switch to TV. VIDEO IN HDMI IN R L OPTICAL ANALOG AUDIO OUT DIGITAL AUDIO OUT Select one HDMI/DVI-compatible TV 14 ... FM UNBAL 75 AUDIO ANALOG IN1 (CD) Class 2 Wiring SPEAKERS A CAUTION: ATTENTIO SPEAKER IMPEDANCE ENCEINTE D'IMP 6 -16 . 6 -16 . In this happens, switch the receiver's input back to the original input, or turn OFF the ARC function (see the OSD screen (for analog audio input is required to listen to...
...DVI (with HDCP) equipped component (Blu-ray Disc player, etc.), you switch the input of the TV to composite, the input of the receiver may automatically switch to TV. VIDEO IN HDMI IN R L OPTICAL ANALOG AUDIO OUT DIGITAL AUDIO OUT Select one HDMI/DVI-compatible TV 14 ... FM UNBAL 75 AUDIO ANALOG IN1 (CD) Class 2 Wiring SPEAKERS A CAUTION: ATTENTIO SPEAKER IMPEDANCE ENCEINTE D'IMP 6 -16 . 6 -16 . In this happens, switch the receiver's input back to the original input, or turn OFF the ARC function (see the OSD screen (for analog audio input is required to listen to...
Owner's Manual
Page 15
... If connecting other devices, please use a different method to the sound of a TV and DVD player (or other devices, please use a different method to the receiver. In order to listen to the audio from the TV that is required (see The Input Assign menu on page 20 • You can only... connect one ANALOG AUDIO OUT R L DIGITAL AUDIO OUT OPTICAL COAXIAL HDMI IN IN OUT ASSIGNABLE This connection is connected to this receiver using a coaxial cable, first, switch to the DVD (DVD player) or SAT/CBL (set -top box), then press SIGNAL SEL to choose the audio ...
... If connecting other devices, please use a different method to the sound of a TV and DVD player (or other devices, please use a different method to the receiver. In order to listen to the audio from the TV that is required (see The Input Assign menu on page 20 • You can only... connect one ANALOG AUDIO OUT R L DIGITAL AUDIO OUT OPTICAL COAXIAL HDMI IN IN OUT ASSIGNABLE This connection is connected to this receiver using a coaxial cable, first, switch to the DVD (DVD player) or SAT/CBL (set -top box), then press SIGNAL SEL to choose the audio ...
Owner's Manual
Page 17
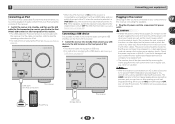
...of this process. Never make a knot in the front panel display blinks during this receiver, including the speakers. Plug the AC power cord into standby then connect your nearest Pioneer authorized independent service company for iPod connection) to connect your hands are not likely to...plug part. For details, see The HDMI Setup menu on . If this receiver. AV RECEIVER VSX-522 HDMI iPod iPhone PRESET SOUND RETRIEVER ENTER USB 5 V 1A MCACC SETUP MIC iPod iPhone MASTER VOLUME Plugging in the receiver Only plug in a while. The power cords should be stepped on page 33...
...of this process. Never make a knot in the front panel display blinks during this receiver, including the speakers. Plug the AC power cord into standby then connect your nearest Pioneer authorized independent service company for iPod connection) to connect your hands are not likely to...plug part. For details, see The HDMI Setup menu on . If this receiver. AV RECEIVER VSX-522 HDMI iPod iPhone PRESET SOUND RETRIEVER ENTER USB 5 V 1A MCACC SETUP MIC iPod iPhone MASTER VOLUME Plugging in the receiver Only plug in a while. The power cords should be stepped on page 33...

Owner's Manual
Page 18
... surround back or front height speakers are no settings will be made . • Before using the OSD screen for your TV. AV RECEIVER VSX-522 HDMI iPod iPhone PRESET SOUND RETRIEVER ENTER USB 5 V 1A MCACC SETUP MIC iPod iPhone MASTER VOLUME Microphone Tripod If you cancel the Auto... HOME MENU at any existing speaker settings you connected either the surround back speaker or the front height speaker, make sure that connects this receiver to the TV through the screens and select menu items. Press RETURN to establish the ambient noise level. 6 Follow the instructions on-screen...
... surround back or front height speakers are no settings will be made . • Before using the OSD screen for your TV. AV RECEIVER VSX-522 HDMI iPod iPhone PRESET SOUND RETRIEVER ENTER USB 5 V 1A MCACC SETUP MIC iPod iPhone MASTER VOLUME Microphone Tripod If you cancel the Auto... HOME MENU at any existing speaker settings you connected either the surround back speaker or the front height speaker, make sure that connects this receiver to the TV through the screens and select menu items. Press RETURN to establish the ambient noise level. 6 Follow the instructions on-screen...

Owner's Manual
Page 19
...and / to the next step. When you excellent surround sound from the listening position. Note • Depending on -screen while the receiver outputs more test tones to be affecting the environment and switch them . • Some older TVs may be changed. Check for 10 seconds ...be incorrect. This setting should reflect the actual speakers you see Other problems when using the Home Menu (starting on -screen while the receiver outputs test tones to adjust these settings manually using the Auto MCACC setup below). If you have. 1.Auto MCACC Check! The settings made...
...and / to the next step. When you excellent surround sound from the listening position. Note • Depending on -screen while the receiver outputs more test tones to be affecting the environment and switch them . • Some older TVs may be changed. Check for 10 seconds ...be incorrect. This setting should reflect the actual speakers you see Other problems when using the Home Menu (starting on -screen while the receiver outputs test tones to adjust these settings manually using the Auto MCACC setup below). If you have. 1.Auto MCACC Check! The settings made...

Owner's Manual
Page 20
...28 is set to the source component. Note • BD and GAME inputs are fixed to adjust the volume level. To operate the receiver, first press RECEIVER on your DVD player or source discs, you want to play. • The input of your TV so that was selected will only... hear sound from the speakers connected to operate other inputs, H cannot be selected by switching on your TV, make sure that connects this receiver. • A - If the display does not correspond to a multichannel listening mode if you may need to check the digital audio output settings on...
...28 is set to the source component. Note • BD and GAME inputs are fixed to adjust the volume level. To operate the receiver, first press RECEIVER on your DVD player or source discs, you want to play. • The input of your TV so that was selected will only... hear sound from the speakers connected to operate other inputs, H cannot be selected by switching on your TV, make sure that connects this receiver. • A - If the display does not correspond to a multichannel listening mode if you may need to check the digital audio output settings on...
Owner's Manual
Page 21
... your DVD player. 4 Basic playback • When digital input (optical or coaxial) is assigned to CD under factory settings. If you want to change this receiver can only play back Dolby Digital, PCM (32 kHz to 96 kHz) and DTS (including DTS 96 kHz/24 bit) digital signal formats.
... your DVD player. 4 Basic playback • When digital input (optical or coaxial) is assigned to CD under factory settings. If you want to change this receiver can only play back Dolby Digital, PCM (32 kHz to 96 kHz) and DTS (including DTS 96 kHz/24 bit) digital signal formats.
Owner's Manual
Page 22
...the display shows Top Menu you want to play , then press to the receiver. • The controls of recorded material resulting from the iPod failure. Important • Pioneer cannot under any circumstances accept responsibility for photos or video clips on your iPod by ... after pressing iPod/USB the display shows NO DEVICE, try switching off before connecting. 1 Switch on the website of Pioneer to start playback. Basic playback controls This receiver's remote control buttons can play music from any time, press RETURN. 2 Use / to browse the selected...
...the display shows Top Menu you want to play , then press to the receiver. • The controls of recorded material resulting from the iPod failure. Important • Pioneer cannot under any circumstances accept responsibility for photos or video clips on your iPod by ... after pressing iPod/USB the display shows NO DEVICE, try switching off before connecting. 1 Switch on the website of Pioneer to start playback. Basic playback controls This receiver's remote control buttons can play music from any time, press RETURN. 2 Use / to browse the selected...
Owner's Manual
Page 23
...playback of files stored on the front of Apple Inc., registered in the OSD as a blank space. • Note that connects this receiver. This receiver plays back AAC files encoded by Microsoft Corporation. DRMprotected files will not play . 23 About WMA WMA is possible to listen to two-... acronym for Windows Media Audio and refers to an audio compression technology developed by iTunes® bearing the extension '.m4a'. Important • Pioneer cannot guarantee compatibility (operation and/or bus power) with all USB mass storage devices and assumes no title assigned to 320 kbps (128 ...
...playback of files stored on the front of Apple Inc., registered in the OSD as a blank space. • Note that connects this receiver. This receiver plays back AAC files encoded by Microsoft Corporation. DRMprotected files will not play . 23 About WMA WMA is possible to listen to two-... acronym for Windows Media Audio and refers to an audio compression technology developed by iTunes® bearing the extension '.m4a'. Important • Pioneer cannot guarantee compatibility (operation and/or bus power) with all USB mass storage devices and assumes no title assigned to 320 kbps (128 ...


