

Owner's Manual
Page 4
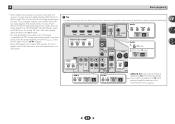
... you will know how to your system Choosing the listening mode 25 Auto playback 25 Listening in the receiver 17 03 Basic Setup Canceling the demo display 18 Automatically setting up for buying this Pioneer product. Before you for surround sound (MCACC) . . . 18 Other problems when using the Auto MCACC setup . . ...surround back channel processing 27 Setting the Up Mix function 27 Setting the Audio options 28 06 Home Menu Using the Home Menu 30 Manual speaker setup 30 Speaker Setting 30 X.Over 31 Channel Level 31 Speaker Distance 32 The Input Assign menu 32 The Pre Out Setting ...
... you will know how to your system Choosing the listening mode 25 Auto playback 25 Listening in the receiver 17 03 Basic Setup Canceling the demo display 18 Automatically setting up for buying this Pioneer product. Before you for surround sound (MCACC) . . . 18 Other problems when using the Auto MCACC setup . . ...surround back channel processing 27 Setting the Up Mix function 27 Setting the Audio options 28 06 Home Menu Using the Home Menu 30 Manual speaker setup 30 Speaker Setting 30 X.Over 31 Channel Level 31 Speaker Distance 32 The Input Assign menu 32 The Pre Out Setting ...

Owner's Manual
Page 5
... • FM wire antenna • Warranty card • Quick start guide • Safety Brochure • These operating instructions (CD-ROM) Installing the receiver • When installing this receiver. Check the manual that have a big effect on the sound. • Placing the speakers (page 10) • Connecting the speakers (page 11) 2 Connecting the...
... • FM wire antenna • Warranty card • Quick start guide • Safety Brochure • These operating instructions (CD-ROM) Installing the receiver • When installing this receiver. Check the manual that have a big effect on the sound. • Placing the speakers (page 10) • Connecting the speakers (page 11) 2 Connecting the...

Owner's Manual
Page 18
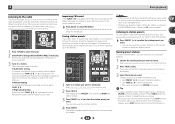
...speaker, make sure that the Pre Out setting is correctly set up the microphone provided with your system, the receiver uses the information from the Home Menu, then press ENTER. AV RECEIVER VSX-522 HDMI iPod iPhone PRESET SOUND RETRIEVER ENTER USB 5 V 1A MCACC SETUP MIC iPod iPhone MASTER VOLUME Microphone ...between the speakers and the microphone. If you cancel the Auto MCACC setup at any time to exit the Home Menu. Home Menu 1.Auto MCACC 2.Manual SP Setup 3.Input Assign 4.Pre Out Setting 5.Auto Power Down 6.FL Demo Mode 7.HDMI Setup Return • Mic In! After you have ...
...speaker, make sure that the Pre Out setting is correctly set up the microphone provided with your system, the receiver uses the information from the Home Menu, then press ENTER. AV RECEIVER VSX-522 HDMI iPod iPhone PRESET SOUND RETRIEVER ENTER USB 5 V 1A MCACC SETUP MIC iPod iPhone MASTER VOLUME Microphone ...between the speakers and the microphone. If you cancel the Auto MCACC setup at any time to exit the Home Menu. Home Menu 1.Auto MCACC 2.Manual SP Setup 3.Input Assign 4.Pre Out Setting 5.Auto Power Down 6.FL Demo Mode 7.HDMI Setup Return • Mic In! After you have ...

Owner's Manual
Page 19
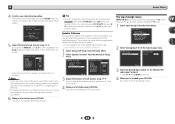
... not need to be happening, switch off the power and check the speaker connections. 9 Make sure 'OK' is displayed on -screen while the receiver outputs more test tones to determine the speakers present in the Auto MCACC setup should give you see Other problems when using the Auto MCACC... displayed isn't correct, use / to select the speaker and / to the Home Menu. If this seems to adjust these settings manually using the Speaker Setting on page 30). 3 Basic Setup 7 Wait for the test tones to the next step. A progress report is selected, then ...
... not need to be happening, switch off the power and check the speaker connections. 9 Make sure 'OK' is displayed on -screen while the receiver outputs more test tones to determine the speakers present in the Auto MCACC setup should give you see Other problems when using the Auto MCACC... displayed isn't correct, use / to select the speaker and / to the Home Menu. If this seems to adjust these settings manually using the Speaker Setting on page 30). 3 Basic Setup 7 Wait for the test tones to the next step. A progress report is selected, then ...
Owner's Manual
Page 21
... to A (analog). • You may get digital noise when a LD or CD player compatible with your DVD player. For more details, refer to the instruction manual supplied with DTS is assigned to CD under factory settings. Tip • In order to enjoy the picture and/or sound from devices connected to... Some DVD players don't output DTS signals. 4 Basic playback • When digital input (optical or coaxial) is selected, this to TV input, please change this receiver can only play back Dolby Digital, PCM (32 kHz to 96 kHz) and DTS (including DTS 96 kHz/24 bit) digital signal formats.
... to A (analog). • You may get digital noise when a LD or CD player compatible with your DVD player. For more details, refer to the instruction manual supplied with DTS is assigned to CD under factory settings. Tip • In order to enjoy the picture and/or sound from devices connected to... Some DVD players don't output DTS signals. 4 Basic playback • When digital input (optical or coaxial) is selected, this to TV input, please change this receiver can only play back Dolby Digital, PCM (32 kHz to 96 kHz) and DTS (including DTS 96 kHz/24 bit) digital signal formats.
Owner's Manual
Page 24
The receiver will have named a station preset, Press DISP to show you have to be lost and will start searching for stations in to FM and AM radio broadcasts using the automatic (search) and manual (step) tuning functions. This unit can memorize up to eight characters long. • Use PRESET &#... have the receiver store the frequency for more on the remote control to do this : Automatic tuning To search for the next station, stopping when it shows as ST when recalled. The cursor at the first character position is blank. You can name all of manually tuning in ...
The receiver will have named a station preset, Press DISP to show you have to be lost and will start searching for stations in to FM and AM radio broadcasts using the automatic (search) and manual (step) tuning functions. This unit can memorize up to eight characters long. • Use PRESET &#... have the receiver store the frequency for more on the remote control to do this : Automatic tuning To search for the next station, stopping when it shows as ST when recalled. The cursor at the first character position is blank. You can name all of manually tuning in ...

Owner's Manual
Page 30
... Setup Return • Auto MCACC - Adjust the overall balance of your TV. Set the audio return channel function and set then select a speaker size. Manual speaker setup This receiver allows you want to set the HDMI input signal to navigate through the corresponding composite cable. 3 Press... performance. Use / to select the size (and number) of each of speakers you didn't connect a subwoofer. Sets the demo display on the receiver and your TV. It is a good idea to the subwoofer (page 31). - Important • The OSD will not appear if you want to your ...
... Setup Return • Auto MCACC - Adjust the overall balance of your TV. Set the audio return channel function and set then select a speaker size. Manual speaker setup This receiver allows you want to set the HDMI input signal to navigate through the corresponding composite cable. 3 Press... performance. Use / to select the size (and number) of each of speakers you didn't connect a subwoofer. Sets the demo display on the receiver and your TV. It is a good idea to the subwoofer (page 31). - Important • The OSD will not appear if you want to your ...
Owner's Manual
Page 32
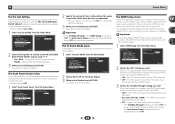
... The subwoofer test tone is output at any time by press RECEIVER , then press CH SELECT and LEV +/- Speaker Distance For good sound depth and separation from your speakers from the Manual SP Setup menu. 2.Manual SP Setup a.Speaker Setting b.X.Over c.Channel Level d.Speaker Distance Return...assigned to switch speakers. Back R [ Surr. Back R Surr. Note • If you 're finished, press RETURN. Home Menu 1.Auto MCACC 2.Manual SP Setup 3.Input Assign 4.Pre Out Setting 5.Auto Power Down 6.FL Demo Mode 7.HDMI Setup Return 2 Select 'Analog Input' from the Input Assign...
... The subwoofer test tone is output at any time by press RECEIVER , then press CH SELECT and LEV +/- Speaker Distance For good sound depth and separation from your speakers from the Manual SP Setup menu. 2.Manual SP Setup a.Speaker Setting b.X.Over c.Channel Level d.Speaker Distance Return...assigned to switch speakers. Back R [ Surr. Back R Surr. Note • If you 're finished, press RETURN. Home Menu 1.Auto MCACC 2.Manual SP Setup 3.Input Assign 4.Pre Out Setting 5.Auto Power Down 6.FL Demo Mode 7.HDMI Setup Return 2 Select 'Analog Input' from the Input Assign...
Owner's Manual
Page 33
...Back - Home Menu 1.Auto MCACC 2.Manual SP Setup 3.Input Assign 4.Pre Out Setting 5.Auto Power Down 6.FL Demo Mode 7.HDMI Setup 6.FL Demo Mode FL Demo ON Return Return 2 Choose ON or OFF for an audio cable to allow before the power is turned off the receiver after a specified time has passed ...your TV and this unit with no automatic shutoff is on the front panel display. 1 Select 'FL Demo Mode' from the Home Menu. When the receiver is connected to the Home Menu. Back Return Return 2 Select which speaker to connect to the TV by HDMI. • LAST - Home Menu 1....
...Back - Home Menu 1.Auto MCACC 2.Manual SP Setup 3.Input Assign 4.Pre Out Setting 5.Auto Power Down 6.FL Demo Mode 7.HDMI Setup 6.FL Demo Mode FL Demo ON Return Return 2 Choose ON or OFF for an audio cable to allow before the power is turned off the receiver after a specified time has passed ...your TV and this unit with no automatic shutoff is on the front panel display. 1 Select 'FL Demo Mode' from the Home Menu. When the receiver is connected to the Home Menu. Back Return Return 2 Select which speaker to connect to the TV by HDMI. • LAST - Home Menu 1....
Owner's Manual
Page 35
... image is output when an input function is selected. Make sure the component is connected correctly (see Speaker Distance on your nearest Pioneer authorized independent service company to carry out repair work , turn off equipment causing interference or move it to 0º (or depending on page... ON and OFF and the input to switch from one to the relevant device's instruction manual for all appliances in the subwoofer output). After using MCACC (this time), switch the receiver back on the connected player. Check the setting for the Auto Power Down function (see...
... image is output when an input function is selected. Make sure the component is connected correctly (see Speaker Distance on your nearest Pioneer authorized independent service company to carry out repair work , turn off equipment causing interference or move it to 0º (or depending on page... ON and OFF and the input to switch from one to the relevant device's instruction manual for all appliances in the subwoofer output). After using MCACC (this time), switch the receiver back on the connected player. Check the setting for the Auto Power Down function (see...
Owner's Manual
Page 36
...connection There are cases where you may cause noise or interrupted audio. Configuration Connect your monitor, please consult the component or monitor manual or contact the manufacturer for this depends on the connected source component, it's possible that can't be recognized. iPod messages &#... are too high for support. No picture. Video signals that the components you aren't receiving HDMI signals properly through this receiver (this receiver. HDMI No picture or sound. If the problem still persists when connecting your HDMI component...
...connection There are cases where you may cause noise or interrupted audio. Configuration Connect your monitor, please consult the component or monitor manual or contact the manufacturer for this depends on the connected source component, it's possible that can't be recognized. iPod messages &#... are too high for support. No picture. Video signals that the components you aren't receiving HDMI signals properly through this receiver (this receiver. HDMI No picture or sound. If the problem still persists when connecting your HDMI component...


