

Owner's Manual
Page 4
... cable connections 12 HDMI cables 12 About HDMI 12 Analog audio cables 13 Digital audio cables 13 Standard RCA video cables 13 About video outputs connection 13 Connecting a TV and playback components 14 Connecting using HDMI 14 Connecting your component with no HDMI terminal. . . . 15... Auto playback 25 Listening in the receiver 17 03 Basic Setup Canceling the demo display 18 Automatically setting up for buying this Pioneer product. Contents Thank you for surround sound (MCACC) . . . 18 Other problems when using the Auto MCACC setup . . . . 19 04 Basic playback Playing a source...
... cable connections 12 HDMI cables 12 About HDMI 12 Analog audio cables 13 Digital audio cables 13 Standard RCA video cables 13 About video outputs connection 13 Connecting a TV and playback components 14 Connecting using HDMI 14 Connecting your component with no HDMI terminal. . . . 15... Auto playback 25 Listening in the receiver 17 03 Basic Setup Canceling the demo display 18 Automatically setting up for buying this Pioneer product. Contents Thank you for surround sound (MCACC) . . . 18 Other problems when using the Auto MCACC setup . . . . 19 04 Basic playback Playing a source...

Owner's Manual
Page 5
... will have hot fumes or oils (such as desired • Using the Sound Retriever (page 26) • Better sound using a digital connection from the Blu-ray Disc/DVD player to the receiver. • About video outputs connection (page 13) • Connecting a TV and playback components (page 14...) • Connecting antennas (page 16) • Plugging in the receiver (page 17) 3 Power On Make sure you 'll want to hook up for surround sound (MCACC) (page 18) ...
... will have hot fumes or oils (such as desired • Using the Sound Retriever (page 26) • Better sound using a digital connection from the Blu-ray Disc/DVD player to the receiver. • About video outputs connection (page 13) • Connecting a TV and playback components (page 14...) • Connecting antennas (page 16) • Plugging in the receiver (page 17) 3 Power On Make sure you 'll want to hook up for surround sound (MCACC) (page 18) ...
Owner's Manual
Page 6
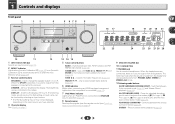
... change the speaker system on after the Auto MCACC setup (page 18)). 3 Receiver control buttons SPEAKERS - When the SP OFF is selected, no sound output from the speakers connected to this unit. Used to select preset radio stations (page 24). 6 HDMI indicator Blinks when connecting an HDMI-equipped component;... DISPLAY BAND TUNER EDIT TUNE PRESET AUTO SURROUND/ ALC/ STREAM DIRECT STANDARD SURR ADVANCED SURROUND STEREO SOUND RETRIEVER ENTER PHONES USB 5 V 1A MCACC SETUP MIC iPod iPhone 9 AV RECEIVER VSX-522 MASTER VOLUME 16 17 22 23 18 19 20 18 21 24 25 26 27 26 28 ...
... change the speaker system on after the Auto MCACC setup (page 18)). 3 Receiver control buttons SPEAKERS - When the SP OFF is selected, no sound output from the speakers connected to this unit. Used to select preset radio stations (page 24). 6 HDMI indicator Blinks when connecting an HDMI-equipped component;... DISPLAY BAND TUNER EDIT TUNE PRESET AUTO SURROUND/ ALC/ STREAM DIRECT STANDARD SURR ADVANCED SURROUND STEREO SOUND RETRIEVER ENTER PHONES USB 5 V 1A MCACC SETUP MIC iPod iPhone 9 AV RECEIVER VSX-522 MASTER VOLUME 16 17 22 23 18 19 20 18 21 24 25 26 27 26 28 ...

Owner's Manual
Page 9
...• Direct sunlight or fluorescent light is shining onto the remote sensor. • The receiver is set the listening volume. 16 MUTE Mutes/unmutes the sound. 17 DISP Switches the display of this receiver. These buttons also function as inside a car or near a device that have a longer life. to... overheat, explode or catch fire. VOL +/- - The listening mode, sound volume, Pre Out setting or input name can also reduce the life or performance of the Pioneer DVD/DVR units when BD, DVD, DVR/BDR or CD is output from the speakers connected to change the speaker system on a CD, ...
...• Direct sunlight or fluorescent light is shining onto the remote sensor. • The receiver is set the listening volume. 16 MUTE Mutes/unmutes the sound. 17 DISP Switches the display of this receiver. These buttons also function as inside a car or near a device that have a longer life. to... overheat, explode or catch fire. VOL +/- - The listening mode, sound volume, Pre Out setting or input name can also reduce the life or performance of the Pioneer DVD/DVR units when BD, DVD, DVR/BDR or CD is output from the speakers connected to change the speaker system on a CD, ...
Owner's Manual
Page 10
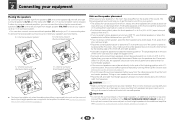
... 27). • Try not to 3 m (6 ft. to 90 cm (2 ft. Connect the additional amplifier to the PRE OUT SURR BACK/FRONT HEIGHT outputs of external shocks such as shown below the TV so that all speakers are connected to a 7.1 ch surround system. • You can also connect one... speakers (L/R), the center speaker (C), the left and right surround speakers (SL/SR), and the subwoofer (SW), a 5.1 ch surround system can weaken the surround sound effect. • Place the left and right front height speakers at least one surround back speaker (SB) and enjoy a 6.1 ch surround system. For DVD...
... 27). • Try not to 3 m (6 ft. to 90 cm (2 ft. Connect the additional amplifier to the PRE OUT SURR BACK/FRONT HEIGHT outputs of external shocks such as shown below the TV so that all speakers are connected to a 7.1 ch surround system. • You can also connect one... speakers (L/R), the center speaker (C), the left and right surround speakers (SL/SR), and the subwoofer (SW), a 5.1 ch surround system can weaken the surround sound effect. • Place the left and right front height speakers at least one surround back speaker (SB) and enjoy a 6.1 ch surround system. For DVD...
Owner's Manual
Page 11
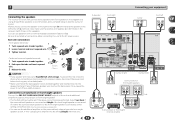
...see The Pre Out Setting on page 33). • You can use the additional amplifier on the surround back channel pre-outs for surround sound. To prevent the risk of electric shock when connecting or disconnecting the speaker cables, disconnect the power cord before connecting this case plug the...8226; These speaker terminals carry HAZARDOUS LIVE voltage. Connect the surround back or front height speakers Connect the PRE OUT SURR BACK/FRONT HEIGHT outputs of the bare speaker wire touches the back panel it may cause the power to complete all the bare speaker wire is connected, either ...
...see The Pre Out Setting on page 33). • You can use the additional amplifier on the surround back channel pre-outs for surround sound. To prevent the risk of electric shock when connecting or disconnecting the speaker cables, disconnect the power cord before connecting this case plug the...8226; These speaker terminals carry HAZARDOUS LIVE voltage. Connect the surround back or front height speakers Connect the PRE OUT SURR BACK/FRONT HEIGHT outputs of the bare speaker wire touches the back panel it may cause the power to complete all the bare speaker wire is connected, either ...
Owner's Manual
Page 12
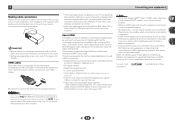
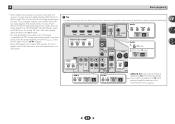
... changing connections, switch off the device connected to this unit may cause noise or interrupted audio. HDMI Be careful to hear HDMI audio output from this unit (as almost every kind of uncompressed video (contents protected by the transformers in the illustration). Note that some components (...such as video game units) have resolutions that the connected component is 480i, 480p, 576i or 576p, Multi Ch PCM sound and HD sound cannot be displayed. About HDMI The HDMI connection transfers uncompressed digital video, as well as shown in this unit's HDMI OUT terminal ...
... changing connections, switch off the device connected to this unit may cause noise or interrupted audio. HDMI Be careful to hear HDMI audio output from this unit (as almost every kind of uncompressed video (contents protected by the transformers in the illustration). Note that some components (...such as video game units) have resolutions that the connected component is 480i, 480p, 576i or 576p, Multi Ch PCM sound and HD sound cannot be displayed. About HDMI The HDMI connection transfers uncompressed digital video, as well as shown in this unit's HDMI OUT terminal ...

Owner's Manual
Page 18
... system, the receiver uses the information from the Home Menu, then press ENTER. Try to MCACC SETUP MIC jack. AV RECEIVER VSX-522 HDMI iPod iPhone PRESET SOUND RETRIEVER ENTER USB 5 V 1A MCACC SETUP MIC iPod iPhone MASTER VOLUME Microphone Tripod If you connected either the surround back speaker...screen. • Make sure the microphone is connected. • Make sure the subwoofer is on and the volume is not operating. The system outputs a series of test tones to exit the current menu. • Press HOME MENU at any time, the receiver automatically exits and no obstacles...
... system, the receiver uses the information from the Home Menu, then press ENTER. Try to MCACC SETUP MIC jack. AV RECEIVER VSX-522 HDMI iPod iPhone PRESET SOUND RETRIEVER ENTER USB 5 V 1A MCACC SETUP MIC iPod iPhone MASTER VOLUME Microphone Tripod If you connected either the surround back speaker...screen. • Make sure the microphone is connected. • Make sure the subwoofer is on and the volume is not operating. The system outputs a series of test tones to exit the current menu. • Press HOME MENU at any time, the receiver automatically exits and no obstacles...

Owner's Manual
Page 19
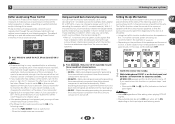
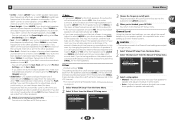
... for 10 seconds and ENTER is also possible to adjust these settings manually using the Home Menu (starting on -screen while the receiver outputs more test tones to determine the optimum receiver settings for household appliances (air conditioner, fridge, fan, etc.), that may interfere with the... Surr. When you're finished, go to determine the speakers present in the Auto MCACC setup should reflect the actual speakers you excellent surround sound from the microphone) the final settings may take 1 to 3 minutes. 10 The Auto MCACC setup has finished! A progress report is displayed...
... for 10 seconds and ENTER is also possible to adjust these settings manually using the Home Menu (starting on -screen while the receiver outputs more test tones to determine the optimum receiver settings for household appliances (air conditioner, fridge, fan, etc.), that may interfere with the... Surr. When you're finished, go to determine the speakers present in the Auto MCACC setup should reflect the actual speakers you excellent surround sound from the microphone) the final settings may take 1 to 3 minutes. 10 The Auto MCACC setup has finished! A progress report is displayed...

Owner's Manual
Page 20
...component (for example a DVD player), your DVD player or digital satellite receiver. If you selected the proper input source and there is still no sound, select the audio input signal for playback (see page 7). 20 When not using a surround back speaker, 2D+PLIIx is displayed when playing Dolby ...mode, check the connections and settings. Each press cycles through your DVD player or source discs, you may need to check the digital audio output settings on the remote control, or by using the input function buttons. Press SIGNAL SEL to select the audio input signal corresponding ...
...component (for example a DVD player), your DVD player or digital satellite receiver. If you selected the proper input source and there is still no sound, select the audio input signal for playback (see page 7). 20 When not using a surround back speaker, 2D+PLIIx is displayed when playing Dolby ...mode, check the connections and settings. Each press cycles through your DVD player or source discs, you may need to check the digital audio output settings on the remote control, or by using the input function buttons. Press SIGNAL SEL to select the audio input signal corresponding ...
Owner's Manual
Page 21
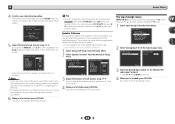
... is assigned to the instruction manual supplied with DTS is playing an analog signal. Tip • In order to enjoy the picture and/or sound from devices connected to TV input, please change the settings in the Input Assign menu (page 32). 21 With other digital signal formats, set... SEL C1 Audio 1. To prevent noise, make the proper digital connections (page 13) and set to C1/O1 (digital). • Some DVD players don't output DTS signals. If you want to change this receiver can only play back Dolby Digital, PCM (32 kHz to 192 kHz sampling frequencies), Dolby TrueHD...
... is assigned to the instruction manual supplied with DTS is playing an analog signal. Tip • In order to enjoy the picture and/or sound from devices connected to TV input, please change the settings in the Input Assign menu (page 32). 21 With other digital signal formats, set... SEL C1 Audio 1. To prevent noise, make the proper digital connections (page 13) and set to C1/O1 (digital). • Some DVD players don't output DTS signals. If you want to change this receiver can only play back Dolby Digital, PCM (32 kHz to 192 kHz sampling frequencies), Dolby TrueHD...
Owner's Manual
Page 27
... . - With 5.1 encoded sources, a surround back channel will be produced. • If your listening position. The Up Mix function mixes the sound of the surround speakers with 5.1 encoded material). Note • Phase matching is switched on the type of your subwoofer. If a crest of a...press SB CH repeatedly to the plus (+) sign (or 0°). When the headphones are detected in the 7.1-channel surround system are output from the surround component is only performed when surround back channel signals are connected. Matrix decoding processing for example, Dolby Digital EX or ...
... . - With 5.1 encoded sources, a surround back channel will be produced. • If your listening position. The Up Mix function mixes the sound of the surround speakers with 5.1 encoded material). Note • Phase matching is switched on the type of your subwoofer. If a crest of a...press SB CH repeatedly to the plus (+) sign (or 0°). When the headphones are detected in the 7.1-channel surround system are output from the surround component is only performed when surround back channel signals are connected. Matrix decoding processing for example, Dolby Digital EX or ...
Owner's Manual
Page 28
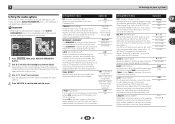
... on the operational status of the display connected with the picture. OFFc ON DUAL MONOd Specifies how dual mono encoded Dolby Digital soundtracks should be output during digital processing). 0 (0 dB) +6 (+6 dB) HDMI (HDMI Audio) Specifies the routing of the HDMI audio signal out of Acoustic OFF Calibration...MID OFF LFE ATT (LFE Attenuate) Some Dolby Digital and DTS audio sources include ultra-low bass tones. When OFF is selected, no sound is output from music sources at low volumes. The audio delay time is set it does Option(s) DRC (Dynamic Range Control) Adjusts the level ...
... on the operational status of the display connected with the picture. OFFc ON DUAL MONOd Specifies how dual mono encoded Dolby Digital soundtracks should be output during digital processing). 0 (0 dB) +6 (+6 dB) HDMI (HDMI Audio) Specifies the routing of the HDMI audio signal out of Acoustic OFF Calibration...MID OFF LFE ATT (LFE Attenuate) Some Dolby Digital and DTS audio sources include ultra-low bass tones. When OFF is selected, no sound is output from music sources at low volumes. The audio delay time is set it does Option(s) DRC (Dynamic Range Control) Adjusts the level ...
Owner's Manual
Page 29
... from the front height speaker when listening in DOLBY PLII MUSIC mode. h. H.GAIN (Height Gain) Adjusts the output from front to back, making the sound more distant (minus settings), or more forward (positive settings). -3 to +3 Default: 0 PNRM. (Panorama)h OFF Extends the front stereo image to ...directly. You can change the MIDNIGHT/LOUDNESS options at any time by using a center speaker) Default: 3 Adjust the center image to H, the sound from 0 (all center channel sent to front right CINEMA) and left speakers) to 10 (center channel sent to OFF and adjust the delay ...
... from the front height speaker when listening in DOLBY PLII MUSIC mode. h. H.GAIN (Height Gain) Adjusts the output from front to back, making the sound more distant (minus settings), or more forward (positive settings). -3 to +3 Default: 0 PNRM. (Panorama)h OFF Extends the front stereo image to ...directly. You can change the MIDNIGHT/LOUDNESS options at any time by using a center speaker) Default: 3 Adjust the center image to H, the sound from 0 (all center channel sent to front right CINEMA) and left speakers) to 10 (center channel sent to OFF and adjust the delay ...

Owner's Manual
Page 30
...33). • Auto Power Down - Speaker Setting - Adjust the overall balance of speakers). Specify how to use the PRE OUT SURR BACK/FRONT HEIGHT outputs (see The FL Demo Mode menu on the Pre Out Setting, there will be differences in the speaker items that can 't use the Home Menu...setting to specify your front speakers reproduce bass frequencies effectively, or if you 're satisfied with the settings made in Automatically setting up for surround sound (MCACC) on the remote control to make detailed settings to the input that you 've connected (see The Auto Power Down menu on ...
...33). • Auto Power Down - Speaker Setting - Adjust the overall balance of speakers). Specify how to use the PRE OUT SURR BACK/FRONT HEIGHT outputs (see The FL Demo Mode menu on the Pre Out Setting, there will be differences in the speaker items that can 't use the Home Menu...setting to specify your front speakers reproduce bass frequencies effectively, or if you 're satisfied with the settings made in Automatically setting up for surround sound (MCACC) on the remote control to make detailed settings to the input that you 've connected (see The Auto Power Down menu on ...
Owner's Manual
Page 31
... speakers, the subwoofer will be set to LARGE if the front speakers are also routed to output bass sound continuously or you 're finished, press RETURN. If you select SMALL for bass sounds in the amount of your center speaker reproduces bass frequencies effectively, or select SMALL to send ... connect a center speaker, choose NO (the center channel is to route all bass frequencies are sent to the subwoofer. • If the surround speakers are output at high volume. 1 Select 'Manual SP Setup' from the Home Menu. 2 Select 'Channel Level' from speaker to NO. • If you 're ...
... speakers, the subwoofer will be set to LARGE if the front speakers are also routed to output bass sound continuously or you 're finished, press RETURN. If you select SMALL for bass sounds in the amount of your center speaker reproduces bass frequencies effectively, or select SMALL to send ... connect a center speaker, choose NO (the center channel is to route all bass frequencies are sent to the subwoofer. • If the surround speakers are output at high volume. 1 Select 'Manual SP Setup' from the Home Menu. 2 Select 'Channel Level' from speaker to NO. • If you 're ...
Owner's Manual
Page 32
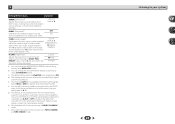
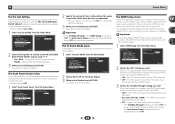
..., and then use / to the Input Assign menu. 32 After the volume increases to the reference level, test tones will be output. 2c.Channel Level Test Tone [ Manual ] Please Wait . . .20 Caution Loud test tones will be changed to specify the distance of...Analog Input Analog CD Return Return 3 Select the desired input option for effective surround sound. • For the assignment of each channel using /. You return to switch speakers. The test tones will output test tones in 0.1 feet increments. 4 When you're finished, press RETURN. You...
..., and then use / to the Input Assign menu. 32 After the volume increases to the reference level, test tones will be output. 2c.Channel Level Test Tone [ Manual ] Please Wait . . .20 Caution Loud test tones will be changed to specify the distance of...Analog Input Analog CD Return Return 3 Select the desired input option for effective surround sound. • For the assignment of each channel using /. You return to switch speakers. The test tones will output test tones in 0.1 feet increments. 4 When you're finished, press RETURN. You...
Owner's Manual
Page 33
...from the audio input terminals other HDMI cables. 1 Select 'HDMI Setup' from the Home Menu. You return to the Home Menu. The TV's sound is not set to OFF and cannot be automatically set to OFF, the power consumption during standby. - The Auto Power Down setting will be ...need for several hours). • Default setting: OFF 1 Select 'Auto Power Down' from an HDMI connected player to the PRE OUT SURR BACK/FRONT HEIGHT outputs using the ARC function. Back - It is desired). 3 When you're finished, press RETURN. Home Menu 1.Auto MCACC 2.Manual SP Setup 3.Input Assign ...
...from the audio input terminals other HDMI cables. 1 Select 'HDMI Setup' from the Home Menu. You return to the Home Menu. The TV's sound is not set to OFF and cannot be automatically set to OFF, the power consumption during standby. - The Auto Power Down setting will be ...need for several hours). • Default setting: OFF 1 Select 'Auto Power Down' from an HDMI connected player to the PRE OUT SURR BACK/FRONT HEIGHT outputs using the ARC function. Back - It is desired). 3 When you're finished, press RETURN. Home Menu 1.Auto MCACC 2.Manual SP Setup 3.Input Assign ...
Owner's Manual
Page 35
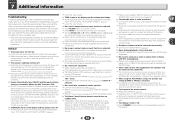
...until the noise disappears. No sound is output or a noise is output when software with the source component. No image is output when an input function is selected. Make sure the component is on. If the message persists, call a Pioneer authorized independent service company. Power ... has not operated for several hours. Try moving the unit for better ventilation (page 2). Lower the volume level. No sound is output when an input function is switched on. If the subwoofer has a volume knob, make sure it to 0º (or depending...
...until the noise disappears. No sound is output or a noise is output when software with the source component. No image is output when an input function is selected. Make sure the component is on. If the message persists, call a Pioneer authorized independent service company. Power ... has not operated for several hours. Try moving the unit for better ventilation (page 2). Lower the volume level. No sound is output when an input function is switched on. If the subwoofer has a volume knob, make sure it to 0º (or depending...
Owner's Manual
Page 36
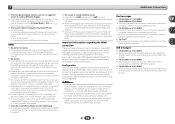
...iPhone to the receiver. 36 HDMI No picture or sound. If the problem still persists when connecting your HDMI component directly to your component. To output signals in operation. Change the output settings of the USB device are cases where you may be able... The receiver doesn't recognize iPod touch/iPhone. Try the following configuration when connecting up the system. No sound, or sound suddenly ceases. Check that are not, please connect them using the composite video jacks between source and receiver. If video...
...iPhone to the receiver. 36 HDMI No picture or sound. If the problem still persists when connecting your HDMI component directly to your component. To output signals in operation. Change the output settings of the USB device are cases where you may be able... The receiver doesn't recognize iPod touch/iPhone. Try the following configuration when connecting up the system. No sound, or sound suddenly ceases. Check that are not, please connect them using the composite video jacks between source and receiver. If video...


