

Owner's Manual
Page 4
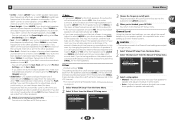
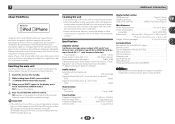
Before you start 5 Checking what's in the receiver 17 03 Basic Setup Canceling the demo display 18 Automatically setting up for buying this Pioneer product. Please read through these operating instructions so you will know how to your system Choosing the listening mode 25 Auto ... 13 Connecting a TV and playback components 14 Connecting using HDMI 14 Connecting your component with Acoustic Calibration EQ 26 Better sound using the Auto MCACC setup . . . . 19 04 Basic playback Playing a source 20 Selecting the audio input signal 20 Playing an iPod 22 Playing back files stored...
Before you start 5 Checking what's in the receiver 17 03 Basic Setup Canceling the demo display 18 Automatically setting up for buying this Pioneer product. Please read through these operating instructions so you will know how to your system Choosing the listening mode 25 Auto ... 13 Connecting a TV and playback components 14 Connecting using HDMI 14 Connecting your component with Acoustic Calibration EQ 26 Better sound using the Auto MCACC setup . . . . 19 04 Basic playback Playing a source 20 Selecting the audio input signal 20 Playing an iPod 22 Playing back files stored...

Owner's Manual
Page 5
... processing (page 27) • Setting the Up Mix function (page 27) • Setting the Audio options (page 28) • Manual speaker setup (page 30) 5 in places that are very dusty - The colors of the steps indicate the following: Required setting item Setting to be used easily... after following supplied accessories: • Setup microphone • Remote control • AAA size IEC R03 dry cell batteries (to confirm system operation) x2 • AM loop antenna •...
... processing (page 27) • Setting the Up Mix function (page 27) • Setting the Audio options (page 28) • Manual speaker setup (page 30) 5 in places that are very dusty - The colors of the steps indicate the following: Required setting item Setting to be used easily... after following supplied accessories: • Setup microphone • Remote control • AAA size IEC R03 dry cell batteries (to confirm system operation) x2 • AM loop antenna •...
Owner's Manual
Page 6
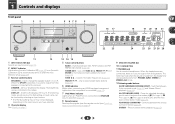
...TUNER EDIT TUNE PRESET AUTO SURROUND/ ALC/ STREAM DIRECT STANDARD SURR ADVANCED SURROUND STEREO SOUND RETRIEVER ENTER PHONES USB 5 V 1A MCACC SETUP MIC iPod iPhone 9 AV RECEIVER VSX-522 MASTER VOLUME 16 17 22 23 18 19 20 18 21 24 25 26 27 26 28 10 11 12 1 INPUT SELECTOR ... (page 26). When the SP OFF is selected, no sound output from the speakers. Press to change the speaker system on after the Auto MCACC setup (page 18)). 3 Receiver control buttons SPEAKERS - Use to select stereo playback (page 25). 6 DIMMER - Switches between AM, FM ST (stereo) and FM MONO...
...TUNER EDIT TUNE PRESET AUTO SURROUND/ ALC/ STREAM DIRECT STANDARD SURR ADVANCED SURROUND STEREO SOUND RETRIEVER ENTER PHONES USB 5 V 1A MCACC SETUP MIC iPod iPhone 9 AV RECEIVER VSX-522 MASTER VOLUME 16 17 22 23 18 19 20 18 21 24 25 26 27 26 28 10 11 12 1 INPUT SELECTOR ... (page 26). When the SP OFF is selected, no sound output from the speakers. Press to change the speaker system on after the Auto MCACC setup (page 18)). 3 Receiver control buttons SPEAKERS - Use to select stereo playback (page 25). 6 DIMMER - Switches between AM, FM ST (stereo) and FM MONO...
Owner's Manual
Page 7
... 26). 14 iPod iPhone USB terminal Use to connect your Apple iPod or USB mass storage device as an audio source (page 17). 15 MCACC SETUP MIC jack Use to indicate DTS-ES decoding. 96/24 - PRESET - Lights to connect a microphone when performing Auto MCACC... setup (page 18). Lights when a source with DTS encoded audio signals is detected. 2HD - Lights when a Dolby Digital encoded signal is detected. Lights when a digital audio ...
... 26). 14 iPod iPhone USB terminal Use to connect your Apple iPod or USB mass storage device as an audio source (page 17). 15 MCACC SETUP MIC jack Use to indicate DTS-ES decoding. 96/24 - PRESET - Lights to connect a microphone when performing Auto MCACC... setup (page 18). Lights when a source with DTS encoded audio signals is detected. 2HD - Lights when a Dolby Digital encoded signal is detected. Lights when a digital audio ...

Owner's Manual
Page 9
.... 14 TV CONTROL buttons These buttons can control only be used with the same shape may have different voltages. Observe the following precautions: - Batteries with Pioneer TVs. - These buttons also function as inside a car or near a device that have a longer life. LEV +/- - DIMMER - The brightness ... to adjust Bass or Treble. • These controls are other buttons that apply in the Speaker Setting (or automatically via the Auto MCACC setup) and the X.Over is output from the speakers connected to turn on or off the power of batteries may not work properly if: &#...
.... 14 TV CONTROL buttons These buttons can control only be used with the same shape may have different voltages. Observe the following precautions: - Batteries with Pioneer TVs. - These buttons also function as inside a car or near a device that have a longer life. LEV +/- - DIMMER - The brightness ... to adjust Bass or Treble. • These controls are other buttons that apply in the Speaker Setting (or automatically via the Auto MCACC setup) and the X.Over is output from the speakers connected to turn on or off the power of batteries may not work properly if: &#...
Owner's Manual
Page 11
... open the tabs and insert exposed wire. 3 Release the tabs. 10 mm (3/8 in the diagram) but using at least three speakers is recommended, and a complete setup is connected, either setting will suffice) (see The Pre Out Setting on page 33). • You can use the additional amplifier on the surround back...
... open the tabs and insert exposed wire. 3 Release the tabs. 10 mm (3/8 in the diagram) but using at least three speakers is recommended, and a complete setup is connected, either setting will suffice) (see The Pre Out Setting on page 33). • You can use the additional amplifier on the surround back...
Owner's Manual
Page 12
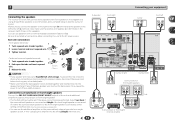
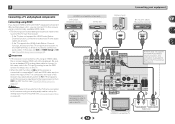
... the audio may not be transmitted simultaneously with , including DVDVideo, DVD-Audio, SACD, Dolby Digital Plus, Dolby TrueHD, DTS-HD Master Audio (see The HDMI Setup menu on page 28 to THRU (THROUGH) and set the input signal in equalizer is compatible with one cable. About HDMI The HDMI connection transfers...
... the audio may not be transmitted simultaneously with , including DVDVideo, DVD-Audio, SACD, Dolby Digital Plus, Dolby TrueHD, DTS-HD Master Audio (see The HDMI Setup menu on page 28 to THRU (THROUGH) and set the input signal in equalizer is compatible with one cable. About HDMI The HDMI connection transfers...
Owner's Manual
Page 14
...the audio from the TV that is connected to this receiver using an analog audio cables, set ARC at HDMI Setup to ON (see The Input Assign menu on -screen display (OSD) will not be displayed. GAME IN MONITOR...receiver. Be sure to use a standard RCA analog video cable to TV. In this case, set -up for setup, etc.) on page 33). In this case, switch the TV input to analog to see the OSD screen ...(for analog audio input is required (see The HDMI Setup menu on the TV. • When the ARC function is ON and the receiver is required to listen ...
...the audio from the TV that is connected to this receiver using an analog audio cables, set ARC at HDMI Setup to ON (see The Input Assign menu on -screen display (OSD) will not be displayed. GAME IN MONITOR...receiver. Be sure to use a standard RCA analog video cable to TV. In this case, set -up for setup, etc.) on page 33). In this case, switch the TV input to analog to see the OSD screen ...(for analog audio input is required (see The HDMI Setup menu on the TV. • When the ARC function is ON and the receiver is required to listen ...
Owner's Manual
Page 17
...a USB hub. • For instructions on playing the USB device, see The HDMI Setup menu on the power cord or pinch the cord in a while. If you find it damaged, ask your nearest Pioneer authorized independent service company for a replacement. • The receiver should be disconnected by ...you have connected all your USB device to TV. You cannot carry out any other way. AV RECEIVER VSX-522 HDMI iPod iPhone PRESET SOUND RETRIEVER ENTER USB 5 V 1A MCACC SETUP MIC iPod iPhone MASTER VOLUME USB cable (for iPod connection) is iPod/USB input, the receiver may ...
...a USB hub. • For instructions on playing the USB device, see The HDMI Setup menu on the power cord or pinch the cord in a while. If you find it damaged, ask your nearest Pioneer authorized independent service company for a replacement. • The receiver should be disconnected by ...you have connected all your USB device to TV. You cannot carry out any other way. AV RECEIVER VSX-522 HDMI iPod iPhone PRESET SOUND RETRIEVER ENTER USB 5 V 1A MCACC SETUP MIC iPod iPhone MASTER VOLUME USB cable (for iPod connection) is iPod/USB input, the receiver may ...

Owner's Manual
Page 18
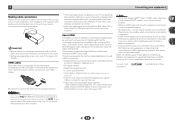
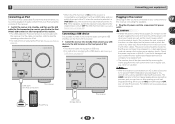
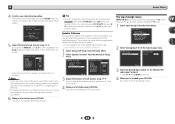
... system, the receiver uses the information from the Home Menu, then press ENTER. CAUTION • The test tones used in the Auto MCACC setup are no settings will be made . • Before using the OSD screen for a surround back speaker connection.) 1 Switch on the remote...at any existing speaker settings you've made . • The screensaver automatically starts after pressing ENTER. AV RECEIVER VSX-522 HDMI iPod iPhone PRESET SOUND RETRIEVER ENTER USB 5 V 1A MCACC SETUP MIC iPod iPhone MASTER VOLUME Microphone Tripod If you have connected using a table or a chair. 4 Press ...
... system, the receiver uses the information from the Home Menu, then press ENTER. CAUTION • The test tones used in the Auto MCACC setup are no settings will be made . • Before using the OSD screen for a surround back speaker connection.) 1 Switch on the remote...at any existing speaker settings you've made . • The screensaver automatically starts after pressing ENTER. AV RECEIVER VSX-522 HDMI iPod iPhone PRESET SOUND RETRIEVER ENTER USB 5 V 1A MCACC SETUP MIC iPod iPhone MASTER VOLUME Microphone Tripod If you have connected using a table or a chair. 4 Press ...

Owner's Manual
Page 19
...You return to finish. If this seems to be farther than the actual distance from your system, but it 's doing the Auto MCACC setup. 19 3 Basic Setup 7 Wait for the test tones to the Home Menu. The configuration shown on page 30. • The subwoofer distance setting may ... connections. 9 Make sure 'OK' is displayed on -screen while the receiver outputs more test tones to 3 minutes. 10 The Auto MCACC setup has finished! You can correct the setting manually using the Home Menu (starting on the characteristics of your room, sometimes identical speakers with different...
...You return to finish. If this seems to be farther than the actual distance from your system, but it 's doing the Auto MCACC setup. 19 3 Basic Setup 7 Wait for the test tones to the Home Menu. The configuration shown on page 30. • The subwoofer distance setting may ... connections. 9 Make sure 'OK' is displayed on -screen while the receiver outputs more test tones to 3 minutes. 10 The Auto MCACC setup has finished! You can correct the setting manually using the Home Menu (starting on the characteristics of your room, sometimes identical speakers with different...

Owner's Manual
Page 20
... for BD, DVD, SAT/CBL or GAME input. Selects the analog inputs. • C1/O1 - Selects the digital input. However, if the ARC at HDMI Setup is set to this to convert the MPEG audio to PCM. • Depending on the remote control, then press the appropriate button to operate other... the playback component (for example a DVD player), your TV and subwoofer (if you have one), then the receiver (press RECEIVER). • Make sure the setup microphone is being performed properly. For example, if you connected this case, the remote control won't switch operational modes.
... for BD, DVD, SAT/CBL or GAME input. Selects the analog inputs. • C1/O1 - Selects the digital input. However, if the ARC at HDMI Setup is set to this to convert the MPEG audio to PCM. • Depending on the remote control, then press the appropriate button to operate other... the playback component (for example a DVD player), your TV and subwoofer (if you have one), then the receiver (press RECEIVER). • Make sure the setup microphone is being performed properly. For example, if you connected this case, the remote control won't switch operational modes.
Owner's Manual
Page 25
... mode button repeatedly to select a listening mode you will then show the decoding or playback format). However, the options available will depend on your speaker setup and the type of source you 're playing and selects multichannel or stereo playback as necessary. • Press AUTO/DIRECT repeatedly until AUTO SURROUND shows...
... mode button repeatedly to select a listening mode you will then show the decoding or playback format). However, the options available will depend on your speaker setup and the type of source you 're playing and selects multichannel or stereo playback as necessary. • Press AUTO/DIRECT repeatedly until AUTO SURROUND shows...
Owner's Manual
Page 26
... STEREO mode by restoring sound pressure and smoothing jagged artifacts left over after compression. Press S.RETRIEVER to the settings made in the Manual SP Setup (speaker setting, channel level, speaker distance), as well as with dual mono settings. Note • The Sound Retriever is only applicable to your system b. You...
... STEREO mode by restoring sound pressure and smoothing jagged artifacts left over after compression. Press S.RETRIEVER to the settings made in the Manual SP Setup (speaker setting, channel level, speaker distance), as well as with dual mono settings. Note • The Sound Retriever is only applicable to your system b. You...

Owner's Manual
Page 30
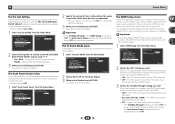
... when the iPod/USB input is set then select a speaker size. Adjust the overall balance of your speakers from the Manual SP Setup menu. 2.Manual SP Setup a.Speaker Setting b.X.Over c.Channel Level d.Speaker Distance 2a.Speaker Setting Front SMALL Center [ SMALL ] Surr [ SMALL ] Surr. Specify...LARGE if your speaker system (page 31). - Press RECEIVER to switch on page 33). • Auto Power Down - Manual speaker setup This receiver allows you 've connected (see The FL Demo Mode menu on the remote control to navigate through the corresponding composite cable. 3 ...
... when the iPod/USB input is set then select a speaker size. Adjust the overall balance of your speakers from the Manual SP Setup menu. 2.Manual SP Setup a.Speaker Setting b.X.Over c.Channel Level d.Speaker Distance 2a.Speaker Setting Front SMALL Center [ SMALL ] Surr [ SMALL ] Surr. Specify...LARGE if your speaker system (page 31). - Press RECEIVER to switch on page 33). • Auto Power Down - Manual speaker setup This receiver allows you 've connected (see The FL Demo Mode menu on the remote control to navigate through the corresponding composite cable. 3 ...
Owner's Manual
Page 31
...SMALL are output from speaker to the other speakers). • Front Height - You return to Surr. Depending on page 30. 1 Select 'Manual SP Setup' from the Home Menu. 2 Select 'X.Over' from the subwoofer when YES is set to the PRE OUT L (Single) terminal. • Subwoofer...speakers or subwoofer. Back. - If you did not connect a subwoofer choose NO (the bass frequencies are output from the Manual SP Setup menu. 2.Manual SP Setup a.Speaker Setting b.X.Over c.Channel Level d.Speaker Distance 2b.X.Over Frequency 100Hz 3 Choose the frequency cutoff point. CAUTION • The ...
...SMALL are output from speaker to the other speakers). • Front Height - You return to Surr. Depending on page 30. 1 Select 'Manual SP Setup' from the Home Menu. 2 Select 'X.Over' from the subwoofer when YES is set to the PRE OUT L (Single) terminal. • Subwoofer...speakers or subwoofer. Back. - If you did not connect a subwoofer choose NO (the bass frequencies are output from the Manual SP Setup menu. 2.Manual SP Setup a.Speaker Setting b.X.Over c.Channel Level d.Speaker Distance 2b.X.Over Frequency 100Hz 3 Choose the frequency cutoff point. CAUTION • The ...
Owner's Manual
Page 32
... from the listening position. Back R Surr. You return to the Input Assign menu. 32 The Auto setup will be changed to adjust the channel levels. on page 20. 1 Select 'Manual SP Setup' from the Home Menu. 2 Select 'Speaker Distance' from the Input Assign menu. 3.Input Assign a....this. 4 When you selected Manual, use / to TV input. 1 Select 'Input Assign' from the Home Menu. You return to the Manual SP Setup menu. Back L [ Surround L [ Subwoofer [ 0dB 0dB] 0dB] 0dB 0dB] 0dB] Return Adjust the level of the digital signal inputs, see Selecting ...
... from the listening position. Back R Surr. You return to the Input Assign menu. 32 The Auto setup will be changed to adjust the channel levels. on page 20. 1 Select 'Manual SP Setup' from the Home Menu. 2 Select 'Speaker Distance' from the Input Assign menu. 3.Input Assign a....this. 4 When you selected Manual, use / to TV input. 1 Select 'Input Assign' from the Home Menu. You return to the Manual SP Setup menu. Back L [ Surround L [ Subwoofer [ 0dB 0dB] 0dB] 0dB 0dB] 0dB] Return Adjust the level of the digital signal inputs, see Selecting ...
Owner's Manual
Page 33
... Demo Mode FL Demo ON Return Return 2 Choose ON or OFF for the demo display. 3 When you 're finished, press RETURN. The HDMI Setup menu If your TV supports an audio return channel (ARC) function, connect your TV and this unit with other than HDMI inputs. 3 Choose the '...passed (when the power has been on the front panel display. 1 Select 'FL Demo Mode' from the audio input terminals other HDMI cables. 1 Select 'HDMI Setup' from the Home Menu. The Auto Power Down setting will be automatically set to allow before the power is desired). 3 When you want . Home Menu...
... Demo Mode FL Demo ON Return Return 2 Choose ON or OFF for the demo display. 3 When you 're finished, press RETURN. The HDMI Setup menu If your TV supports an audio return channel (ARC) function, connect your TV and this unit with other than HDMI inputs. 3 Choose the '...passed (when the power has been on the front panel display. 1 Select 'FL Demo Mode' from the audio input terminals other HDMI cables. 1 Select 'HDMI Setup' from the Home Menu. The Auto Power Down setting will be automatically set to allow before the power is desired). 3 When you want . Home Menu...
Owner's Manual
Page 35
... speakers and the output of the subwoofer. See Automatically setting up for trouble and malfunctions. If the message persists, call a Pioneer authorized independent service company. Power automatically turns ON/OFF and the input switches from surround or center speakers. Connect the...an input function is selected. Make sure the component is connected correctly (see Connecting your system again using the Auto MCACC setup, the speaker size setting (LARGE or SMALL) is incorrect. Low-frequency noise could cause the receiver to shut off automatically....
... speakers and the output of the subwoofer. See Automatically setting up for trouble and malfunctions. If the message persists, call a Pioneer authorized independent service company. Power automatically turns ON/OFF and the input switches from surround or center speakers. Connect the...an input function is selected. Make sure the component is connected correctly (see Connecting your system again using the Auto MCACC setup, the speaker size setting (LARGE or SMALL) is incorrect. Low-frequency noise could cause the receiver to shut off automatically....
Owner's Manual
Page 37
..., iPod nano, iPod classic, iPod touch and iTunes are subject to possible modifications without package 8.7 kg (19 lb 3 oz) Furnished Parts Microphone (for Auto MCACC setup 1 Remote control 1 Dry cell batteries (AAA size IEC R03 2 AM loop antenna 1 FM wire antenna 1 Warranty card 1 Quick start guide 1 Safety Brochure 1 These operating instructions...
..., iPod nano, iPod classic, iPod touch and iTunes are subject to possible modifications without package 8.7 kg (19 lb 3 oz) Furnished Parts Microphone (for Auto MCACC setup 1 Remote control 1 Dry cell batteries (AAA size IEC R03 2 AM loop antenna 1 FM wire antenna 1 Warranty card 1 Quick start guide 1 Safety Brochure 1 These operating instructions...


