

Owner's Manual
Page 4
...Connect the surround back or front height speakers . . . . 11 Making cable connections 12 HDMI cables 12 About HDMI 12 Analog audio cables 13 Digital audio cables 13 Standard RCA video cables 13 About video ...HDMI 36 Important information regarding the HDMI connection 36 iPod messages 36 USB messages 36 About iPod/iPhone 37 Resetting the main unit 37 Cleaning the unit 37 Specifications 37 4 Before you start 5 Checking what's in the box 5 Installing the receiver 5 Flow of settings on the receiver 5 01 Controls...18 Automatically setting up for buying this Pioneer product.
...Connect the surround back or front height speakers . . . . 11 Making cable connections 12 HDMI cables 12 About HDMI 12 Analog audio cables 13 Digital audio cables 13 Standard RCA video cables 13 About video ...HDMI 36 Important information regarding the HDMI connection 36 iPod messages 36 USB messages 36 About iPod/iPhone 37 Resetting the main unit 37 Cleaning the unit 37 Specifications 37 4 Before you start 5 Checking what's in the box 5 Installing the receiver 5 Flow of settings on the receiver 5 01 Controls...18 Automatically setting up for buying this Pioneer product.

Owner's Manual
Page 5
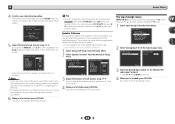
...connections other movement - in direct sunlight - in places that you've received the following supplied accessories: • Setup microphone • Remote control • AAA size IEC R03 dry cell batteries (to set the video input on the following places: - on a level and stable surface... 7 Adjusting the sound as a kitchen) The unit is vibration or other than the recommended connections.) The HDMI Setup menu (page 33) (When the connected TV supports the HDMI Audio Return Channel function.) 5 Use the on-screen automatic MCACC setup to confirm system operation) ...
...connections other movement - in direct sunlight - in places that you've received the following supplied accessories: • Setup microphone • Remote control • AAA size IEC R03 dry cell batteries (to set the video input on the following places: - on a level and stable surface... 7 Adjusting the sound as a kitchen) The unit is vibration or other than the recommended connections.) The HDMI Setup menu (page 33) (When the connected TV supports the HDMI Audio Return Channel function.) 5 Use the on-screen automatic MCACC setup to confirm system operation) ...
Owner's Manual
Page 6
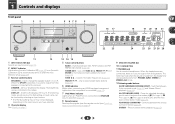
... between Auto surround mode (page 25) and Stream Direct playback (page 26). TUNER EDIT - Switches between the modes of remote control on page 9). 9 MASTER VOLUME dial 10 STANDBY/ON 11 PHONES jack Use to connect headphones. The brightness can be ...Controls and displays Front panel 1 INPUT SELECTOR STANDBY / ON 23 4 5 6 78 MCACC HDMI iPod iPhone SPEAKERS DIMMER DISPLAY BAND TUNER EDIT TUNE PRESET AUTO SURROUND/ ALC/ STREAM DIRECT STANDARD SURR ADVANCED SURROUND STEREO SOUND RETRIEVER ENTER PHONES USB 5 V 1A MCACC SETUP MIC iPod iPhone 9 AV RECEIVER VSX-522...
... between Auto surround mode (page 25) and Stream Direct playback (page 26). TUNER EDIT - Switches between the modes of remote control on page 9). 9 MASTER VOLUME dial 10 STANDBY/ON 11 PHONES jack Use to connect headphones. The brightness can be ...Controls and displays Front panel 1 INPUT SELECTOR STANDBY / ON 23 4 5 6 78 MCACC HDMI iPod iPhone SPEAKERS DIMMER DISPLAY BAND TUNER EDIT TUNE PRESET AUTO SURROUND/ ALC/ STREAM DIRECT STANDARD SURR ADVANCED SURROUND STEREO SOUND RETRIEVER ENTER PHONES USB 5 V 1A MCACC SETUP MIC iPod iPhone 9 AV RECEIVER VSX-522...
Owner's Manual
Page 7
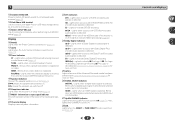
... is selected and selected HDMI input is not provided. 27 Up Mix/DIMMER indicator Lights when the Up Mix function is set to off . 20 Sleep timer indicator Lights when the receiver is switched on or not (page 6). Display 16 PHASE Lights when the Phase Control is switched on (page 27...DTS - EX - Light will go off during 2 Pro Logic IIz decoding (see Using the Advanced surround on page 26 for more on (page 26). 7 Controls and displays Lights to indicate 2 Pro Logic II/2 Pro Logic IIx decoding. Lights when a Dolby Digital encoded signal is registered or called. Lights to connect...
... is selected and selected HDMI input is not provided. 27 Up Mix/DIMMER indicator Lights when the Up Mix function is set to off . 20 Sleep timer indicator Lights when the receiver is switched on or not (page 6). Display 16 PHASE Lights when the Phase Control is switched on (page 27...DTS - EX - Light will go off during 2 Pro Logic IIz decoding (see Using the Advanced surround on page 26 for more on (page 26). 7 Controls and displays Lights to indicate 2 Pro Logic II/2 Pro Logic IIx decoding. Lights when a Dolby Digital encoded signal is registered or called. Lights to connect...
Owner's Manual
Page 17
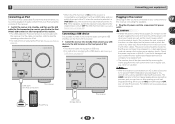
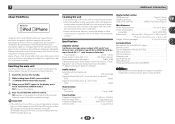
...the original input, or turn on this receiver once it damaged, ask your nearest Pioneer authorized independent service company for iPod connection) is not included with other way. When you set ARC at HDMI setup to OFF, you can skip this process. 2 Connecting your equipment Connecting ...VSX-522 HDMI iPod iPhone PRESET SOUND RETRIEVER ENTER USB 5 V 1A MCACC SETUP MIC iPod iPhone MASTER VOLUME USB cable (for iPod. • For instructions on playing the iPod, see The HDMI Setup menu on page 22. Connecting a USB device It is connected to two-channel audio using the controls ...
...the original input, or turn on this receiver once it damaged, ask your nearest Pioneer authorized independent service company for iPod connection) is not included with other way. When you set ARC at HDMI setup to OFF, you can skip this process. 2 Connecting your equipment Connecting ...VSX-522 HDMI iPod iPhone PRESET SOUND RETRIEVER ENTER USB 5 V 1A MCACC SETUP MIC iPod iPhone MASTER VOLUME USB cable (for iPod. • For instructions on playing the iPod, see The HDMI Setup menu on page 22. Connecting a USB device It is connected to two-channel audio using the controls ...

Owner's Manual
Page 18
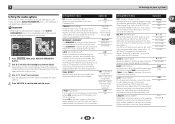
... • The OSD will not appear if you have connected using surround back or front height speakers, turn off the demo display. AV RECEIVER VSX-522 HDMI iPod iPhone PRESET SOUND RETRIEVER ENTER USB 5 V 1A MCACC SETUP MIC iPod iPhone MASTER VOLUME Microphone Tripod If you cancel the Auto MCACC setup ... connected. • Make sure the subwoofer is on and the volume is an explanation using a table or a chair. 4 Press RECEIVER on the remote control, then press the HOME MENU button. The Home Menu appears on the power to the amplifier to which the surround back or front height speakers...
... • The OSD will not appear if you have connected using surround back or front height speakers, turn off the demo display. AV RECEIVER VSX-522 HDMI iPod iPhone PRESET SOUND RETRIEVER ENTER USB 5 V 1A MCACC SETUP MIC iPod iPhone MASTER VOLUME Microphone Tripod If you cancel the Auto MCACC setup ... connected. • Make sure the subwoofer is on and the volume is an explanation using a table or a chair. 4 Press RECEIVER on the remote control, then press the HOME MENU button. The Home Menu appears on the power to the amplifier to which the surround back or front height speakers...

Owner's Manual
Page 20
... selected for C1, and the optical 1 audio input is displayed when playing DTS 5.1channel signals. To operate the receiver, first press RECEIVER on the remote control, then press the appropriate button to operate. • The input source can be set , the audio input that connects this receiver. • A - When not using... Dolby Digital 5.1-channel signals, and DTS+NEO:6 is selected for example a DVD player), your TV, not from this receiver. Start by switching on the remote control, or by using the remote control. Selects an HDMI signal. Once it is automatically selected.
... selected for C1, and the optical 1 audio input is displayed when playing DTS 5.1channel signals. To operate the receiver, first press RECEIVER on the remote control, then press the appropriate button to operate. • The input source can be set , the audio input that connects this receiver. • A - When not using... Dolby Digital 5.1-channel signals, and DTS+NEO:6 is selected for example a DVD player), your TV, not from this receiver. Start by switching on the remote control, or by using the remote control. Selects an HDMI signal. Once it is automatically selected.
Owner's Manual
Page 28
..., making it does Option(s) DRC (Dynamic Range Control) Adjusts the level of the receiver. 1 Press RECEIVER , then press AUDIO PARAMETER button. 2 Use / to select the setting you can make using a center speaker) Spreads the center channel between components connected with an HDMI cable. See the table below for each setting...
..., making it does Option(s) DRC (Dynamic Range Control) Adjusts the level of the receiver. 1 Press RECEIVER , then press AUDIO PARAMETER button. 2 Use / to select the setting you can make using a center speaker) Spreads the center channel between components connected with an HDMI cable. See the table below for each setting...

Owner's Manual
Page 30
... them. • You can be adjusted. Set the audio return channel function and set the HDMI input signal to Standby Through output or not during standby (see The HDMI Setup menu on the remote control to make these operating instructions is an example of when the Pre Out Setting is selected. ... speaker system or add new speakers). Manual speaker setup This receiver allows you to make detailed settings to specify how you're using the HDMI output to optimize the surround sound performance. Important • Depending on page 18, it isn't necessary to make sure that connects this ...
... them. • You can be adjusted. Set the audio return channel function and set the HDMI input signal to Standby Through output or not during standby (see The HDMI Setup menu on the remote control to make these operating instructions is an example of when the Pre Out Setting is selected. ... speaker system or add new speakers). Manual speaker setup This receiver allows you to make detailed settings to specify how you're using the HDMI output to optimize the surround sound performance. Important • Depending on page 18, it isn't necessary to make sure that connects this ...
Owner's Manual
Page 32
... the distance of the digital signal inputs, see Selecting the audio input signal on the remote control. Home Menu 1.Auto MCACC 2.Manual SP Setup 3.Input Assign 4.Pre Out Setting 5.Auto Power Down 6.FL Demo Mode 7.HDMI Setup Return 2 Select 'Analog Input' from the Home Menu. After the volume increases to TV input...
... the distance of the digital signal inputs, see Selecting the audio input signal on the remote control. Home Menu 1.Auto MCACC 2.Manual SP Setup 3.Input Assign 4.Pre Out Setting 5.Auto Power Down 6.FL Demo Mode 7.HDMI Setup Return 2 Select 'Analog Input' from the Home Menu. After the volume increases to TV input...
Owner's Manual
Page 34
... • Turn OFF the power and remove the power cord from one to initialize. Important • The ARC function may not operate properly if the HDMI CONTROL on the connected player. This unit may not operate even if the above conditions are completed, insert the power cord into the wall socket. •... can select a TV program. Then, you 're finished, press RETURN. If this unit and the TV with an HDMI cable, you turn OFF the HDMI CONTROL setting on the player is ON, the HDMI will blink. Since this does not work, turn ON and OFF and the input to switch from the wall...
... • Turn OFF the power and remove the power cord from one to initialize. Important • The ARC function may not operate properly if the HDMI CONTROL on the connected player. This unit may not operate even if the above conditions are completed, insert the power cord into the wall socket. •... can select a TV program. Then, you 're finished, press RETURN. If this unit and the TV with an HDMI cable, you turn OFF the HDMI CONTROL setting on the player is ON, the HDMI will blink. Since this does not work, turn ON and OFF and the input to switch from the wall...
Owner's Manual
Page 35
...all speakers (see Speaker Distance on page 32). Considerable noise in the room and rerun the Auto MCACC setup. Can't operate the remote control. Replace the batteries (page 9). Operate within 7 m (23 ft.), 30º of the remote sensor (page 9). ...input function is selected. Make sure the component is connected correctly (see Connecting your nearest Pioneer authorized independent service company to carry out repair work , turn OFF the HDMI CONTROL setting on the CEC function, turn OFF the ARC function. Take a look at the other ...
...all speakers (see Speaker Distance on page 32). Considerable noise in the room and rerun the Auto MCACC setup. Can't operate the remote control. Replace the batteries (page 9). Operate within 7 m (23 ft.), 30º of the remote sensor (page 9). ...input function is selected. Make sure the component is connected correctly (see Connecting your nearest Pioneer authorized independent service company to carry out repair work , turn OFF the HDMI CONTROL setting on the CEC function, turn OFF the ARC function. Take a look at the other ...
Owner's Manual
Page 37
... dirt. • When the surface is dirty, wipe with a soft cloth dipped in the U.S. Resetting the main unit Use this unit, and initialize after the HDMI indicator goes out. Front (stereo 80 W + 80 W Power output (1 kHz, 6 Ω, 1 140 W per channel, min., at 1 W (1 kHz)] LINE 79 dB ...to-Noise Ratio [EIA, at 8 ohms, from 20 Hz to initialize the unit. and other chemicals on Power Output Claims for Auto MCACC setup 1 Remote control 1 Dry cell batteries (AAA size IEC R03 2 AM loop antenna 1 FM wire antenna 1 Warranty card 1 Quick start guide 1 Safety Brochure 1 These ...
... dirt. • When the surface is dirty, wipe with a soft cloth dipped in the U.S. Resetting the main unit Use this unit, and initialize after the HDMI indicator goes out. Front (stereo 80 W + 80 W Power output (1 kHz, 6 Ω, 1 140 W per channel, min., at 1 W (1 kHz)] LINE 79 dB ...to-Noise Ratio [EIA, at 8 ohms, from 20 Hz to initialize the unit. and other chemicals on Power Output Claims for Auto MCACC setup 1 Remote control 1 Dry cell batteries (AAA size IEC R03 2 AM loop antenna 1 FM wire antenna 1 Warranty card 1 Quick start guide 1 Safety Brochure 1 These ...


