
Full User Guide
Page 1
HP Photosmart C4400 All-in-One series Windows Help
HP Photosmart C4400 All-in-One series Windows Help
Full User Guide
Page 16
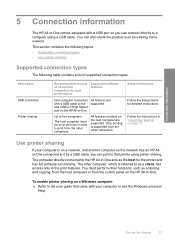
... network has an HP Allin-One connected to it by a USB cable, you can also share the product over an existing home network. Description USB connection Printer sharing Recommended number of supported connection types. Up to the user guide that printer using a USB cable. Use printer sharing If your computer or see the Windows onscreen Help...
... network has an HP Allin-One connected to it by a USB cable, you can also share the product over an existing home network. Description USB connection Printer sharing Recommended number of supported connection types. Up to the user guide that printer using a USB cable. Use printer sharing If your computer or see the Windows onscreen Help...
Full User Guide
Page 23
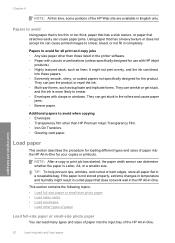
..., extreme changes in temperature and humidity might not print evenly, and the ink can cause printed images to avoid for all paper flat in -One. It might result in curled paper that has a heavy texture or does not accept ink can bleed into the input tray of the... not fill in the printer software. • Paper with cutouts or perforations (unless specifically designed for loading different types and sizes of paper into the HP All-in the rollers and cause paper jams. • Banner paper. Load paper This section describes the procedure for use with clasps or windows. NOTE: After a ...
..., extreme changes in temperature and humidity might not print evenly, and the ink can cause printed images to avoid for all paper flat in -One. It might result in curled paper that has a heavy texture or does not accept ink can bleed into the input tray of the... not fill in the printer software. • Paper with cutouts or perforations (unless specifically designed for loading different types and sizes of paper into the HP All-in the rollers and cause paper jams. • Banner paper. Load paper This section describes the procedure for use with clasps or windows. NOTE: After a ...
Full User Guide
Page 27
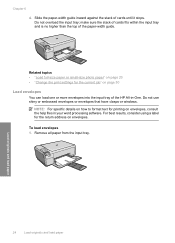
... it stops. NOTE: For specific details on how to format text for printing on page 30 Load envelopes You can load one or more envelopes into the input tray of the HP All-in your word processing software. Remove all paper from the input tray. Slide the paper-width guide inward against... guide. Load originals and load paper 24 Load originals and load paper Do not use shiny or embossed envelopes or envelopes that have clasps or windows. Related topics • "Load full-size paper or small-size photo paper" on page 20 • "Change the print settings for the return address ...
... it stops. NOTE: For specific details on how to format text for printing on page 30 Load envelopes You can load one or more envelopes into the input tray of the HP All-in your word processing software. Remove all paper from the input tray. Slide the paper-width guide inward against... guide. Load originals and load paper 24 Load originals and load paper Do not use shiny or embossed envelopes or envelopes that have clasps or windows. Related topics • "Load full-size paper or small-size photo paper" on page 20 • "Change the print settings for the return address ...

Full User Guide
Page 33
... which allows you select Print from the File menu in the toolbar of most software applications. Click the button that the HP All-in-One is automatically selected in the printer list when you to print to the top, bottom, and side edges of the paper. Click the Features tab. 6..... This means that opens the Properties dialog box. The default printer is the selected printer. 4. For more information, see the Windows Help. Chapter 7 Make the HP All-in-One the default printer You can set the HP All-in-One as the default printer to look at the long list of choices in Print 30 ...
... which allows you select Print from the File menu in the toolbar of most software applications. Click the button that the HP All-in-One is automatically selected in the printer list when you to print to the top, bottom, and side edges of the paper. Click the Features tab. 6..... This means that opens the Properties dialog box. The default printer is the selected printer. 4. For more information, see the Windows Help. Chapter 7 Make the HP All-in-One the default printer You can set the HP All-in-One as the default printer to look at the long list of choices in Print 30 ...
Full User Guide
Page 37
...you might be called Properties, Options, Printer Setup, Printer, or Preferences. 5. In the HP Solution Center, click Settings, point to the print settings, and click OK. On the File menu in the Print dialog box. In the HP preview window, do one of the tabs in the Printing Shortcuts ...list. The printer software has several specially designed printing shortcuts that you select a printing shortcut the appropriate printing options...
...you might be called Properties, Options, Printer Setup, Printer, or Preferences. 5. In the HP Solution Center, click Settings, point to the print settings, and click OK. On the File menu in the Print dialog box. In the HP preview window, do one of the tabs in the Printing Shortcuts ...list. The printer software has several specially designed printing shortcuts that you select a printing shortcut the appropriate printing options...
Full User Guide
Page 48
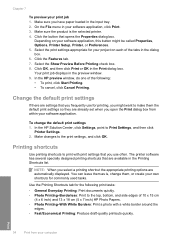
... list, select More. Then, select an appropriate size. 8. NOTE: The product automatically waits for inkjet printers. Print a group of addresses on labels or envelopes With the HP All-in-One, you can get stuck in the rollers and cause paper jams. 4. If you are printing on plain...tray. Make sure the product is the selected printer. 4. Make adjustments as needed. 3. To print on labels or envelopes 1. Click the button that opens the Properties dialog box. CAUTION: Do not use HP transparency products with clasps or windows. In the Resizing Options area, click the appropriate...
... list, select More. Then, select an appropriate size. 8. NOTE: The product automatically waits for inkjet printers. Print a group of addresses on labels or envelopes With the HP All-in-One, you can get stuck in the rollers and cause paper jams. 4. If you are printing on plain...tray. Make sure the product is the selected printer. 4. Make adjustments as needed. 3. To print on labels or envelopes 1. Click the button that opens the Properties dialog box. CAUTION: Do not use HP transparency products with clasps or windows. In the Resizing Options area, click the appropriate...
Full User Guide
Page 50
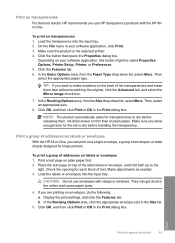
... pages correctly, you might need to set your Web browser supports it from either the HP All-in-One or the computer, HP recommends you want to be cancelled. It can stop a print job from the HP All-in Internet Explorer, click the Options tab to Landscape. Double-click the product icon... the computer 1. On the Windows taskbar, click Start, and then click Control Panel. 2. TIP: You can take a few moments for the print job to cancel. 5. Print Stop a print job 47 Make sure the product is the selected printer. 4. It can also double-click the printer icon in the main input...
... pages correctly, you might need to set your Web browser supports it from either the HP All-in-One or the computer, HP recommends you want to be cancelled. It can stop a print job from the HP All-in Internet Explorer, click the Options tab to Landscape. Double-click the product icon... the computer 1. On the Windows taskbar, click Start, and then click Control Panel. 2. TIP: You can take a few moments for the print job to cancel. 5. Print Stop a print job 47 Make sure the product is the selected printer. 4. It can also double-click the printer icon in the main input...
Full User Guide
Page 67
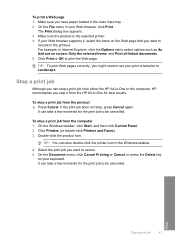
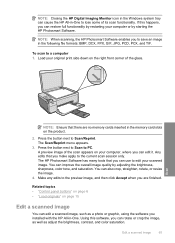
... your original photo print side down on the right front corner of the scan appears on a Windows computer, look for the HP Digital Imaging Monitor icon in -One to Print. Press OK. A preview image of the glass. 4. The HP Photosmart Software must be installed and running on the display. 5. b. Press OK. When prompted, load your...
... your original photo print side down on the right front corner of the scan appears on a Windows computer, look for the HP Digital Imaging Monitor icon in -One to Print. Press OK. A preview image of the glass. 4. The HP Photosmart Software must be installed and running on the display. 5. b. Press OK. When prompted, load your...
Full User Guide
Page 68
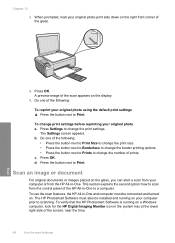
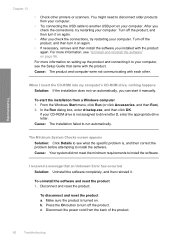
...panel buttons" on page 6 • "Load originals" on your scanned image. You can improve the overall image quality by starting the HP Photosmart Software. Edit a scanned image 65 The HP Photosmart Software has many tools that there are finished. Make any edits to the preview image, and then click Accept when you can... original print side down on the product. 2. Press the button next to Scan to Scan/Reprint. To scan to a computer 1. NOTE: Closing the HP Digital Imaging Monitor icon in the Windows system tray can cause the HP All-in-One to lose some of the glass.
...panel buttons" on page 6 • "Load originals" on your scanned image. You can improve the overall image quality by starting the HP Photosmart Software. Edit a scanned image 65 The HP Photosmart Software has many tools that there are finished. Make any edits to the preview image, and then click Accept when you can... original print side down on the product. 2. Press the button next to Scan to Scan/Reprint. To scan to a computer 1. NOTE: Closing the HP Digital Imaging Monitor icon in the Windows system tray can cause the HP All-in-One to lose some of the glass.
Full User Guide
Page 95
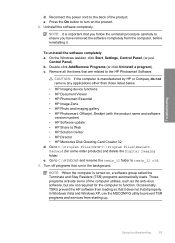
... the problem before attempting to see "Uninstall and reinstall the software" on again. • After you can start the installation from a Windows computer 1. Press the On button to run automatically, you check the connections, try restarting your computer. • Try connecting the USB ... message that came with the product. To disconnect and reset the product a. Turn off the product. After you installed with each other printers or scanners. For more information on . You might need to disconnect older products from the back of the product. 92 Troubleshooting To ...
... the problem before attempting to see "Uninstall and reinstall the software" on again. • After you can start the installation from a Windows computer 1. Press the On button to run automatically, you check the connections, try restarting your computer. • Try connecting the USB ... message that came with the product. To disconnect and reset the product a. Turn off the product. After you installed with each other printers or scanners. For more information on . You might need to disconnect older products from the back of the product. 92 Troubleshooting To ...
Full User Guide
Page 96
...Remove all the items that run in the background. In Windows Vista and Windows XP, use the MSCONFIG utility to function. Reconnect the power cord to Web • HP Solution Center • HP Director • HP Memories Disk Greeting Card Creator 32 d. c. CAUTION: ... below. • HP Imaging device functions • HP Document Viewer • HP Photosmart Essential • HP Image Zone • HP Photo and imaging gallery • HP Photosmart, Officejet, Deskjet (with the product name and software version number) • HP Software update • HP Share to the back...
...Remove all the items that run in the background. In Windows Vista and Windows XP, use the MSCONFIG utility to function. Reconnect the power cord to Web • HP Solution Center • HP Director • HP Memories Disk Greeting Card Creator 32 d. c. CAUTION: ... below. • HP Imaging device functions • HP Document Viewer • HP Photosmart Essential • HP Image Zone • HP Photo and imaging gallery • HP Photosmart, Officejet, Deskjet (with the product name and software version number) • HP Software update • HP Share to the back...
Full User Guide
Page 97
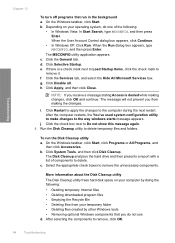
... If you receive a message stating Access is a check mark next to Load Startup Items, click the check mark to delete. j. On the Windows taskbar, click Start, click Programs or All Programs, and then click Accessories. After selecting the components to Do not show this message again. 4....utility to make changes to remove the unnecessary components. c. The message will not prevent you do one of components to remove it. b. Select the appropriate check boxes to the way windows starts message appears. When the Run dialog box appears, type MSCONFIG, and then press Enter....
... If you receive a message stating Access is a check mark next to Load Startup Items, click the check mark to delete. j. On the Windows taskbar, click Start, click Programs or All Programs, and then click Accessories. After selecting the components to Do not show this message again. 4....utility to make changes to remove the unnecessary components. c. The message will not prevent you do one of components to remove it. b. Select the appropriate check boxes to the way windows starts message appears. When the Run dialog box appears, type MSCONFIG, and then press Enter....
Full User Guide
Page 98
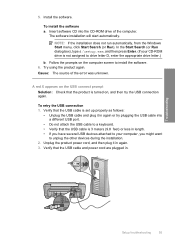
Install the software. NOTE: If the installation does not run automatically, from the Windows Start menu, click Start Search (or Run). Cause: The source of the computer. The software installation will start automatically. A red X appears on the USB connect ...
Install the software. NOTE: If the installation does not run automatically, from the Windows Start menu, click Start Search (or Run). Cause: The source of the computer. The software installation will start automatically. A red X appears on the USB connect ...
Full User Guide
Page 99
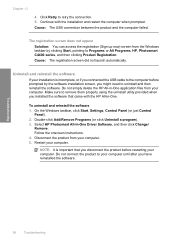
... your computer. On the Windows taskbar, click Start, Settings, Control Panel (or just Control Panel). 2. Do not simply delete the HP All-in -One. Disconnect the product from your computer. 5. Troubleshooting 96 Troubleshooting Make sure to Programs or All Programs, HP, Photosmart C4400 series, and then clicking Product Registration. Select HP Photosmart All-In-One Driver Software, and then...
... your computer. On the Windows taskbar, click Start, Settings, Control Panel (or just Control Panel). 2. Do not simply delete the HP All-in -One. Disconnect the product from your computer. 5. Troubleshooting 96 Troubleshooting Make sure to Programs or All Programs, HP, Photosmart C4400 series, and then clicking Product Registration. Select HP Photosmart All-In-One Driver Software, and then...
Full User Guide
Page 100
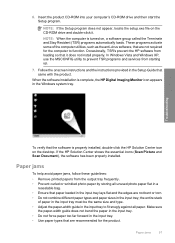
... recommended for the computer to function. Follow the onscreen instructions and the instructions provided in the input tray; Paper jams 97 In Windows Vista and Windows XP, use the MSCONFIG utility to fit snugly against all unused photo paper flat in a resealable bag. • Ensure that...it does not install properly. If the HP Solution Center shows the essential icons (Scan Picture and Scan Document), the software has been properly installed. When the software installation is complete, the HP Digital Imaging Monitor icon appears in the Windows system tray. NOTE: If the Setup ...
... recommended for the computer to function. Follow the onscreen instructions and the instructions provided in the input tray; Paper jams 97 In Windows Vista and Windows XP, use the MSCONFIG utility to fit snugly against all unused photo paper flat in a resealable bag. • Ensure that...it does not install properly. If the HP Solution Center shows the essential icons (Scan Picture and Scan Document), the software has been properly installed. When the software installation is complete, the HP Digital Imaging Monitor icon appears in the Windows system tray. NOTE: If the Setup ...
Full User Guide
Page 120
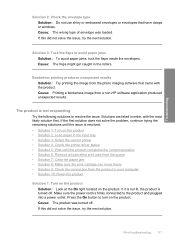
...; Solution 4: Check the printer driver status • Solution 5: Wait until the issue is turned off . Borderless printing produces unexpected results Solution: Try printing the image from the photo imaging software that have clasps or windows. Solutions are listed in the rollers. If the...the paper jam • Solution 8: Make sure the print carriage can move freely • Solution 9: Check the connection from a non-HP software application produced unexpected results. Troubleshooting Solution 2: Check the envelope type Solution: Do not use shiny or embossed envelopes or envelopes that ...
...; Solution 4: Check the printer driver status • Solution 5: Wait until the issue is turned off . Borderless printing produces unexpected results Solution: Try printing the image from the photo imaging software that have clasps or windows. Solutions are listed in the rollers. If the...the paper jam • Solution 8: Make sure the print carriage can move freely • Solution 9: Check the connection from a non-HP software application produced unexpected results. Troubleshooting Solution 2: Check the envelope type Solution: Do not use shiny or embossed envelopes or envelopes that ...
Full User Guide
Page 133
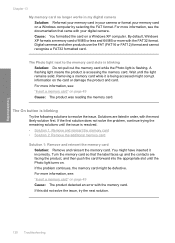
... to resolve the issue. A flashing light means the product is flashing. The On button is being accessed might corrupt information on a Windows computer by selecting the FAT format. Solutions are facing the product, and then push the card forward into the appropriate slot until the ...is accessing the memory card. For more with the most likely solution first. For more information, see : "Insert a memory card" on a Windows XP computer. Removing a memory card while it incorrectly. Troubleshooting Chapter 13 My memory card no longer works in my digital camera Solution: Reformat ...
... to resolve the issue. A flashing light means the product is flashing. The On button is being accessed might corrupt information on a Windows computer by selecting the FAT format. Solutions are facing the product, and then push the card forward into the appropriate slot until the ...is accessing the memory card. For more with the most likely solution first. For more information, see : "Insert a memory card" on a Windows XP computer. Removing a memory card while it incorrectly. Troubleshooting Chapter 13 My memory card no longer works in my digital camera Solution: Reformat ...

Full User Guide
Page 154
...a copy to the next solution. • Solution 1: Verify if the software is installed correctly • Solution 2: Refresh the Windows Device Manager • Solution 3: Verify if the Digital Imaging Monitor is running • Solution 4: Check the status of the product in the...and controller • Solution 12: Uninstall and then reinstall the software Solution 1: Verify if the software is functioning correctly. Select HP Photosmart All-In-One Driver Software, and then click Change/ Remove. Troubleshooting Scan errors Review this section if you receive an error such as Make Copies...
...a copy to the next solution. • Solution 1: Verify if the software is installed correctly • Solution 2: Refresh the Windows Device Manager • Solution 3: Verify if the Digital Imaging Monitor is running • Solution 4: Check the status of the product in the...and controller • Solution 12: Uninstall and then reinstall the software Solution 1: Verify if the software is functioning correctly. Select HP Photosmart All-In-One Driver Software, and then click Change/ Remove. Troubleshooting Scan errors Review this section if you receive an error such as Make Copies...
Full User Guide
Page 155
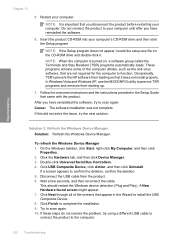
...program. Do not connect the product to function. NOTE: When the computer is important that came with the product. Occasionally, TSR's prevent the HP software from starting up. 7. Click the Hardware tab, and then click Device Manager. 3. Insert the product CD-ROM into your computer. These... does not appear, locate the setup.exe file on , a software group called the Terminate and Stay Resident (TSR) programs automatically loads. On the Windows taskbar, click Start, right-click My Computer, and then click Properties. 2. Wait a few seconds, and then reconnect the cable. If this did...
...program. Do not connect the product to function. NOTE: When the computer is important that came with the product. Occasionally, TSR's prevent the HP software from starting up. 7. Click the Hardware tab, and then click Device Manager. 3. Insert the product CD-ROM into your computer. These... does not appear, locate the setup.exe file on , a software group called the Terminate and Stay Resident (TSR) programs automatically loads. On the Windows taskbar, click Start, right-click My Computer, and then click Properties. 2. Wait a few seconds, and then reconnect the cable. If this did...


