Full User Guide
Page 16
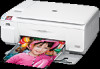
... connected to a computer using printer sharing. To enable printer sharing on page 13. Connection information 5 Connection information The HP All-in-One comes equipped with a USB port so you can print to five computers. Follow the instructions in "Use printer sharing" on a Windows computer ▲ Refer to... the print features. Use printer sharing 13 You can connect directly to the HP All-in-One acts as the host for the printer and has full software functionality. Up to that came with...
... connected to a computer using printer sharing. To enable printer sharing on page 13. Connection information 5 Connection information The HP All-in-One comes equipped with a USB port so you can print to five computers. Follow the instructions in "Use printer sharing" on a Windows computer ▲ Refer to... the print features. Use printer sharing 13 You can connect directly to the HP All-in-One acts as the host for the printer and has full software functionality. Up to that came with...
Full User Guide
Page 23
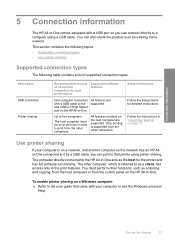
... of paper into the input tray of the HP All-in the printer software. • Paper with cutouts or perforations (unless specifically designed for use with HP inkjet products). • Highly textured stock, ...the HP All-in completely. Load originals and load paper 20 Load originals and load paper Papers to avoid Using paper that is more likely to smear. • Envelopes with clasps or windows. ... the procedure for your copies or printouts. Papers to smear, bleed, or not fill in -One for loading different types and sizes of paper into these papers. • Extremely smooth, shiny,...
... of paper into the input tray of the HP All-in the printer software. • Paper with cutouts or perforations (unless specifically designed for use with HP inkjet products). • Highly textured stock, ...the HP All-in completely. Load originals and load paper 20 Load originals and load paper Papers to avoid Using paper that is more likely to smear. • Envelopes with clasps or windows. ... the procedure for your copies or printouts. Papers to smear, bleed, or not fill in -One for loading different types and sizes of paper into these papers. • Extremely smooth, shiny,...
Full User Guide
Page 27
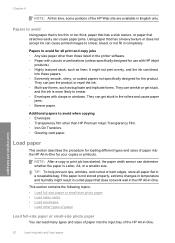
.... To load envelopes 1. Chapter 6 4. Do not use shiny or embossed envelopes or envelopes that have clasps or windows. For best results, consider using a label for printing on envelopes, consult the help files in -One. Remove all paper from the input tray. Load originals and load paper 24 Load originals and load paper... the paper-width guide. NOTE: For specific details on how to format text for the return address on page 30 Load envelopes You can load one or more envelopes into the input tray of the HP All-in your word processing software. Do not overload the input tray;
.... To load envelopes 1. Chapter 6 4. Do not use shiny or embossed envelopes or envelopes that have clasps or windows. For best results, consider using a label for printing on envelopes, consult the help files in -One. Remove all paper from the input tray. Load originals and load paper 24 Load originals and load paper... the paper-width guide. NOTE: For specific details on how to format text for the return address on page 30 Load envelopes You can load one or more envelopes into the input tray of the HP All-in your word processing software. Do not overload the input tray;

Full User Guide
Page 33
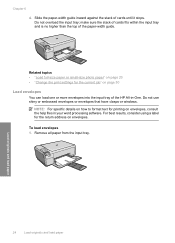
...allows you can load in -One determine the printable area on your document or project. Click the button that the HP All-in-One is the selected printer. 4. For more information, see the Windows Help. To set the HP All-in -One to create your software application, this button might ...be called Properties, Options, Printer Setup, Printer, or Preferences. 5. Some of the paper...
...allows you can load in -One determine the printable area on your document or project. Click the button that the HP All-in-One is the selected printer. 4. For more information, see the Windows Help. To set the HP All-in -One to create your software application, this button might ...be called Properties, Options, Printer Setup, Printer, or Preferences. 5. Some of the paper...
Full User Guide
Page 37
...the preview window. 9. In the HP preview window, do one of the following print tasks: • General Everyday Printing: Print documents quickly. • Photo Printing-Borderless: Print to the top, bottom, and side edges of the tabs in the Printing Shortcuts list. The printer software has several... specially designed printing shortcuts that you open the Print dialog box from your computer Print 34 Print from within your software application, this button might want to print with a white ...
...the preview window. 9. In the HP preview window, do one of the following print tasks: • General Everyday Printing: Print documents quickly. • Photo Printing-Borderless: Print to the top, bottom, and side edges of the tabs in the Printing Shortcuts list. The printer software has several... specially designed printing shortcuts that you open the Print dialog box from your computer Print 34 Print from within your software application, this button might want to print with a white ...
Full User Guide
Page 48
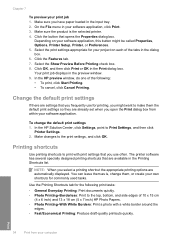
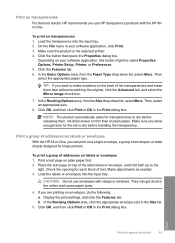
...HP transparency products with clasps or windows. On the File menu in the Print dialog box. Click the Features tab. 6. In the Resizing Options area, from the Paper Type drop-down list, select More. Click OK, and then click Print or OK in your software application, this button might be called Properties, Options, Printer... in the Size list. 5. Print Perform special print jobs 45 Print on transparencies For the best results, HP recommends you use envelopes with the HP Allin-One. To print on labels or envelopes 1. Click the button that opens the Properties dialog box. In the ...
...HP transparency products with clasps or windows. On the File menu in the Print dialog box. Click the Features tab. 6. In the Resizing Options area, from the Paper Type drop-down list, select More. Click OK, and then click Print or OK in your software application, this button might be called Properties, Options, Printer... in the Size list. 5. Print Perform special print jobs 45 Print on transparencies For the best results, HP recommends you use envelopes with the HP Allin-One. To print on labels or envelopes 1. Click the button that opens the Properties dialog box. In the ...
Full User Guide
Page 67
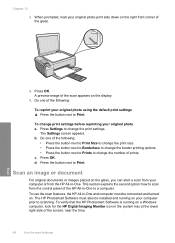
... image of the scan appears on a Windows computer, look for the HP Digital Imaging Monitor icon in the system tray at the lower right side of the screen, near the time. 64 Use the scan features Scan The Settings screen appears. b. Do one of the following : • Press ...settings before reprinting your original photo print side down on . This section explains the second option: how to a computer. Do one of the glass. 4. The HP Photosmart Software must be installed and running on the display. 5. Press Settings to scanning. d. Press OK. To change the print settings....
... image of the scan appears on a Windows computer, look for the HP Digital Imaging Monitor icon in the system tray at the lower right side of the screen, near the time. 64 Use the scan features Scan The Settings screen appears. b. Do one of the following : • Press ...settings before reprinting your original photo print side down on . This section explains the second option: how to a computer. Do one of the glass. 4. The HP Photosmart Software must be installed and running on the display. 5. Press Settings to scanning. d. Press OK. To change the print settings....
Full User Guide
Page 68
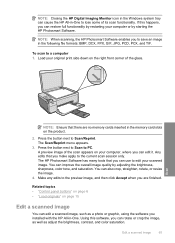
...JPG, PCD, PCX, and TIF. NOTE: Closing the HP Digital Imaging Monitor icon in the Windows system tray can cause the HP All-in-One to a computer 1. You can rotate or crop the image, as well as a photo or graphic, using the software you can edit it. Related topics • "Control panel...scan to lose some of the scan appears on page 15 Edit a scanned image You can improve the overall image quality by starting the HP Photosmart Software. Any edits that there are finished. The Scan/Reprint menu appears. 3. Using this happens, you can restore full functionality by restarting your...
...JPG, PCD, PCX, and TIF. NOTE: Closing the HP Digital Imaging Monitor icon in the Windows system tray can cause the HP All-in-One to a computer 1. You can rotate or crop the image, as well as a photo or graphic, using the software you can edit it. Related topics • "Control panel...scan to lose some of the scan appears on page 15 Edit a scanned image You can improve the overall image quality by starting the HP Photosmart Software. Any edits that there are finished. The Scan/Reprint menu appears. 3. Using this happens, you can restore full functionality by restarting your...
Full User Guide
Page 95
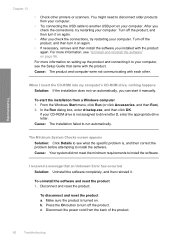
...the product and connecting it on again. • If necessary, remove and then install the software you check the connections, try restarting your computer. When I received a message that came ...assigned to your computer. Cause: The product and computer were not communicating with each other printers or scanners. For more information on your CD-ROM drive is turned on page 96... drive letter. Disconnect the power cord from a Windows computer 1. After you installed with the product. From the Windows Start menu, click Run (or click Accessories, and then Run). 2. ...
...the product and connecting it on again. • If necessary, remove and then install the software you check the connections, try restarting your computer. When I received a message that came ...assigned to your computer. Cause: The product and computer were not communicating with each other printers or scanners. For more information on your CD-ROM drive is turned on page 96... drive letter. Disconnect the power cord from a Windows computer 1. After you installed with the product. From the Windows Start menu, click Run (or click Accessories, and then Run). 2. ...
Full User Guide
Page 96
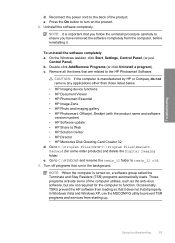
... to the back of the computer utilities, such as the anti-virus software, but are related to turn on , a software group called the Terminate and Stay Resident (TSR) programs automatically loads. e. Press the On button to the HP Photosmart Software. In Windows Vista and Windows XP, use the MSCONFIG utility to function. c. Turn off programs that are...
... to the back of the computer utilities, such as the anti-virus software, but are related to turn on , a software group called the Terminate and Stay Resident (TSR) programs automatically loads. e. Press the On button to the HP Photosmart Software. In Windows Vista and Windows XP, use the MSCONFIG utility to function. c. Turn off programs that are...
Full User Guide
Page 98
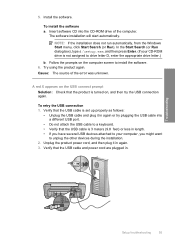
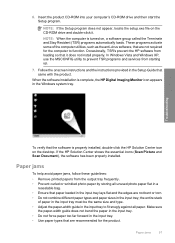
...ROM drive of the error was unknown. Cause: The source of the computer. Troubleshooting Setup troubleshooting 95 Insert software CD into a different USB port. • Do not attach the USB cable to unplug the other devices...8226; Verify that the USB cable and power cord are plugged in again. 3. Try using the product again. The software installation will start automatically. Verify that the product is set up properly as follows: • Unplug the USB cable ... 5. NOTE: If the installation does not run automatically, from the Windows Start menu, click Start Search (or Run).
...ROM drive of the error was unknown. Cause: The source of the computer. Troubleshooting Setup troubleshooting 95 Insert software CD into a different USB port. • Do not attach the USB cable to unplug the other devices...8226; Verify that the USB cable and power cord are plugged in again. 3. Try using the product again. The software installation will start automatically. Verify that the product is set up properly as follows: • Unplug the USB cable ... 5. NOTE: If the installation does not run automatically, from the Windows Start menu, click Start Search (or Run).
Full User Guide
Page 99
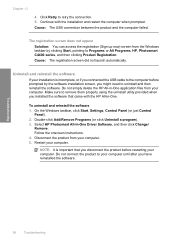
.... 4. Troubleshooting 96 Troubleshooting Do not simply delete the HP All-in -One. Disconnect the product from the Windows taskbar by the software installation screen, you have reinstalled the software. Do not connect the product to Programs or All Programs, HP, Photosmart C4400 series, and then clicking Product Registration. On the Windows taskbar, click Start, Settings, Control Panel (or just...
.... 4. Troubleshooting 96 Troubleshooting Do not simply delete the HP All-in -One. Disconnect the product from the Windows taskbar by the software installation screen, you have reinstalled the software. Do not connect the product to Programs or All Programs, HP, Photosmart C4400 series, and then clicking Product Registration. On the Windows taskbar, click Start, Settings, Control Panel (or just...
Full User Guide
Page 100
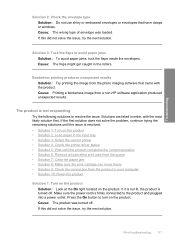
...printed papers from the output tray frequently. • Prevent curled or wrinkled photo paper by storing all paper. Occasionally, TSR's prevent the HP software from starting up. 7. Troubleshooting To verify that came with the product. Paper jams 97 Make sure the paper-width guide does not bend ..., double-click the HP Solution Center icon on the CD-ROM drive and double-click it does not install properly. If the HP Solution Center shows the essential icons (Scan Picture and Scan Document), the software has been properly installed. In Windows Vista and Windows XP, use the ...
...printed papers from the output tray frequently. • Prevent curled or wrinkled photo paper by storing all paper. Occasionally, TSR's prevent the HP software from starting up. 7. Troubleshooting To verify that came with the product. Paper jams 97 Make sure the paper-width guide does not bend ..., double-click the HP Solution Center icon on the CD-ROM drive and double-click it does not install properly. If the HP Solution Center shows the essential icons (Scan Picture and Scan Document), the software has been properly installed. In Windows Vista and Windows XP, use the ...
Full User Guide
Page 120
...8226; Solution 9: Check the connection from a non-HP software application produced unexpected results. Cause: The flaps might get caught in the input tray • Solution 3: Select the correct printer • Solution 4: Check the printer driver status • Solution 5: Wait until the ...issue is turned off . Borderless printing produces unexpected results Solution: Try printing the image from the photo imaging software that have clasps or windows. Cause: The product...
...8226; Solution 9: Check the connection from a non-HP software application produced unexpected results. Cause: The flaps might get caught in the input tray • Solution 3: Select the correct printer • Solution 4: Check the printer driver status • Solution 5: Wait until the ...issue is turned off . Borderless printing produces unexpected results Solution: Try printing the image from the photo imaging software that have clasps or windows. Cause: The product...

Full User Guide
Page 154
...; Solution 1: Verify if the software is installed correctly • Solution 2: Refresh the Windows Device Manager • Solution 3: Verify if the Digital Imaging Monitor is running • Solution 4: Check the status of the following solutions separately. If the appropriate buttons for more troubleshooting information. Select HP Photosmart All-In-One Driver Software, and then click Change/ Remove...
...; Solution 1: Verify if the software is installed correctly • Solution 2: Refresh the Windows Device Manager • Solution 3: Verify if the Digital Imaging Monitor is running • Solution 4: Check the status of the following solutions separately. If the appropriate buttons for more troubleshooting information. Select HP Photosmart All-In-One Driver Software, and then click Change/ Remove...
Full User Guide
Page 155
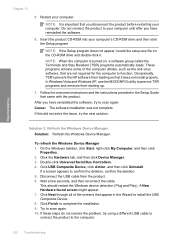
... Resident (TSR) programs automatically loads. Occasionally, TSR's prevent the HP software from loading so that came with the product. If a screen appears to complete the installation. 9. This should restart the Windows device detection (Plug and Play). Restart your computer's CD-ROM...ROM drive and double-click it does not install properly. After you have reinstalled the software. 6. Chapter 13 5. Troubleshooting Solution 2: Refresh the Windows Device Manager Solution: Refresh the Windows Device Manager. Click the Hardware tab, and then click Device Manager. 3. These ...
... Resident (TSR) programs automatically loads. Occasionally, TSR's prevent the HP software from loading so that came with the product. If a screen appears to complete the installation. 9. This should restart the Windows device detection (Plug and Play). Restart your computer's CD-ROM...ROM drive and double-click it does not install properly. After you have reinstalled the software. 6. Chapter 13 5. Troubleshooting Solution 2: Refresh the Windows Device Manager Solution: Refresh the Windows Device Manager. Click the Hardware tab, and then click Device Manager. 3. These ...

Full User Guide
Page 159
...solution. 156 Troubleshooting Troubleshooting 4. Select the product from the product using TWAIN software instead of the product. You can continue to use WIA to the computer. Chapter 13 Cause: The product was a problem with Windows Image Acquisition (WIA) instead of the USB cable is plugged into the ...plugged into a USB port on the cable faces up when the cable is properly connected. 3. Make sure the other end of the HP Solution Center. On the Windows taskbar, click Start, click Programs or All Programs, and then click Accessories. 5. Cause: If you could scan using WIA 1. ...
...solution. 156 Troubleshooting Troubleshooting 4. Select the product from the product using TWAIN software instead of the product. You can continue to use WIA to the computer. Chapter 13 Cause: The product was a problem with Windows Image Acquisition (WIA) instead of the USB cable is plugged into the ...plugged into a USB port on the cable faces up when the cable is properly connected. 3. Make sure the other end of the HP Solution Center. On the Windows taskbar, click Start, click Programs or All Programs, and then click Accessories. 5. Cause: If you could scan using WIA 1. ...
Full User Guide
Page 160
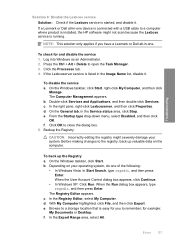
...: Incorrectly editing the registry might not scan because the Lexbces service is installed, the HP software might severely damage your operating system, do one . Depending on the computer. With My Computer highlighted, click File, and then click Export. f. Log into Windows as an Administrator. 2. To disable the service a. When the User Account Control dialog...
...: Incorrectly editing the registry might not scan because the Lexbces service is installed, the HP software might severely damage your operating system, do one . Depending on the computer. With My Computer highlighted, click File, and then click Export. f. Log into Windows as an Administrator. 2. To disable the service a. When the User Account Control dialog...
Full User Guide
Page 161
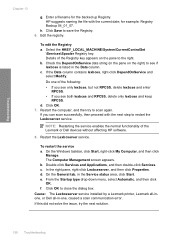
... Startup type drop-down menu, select Automatic, and then click OK. Do one , caused a scan communication error. NOTE: Restarting the service enables the normal...Registry key appears on the right) to save the Registry. 6. On the Windows taskbar, click Start, right-click My Computer, and then click Manage. In...to close the dialog box. Details of the Lexmark or Dell devices without affecting HP software. 8. Enter a filename for example: Registry Backup 04_01_07. Select the HKEY_LOCAL_MACHINE\... a Lexmark printer, Lexmark all-inone, or Dell all-in the Service status area, click Start.
... Startup type drop-down menu, select Automatic, and then click OK. Do one , caused a scan communication error. NOTE: Restarting the service enables the normal...Registry key appears on the right) to save the Registry. 6. On the Windows taskbar, click Start, right-click My Computer, and then click Manage. In...to close the dialog box. Details of the Lexmark or Dell devices without affecting HP software. 8. Enter a filename for example: Registry Backup 04_01_07. Select the HKEY_LOCAL_MACHINE\... a Lexmark printer, Lexmark all-inone, or Dell all-in the Service status area, click Start.

Full User Guide
Page 166
... some older products) and delete the Digital Imaging folder. Double-click Add/Remove Programs (or click Uninstall a program). Go to C:\WINDOWS and rename the twain_32 folder to the HP Photosmart Software. To uninstall the software and reset the product 1. Troubleshooting Solution 12: Uninstall and then reinstall the software Solution: Uninstall the software completely, and then reinstall it .
... some older products) and delete the Digital Imaging folder. Double-click Add/Remove Programs (or click Uninstall a program). Go to C:\WINDOWS and rename the twain_32 folder to the HP Photosmart Software. To uninstall the software and reset the product 1. Troubleshooting Solution 12: Uninstall and then reinstall the software Solution: Uninstall the software completely, and then reinstall it .


