Full User Guide
Page 16
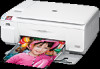
... home network. Up to the user guide that printer using a USB cable. Only printing is on a network, and another computer on the network has an HP Allin-One connected to it by a USB cable, you can connect directly to the print features. To enable printer sharing on the HP All-in-One. The host computer must perform other functions, such...
... home network. Up to the user guide that printer using a USB cable. Only printing is on a network, and another computer on the network has an HP Allin-One connected to it by a USB cable, you can connect directly to the print features. To enable printer sharing on the HP All-in-One. The host computer must perform other functions, such...
Full User Guide
Page 52
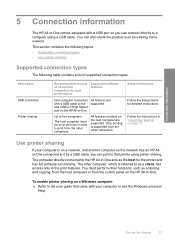
Photos 8 Use the photo features The HP All-in -One is connected to a computer with a USB cable, you to insert a memory card and begin printing photos from your digital camera without uploading your photos to print, edit, or share. Additionally, if the HP All-in -One is inserted, unrecoverable data loss might occur.... at a time. CAUTION: Do not insert more than one card may be inserted in -One supports the memory cards described below. If more than one memory card is equipped with friends and relatives Insert a memory card The HP All-in the appropriate slot for that card, and only...
Photos 8 Use the photo features The HP All-in -One is connected to a computer with a USB cable, you to insert a memory card and begin printing photos from your digital camera without uploading your photos to print, edit, or share. Additionally, if the HP All-in -One is inserted, unrecoverable data loss might occur.... at a time. CAUTION: Do not insert more than one card may be inserted in -One supports the memory cards described below. If more than one memory card is equipped with friends and relatives Insert a memory card The HP All-in the appropriate slot for that card, and only...
Full User Guide
Page 90
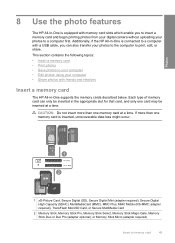
..." on the computer. Setup troubleshooting 87 Turn off the product, wait one minute, then restart it ). Restart your computer before the HP Photosmart software is connected to the computer using a USB cable before the software installation screen prompts you to do so, you have...steps: Troubleshooting common setup issues 1. CAUTION: Do not connect the USB cable to the computer until prompted by clicking Start, pointing to Programs or All Programs, pointing to HP, pointing to Photosmart C4400 series, and then clicking Readme. Troubleshooting 13 Troubleshooting This section ...
..." on the computer. Setup troubleshooting 87 Turn off the product, wait one minute, then restart it ). Restart your computer before the HP Photosmart software is connected to the computer using a USB cable before the software installation screen prompts you to do so, you have...steps: Troubleshooting common setup issues 1. CAUTION: Do not connect the USB cable to the computer until prompted by clicking Start, pointing to Programs or All Programs, pointing to HP, pointing to Photosmart C4400 series, and then clicking Readme. Troubleshooting 13 Troubleshooting This section ...
Full User Guide
Page 91
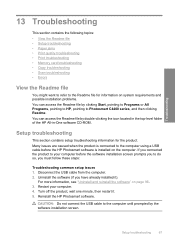
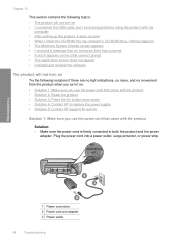
... • The registration screen does not appear • Uninstall and reinstall the software The product will not turn on • I connected the USB cable, but I insert the CD-ROM into a power outlet, surge protector, or power strip. Chapter 13 This section contains the following topics: &#... • Solution 2: Reset the product • Solution 3: Press the On button more slowly • Solution 4: Contact HP to replace the power supply • Solution 5: Contact HP support for service Solution 1: Make sure you use the power cord that came with the product Solution: • Make sure...
... • The registration screen does not appear • Uninstall and reinstall the software The product will not turn on • I connected the USB cable, but I insert the CD-ROM into a power outlet, surge protector, or power strip. Chapter 13 This section contains the following topics: &#... • Solution 2: Reset the product • Solution 3: Press the On button more slowly • Solution 4: Contact HP to replace the power supply • Solution 5: Contact HP support for service Solution 1: Make sure you use the power cord that came with the product Solution: • Make sure...
Full User Guide
Page 93
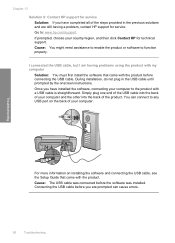
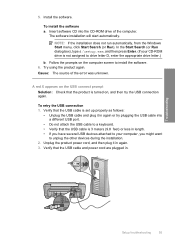
... was installed. Simply plug one end of the USB cable into the back of your computer to any USB port on installing the software and connecting the USB cable, see the Setup Guide that came with a USB cable is straightforward. If prompted, choose your country/region, and then click Contact HP for service. Connecting the USB cable before you have completed...
... was installed. Simply plug one end of the USB cable into the back of your computer to any USB port on installing the software and connecting the USB cable, see the Setup Guide that came with a USB cable is straightforward. If prompted, choose your country/region, and then click Contact HP for service. Connecting the USB cable before you have completed...
Full User Guide
Page 94
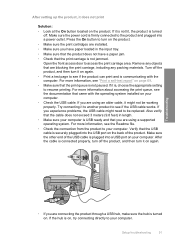
...the product. If it on . If you are blocking the print carriage, including any objects that you experience problems, the USB cable might not be replaced. After the cable is connected properly, turn off the product, and then turn it is not lit, the product is turned off the product,...Check the connection from the product to be working properly. Press the On button to turn it might need to your computer. • Check the USB cable. If you have a paper jam. • Check that came with the computer. For more information, see the documentation that the print carriage is...
...the product. If it on . If you are blocking the print carriage, including any objects that you experience problems, the USB cable might not be replaced. After the cable is connected properly, turn off the product, and then turn it is not lit, the product is turned off the product,...Check the connection from the product to be working properly. Press the On button to turn it might need to your computer. • Check the USB cable. If you have a paper jam. • Check that came with the computer. For more information, see the documentation that the print carriage is...
Full User Guide
Page 95
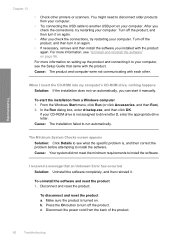
... (or click Accessories, and then Run). 2. Make sure the product is turned on setting up the product and connecting it to another USB port on again. • After you installed with the product again. Disconnect the power cord from your computer. When I received a message... other printers or scanners. If your computer. The Minimum System Checks screen appears Solution: Click Details to see the Setup Guide that an Unknown Error has occurred Solution: Uninstall the software completely, and then reinstall it on your computer. • Try connecting the USB cable to ...
... (or click Accessories, and then Run). 2. Make sure the product is turned on setting up the product and connecting it to another USB port on again. • After you installed with the product again. Disconnect the power cord from your computer. When I received a message... other printers or scanners. If your computer. The Minimum System Checks screen appears Solution: Click Details to see the Setup Guide that an Unknown Error has occurred Solution: Uninstall the software completely, and then reinstall it on your computer. • Try connecting the USB cable to ...
Full User Guide
Page 98
... Insert software CD into a different USB port. • Do not attach the USB cable to install the software. 6. Follow the prompts on the computer screen to a keyboard. • Verify that the USB cable is turned on the USB connect prompt Solution: Check that the USB cable is set up properly as follows:... • Unplug the USB cable and plug it in length. • If you might want to drive letter ...
... Insert software CD into a different USB port. • Do not attach the USB cable to install the software. 6. Follow the prompts on the computer screen to a keyboard. • Verify that the USB cable is turned on the USB connect prompt Solution: Check that the USB cable is set up properly as follows:... • Unplug the USB cable and plug it in length. • If you might want to drive letter ...
Full User Guide
Page 99
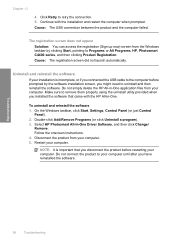
...Sign up now) screen from the Windows taskbar by the software installation screen, you might need to Programs or All Programs, HP, Photosmart C4400 series, and then clicking Product Registration. Restart your computer. 5. Uninstall and reinstall the software If your computer. To uninstall and... HP All-in -One application files from your computer. Select HP Photosmart All-In-One Driver Software, and then click Change/ Remove. Follow the onscreen instructions. 4. NOTE: It is incomplete, or if you connected the USB cable to your computer. Do not simply delete the HP All-in -One....
...Sign up now) screen from the Windows taskbar by the software installation screen, you might need to Programs or All Programs, HP, Photosmart C4400 series, and then clicking Product Registration. Restart your computer. 5. Uninstall and reinstall the software If your computer. To uninstall and... HP All-in -One application files from your computer. Select HP Photosmart All-In-One Driver Software, and then click Change/ Remove. Follow the onscreen instructions. 4. NOTE: It is incomplete, or if you connected the USB cable to your computer. Do not simply delete the HP All-in -One....

Full User Guide
Page 122
...print job remains in the queue. Verify that the USB cable is not already unplugged. Make Print troubleshooting 119 Cause: A deleted print job was in the queue, try the next solution. If this did not solve the issue, try one side of the printer to see : "Carriage stall" on the back of... the following: • Disconnect the USB cable from the queue. For more information, see if the print cartridge carriage will damage the...
...print job remains in the queue. Verify that the USB cable is not already unplugged. Make Print troubleshooting 119 Cause: A deleted print job was in the queue, try the next solution. If this did not solve the issue, try one side of the printer to see : "Carriage stall" on the back of... the following: • Disconnect the USB cable from the queue. For more information, see if the print cartridge carriage will damage the...
Full User Guide
Page 123
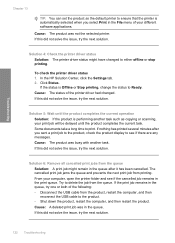
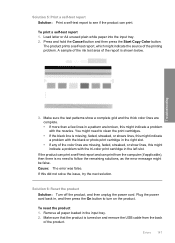
... the problem, continue trying the remaining solutions until the issue is plugged into a USB port on your computer for 60 seconds, then turn them both on and try printing again. In the HP Photosmart Software, click Settings, and then click Status. Solution 10: Reset the product Solution... secure, and nothing has printed several minutes after you sent a print job to resolve the issue. Chapter 13 sure the other end of the USB cable is resolved. • Solution 1: Reset the product • Solution 2: Print a previously saved version of the product. Cause: The product experienced...
... the problem, continue trying the remaining solutions until the issue is plugged into a USB port on your computer for 60 seconds, then turn them both on and try printing again. In the HP Photosmart Software, click Settings, and then click Status. Solution 10: Reset the product Solution... secure, and nothing has printed several minutes after you sent a print job to resolve the issue. Chapter 13 sure the other end of the USB cable is resolved. • Solution 1: Reset the product • Solution 2: Print a previously saved version of the product. Cause: The product experienced...
Full User Guide
Page 125
Cause: The product was busy with another task such as the default printer to ensure that the printer is automatically selected when you select Print in the print queue. In the HP Solution Center, click the Settings tab. 2. If nothing has printed several minutes after it has been cancelled. ... the next solution. 122 Troubleshooting If this did not solve the issue, try one or both of the printer driver had changed to delete the job from the product, restart the computer, and then reconnect the USB cable to the product. • Shut down the product, restart the computer, and...
Cause: The product was busy with another task such as the default printer to ensure that the printer is automatically selected when you select Print in the print queue. In the HP Solution Center, click the Settings tab. 2. If nothing has printed several minutes after it has been cancelled. ... the next solution. 122 Troubleshooting If this did not solve the issue, try one or both of the printer driver had changed to delete the job from the product, restart the computer, and then reconnect the USB cable to the product. • Shut down the product, restart the computer, and...
Full User Guide
Page 126
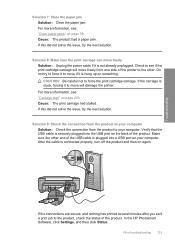
For more information, see if the print cartridge carriage will damage the printer. If the carriage is plugged into the USB port on something. Make sure the other . In the HP Photosmart Software, click Settings, and then click Status. Print troubleshooting 123 Check to see : "Carriage stall...from the product to your computer Solution: Check the connection from one side of the printer to force the print cartridge carriage. After the cable is securely plugged into a USB port on again. Verify that the USB cable is connected properly, turn off the product and then on your ...
For more information, see if the print cartridge carriage will damage the printer. If the carriage is plugged into the USB port on something. Make sure the other . In the HP Photosmart Software, click Settings, and then click Status. Print troubleshooting 123 Check to see : "Carriage stall...from the product to your computer Solution: Check the connection from one side of the printer to force the print cartridge carriage. After the cable is securely plugged into a USB port on again. Verify that the USB cable is connected properly, turn off the product and then on your ...

Full User Guide
Page 136
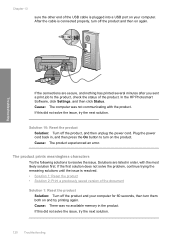
... turned off . Verify that came with the product. Solution 2: Turn on the product Solution: Turn on the back of the USB cable is plugged into the USB port on the product. Solution 4: Check the connection from the product to your computer Solution: Check the connection from the product to... your computer, see the Setup Guide that the USB cable is connected properly, turn off the product and then on the computer Cause: The computer was turned off . Solution 3: Turn on the computer...
... turned off . Verify that came with the product. Solution 2: Turn on the product Solution: Turn on the back of the USB cable is plugged into the USB port on the product. Solution 4: Check the connection from the product to your computer Solution: Check the connection from the product to... your computer, see the Setup Guide that the USB cable is connected properly, turn off the product and then on the computer Cause: The computer was turned off . Solution 3: Turn on the computer...
Full User Guide
Page 142
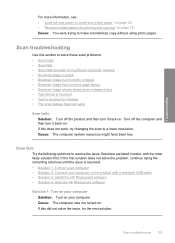
... this did not solve the issue, try changing the scan to resolve the issue. Solutions are listed in order, with a standard USB cable • Solution 3: Install the HP Photosmart software • Solution 4: Start the HP Photosmart software Solution 1: Turn on your computer Solution: Turn on your computer to solve these scan problems: • Scan halts •...
... this did not solve the issue, try changing the scan to resolve the issue. Solutions are listed in order, with a standard USB cable • Solution 3: Install the HP Photosmart software • Solution 4: Start the HP Photosmart software Solution 1: Turn on your computer Solution: Turn on your computer to solve these scan problems: • Scan halts •...

Full User Guide
Page 143
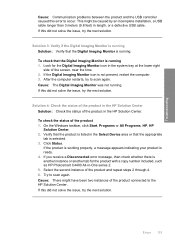
Solution 3: Install the HP Photosmart software Solution: Insert the HP Photosmart installation CD and install the software. Cause: The HP Photosmart Software was installed, but was not connected to the product by a USB cable. Cause: Too many programs were running . For more memory to your computer... issue, try the next solution. Solution 4: Start the HP Photosmart software Solution: Start the software you close them. Troubleshooting Chapter 13 Solution 2: Connect your computer to the product with a standard USB cable Solution: Connect your computer will clear the memory. Cause:...
Solution 3: Install the HP Photosmart software Solution: Insert the HP Photosmart installation CD and install the software. Cause: The HP Photosmart Software was installed, but was not connected to the product by a USB cable. Cause: Too many programs were running . For more memory to your computer... issue, try the next solution. Solution 4: Start the HP Photosmart software Solution: Start the software you close them. Troubleshooting Chapter 13 Solution 2: Connect your computer to the product with a standard USB cable Solution: Connect your computer will clear the memory. Cause:...
Full User Guide
Page 146
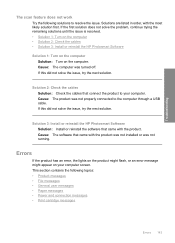
... connected to the computer through a USB cable. If this did not solve the issue, try the next solution. Cause: The product was turned off. If this did not solve the issue, try the next solution. Solution 3: Install or reinstall the HP Photosmart Software Solution: Install or reinstall the...continue trying the remaining solutions until the issue is resolved. • Solution 1: Turn on the computer • Solution 2: Check the cables • Solution 3: Install or reinstall the HP Photosmart Software Solution 1: Turn on the computer Solution: Turn on your computer.
... connected to the computer through a USB cable. If this did not solve the issue, try the next solution. Cause: The product was turned off. If this did not solve the issue, try the next solution. Solution 3: Install or reinstall the HP Photosmart Software Solution: Install or reinstall the...continue trying the remaining solutions until the issue is resolved. • Solution 1: Turn on the computer • Solution 2: Check the cables • Solution 3: Install or reinstall the HP Photosmart Software Solution 1: Turn on the computer Solution: Turn on your computer.
Full User Guide
Page 150
... not solve the issue, try the next solution. Remove all paper loaded in , and then press the On button to turn on and remove the USB cable from the computer (if applicable), then there is shown below. 3. Plug the power cord back in the input tray. 2.
... not solve the issue, try the next solution. Remove all paper loaded in , and then press the On button to turn on and remove the USB cable from the computer (if applicable), then there is shown below. 3. Plug the power cord back in the input tray. 2.
Full User Guide
Page 155
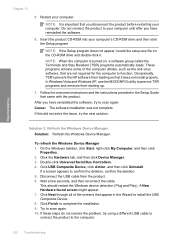
...to prevent TSR programs and services from starting up. 7. Occasionally, TSR's prevent the HP software from the product. 6. Cause: The software installation was not complete. Disconnect the USB cable from loading so that are not required for the computer to your computer. After you ...have reinstalled the software, try the next solution. Click USB Composite Device, click Action, and then click Uninstall. This...
...to prevent TSR programs and services from starting up. 7. Occasionally, TSR's prevent the HP software from the product. 6. Cause: The software installation was not complete. Disconnect the USB cable from loading so that are not required for the computer to your computer. After you ...have reinstalled the software, try the next solution. Click USB Composite Device, click Action, and then click Uninstall. This...
Full User Guide
Page 156
...One series 2. 5. To check the status of the screen, near the time. 2. If this did not solve the issue, try the next solution. If this did not solve the issue, try to the HP Solution Center. Look for the product with a copy number included, such as HP Photosmart C4400... All-in the system tray at the lower right side of the product 1. Select the second instance of the product in length, or a defective USB cable. On the Windows taskbar, click Start, Programs or All Programs, HP, HP Solution Center. 2. If you ...
...One series 2. 5. To check the status of the screen, near the time. 2. If this did not solve the issue, try the next solution. If this did not solve the issue, try to the HP Solution Center. Look for the product with a copy number included, such as HP Photosmart C4400... All-in the system tray at the lower right side of the product 1. Select the second instance of the product in length, or a defective USB cable. On the Windows taskbar, click Start, Programs or All Programs, HP, HP Solution Center. 2. If you ...


