Quick Start Guide
Page 5
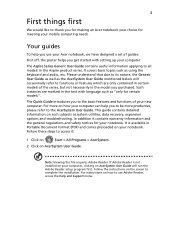
... detailed information on AcerSystem User Guide will occasionally refer to functions or features which are marked in the model you get started with language such as the AcerSystem User Guide mentioned below will run the Adobe Reader setup program first. For instructions on... Format (PDF) and comes preloaded on AcerSystem User Guide. The Aspire Series Generic User Guide contains useful information applying to use your Acer notebook, we have designed a set of your notebook. In addition it : 1 Click on Start > All Programs > AcerSystem. 2 Click on your new computer....
... detailed information on AcerSystem User Guide will occasionally refer to functions or features which are marked in the model you get started with language such as the AcerSystem User Guide mentioned below will run the Adobe Reader setup program first. For instructions on... Format (PDF) and comes preloaded on AcerSystem User Guide. The Aspire Series Generic User Guide contains useful information applying to use your Acer notebook, we have designed a set of your notebook. In addition it : 1 Click on Start > All Programs > AcerSystem. 2 Click on your new computer....
Quick Start Guide
Page 267
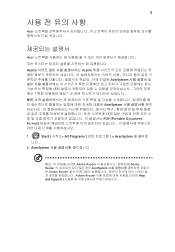
3 Acer Acer Aspire Aspire AcerSystem AcerSystem PDF (Portable Document Format 1 Start All Programs AcerSystem 니다 . 2 AcerSystem Adobe Reader Adobe Reader AcerSystem Adobe Reader Adobe Reader Help and Support
3 Acer Acer Aspire Aspire AcerSystem AcerSystem PDF (Portable Document Format 1 Start All Programs AcerSystem 니다 . 2 AcerSystem Adobe Reader Adobe Reader AcerSystem Adobe Reader Adobe Reader Help and Support
Service Guide
Page 22
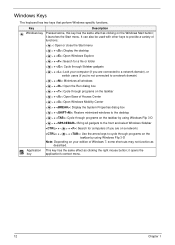
.... Windows Keys The keyboard has two keys that perform Windows-specific functions. it opens the key application's context menu. 12 Chapter 1 it launches the Start menu. It can also be used with other keys to provide a variety of functions: < >: Open or close the...(if you are on a network) + < > + : Use the arrow keys to cycle through programs on the taskbar by using Windows Flip 3-D Note: Depending on the Windows Start button; Key Description Windows key Pressed alone, this key has the same effect as clicking on your edition of Windows 7, some shortcuts may not function...
.... Windows Keys The keyboard has two keys that perform Windows-specific functions. it opens the key application's context menu. 12 Chapter 1 it launches the Start menu. It can also be used with other keys to provide a variety of functions: < >: Open or close the...(if you are on a network) + < > + : Use the arrow keys to cycle through programs on the taskbar by using Windows Flip 3-D Note: Depending on the Windows Start button; Key Description Windows key Pressed alone, this key has the same effect as clicking on your edition of Windows 7, some shortcuts may not function...

Service Guide
Page 74
Work along the front edge of the Lower Cover. 64 Chapter 3 Starting at the top right side of the cover, pry apart the Upper and Lower Covers as shown, then lift the Upper Cover clear of the casing to the left as shown. Step Upper Cover Size M2.5*5 Quantity 7 Screw Type 10. 9. Remove the seven (7) screws on the Upper Cover as shown.
Work along the front edge of the Lower Cover. 64 Chapter 3 Starting at the top right side of the cover, pry apart the Upper and Lower Covers as shown, then lift the Upper Cover clear of the casing to the left as shown. Step Upper Cover Size M2.5*5 Quantity 7 Screw Type 10. 9. Remove the seven (7) screws on the Upper Cover as shown.
Service Guide
Page 98
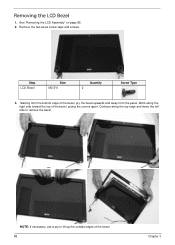
Removing the LCD Bezel 1. Remove the two bezel screw caps and screws. Starting from the panel. See "Removing the LCD Assembly" on page 85. 2. Continue along the right side toward the top of the bezel, pry the bezel upwards and away from the bottom edge of the bezel, prying the covers apart. Work along the top edge and down the left side to lift up the outside edges of the bezel. 88 Chapter 3 NOTE: If necessary, use a pry to remove the bezel. Step LCD Bezel Size M2.5*6 Quantity 2 Screw Type 3.
Removing the LCD Bezel 1. Remove the two bezel screw caps and screws. Starting from the panel. See "Removing the LCD Assembly" on page 85. 2. Continue along the right side toward the top of the bezel, pry the bezel upwards and away from the bottom edge of the bezel, prying the covers apart. Work along the top edge and down the left side to lift up the outside edges of the bezel. 88 Chapter 3 NOTE: If necessary, use a pry to remove the bezel. Step LCD Bezel Size M2.5*6 Quantity 2 Screw Type 3.
Service Guide
Page 149
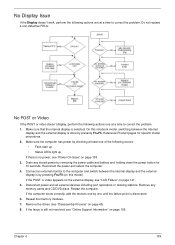
... discovered. 6. Reconnect the power and reboot the computer. 4. If the computer boots correctly, add the devices one by one of the following occurs: • Fans start up • Status LEDs light up If there is no power, see "Disassembly Process" on this notebook model, switching between the internal display and the...
... discovered. 6. Reconnect the power and reboot the computer. 4. If the computer boots correctly, add the devices one by one of the following occurs: • Fans start up • Status LEDs light up If there is no power, see "Disassembly Process" on this notebook model, switching between the internal display and the...
Service Guide
Page 153
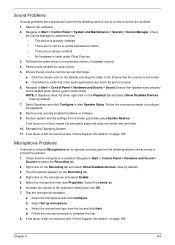
...resolved, see "Online Support Information" on the Recording tab and select Show Disabled Devices (clear by default). 7. Select Speakers and click Configure to Start´ Control Panel´ System and Maintenance´ System´ Device Manager. Select the microphone then click Properties. Select Set up microphone. ...Sound Problems If sound problems are experienced, perform the following actions one at a time to Start´ Control Panel´ Hardware and Sound´ Sound and select the Recording tab. 2. Reboot the computer. 2. Navigate to...
...resolved, see "Online Support Information" on the Recording tab and select Show Disabled Devices (clear by default). 7. Select Speakers and click Configure to Start´ Control Panel´ System and Maintenance´ System´ Device Manager. Select the microphone then click Properties. Select Set up microphone. ...Sound Problems If sound problems are experienced, perform the following actions one at a time to Start´ Control Panel´ Hardware and Sound´ Sound and select the Recording tab. 2. Reboot the computer. 2. Navigate to...
Service Guide
Page 154
.... Select Startup Repair. Startup Repair attempts to resolve the problem. 4. Run the Windows Disk Defragmenter. The System Recovery Options screen displays. f. Remove any key to start to correct the problem. 1. If the issue is set correctly. 7. The Install Windows screen displays. NOTE: Click Load Drivers if controller drives are set as...
.... Select Startup Repair. Startup Repair attempts to resolve the problem. 4. Run the Windows Disk Defragmenter. The System Recovery Options screen displays. f. Remove any key to start to correct the problem. 1. If the issue is set correctly. 7. The Install Windows screen displays. NOTE: Click Load Drivers if controller drives are set as...
Service Guide
Page 155
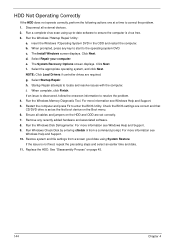
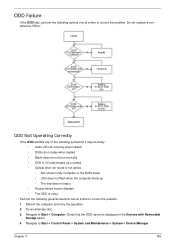
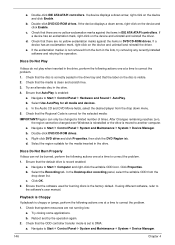
... at a time to correct the problem. 1. Reboot the computer and retry the operation. 2. Navigate to Start´ Control Panel´ System and Maintenance´ System´ Device Manager. Navigate to Start´ Computer. Try an alternate disc. 3. Check that the ODD device is displayed in My Computer or... the BIOS setup • LED does not flash when the computer starts up or jumps • Optical drive not found or not active: • Not shown in the Devices with Removable Storage panel. 4. Chapter 4...
... at a time to correct the problem. 1. Reboot the computer and retry the operation. 2. Navigate to Start´ Control Panel´ System and Maintenance´ System´ Device Manager. Navigate to Start´ Computer. Try an alternate disc. 3. Check that the ODD device is displayed in My Computer or... the BIOS setup • LED does not flash when the computer starts up or jumps • Optical drive not found or not active: • Not shown in the Devices with Removable Storage panel. 4. Chapter 4...
Service Guide
Page 156
... try removing any recently installed software and retrying the operation. Double-click lDE ATA/ATAPI controllers. c. If using different software, refer to Start´ Control Panel´ System and Maintenance´ System´ Device Manager. 146 Chapter 4 Check that the ODD controller transfer mode... a. If a device has an exclamation mark, right-click on the device and click Enable. Double-click DVD/CD-ROM drives. Navigate to Start´ Control Panel´ Hardware and Sound´ AutoPlay. Double-click DVD/CD-ROM drives. d. Navigate to DMA: a. Check that system...
... try removing any recently installed software and retrying the operation. Double-click lDE ATA/ATAPI controllers. c. If using different software, refer to Start´ Control Panel´ System and Maintenance´ System´ Device Manager. 146 Chapter 4 Check that the ODD controller transfer mode... a. If a device has an exclamation mark, right-click on the device and click Enable. Double-click DVD/CD-ROM drives. Navigate to Start´ Control Panel´ Hardware and Sound´ AutoPlay. Double-click DVD/CD-ROM drives. d. Navigate to DMA: a. Check that system...
Service Guide
Page 161
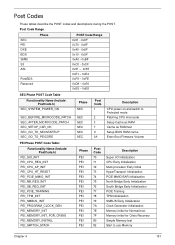
... Bridge Early Initialization South Bridge Early Initialization PCIE Training TPM Initialization SMBUS Early Initialization Clock Generator Initialization Memory Initial for Crisis Recovery Simple Memory test Start to use Memory Chapter 4 151 Post Codes These tables describe the POST codes and descriptions during the POST. Memory Initial for Normal boot.
... Bridge Early Initialization South Bridge Early Initialization PCIE Training TPM Initialization SMBUS Early Initialization Clock Generator Initialization Memory Initial for Crisis Recovery Simple Memory test Start to use Memory Chapter 4 151 Post Codes These tables describe the POST codes and descriptions during the POST. Memory Initial for Normal boot.
Service Guide
Page 162
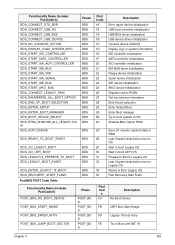
... 87 88 89 8A 8B Description Set cache for physical memory Recovery device Initialization Found Recovery image Recovery image not found Load Recovery Image completed Start Flash BIOS with Recovery image Loading BIOS image to RAM Loading DXE core Enter DXE core Functionality Name (Include\ PostCode.h) DXE_NB_INIT DXE_SB_INIT DXE_IDENTIFY_FLASH_DEVICE DXE_FTW_INIT DXE_VARIABLE_INIT...
... 87 88 89 8A 8B Description Set cache for physical memory Recovery device Initialization Found Recovery image Recovery image not found Load Recovery Image completed Start Flash BIOS with Recovery image Loading BIOS image to RAM Loading DXE core Enter DXE core Functionality Name (Include\ PostCode.h) DXE_NB_INIT DXE_SB_INIT DXE_IDENTIFY_FLASH_DEVICE DXE_FTW_INIT DXE_VARIABLE_INIT...
Service Guide
Page 163
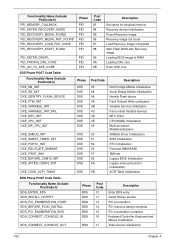
... to OS Shadow Misc Option ROM 2D Save S3 resume required data in RAM 2E Last Chipset initial before boot to OS 2F Start to boot Legacy OS 30 Start to boot UEFI OS 31 Prepare to Boot to Legacy OS 33 Last Chipset initial before boot to Legacy OS. 34 Ready... to Boot with INT 19 Chapter 4 153 Post Cod e F9 Description No Boot Device FB UEFI Boot Start Image FD Legacy 16 boot entry FE Try to Boot Legacy OS. 35 Fast Recovery...
... to OS Shadow Misc Option ROM 2D Save S3 resume required data in RAM 2E Last Chipset initial before boot to OS 2F Start to boot Legacy OS 30 Start to boot UEFI OS 31 Prepare to Boot to Legacy OS 33 Last Chipset initial before boot to Legacy OS. 34 Ready... to Boot with INT 19 Chapter 4 153 Post Cod e F9 Description No Boot Device FB UEFI Boot Start Image FD Legacy 16 boot entry FE Try to Boot Legacy OS. 35 Fast Recovery...
Service Guide
Page 164
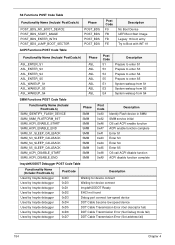
... Functionality Name (Include\ PostCode.h) POST_BDS_NO_BOOT_DEVICE POST_BDS_START_IMAGE POST_BDS_ENTER_INT19 POST_BDS_JUMP_BOOT_SECTOR Phase POST_BDS POST_BDS POST_BDS POST_BDS Post Code F9 FB FD FE Description No Boot Device UEFI Boot Start Image Legacy 16 boot entry Try to Boot with INT 19 ACPI Functions POST Code Table Functionality Name (Include\ PostCode.h) ASL_ENTER_S1 ASL_ENTER_S3 ASL_ENTER_S4 ASL_ENTER_S5 ASL_WAKEUP_S1...
... Functionality Name (Include\ PostCode.h) POST_BDS_NO_BOOT_DEVICE POST_BDS_START_IMAGE POST_BDS_ENTER_INT19 POST_BDS_JUMP_BOOT_SECTOR Phase POST_BDS POST_BDS POST_BDS POST_BDS Post Code F9 FB FD FE Description No Boot Device UEFI Boot Start Image Legacy 16 boot entry Try to Boot with INT 19 ACPI Functions POST Code Table Functionality Name (Include\ PostCode.h) ASL_ENTER_S1 ASL_ENTER_S3 ASL_ENTER_S4 ASL_ENTER_S5 ASL_WAKEUP_S1...


