Service Guide
Page 8
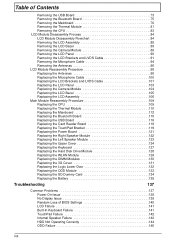
... the 3G Cover 131 Replacing the Logic Lower Door 132 Replacing the ODD Module 133 Replacing the SD Dummy Card 134 Replacing the Battery 135 Troubleshooting 137 Common Problems 137 Power On Issue 138 No Display Issue 139 Random Loss of BIOS Settings 140 LCD Failure 141 Built-In Keyboard Failure 141...
... the 3G Cover 131 Replacing the Logic Lower Door 132 Replacing the ODD Module 133 Replacing the SD Dummy Card 134 Replacing the Battery 135 Troubleshooting 137 Common Problems 137 Power On Issue 138 No Display Issue 139 Random Loss of BIOS Settings 140 LCD Failure 141 Built-In Keyboard Failure 141...
Service Guide
Page 149
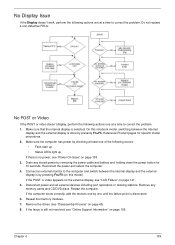
... devices including port replicators or docking stations. Restart the computer. Chapter 4 139 On this model). Connect an external monitor to correct the problem. Remove any stored power by pressing Fn+F5. Reseat the memory modules. 7. Reconnect the power and reboot the computer. 4. No Display...actions one until the failure point is discovered. 6. Make sure that the internal display is done by removing the power cable and battery and holding down the power button for specific model procedures. 2. Reference Product pages for 10 seconds. Drain any memory cards and CD...
... devices including port replicators or docking stations. Restart the computer. Chapter 4 139 On this model). Connect an external monitor to correct the problem. Remove any stored power by pressing Fn+F5. Reseat the memory modules. 7. Reconnect the power and reboot the computer. 4. No Display...actions one until the failure point is discovered. 6. Make sure that the internal display is done by removing the power cable and battery and holding down the power button for specific model procedures. 2. Reference Product pages for 10 seconds. Drain any memory cards and CD...
Service Guide
Page 150
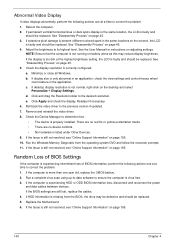
... (different colored spots in the application. If the display is too dim at a time to correct the problem. 1. Check the display resolution is more than one year old, replace the CMOS battery. 2. e. Replace the Motherboard. 6. c. d. Click and drag the Resolution slider to its highest level....Loss of BIOS Settings If the computer is experiencing intermittent loss of BIOS information, perform the following actions one at a time to correct the problem. 1. If the BIOS settings are no red Xs or yellow exclamation marks. • There are still lost, replace the cables. 4. ...
... (different colored spots in the application. If the display is too dim at a time to correct the problem. 1. Check the display resolution is more than one year old, replace the CMOS battery. 2. e. Replace the Motherboard. 6. c. d. Click and drag the Resolution slider to its highest level....Loss of BIOS Settings If the computer is experiencing intermittent loss of BIOS information, perform the following actions one at a time to correct the problem. 1. If the BIOS settings are no red Xs or yellow exclamation marks. • There are still lost, replace the cables. 4. ...
Service Guide
Page 159
... 1. Reinstall the program experiencing mouse failure. 5. Remove and reinstall the mouse driver. 12. Swap M/B to correct the problem. 1. Try an alternative program to correct the problem. Chapter 4 149 For more information see "Online Support Information" on page 195. Other Failures If the CRT Switch, ... 7. Run the Event Viewer to the previous version if updated recently. 11. If the mouse uses a wireless connection, insert new batteries and confirm there is ok. 3. Restore system and file settings from a known good date using System Restore. Roll back the mouse...
... 1. Reinstall the program experiencing mouse failure. 5. Remove and reinstall the mouse driver. 12. Swap M/B to correct the problem. 1. Try an alternative program to correct the problem. Chapter 4 149 For more information see "Online Support Information" on page 195. Other Failures If the CRT Switch, ... 7. Run the Event Viewer to the previous version if updated recently. 11. If the mouse uses a wireless connection, insert new batteries and confirm there is ok. 3. Restore system and file settings from a known good date using System Restore. Roll back the mouse...
Service Guide
Page 160
... the FRU. 3. Power-off the computer. 2. Power-on page 138.): 1. If the problem does not recur, reconnect the removed devices one at the time of the following devices: • Non-Acer devices • Printer, mouse, and other external devices • Battery pack • Hard disk drive • DIMM • CD-ROM/Diskette drive...
... the FRU. 3. Power-off the computer. 2. Power-on page 138.): 1. If the problem does not recur, reconnect the removed devices one at the time of the following devices: • Non-Acer devices • Printer, mouse, and other external devices • Battery pack • Hard disk drive • DIMM • CD-ROM/Diskette drive...
Service Guide
Page 207
...Utility 33 Antennas Removing 94, 96 Replacing 98 B Battery Replacing 135 Battery Pack Removing 47 BIOS ROM type 16 vendor 16... Top View 155 brightness hotkeys 13 C Camera Module Removing 89 Replacing 101, 103, 104, 106 Common Problems 138 computer on indicator 9 CPU Removing 83 Replacing 109 D DIMM Modules Replacing 130 Display 5 Index display... Removing 56 Replacing 128 HDTV Switch Failure 149 Hibernation mode hotkey 13 Hot Keys 11 I Indicators 9 Intermittent Problems 150 Internal Microphone Failure 143 Internal Speaker Failure 142 J Jumper and Connector Locations 155 K Keyboard Removing 59 ...
...Utility 33 Antennas Removing 94, 96 Replacing 98 B Battery Replacing 135 Battery Pack Removing 47 BIOS ROM type 16 vendor 16... Top View 155 brightness hotkeys 13 C Camera Module Removing 89 Replacing 101, 103, 104, 106 Common Problems 138 computer on indicator 9 CPU Removing 83 Replacing 109 D DIMM Modules Replacing 130 Display 5 Index display... Removing 56 Replacing 128 HDTV Switch Failure 149 Hibernation mode hotkey 13 Hot Keys 11 I Indicators 9 Intermittent Problems 150 Internal Microphone Failure 143 Internal Speaker Failure 142 J Jumper and Connector Locations 155 K Keyboard Removing 59 ...


