Service Guide
Page 7
...Acer Notebook tour 6 Front View 6 Closed Front View 7 Left View 7 Right View 8 Bottom View 9 Indicators 9 TouchPad Basics 10 Using the Keyboard 11 Lock Keys and embedded numeric keypad 11 Windows Keys 12 Hot Keys 13 Hardware Specifications and Configurations 14 System Utilities 25 BIOS Setup Utility 25 Navigating the BIOS Utility 25 Aspire 5251.../5551G/5551 BIOS 26 Information 26 Main 27 Security 28 Boot 31 Exit 32 BIOS Flash Utilities 33 DOS Flash Utility ...
...Acer Notebook tour 6 Front View 6 Closed Front View 7 Left View 7 Right View 8 Bottom View 9 Indicators 9 TouchPad Basics 10 Using the Keyboard 11 Lock Keys and embedded numeric keypad 11 Windows Keys 12 Hot Keys 13 Hardware Specifications and Configurations 14 System Utilities 25 BIOS Setup Utility 25 Navigating the BIOS Utility 25 Aspire 5251.../5551G/5551 BIOS 26 Information 26 Main 27 Security 28 Boot 31 Exit 32 BIOS Flash Utilities 33 DOS Flash Utility ...
Service Guide
Page 8
... the SD Dummy Card 134 Replacing the Battery 135 Troubleshooting 137 Common Problems 137 Power On Issue 138 No Display Issue 139 Random Loss of BIOS Settings 140 LCD Failure 141 Built-In Keyboard Failure 141 TouchPad Failure 142 Internal Speaker Failure 142 HDD Not Operating Correctly 144 ODD Failure 145...
... the SD Dummy Card 134 Replacing the Battery 135 Troubleshooting 137 Common Problems 137 Power On Issue 138 No Display Issue 139 Random Loss of BIOS Settings 140 LCD Failure 141 Built-In Keyboard Failure 141 TouchPad Failure 142 Internal Speaker Failure 142 HDD Not Operating Correctly 144 ODD Failure 145...
Service Guide
Page 9
...Power Board 157 CR/B Board 158 Clearing Password Check and BIOS Recovery 159 Clearing Password Check 159 Clear CMOS Jumper 159 BIOS Recovery by Crisis Disk 160 FRU (Field Replaceable Unit) List 161 Aspire 5251/5551G/5551 Exploded Diagrams 162 Main Assembly 162 Base Assembly ...163 LED Assembly 164 Aspire 5251/5551G/5551 FRU List 165 Screw List 166 Model Definition and Configuration 168 Aspire 5251 168 Aspire 5551G 170 Aspire...
...Power Board 157 CR/B Board 158 Clearing Password Check and BIOS Recovery 159 Clearing Password Check 159 Clear CMOS Jumper 159 BIOS Recovery by Crisis Disk 160 FRU (Field Replaceable Unit) List 161 Aspire 5251/5551G/5551 Exploded Diagrams 162 Main Assembly 162 Base Assembly ...163 LED Assembly 164 Aspire 5251/5551G/5551 FRU List 165 Screw List 166 Model Definition and Configuration 168 Aspire 5251 168 Aspire 5551G 170 Aspire...
Service Guide
Page 13
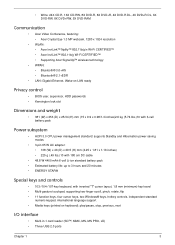
...8X DVD+RW, 5X DVD-RAM Communication • Acer Video Conference, featuring: • Acer Crystal Eye 1.3 MP webcam, 1280 x 1024 resolution • WLAN: • Acer InviLink™ Nplify™ 802.11b/g/n Wi-Fi CERTIFIED™ • Acer InviLink™ 802.11b/g Wi-Fi CERTIFIED™ ...• Supporting Acer SignalUp™ wireless technology • WPAN: • Bluetooth® 3.0+HS • Bluetooth® 2.1+EDR • LAN: Gigabit Ethernet, Wake-on-LAN ready Privacy control • BIOS user, supervisor, HDD...
...8X DVD+RW, 5X DVD-RAM Communication • Acer Video Conference, featuring: • Acer Crystal Eye 1.3 MP webcam, 1280 x 1024 resolution • WLAN: • Acer InviLink™ Nplify™ 802.11b/g/n Wi-Fi CERTIFIED™ • Acer InviLink™ 802.11b/g Wi-Fi CERTIFIED™ ...• Supporting Acer SignalUp™ wireless technology • WPAN: • Bluetooth® 3.0+HS • Bluetooth® 2.1+EDR • LAN: Gigabit Ethernet, Wake-on-LAN ready Privacy control • BIOS user, supervisor, HDD...
Service Guide
Page 23
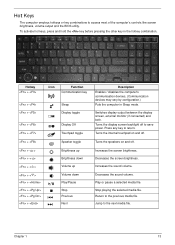
... . Chapter 1 13 Hot Keys The computer employs hotkeys or key combinations to access most of the computer's controls like screen brightness, volume output and the BIOS utility. To activate hot keys, press and hold the key before pressing the other key in Sleep mode.
... . Chapter 1 13 Hot Keys The computer employs hotkeys or key combinations to access most of the computer's controls like screen brightness, volume output and the BIOS utility. To activate hot keys, press and hold the key before pressing the other key in Sleep mode.
Service Guide
Page 26
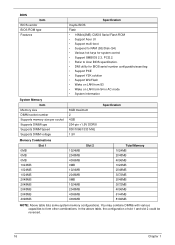
BIOS Item BIOS vendor BIOS ROM type Features Specification Insyde BIOS Flash • 16Mbit(2MB) CMOS Serial Flash ROM • Support Acer UI • Support multi-boot • Suspend to RAM (S3)/Disk (S4) • Various hot-keys for system control • Support ...SMBIOS 2.3, PCI2.2. • Refer to form other combinations. You may combine DIMMs with various capacities to Acer BIOS specification. • DMI utility for BIOS serial number configurable/asset tag • Support PXE • Support Y2K solution • Support WinFlash • Wake on LAN from...
BIOS Item BIOS vendor BIOS ROM type Features Specification Insyde BIOS Flash • 16Mbit(2MB) CMOS Serial Flash ROM • Support Acer UI • Support multi-boot • Suspend to RAM (S3)/Disk (S4) • Various hot-keys for system control • Support ...SMBIOS 2.3, PCI2.2. • Refer to form other combinations. You may combine DIMMs with various capacities to Acer BIOS specification. • DMI utility for BIOS serial number configurable/asset tag • Support PXE • Support Y2K solution • Support WinFlash • Wake on LAN from...
Service Guide
Page 31
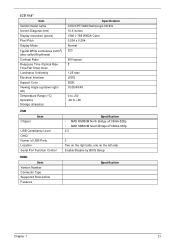
... RS880M North Bridge uFCBGA-528p • AMD SB820M South Bridge uFCBGA-605p 2.0 3 Two on the right side, one on the left side Enable/Disable by BIOS Setup HDMI Item Version Number Connector Type Supported Resolutions Features Specification Chapter 1 21
... RS880M North Bridge uFCBGA-528p • AMD SB820M South Bridge uFCBGA-605p 2.0 3 Two on the right side, one on the left side Enable/Disable by BIOS Setup HDMI Item Version Number Connector Type Supported Resolutions Features Specification Chapter 1 21
Service Guide
Page 35
... Exit. Chapter 2 25 You can change the value of screen). Please note that system information is a hardware configuration program built into your computer's BIOS (Basic Input/ Output System). In this menu, user can also press F10 to save any menu, you may need to run Setup. NOTE:... You can load default settings by pressing F9. However, if you encounter configuration problems, you can change boot device without entering BIOS SETUP Utility. The default parameter of F12 Boot Menu is already properly configured and optimized, and you want to change the value of a...
... Exit. Chapter 2 25 You can change the value of screen). Please note that system information is a hardware configuration program built into your computer's BIOS (Basic Input/ Output System). In this menu, user can also press F10 to save any menu, you may need to run Setup. NOTE:... You can load default settings by pressing F9. However, if you encounter configuration problems, you can change boot device without entering BIOS SETUP Utility. The default parameter of F12 Boot Menu is already properly configured and optimized, and you want to change the value of a...
Service Guide
Page 36
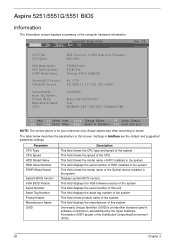
... System BIOS Version: VGA BIOS Version: Serial Number: Asset Tag Number: Product Name: Manufacturer Name: UUID: AMD Turion(tm) II N530 Dual-Core Processor 2500 MHz ST9250315AS 5VC8CXKX Slimtype DVD A DS8A2SH V0. 17T01 ATI VER0.12. 017. 000. 000. 034815 123456789 Aspire 5251/5551G/5551 Acer AE088D61-...suggested parameter settings. This field displays the serial number of the system. This field shows product name of this unit. Aspire 5251/5551G/5551 BIOS Information The Information screen displays a summary of the Optical device installed in the system. This field shows the model ...
... System BIOS Version: VGA BIOS Version: Serial Number: Asset Tag Number: Product Name: Manufacturer Name: UUID: AMD Turion(tm) II N530 Dual-Core Processor 2500 MHz ST9250315AS 5VC8CXKX Slimtype DVD A DS8A2SH V0. 17T01 ATI VER0.12. 017. 000. 000. 034815 123456789 Aspire 5251/5551G/5551 Acer AE088D61-...suggested parameter settings. This field displays the serial number of the system. This field shows product name of this unit. Aspire 5251/5551G/5551 BIOS Information The Information screen displays a summary of the Optical device installed in the system. This field shows the model ...
Service Guide
Page 38
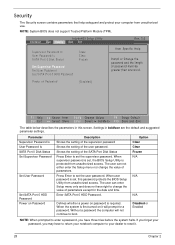
... Frozen Rev. 3.5 Item Specific Help Install or Change the password and the length of the SATA Port Disk Status Press Enter to set , the BIOS Setup Utility is set the user password. Press Enter to set , this screen. Option Clear Clear Frozen N/A N/A N/A Disabled or Enabled NOTE: ...the setting of the user password. If you forget your computer from unauthorized access. NOTE: System BIOS does not support Trusted Platform Module (TPM). Settings in this password protects the BIOS Setup Utility from unauthorized access. The user can not either enter the Setup menu nor change ...
... Frozen Rev. 3.5 Item Specific Help Install or Change the password and the length of the SATA Port Disk Status Press Enter to set , the BIOS Setup Utility is set the user password. Press Enter to set , this screen. Option Clear Clear Frozen N/A N/A N/A Disabled or Enabled NOTE: ...the setting of the user password. If you forget your computer from unauthorized access. NOTE: System BIOS does not support Trusted Platform Module (TPM). Settings in this password protects the BIOS Setup Utility from unauthorized access. The user can not either enter the Setup menu nor change ...
Service Guide
Page 39
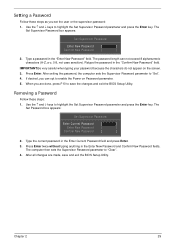
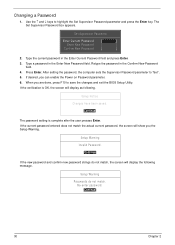
...password in the "Enter New Password" field. Setting a Password Follow these steps: 1. The password length can opt to save and exit the BIOS Setup Utility. When you set the user or the supervisor password: 1. The Set Password box appears: Set Supervisor Password Enter Current Password [... New Password [ ] Confirm New Password [ ] 2. Removing a Password Follow these steps as you are made, save the changes and exit the BIOS Setup Utility. Use the ↑ and ↓ keys to "Clear". 4. The computer then sets the Supervisor Password parameter to highlight the Set Supervisor...
...password in the "Enter New Password" field. Setting a Password Follow these steps: 1. The password length can opt to save and exit the BIOS Setup Utility. When you set the user or the supervisor password: 1. The Set Password box appears: Set Supervisor Password Enter Current Password [... New Password [ ] Confirm New Password [ ] 2. Removing a Password Follow these steps as you are made, save the changes and exit the BIOS Setup Utility. Use the ↑ and ↓ keys to "Clear". 4. The computer then sets the Supervisor Password parameter to highlight the Set Supervisor...
Service Guide
Page 40
Use the ↑ and ↓ keys to save the changes and exit the BIOS Setup Utility. The Set Supervisor Password box appears. Type a password in the Enter Current Password field and press Enter. 3. Setup Notice Changes have been saved. [...
Use the ↑ and ↓ keys to save the changes and exit the BIOS Setup Utility. The Set Supervisor Password box appears. Type a password in the Enter Current Password field and press Enter. 3. Setup Notice Changes have been saved. [...
Service Guide
Page 42
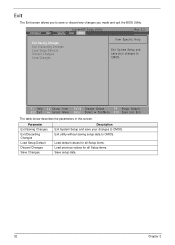
Exit utility without saving setup data to CMOS. Exit The Exit screen allows you made and quit the BIOS Utility. Load default values for all Setup items. Load previous values for all Setup items. Save setup data. 32 Chapter 2 Information Main InsydeH20 Setup Utility ...
Exit utility without saving setup data to CMOS. Exit The Exit screen allows you made and quit the BIOS Utility. Load default values for all Setup items. Load previous values for all Setup items. Save setup data. 32 Chapter 2 Information Main InsydeH20 Setup Utility ...
Service Guide
Page 43
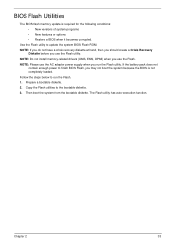
...does not contain enough power to run the Flash utility. Prepare a bootable diskette. 2. Copy the Flash utilities to update the system BIOS Flash ROM. BIOS Flash Utilities The BIOS flash memory update is not completely loaded. NOTE: If you do not have a crisis recovery diskette at hand, then you should ...corrupted. NOTE: Do not install memory-related drivers (XMS, EMS, DPMI) when you run the Flash. 1. Follow the steps below to finish BIOS Flash, you use the Flash. The Flash utility has auto-execution function. Chapter 2 33 NOTE: Please use the AC adaptor power supply when you...
...does not contain enough power to run the Flash utility. Prepare a bootable diskette. 2. Copy the Flash utilities to update the system BIOS Flash ROM. BIOS Flash Utilities The BIOS flash memory update is not completely loaded. NOTE: If you do not have a crisis recovery diskette at hand, then you should ...corrupted. NOTE: Do not install memory-related drivers (XMS, EMS, DPMI) when you run the Flash. 1. Follow the steps below to finish BIOS Flash, you use the Flash. The Flash utility has auto-execution function. Chapter 2 33 NOTE: Please use the AC adaptor power supply when you...
Service Guide
Page 44
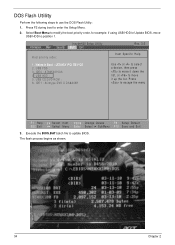
... list, or to position 1. InsydeH20 Setup Utility Information Main Security Boot Exit Boot priority order: Rev. 3.5 Item Specific Help 1. Execute the BIOS.BAT batch file to escape the menu F1 Help ESC Exit Select Item F5/F6 Change Values F9 Setup Default Select Menu Enter Select SubMenu... F10 Save and Exit 3. The flash process begins as shown. 34 Chapter 2 Network Boot : LEGACY PCI DEVICE 2. Press to update BIOS. DOS Flash Utility Perform the following steps to enter the Setup Menu. 2. Press F2 during boot to use the DOS Flash Utility: 1. USB FDD ...
... list, or to position 1. InsydeH20 Setup Utility Information Main Security Boot Exit Boot priority order: Rev. 3.5 Item Specific Help 1. Execute the BIOS.BAT batch file to escape the menu F1 Help ESC Exit Select Item F5/F6 Change Values F9 Setup Default Select Menu Enter Select SubMenu... F10 Save and Exit 3. The flash process begins as shown. 34 Chapter 2 Network Boot : LEGACY PCI DEVICE 2. Press to update BIOS. DOS Flash Utility Perform the following steps to enter the Setup Menu. 2. Press F2 during boot to use the DOS Flash Utility: 1. USB FDD ...

Service Guide
Page 45
Flash is not connected, the following message displays. Plug in the AC power to continue. 5. NOTE: If the AC power is complete when the message Flash programming complete displays. In flash BIOS, the message Please do not remove AC Power Source displays. Chapter 2 35 4.
Flash is not connected, the following message displays. Plug in the AC power to continue. 5. NOTE: If the AC power is complete when the message Flash programming complete displays. In flash BIOS, the message Please do not remove AC Power Source displays. Chapter 2 35 4.
Service Guide
Page 47
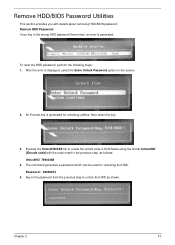
Note down this key. 3. Password : 46548274 5. An Encode key is generated. Remove HDD/BIOS Password Utilities This section provides you with the code noted in the wrong HDD password three times, an error is generated for unlocking the HDD. ... the password from the previous step to create the unlock code in DOS Mode using the format UnlockHD [Encode code] with details about removing HDD/BIOS password: Remove HDD Password: If you key in the previous step, as shown. Execute the UnlockHD.EXE file to unlock the HDD as follows: UnlockHD...
Note down this key. 3. Password : 46548274 5. An Encode key is generated. Remove HDD/BIOS Password Utilities This section provides you with the code noted in the wrong HDD password three times, an error is generated for unlocking the HDD. ... the password from the previous step to create the unlock code in DOS Mode using the format UnlockHD [Encode code] with details about removing HDD/BIOS password: Remove HDD Password: If you key in the previous step, as shown. Execute the UnlockHD.EXE file to unlock the HDD as follows: UnlockHD...
Service Guide
Page 48
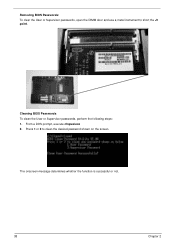
From a DOS prompt, execute clnpwd.exe 2. Press 1 or 2 to short the J1 point. Removing BIOS Passwords: To clear the User or Supervisor passwords, open the DIMM door and use a metal instrument to clean the desired password shown on the screen. The onscreen message determines whether the function is successful or not. 38 Chapter 2 Cleaning BIOS Passwords To clean the User or Supervisor passwords, perform the following steps: 1.
From a DOS prompt, execute clnpwd.exe 2. Press 1 or 2 to short the J1 point. Removing BIOS Passwords: To clear the User or Supervisor passwords, open the DIMM door and use a metal instrument to clean the desired password shown on the screen. The onscreen message determines whether the function is successful or not. 38 Chapter 2 Cleaning BIOS Passwords To clean the User or Supervisor passwords, perform the following steps: 1.
Service Guide
Page 49
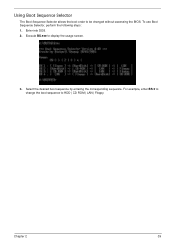
Using Boot Sequence Selector The Boot Sequence Selector allows the boot order to HDD | CD ROM | LAN | Floppy. To use Boot Sequence Selector, perform the following steps: 1. Select the desired boot sequence by entering the corresponding sequence. For example, enter BS 2 to change the boot sequence to be changed without accessing the BIOS. Enter into DOS. 2. Chapter 2 39 Execute BS.exe to display the usage screen. 3.
Using Boot Sequence Selector The Boot Sequence Selector allows the boot order to HDD | CD ROM | LAN | Floppy. To use Boot Sequence Selector, perform the following steps: 1. Select the desired boot sequence by entering the corresponding sequence. For example, enter BS 2 to change the boot sequence to be changed without accessing the BIOS. Enter into DOS. 2. Chapter 2 39 Execute BS.exe to display the usage screen. 3.
Service Guide
Page 50
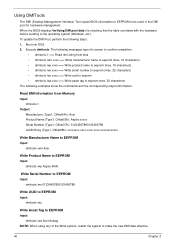
... completion: • dmitools /r ==> Read dmi string from Memory Input: dmitools /r Output: Manufacturer (Type1, Offset04h): Acer Product Name (Type1, Offset05h): Aspire xxxxx Serial Number (Type1, Offset07h): 01234567890123456789 UUID String (Type1, Offset08h): xxxxxxxx-xxxx-xxxx-xxxx-xxxxxxxxxxxx Write Manufacturer Name to...max. 32 characters) The following examples show the commands and the corresponding output information. Boot into DOS. 2. Read DMI Information from bios • dmitools /wm xxxx ==> Write manufacturer name to eeprom (max. 16 characters) • dmitools /wp xxxx ==> Write...
... completion: • dmitools /r ==> Read dmi string from Memory Input: dmitools /r Output: Manufacturer (Type1, Offset04h): Acer Product Name (Type1, Offset05h): Aspire xxxxx Serial Number (Type1, Offset07h): 01234567890123456789 UUID String (Type1, Offset08h): xxxxxxxx-xxxx-xxxx-xxxx-xxxxxxxxxxxx Write Manufacturer Name to...max. 32 characters) The following examples show the commands and the corresponding output information. Boot into DOS. 2. Read DMI Information from bios • dmitools /wm xxxx ==> Write manufacturer name to eeprom (max. 16 characters) • dmitools /wp xxxx ==> Write...


