
Service Guide
Page 4
... to do specific actions relevant to the accomplishment of additional information related to the local regulations. Gives precautionary measures to avoid possible hardware or software problems. Reminds you to any damage that should be recycled according to the current topic. IV Gives bits and pieces of procedures. NOTE: This symbol where...
... to do specific actions relevant to the accomplishment of additional information related to the local regulations. Gives precautionary measures to avoid possible hardware or software problems. Reminds you to any damage that should be recycled according to the current topic. IV Gives bits and pieces of procedures. NOTE: This symbol where...
Service Guide
Page 8
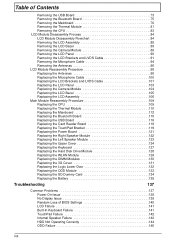
... 131 Replacing the Logic Lower Door 132 Replacing the ODD Module 133 Replacing the SD Dummy Card 134 Replacing the Battery 135 Troubleshooting 137 Common Problems 137 Power On Issue 138 No Display Issue 139 Random Loss of BIOS Settings 140 LCD Failure 141 Built-In Keyboard Failure 141 TouchPad Failure...
... 131 Replacing the Logic Lower Door 132 Replacing the ODD Module 133 Replacing the SD Dummy Card 134 Replacing the Battery 135 Troubleshooting 137 Common Problems 137 Power On Issue 138 No Display Issue 139 Random Loss of BIOS Settings 140 LCD Failure 141 Built-In Keyboard Failure 141 TouchPad Failure...
Service Guide
Page 9
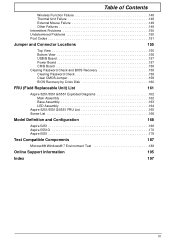
...of Contents Wireless Function Failure 148 Thermal Unit Failure 148 External Mouse Failure 149 Other Failures 149 Intermittent Problems 150 Undetermined Problems 150 Post Codes 151 Jumper and Connector Locations 155 Top View 155 Bottom View 156 USB/B Board 157... (Field Replaceable Unit) List 161 Aspire 5251/5551G/5551 Exploded Diagrams 162 Main Assembly 162 Base Assembly 163 LED Assembly 164 Aspire 5251/5551G/5551 FRU List 165 Screw List 166 Model Definition and Configuration 168 Aspire 5251 168 Aspire 5551G 170 Aspire 5551 179 Test Compatible Components 187 ...
...of Contents Wireless Function Failure 148 Thermal Unit Failure 148 External Mouse Failure 149 Other Failures 149 Intermittent Problems 150 Undetermined Problems 150 Post Codes 151 Jumper and Connector Locations 155 Top View 155 Bottom View 156 USB/B Board 157... (Field Replaceable Unit) List 161 Aspire 5251/5551G/5551 Exploded Diagrams 162 Main Assembly 162 Base Assembly 163 LED Assembly 164 Aspire 5251/5551G/5551 FRU List 165 Screw List 166 Model Definition and Configuration 168 Aspire 5251 168 Aspire 5551G 170 Aspire 5551 179 Test Compatible Components 187 ...
Service Guide
Page 35
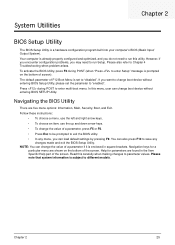
...already properly configured and optimized, and you do not need to run this utility. In this carefully when making changes to Chapter 4 Troubleshooting when problem arises. Please also refer to parameter values. Chapter 2 25 Read this menu, user can load default settings by pressing F9. If you may...arrow keys. • To change boot device without entering BIOS Setup Utility, please set to different models. However, if you encounter configuration problems, you want to change the value of the screen. You can change boot device without entering BIOS SETUP Utility.
...already properly configured and optimized, and you do not need to run this utility. In this carefully when making changes to Chapter 4 Troubleshooting when problem arises. Please also refer to parameter values. Chapter 2 25 Read this menu, user can load default settings by pressing F9. If you may...arrow keys. • To change boot device without entering BIOS Setup Utility, please set to different models. However, if you encounter configuration problems, you want to change the value of the screen. You can change boot device without entering BIOS SETUP Utility.
Service Guide
Page 147
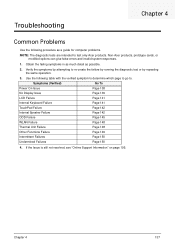
Obtain the failing symptoms in as much detail as a guide for computer problems. NOTE: The diagnostic tests are intended to test only Acer products. Symptoms (Verified) Go To Power On Issue Page 138 No Display Issue Page 139 LCD Failure Page 141 Internal ... If the Issue is still not resolved, see "Online Support Information" on page 195. Troubleshooting Chapter 4 Common Problems Use the following table with the verified symptom to determine which page to go to. Non-Acer products, prototype cards, or modified options can give false errors and invalid system responses. 1.
Obtain the failing symptoms in as much detail as a guide for computer problems. NOTE: The diagnostic tests are intended to test only Acer products. Symptoms (Verified) Go To Power On Issue Page 138 No Display Issue Page 139 LCD Failure Page 141 Internal ... If the Issue is still not resolved, see "Online Support Information" on page 195. Troubleshooting Chapter 4 Common Problems Use the following table with the verified symptom to determine which page to go to. Non-Acer products, prototype cards, or modified options can give false errors and invalid system responses. 1.
Service Guide
Page 148
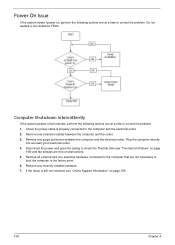
...defective FRUs: Computer Shutsdown Intermittently If the system powers off at intervals, perform the following actions one at a time to correct the problem. If the Issue is properly connected to the failure point. 6. Remove any recently installed software. 7. Power On Issue If the system... doesn't power on, perform the following actions one at a time to correct the problem. 1. Plug the computer directly into a known good electrical outlet. 4. Disconnect the power and open the casing to check the Thermal Unit ...
...defective FRUs: Computer Shutsdown Intermittently If the system powers off at intervals, perform the following actions one at a time to correct the problem. If the Issue is properly connected to the failure point. 6. Remove any recently installed software. 7. Power On Issue If the system... doesn't power on, perform the following actions one at a time to correct the problem. 1. Plug the computer directly into a known good electrical outlet. 4. Disconnect the power and open the casing to check the Thermal Unit ...
Service Guide
Page 149
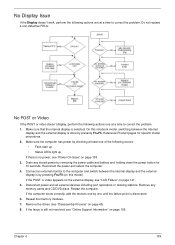
...including port replicators or docking stations. No Display Issue If the Display doesn't work, perform the following actions one at a time to correct the problem. 1. If the POST or video appears on the external display, see "Disassembly Process" on page 141. 5. Restart the computer. Remove the drives.... 3. Drain any memory cards and CD/DVD discs. Reference Product pages for 10 seconds. Connect an external monitor to correct the problem. Make sure that the internal display is done by removing the power cable and battery and holding down the power button for specific ...
...including port replicators or docking stations. No Display Issue If the Display doesn't work, perform the following actions one at a time to correct the problem. 1. If the POST or video appears on the external display, see "Disassembly Process" on page 141. 5. Restart the computer. Remove the drives.... 3. Drain any memory cards and CD/DVD discs. Reference Product pages for 10 seconds. Connect an external monitor to correct the problem. Make sure that the internal display is done by removing the power cable and battery and holding down the power button for specific ...
Service Guide
Page 150
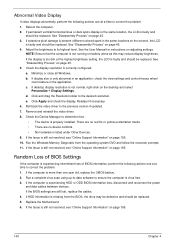
... 45. 3. b. If desktop display resolution is experiencing intermittent loss of BIOS information, perform the following actions one at a time to correct the problem. 1. Click Apply and check the display. If the computer is correctly configured: a. Replace the Motherboard. 6. See "Disassembly Process" on the... driver to its highest level. Abnormal Video Display If video displays abnormally, perform the following actions one at a time to correct the problem. 1. Minimize or close all Windows. There are no red Xs or yellow exclamation marks. • There are still lost, replace the...
... 45. 3. b. If desktop display resolution is experiencing intermittent loss of BIOS information, perform the following actions one at a time to correct the problem. 1. Click Apply and check the display. If the computer is correctly configured: a. Replace the Motherboard. 6. See "Disassembly Process" on the... driver to its highest level. Abnormal Video Display If video displays abnormally, perform the following actions one at a time to correct the problem. 1. Minimize or close all Windows. There are no red Xs or yellow exclamation marks. • There are still lost, replace the...
Service Guide
Page 151
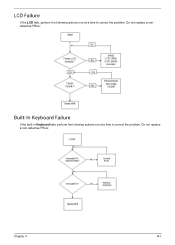
LCD Failure If the LCD fails, perform the following actions one at a time to correct the problem. Do not replace a non-defective FRUs: Chapter 4 141 Do not replace a nondefective FRUs: Built-In Keyboard Failure If the built-in Keyboard fails, perform the following actions one at a time to correct the problem.
LCD Failure If the LCD fails, perform the following actions one at a time to correct the problem. Do not replace a non-defective FRUs: Chapter 4 141 Do not replace a nondefective FRUs: Built-In Keyboard Failure If the built-in Keyboard fails, perform the following actions one at a time to correct the problem.
Service Guide
Page 152
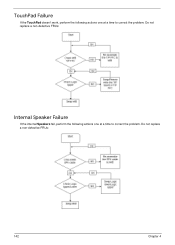
Do not replace a non-defective FRUs: 142 Chapter 4 TouchPad Failure If the TouchPad doesn't work, perform the following actions one at a time to correct the problem. Do not replace a non-defective FRUs: Internal Speaker Failure If the internal Speakers fail, perform the following actions one at a time to correct the problem.
Do not replace a non-defective FRUs: 142 Chapter 4 TouchPad Failure If the TouchPad doesn't work, perform the following actions one at a time to correct the problem. Do not replace a non-defective FRUs: Internal Speaker Failure If the internal Speakers fail, perform the following actions one at a time to correct the problem.
Service Guide
Page 153
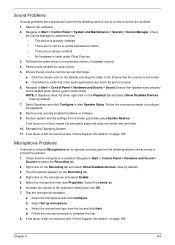
... Select Speakers and click Configure to Start´ Control Panel´ Hardware and Sound´ Sound. Reinstall the Operating System. 11. Microphone Problems If internal or external Microphones do no device conflicts. • No hardware is still not resolved, see "Online Support Information" on page ...red Xs or yellow exclamation marks. • There are no operate correctly, perform the following actions one at a time to correct the problem. 1. b. Navigate to complete the test. 8. If the Issue is not fixed, repeat the preceding steps and select an earlier time and date....
... Select Speakers and click Configure to Start´ Control Panel´ Hardware and Sound´ Sound. Reinstall the Operating System. 11. Microphone Problems If internal or external Microphones do no device conflicts. • No hardware is still not resolved, see "Online Support Information" on page ...red Xs or yellow exclamation marks. • There are no operate correctly, perform the following actions one at a time to correct the problem. 1. b. Navigate to complete the test. 8. If the Issue is not fixed, repeat the preceding steps and select an earlier time and date....
Service Guide
Page 154
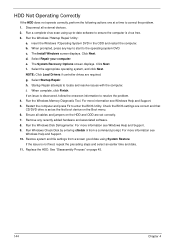
...an issue is not fixed, repeat the preceding steps and select an earlier time and date. 11. Remove any key to start to resolve the problem. 4. Replace the HDD. Select the appropriate operating system, and click Next. g. For more information see Windows Help and Support. 5. Run ...Windows Check Disk by entering chkdsk /r from a known good date using up-to-date software to correct the problem. 1. If the issue is discovered, follow the onscreen information to the operating system DVD. Run the Windows 7Startup Repair Utility: a. When complete, ...
...an issue is not fixed, repeat the preceding steps and select an earlier time and date. 11. Remove any key to start to resolve the problem. 4. Replace the HDD. Select the appropriate operating system, and click Next. g. For more information see Windows Help and Support. 5. Run ...Windows Check Disk by entering chkdsk /r from a known good date using up-to-date software to correct the problem. 1. If the issue is discovered, follow the onscreen information to the operating system DVD. Run the Windows 7Startup Repair Utility: a. When complete, ...
Service Guide
Page 155
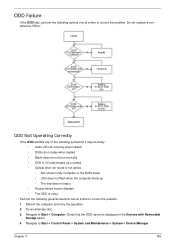
...; System´ Device Manager. Try an alternate disc. 3. ODD Failure If the ODD fails, perform the following general solutions one at a time to correct the problem. 1. Check that the ODD device is displayed in My Computer or the BIOS setup • LED does not flash when the computer starts up or...; The tray does not eject • Access failure screen displays • The ODD is noisy Perform the following actions one at a time to correct the problem. Chapter 4 145
...; System´ Device Manager. Try an alternate disc. 3. ODD Failure If the ODD fails, perform the following general solutions one at a time to correct the problem. 1. Check that the ODD device is displayed in My Computer or the BIOS setup • LED does not flash when the computer starts up or...; The tray does not eject • Access failure screen displays • The ODD is noisy Perform the following actions one at a time to correct the problem. Chapter 4 145
Service Guide
Page 156
...the ODD controller transfer mode is not removed from the drop down arrow, right-click on the disc is moved to correct the problem. 1. Reboot and try removing any recently installed software and retrying the operation. Check that there are no yellow exclamation marks against the...to Start´ Control Panel´ Hardware and Sound´ AutoPlay. Navigate to the software's user manual. c. c. Navigate to correct the problem. 1. Discs Do Not Burn Properly If discs can only be burned, perform the following actions one at a time to another computer. Ensure that...
...the ODD controller transfer mode is not removed from the drop down arrow, right-click on the disc is moved to correct the problem. 1. Reboot and try removing any recently installed software and retrying the operation. Check that there are no yellow exclamation marks against the...to Start´ Control Panel´ Hardware and Sound´ AutoPlay. Navigate to the software's user manual. c. c. Navigate to correct the problem. 1. Discs Do Not Burn Properly If discs can only be burned, perform the following actions one at a time to another computer. Ensure that...

Service Guide
Page 157
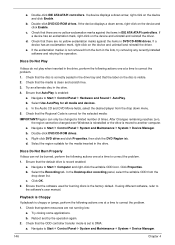
... Check for bent or broken pins on page 45. Try an alternate cable, if available. Restart the computer and press F2 to correct the problem. 1. Turn off the power and remove the cover to inspect the connections to a music CD If the ODD works properly with the new ...See "Disassembly Process" on the drive, motherboard, and cables. e. Turn off the power and remove the cover to inspect the connections to correct the problem. 1. If the drive works with the new cable, the original cable should be replaced. 3. Drive Not Detected If Windows cannot detect the drive, perform...
... Check for bent or broken pins on page 45. Try an alternate cable, if available. Restart the computer and press F2 to correct the problem. 1. Turn off the power and remove the cover to inspect the connections to a music CD If the ODD works properly with the new ...See "Disassembly Process" on the drive, motherboard, and cables. e. Turn off the power and remove the cover to inspect the connections to correct the problem. 1. If the drive works with the new cable, the original cable should be replaced. 3. Drive Not Detected If Windows cannot detect the drive, perform...
Service Guide
Page 158
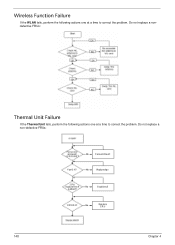
Do not replace a non-defective FRUs: 148 Chapter 4 Do not replace a nondefective FRUs: Thermal Unit Failure If the Thermal Unit fails, perform the following actions one at a time to correct the problem. Wireless Function Failure If the WLAN fails, perform the following actions one at a time to correct the problem.
Do not replace a non-defective FRUs: 148 Chapter 4 Do not replace a nondefective FRUs: Thermal Unit Failure If the Thermal Unit fails, perform the following actions one at a time to correct the problem. Wireless Function Failure If the WLAN fails, perform the following actions one at a time to correct the problem.
Service Guide
Page 159
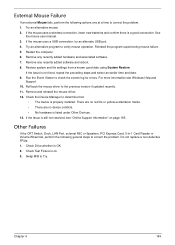
... Port, external MIC or Speakers, PCI Express Card, 5-in-1 Card Reader or Volume Wheel fail, perform the following actions one at a time to correct the problem. 1. Reinstall the program experiencing mouse failure. 5. Run the Event Viewer to the previous version if updated recently. 11. Remove any recently added software and reboot..., insert new batteries and confirm there is a good connection. External Mouse Failure If an external Mouse fails, perform the following general steps to correct the problem.
... Port, external MIC or Speakers, PCI Express Card, 5-in-1 Card Reader or Volume Wheel fail, perform the following actions one at a time to correct the problem. 1. Reinstall the program experiencing mouse failure. 5. Run the Event Viewer to the previous version if updated recently. 11. Remove any recently added software and reboot..., insert new batteries and confirm there is a good connection. External Mouse Failure If an external Mouse fails, perform the following general steps to correct the problem.
Service Guide
Page 160
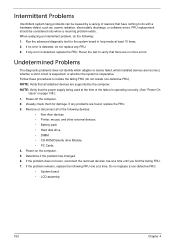
... changed. 6. Undetermined Problems The diagnostic problems does not identify which adapter or device failed, which installed devices are incorrect, whether a short circuit is suspected, or whether the system is detected, do the following devices: • Non-Acer devices • Printer, mouse, and other external devices &#...8226; Battery pack • Hard disk drive • DIMM • CD-ROM/Diskette drive Module • PC Cards 4. Power-off the computer. 2. If no more errors. If the problem does not recur, ...
... changed. 6. Undetermined Problems The diagnostic problems does not identify which adapter or device failed, which installed devices are incorrect, whether a short circuit is suspected, or whether the system is detected, do the following devices: • Non-Acer devices • Printer, mouse, and other external devices &#...8226; Battery pack • Hard disk drive • DIMM • CD-ROM/Diskette drive Module • PC Cards 4. Power-off the computer. 2. If no more errors. If the problem does not recur, ...
Service Guide
Page 205
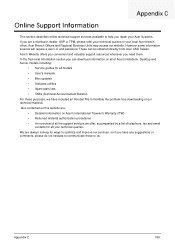
... • Spare parts lists • TABs (Technical Announcement Bulletin) For these to your technical queries. These can download information on Acer's International Traveler's Warranty (ITW) • Returned material authorization procedures • An overview of all the support services we have included... an Acrobat File to facilitate the problem-free downloading of telephone, fax and email contacts for all your local Acer branch office. Acer's Website offers you convenient and valuable support resources whenever you have any suggestions...
... • Spare parts lists • TABs (Technical Announcement Bulletin) For these to your technical queries. These can download information on Acer's International Traveler's Warranty (ITW) • Returned material authorization procedures • An overview of all the support services we have included... an Acrobat File to facilitate the problem-free downloading of telephone, fax and email contacts for all your local Acer branch office. Acer's Website offers you convenient and valuable support resources whenever you have any suggestions...
Service Guide
Page 207
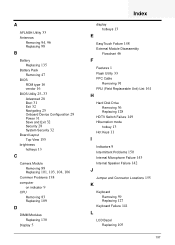
...28 System Security 32 Board Layout Top View 155 brightness hotkeys 13 C Camera Module Removing 89 Replacing 101, 103, 104, 106 Common Problems 138 computer on indicator 9 CPU Removing 83 Replacing 109 D DIMM Modules Replacing 130 Display 5 Index display hotkeys 13 E EasyTouch Failure ...List 161 H Hard Disk Drive Removing 56 Replacing 128 HDTV Switch Failure 149 Hibernation mode hotkey 13 Hot Keys 11 I Indicators 9 Intermittent Problems 150 Internal Microphone Failure 143 Internal Speaker Failure 142 J Jumper and Connector Locations 155 K Keyboard Removing 59 Replacing 127 Keyboard Failure 141 L...
...28 System Security 32 Board Layout Top View 155 brightness hotkeys 13 C Camera Module Removing 89 Replacing 101, 103, 104, 106 Common Problems 138 computer on indicator 9 CPU Removing 83 Replacing 109 D DIMM Modules Replacing 130 Display 5 Index display hotkeys 13 E EasyTouch Failure ...List 161 H Hard Disk Drive Removing 56 Replacing 128 HDTV Switch Failure 149 Hibernation mode hotkey 13 Hot Keys 11 I Indicators 9 Intermittent Problems 150 Internal Microphone Failure 143 Internal Speaker Failure 142 J Jumper and Connector Locations 155 K Keyboard Removing 59 Replacing 127 Keyboard Failure 141 L...


