
Service Guide
Page 87
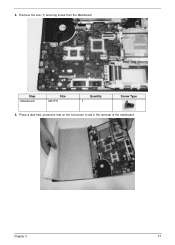
Place a dust free, protective mat on the lcd screen to aid in the removal of the mainboard. Chapter 3 77 Step Mainboard Size M2.5*5 Quantity 1 Screw Type 5. 4. Remove the one (1) securing screw from the Mainboard.
Place a dust free, protective mat on the lcd screen to aid in the removal of the mainboard. Chapter 3 77 Step Mainboard Size M2.5*5 Quantity 1 Screw Type 5. 4. Remove the one (1) securing screw from the Mainboard.
Service Guide
Page 150
...version if updated. 7. Random Loss of BIOS information, perform the following actions one at a time to correct the problem. 1. If display size is faulty and should be replaced. Run the Windows Memory Diagnostic from the BIOS, the drive may reduce display brightness. Minimize or close ...all Windows. If the Issue is still not resolved, see "Online Support Information" on the screen), the LCD is only abnormal in an application, check the view settings and control/mouse wheel zoom feature in the same locations on ...
...version if updated. 7. Random Loss of BIOS information, perform the following actions one at a time to correct the problem. 1. If display size is faulty and should be replaced. Run the Windows Memory Diagnostic from the BIOS, the drive may reduce display brightness. Minimize or close ...all Windows. If the Issue is still not resolved, see "Online Support Information" on the screen), the LCD is only abnormal in an application, check the view settings and control/mouse wheel zoom feature in the same locations on ...


