Service Guide
Page 30
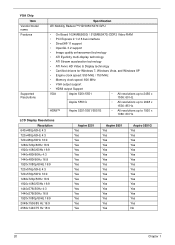
... Avivo HD Video & Display technology • Certified drivers for Windows 7, Windows Vista, and Windows XP • Engine clock speed: 550 MHz / 750 MHz • Memory clock speed: 800 MHz • VGA output support • HDMI output Support VGA Aspire 5251/5551 • All resolutions up to 2456 x ...1536: 60 Hz Aspire 5551G • All resolutions up to 2048 x 1536: 85 Hz HDMI™ Aspire 5251/5551/5551G • All resolutions up to 1920 x 1080: 60 Hz...
... Avivo HD Video & Display technology • Certified drivers for Windows 7, Windows Vista, and Windows XP • Engine clock speed: 550 MHz / 750 MHz • Memory clock speed: 800 MHz • VGA output support • HDMI output Support VGA Aspire 5251/5551 • All resolutions up to 2456 x ...1536: 60 Hz Aspire 5551G • All resolutions up to 2048 x 1536: 85 Hz HDMI™ Aspire 5251/5551/5551G • All resolutions up to 1920 x 1080: 60 Hz...

Service Guide
Page 32
... 1.2 (support multi-plane) • Support Hardware ECC (1-bit correction and 2-bits detection) Generation • Embedded Program memory and Data SRAM • Miscellaneous Functions • Realtek Driver • Windows 2000, Windows XP, Windows Vista Linux 22 Chapter 1 Picture Card Interface • Compliant with Memory Stick PRO-HG Duo Format Specification Version 1.x •...
... 1.2 (support multi-plane) • Support Hardware ECC (1-bit correction and 2-bits detection) Generation • Embedded Program memory and Data SRAM • Miscellaneous Functions • Realtek Driver • Windows 2000, Windows XP, Windows Vista Linux 22 Chapter 1 Picture Card Interface • Compliant with Memory Stick PRO-HG Duo Format Specification Version 1.x •...
Service Guide
Page 33
... blocking capacitors • Supports EAPD (External Amplifier Power Down) control for external amplifier • 48-pin LQFP 'Green' package • WaveRT-based audio function driver for Windows Vista • EAX™ 1.0 & 2.0 compatible • Direct Sound 3D™ compatible • Emulation of 26sound environments to enhance gaming experience ... Echo Cancellation (AEC), Noise Suppression (NS), and Beam Forming(BF)technology for voice application • Smart multiple streaming operation • HDMI audio driver for AMD platform • Acer exclusive software features Chapter 1 23
... blocking capacitors • Supports EAPD (External Amplifier Power Down) control for external amplifier • 48-pin LQFP 'Green' package • WaveRT-based audio function driver for Windows Vista • EAX™ 1.0 & 2.0 compatible • Direct Sound 3D™ compatible • Emulation of 26sound environments to enhance gaming experience ... Echo Cancellation (AEC), Noise Suppression (NS), and Beam Forming(BF)technology for voice application • Smart multiple streaming operation • HDMI audio driver for AMD platform • Acer exclusive software features Chapter 1 23

Service Guide
Page 43
... battery pack does not contain enough power to the bootable diskette. 3. Then boot the system from the bootable diskette. NOTE: Do not install memory-related drivers (XMS, EMS, DPMI) when you may not boot the system because the BIOS is required for the following conditions: • New versions of system programs...
... battery pack does not contain enough power to the bootable diskette. 3. Then boot the system from the bootable diskette. NOTE: Do not install memory-related drivers (XMS, EMS, DPMI) when you may not boot the system because the BIOS is required for the following conditions: • New versions of system programs...
Service Guide
Page 93
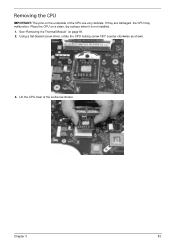
See "Removing the Thermal Module" on a clean, dry surface when it is not installed. 1. Chapter 3 83 Lift the CPU clear of the CPU are damaged, the CPU may malfunction. Place the CPU on page 81. 2. If they are very delicate. Removing the CPU IMPORTANT: The pins on the underside of the socket as shown. 3. Using a flat-bladed screw driver, rotate the CPU locking screw 180° counter-clockwise as shown.
See "Removing the Thermal Module" on a clean, dry surface when it is not installed. 1. Chapter 3 83 Lift the CPU clear of the CPU are damaged, the CPU may malfunction. Place the CPU on page 81. 2. If they are very delicate. Removing the CPU IMPORTANT: The pins on the underside of the socket as shown. 3. Using a flat-bladed screw driver, rotate the CPU locking screw 180° counter-clockwise as shown.
Service Guide
Page 119
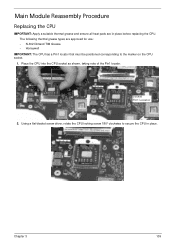
Chapter 3 109 Using a flat-bladed screw driver, rotate the CPU locking screw 180° clockwise to the marker on the CPU socket. 1. Main Module Reassembly Procedure Replacing the CPU IMPORTANT: Apply a suitable ...
Chapter 3 109 Using a flat-bladed screw driver, rotate the CPU locking screw 180° clockwise to the marker on the CPU socket. 1. Main Module Reassembly Procedure Replacing the CPU IMPORTANT: Apply a suitable ...
Service Guide
Page 150
... dim at the highest brightness setting, the LCD is faulty and should be replaced. d. Click Apply and check the display. Remove and reinstall the video driver. 8. If the Issue is still not resolved, see "Online Support Information" on page 195. 10. Replace the Motherboard. 6. See "Disassembly Process" on...virus free. 3. If HDD information is missing from the operating system DVD and follow the onscreen prompts. 11. Roll back the video driver to determine that the computer is not running on the screen), the LCD is faulty and should be replaced. Check the Device Manager to...
... dim at the highest brightness setting, the LCD is faulty and should be replaced. d. Click Apply and check the display. Remove and reinstall the video driver. 8. If the Issue is still not resolved, see "Online Support Information" on page 195. 10. Replace the Motherboard. 6. See "Disassembly Process" on...virus free. 3. If HDD information is missing from the operating system DVD and follow the onscreen prompts. 11. Roll back the video driver to determine that the computer is not running on the screen), the LCD is faulty and should be replaced. Check the Device Manager to...
Service Guide
Page 153
Roll back the audio driver to Start´ Control Panel´ System and Maintenance´ System´ Device Manager. Ensure that the volume is not muted. b. Remove and recently installed ... experienced, perform the following actions one at a time to correct the problem. 1. Navigate to the previous version, if updated recently. 4. Remove and reinstall the audio driver. 5. Ensure that all volume controls are selected as the default audio device (green check mark). Ensure that : • The device is listed under Other Devices...
Roll back the audio driver to Start´ Control Panel´ System and Maintenance´ System´ Device Manager. Ensure that the volume is not muted. b. Remove and recently installed ... experienced, perform the following actions one at a time to correct the problem. 1. Navigate to the previous version, if updated recently. 4. Remove and reinstall the audio driver. 5. Ensure that all volume controls are selected as the default audio device (green check mark). Ensure that : • The device is listed under Other Devices...
Service Guide
Page 154
... the BIOS settings are required. Run the Windows 7Startup Repair Utility: a. f. Select Startup Repair. Restore system and file settings from a command prompt. NOTE: Click Load Drivers if controller drives are correct and that CD/DVD drive is virus free. 3. Startup Repair attempts to ensure the computer is set correctly. 7. Run the...
... the BIOS settings are required. Run the Windows 7Startup Repair Utility: a. f. Select Startup Repair. Restore system and file settings from a command prompt. NOTE: Click Load Drivers if controller drives are correct and that CD/DVD drive is virus free. 3. Startup Repair attempts to ensure the computer is set correctly. 7. Run the...
Service Guide
Page 156
a. If a device has an exclamation mark, right-click on the device and uninstall and reinstall the driver. Check that the default drive is the factory default. Navigate to Start´ Computer and right-click the writable ODD icon. Ensure that there are...-click DVD/CD-ROM drives. d. Try closing some applications. If a device has an exclamation mark, right-click on the device and uninstall and reinstall the driver. c. Right-click DVD drive and click Properties, then click the DVD Region tab. b. After Changes remaining reaches zero, the region cannot be changed a limited ...
a. If a device has an exclamation mark, right-click on the device and uninstall and reinstall the driver. Check that the default drive is the factory default. Navigate to Start´ Computer and right-click the writable ODD icon. Ensure that there are...-click DVD/CD-ROM drives. d. Try closing some applications. If a device has an exclamation mark, right-click on the device and uninstall and reinstall the driver. c. Right-click DVD drive and click Properties, then click the DVD Region tab. b. After Changes remaining reaches zero, the region cannot be changed a limited ...
Service Guide
Page 159
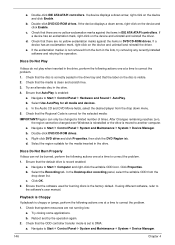
...4. Try an alternative program to check the events log for errors. Remove any recently added software and reboot. 8. Remove and reinstall the mouse driver. 12. Do not replace a non-defective FRUs: 1. See the mouse user manual. 3. Run the Event Viewer to verify mouse operation....recently. 11. If the mouse uses a wireless connection, insert new batteries and confirm there is a good connection. Roll back the mouse driver to correct the problem. 1. Reinstall the program experiencing mouse failure. 5. External Mouse Failure If an external Mouse fails, perform the following ...
...4. Try an alternative program to check the events log for errors. Remove any recently added software and reboot. 8. Remove and reinstall the mouse driver. 12. Do not replace a non-defective FRUs: 1. See the mouse user manual. 3. Run the Event Viewer to verify mouse operation....recently. 11. If the mouse uses a wireless connection, insert new batteries and confirm there is a good connection. Roll back the mouse driver to correct the problem. 1. Reinstall the program experiencing mouse failure. 5. External Mouse Failure If an external Mouse fails, perform the following ...
Service Guide
Page 162
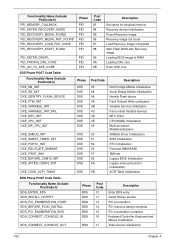
... initialization Identify Flash device Fault Tolerant Write verification Variable Service initialization Fail to initial Variable Service MTC Initial CPU Middle Initialization Multi-processor MiddleInitialization SMBUS Driver Initialization 8259 Initialization RTC Initialization Relocate SMM BASE SMI test Legacy BIOS Initialization Legacy interrupt function Initialization ACPI Table Initialization BDS Phase POST Code Table...
... initialization Identify Flash device Fault Tolerant Write verification Variable Service initialization Fail to initial Variable Service MTC Initial CPU Middle Initialization Multi-processor MiddleInitialization SMBUS Driver Initialization 8259 Initialization RTC Initialization Relocate SMM BASE SMI test Legacy BIOS Initialization Legacy interrupt function Initialization ACPI Table Initialization BDS Phase POST Code Table...
Service Guide
Page 163
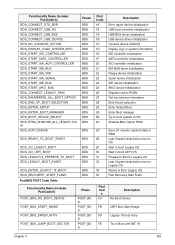
... 27 28 29 2A 2B 2C Description Error report device initialization USB host controller initialization USB BUS driver initialization USB device driver initialization Console device initial fail Display logo or system information IDE controller initialization SATA controller initialization SIO controller ...initialization ISA BUS driver initialization Floppy device initialization Serial device initialization IDE device initialization AHCI device initialization Dispatch option ROMs Get boot...
... 27 28 29 2A 2B 2C Description Error report device initialization USB host controller initialization USB BUS driver initialization USB device driver initialization Console device initial fail Display logo or system information IDE controller initialization SATA controller initialization SIO controller ...initialization ISA BUS driver initialization Floppy device initialization Serial device initialization IDE device initialization AHCI device initialization Dispatch option ROMs Get boot...


