User's Guide
Page 5
... device using the printer software 88 Printing photos from a PictBridge-enabled digital camera 90 Printing photos stored on a memory device using the proof sheet 91 Printing photos from a digital camera using DPOF ...92 Scanning 93 Scanning original documents...93 Scanning color or black-and-white original documents 95 Scanning photos for editing...95 Scanning to a computer...
... device using the printer software 88 Printing photos from a PictBridge-enabled digital camera 90 Printing photos stored on a memory device using the proof sheet 91 Printing photos from a digital camera using DPOF ...92 Scanning 93 Scanning original documents...93 Scanning color or black-and-white original documents 95 Scanning photos for editing...95 Scanning to a computer...
User's Guide
Page 20
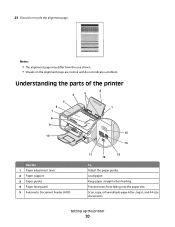
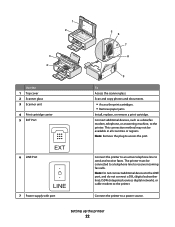
.... Scan, copy, or fax multiple-page letter-, legal-, and A4-size documents. Understanding the parts of the printer 2 4 3 5 6 1 7 8 9 10 W I F I PRINTING WI F I PRINTING 15 14 Use the 1 Paper adjustment lever 2 Paper support 3 Paper guides 4 Paper feed guard 5 Automatic Document Feeder (ADF) 11 13 12 To Adjust the paper guides. Setting up the printer 20...
.... Scan, copy, or fax multiple-page letter-, legal-, and A4-size documents. Understanding the parts of the printer 2 4 3 5 6 1 7 8 9 10 W I F I PRINTING WI F I PRINTING 15 14 Use the 1 Paper adjustment lever 2 Paper support 3 Paper guides 4 Paper feed guard 5 Automatic Document Feeder (ADF) 11 13 12 To Adjust the paper guides. Setting up the printer 20...
User's Guide
Page 21
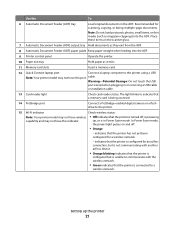
...exit from the ADF. 8 Automatic Document Feeder (ADF) paper guide Keep paper straight when feeding into the ADF. 9 Printer control panel Operate the printer. 10 Paper exit tray Hold paper as magazine clippings) into the ADF. cable. Warning-Potential Damage: Do not touch ...turned off . • Orange - up the printer 21 indicates that the printer is configured for scanning, copying, or faxing multiple-page documents. Setting up , or is unable to the printer. 15 Wi-Fi indicator Check wireless status: Note: Your printer model may not have wireless • Off indicates...
...exit from the ADF. 8 Automatic Document Feeder (ADF) paper guide Keep paper straight when feeding into the ADF. 9 Printer control panel Operate the printer. 10 Paper exit tray Hold paper as magazine clippings) into the ADF. cable. Warning-Potential Damage: Do not touch ...turned off . • Orange - up the printer 21 indicates that the printer is configured for scanning, copying, or faxing multiple-page documents. Setting up , or is unable to the printer. 15 Wi-Fi indicator Check wireless status: Note: Your printer model may not have wireless • Off indicates...
User's Guide
Page 22
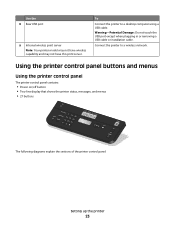
... (digital subscriber line), ISDN (integrated services digital network), or cable modem to send and receive faxes. Connect the printer to an active telephone line to the printer. Scan and copy photos and documents. • Access the print cartridges. • Remove paper jams. Install, replace, or... remove a print cartridge. The printer must be available in all countries or regions. Connect additional devices, such as a ...
... (digital subscriber line), ISDN (integrated services digital network), or cable modem to send and receive faxes. Connect the printer to an active telephone line to the printer. Scan and copy photos and documents. • Access the print cartridges. • Remove paper jams. Install, replace, or... remove a print cartridge. The printer must be available in all countries or regions. Connect additional devices, such as a ...
User's Guide
Page 23
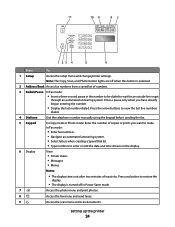
...installation cable. Using the printer control panel buttons and menus Using the printer control panel The printer control panel contains: • Power on/off button • Two-line display that shows the printer status, messages, and menus • 27 buttons ON COPY SCAN FAX PHOTO The following... diagrams explain the sections of the printer control panel: Setting up the printer 23 Connect the printer to a desktop computer using a USB cable. Use ...
...installation cable. Using the printer control panel buttons and menus Using the printer control panel The printer control panel contains: • Power on/off button • Two-line display that shows the printer status, messages, and menus • 27 buttons ON COPY SCAN FAX PHOTO The following... diagrams explain the sections of the printer control panel: Setting up the printer 23 Connect the printer to a desktop computer using a USB cable. Use ...
User's Guide
Page 24
...photo menu and print photos. 8 Access the fax menu and send faxes. 9 Access the scan menu and scan documents. Press the arrow buttons to wait for an outside line or get through an automated answering system. Setting up the printer 24 11 10 9 87 1 23 4 5 6 Press To 1 Setup Access the setup... menu and change printer settings. Note: The Copy, Scan, and Photo button lights are off in the number to be dialed to view the...
...photo menu and print photos. 8 Access the fax menu and send faxes. 9 Access the scan menu and scan documents. Press the arrow buttons to wait for an outside line or get through an automated answering system. Setting up the printer 24 11 10 9 87 1 23 4 5 6 Press To 1 Setup Access the setup... menu and change printer settings. Note: The Copy, Scan, and Photo button lights are off in the number to be dialed to view the...
User's Guide
Page 26
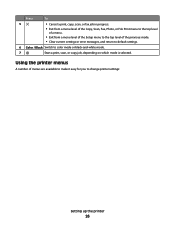
... fax job in progress. • Exit from a menu level of the Copy, Scan, Fax, Photo, or File Print menu to the top level of a menu. • Exit from a menu level of the Setup menu to the top level ...of menus are available to make it easy for you to color mode or black-and-white mode. 7 Start a print, scan, or copy job, depending on which mode is selected. Using the printer menus A number of the previous mode. • Clear current settings or error messages, and return to default settings. 6 Color...
... fax job in progress. • Exit from a menu level of the Copy, Scan, Fax, Photo, or File Print menu to the top level of a menu. • Exit from a menu level of the Setup menu to the top level ...of menus are available to make it easy for you to color mode or black-and-white mode. 7 Start a print, scan, or copy job, depending on which mode is selected. Using the printer menus A number of the previous mode. • Clear current settings or error messages, and return to default settings. 6 Color...
User's Guide
Page 27
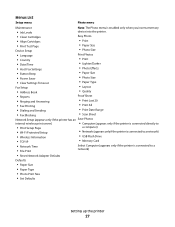
Menus List Setup menu Photo menu Maintenance Note: The Photo menu is enabled only when you insert a memory • Ink Levels device into the printer. • Clean Cartridges • Align Cartridges • Print Test Page Device Setup Easy Photo • Print • Paper Size • ...; Print Last 20 • Print All • Print Date Range • Scan Sheet Network Setup (appears only if the printer has an Save Photos internal wireless print server) • Computer (appears only if the printer is connected directly to • Print Setup Page • Wi-Fi Protected Setup...
Menus List Setup menu Photo menu Maintenance Note: The Photo menu is enabled only when you insert a memory • Ink Levels device into the printer. • Clean Cartridges • Align Cartridges • Print Test Page Device Setup Easy Photo • Print • Paper Size • ...; Print Last 20 • Print All • Print Date Range • Scan Sheet Network Setup (appears only if the printer has an Save Photos internal wireless print server) • Computer (appears only if the printer is connected directly to • Print Setup Page • Wi-Fi Protected Setup...
User's Guide
Page 28
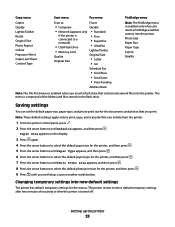
...type, and photo print size for the menus. Note: These default settings apply only to print, copy, and scan jobs that you initiate from the printer. 1 From the printer control panel, press . 2 Press the arrow buttons until you print. Copy menu Copies Quality Lighter/Darker Resize Original... Size Photo Reprint Collate Pages per Sheet Copies per Sheet Content Type Scan menu Fax menu Scan to Fax to • Computer Quality • Network (appears only • Standard if the printer is connected to a network) • USB Flash Drive • Memory Card Quality...
...type, and photo print size for the menus. Note: These default settings apply only to print, copy, and scan jobs that you initiate from the printer. 1 From the printer control panel, press . 2 Press the arrow buttons until you print. Copy menu Copies Quality Lighter/Darker Resize Original... Size Photo Reprint Collate Pages per Sheet Copies per Sheet Content Type Scan menu Fax menu Scan to Fax to • Computer Quality • Network (appears only • Standard if the printer is connected to a network) • USB Flash Drive • Memory Card Quality...
User's Guide
Page 29
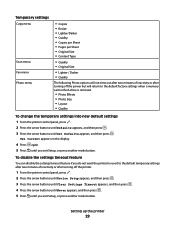
Setting up the printer 29 Temporary settings Copy menu Scan menu Fax menu Photo menu • Copies • Resize • ...Quality The following Photo options will not time out after two minutes of inactivity or after turning off the printer. 1 From the printer control panel, press . 2 Press the arrow buttons until Device Setup appears, and then press . ...; Photo Size • Layout • Quality To change the temporary settings into new default settings 1 From the printer control panel, press . 2 Press the arrow buttons until Defaults appears, and then press . 3 Press the arrow...
Setting up the printer 29 Temporary settings Copy menu Scan menu Fax menu Photo menu • Copies • Resize • ...Quality The following Photo options will not time out after two minutes of inactivity or after turning off the printer. 1 From the printer control panel, press . 2 Press the arrow buttons until Device Setup appears, and then press . ...; Photo Size • Layout • Quality To change the temporary settings into new default settings 1 From the printer control panel, press . 2 Press the arrow buttons until Defaults appears, and then press . 3 Press the arrow...
User's Guide
Page 32
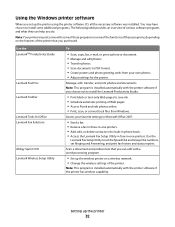
... CD, all the necessary software was installed. Use the LexmarkTM Productivity Studio Lexmark Fast Pics Lexmark Toolbar Lexmark Tools for the printer. Access your own photos. • Adjust settings for Office Lexmark Fax Solutions Abbyy Sprint OCR Lexmark Wireless Setup Utility To • Scan, copy, fax, e-mail, or print a photo or document. • Manage and edit photos...
... CD, all the necessary software was installed. Use the LexmarkTM Productivity Studio Lexmark Fast Pics Lexmark Toolbar Lexmark Tools for the printer. Access your own photos. • Adjust settings for Office Lexmark Fax Solutions Abbyy Sprint OCR Lexmark Wireless Setup Utility To • Scan, copy, fax, e-mail, or print a photo or document. • Manage and edit photos...
User's Guide
Page 33
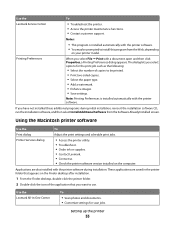
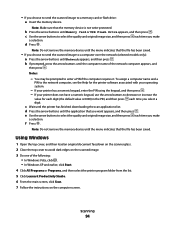
... for scan jobs. These applications are also installed with a document open and then click Properties, a Printing Preferences dialog appears. Using the Macintosh printer software Use the Print dialog Printer Services dialog To Adjust the print settings and schedule print jobs. • Access the printer utility. • Troubleshoot. • Order ink or supplies. • Contact Lexmark...
... for scan jobs. These applications are also installed with a document open and then click Properties, a Printing Preferences dialog appears. Using the Macintosh printer software Use the Print dialog Printer Services dialog To Adjust the print settings and schedule print jobs. • Access the printer utility. • Troubleshoot. • Order ink or supplies. • Contact Lexmark...
User's Guide
Page 70
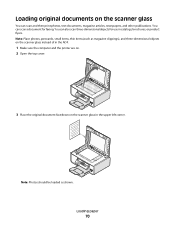
... objects on the scanner glass instead of in the ADF. 1 Make sure the computer and the printer are on. 2 Open the top cover. 3 Place the original document facedown on the scanner glass You can scan and then print photos, text documents, magazine articles, newspapers, and other publications. Note: Place photos..., postcards, small items, thin items (such as shown. Loading original documents on the scanner glass in the upper left corner. You can also scan three-dimensional objects for faxing. Loading paper 70 You can scan a document for use in catalogs, brochures, or product flyers.
... objects on the scanner glass instead of in the ADF. 1 Make sure the computer and the printer are on. 2 Open the top cover. 3 Place the original document facedown on the scanner glass You can scan and then print photos, text documents, magazine articles, newspapers, and other publications. Note: Place photos..., postcards, small items, thin items (such as shown. Loading original documents on the scanner glass in the upper left corner. You can also scan three-dimensional objects for faxing. Loading paper 70 You can scan a document for use in catalogs, brochures, or product flyers.

User's Guide
Page 71
Place these items on the scanner glass. 1 Adjust the paper guide on the scanned image. Notes: • Use only new, unwrinkled paper that is not curled. • Do not load postcards, photos, small items, transparencies, photo paper, or thin ... the original document. 2 Fan the original document. You can load up to the width of an original document into the Automatic Document Feeder (ADF) for scanning, copying, and faxing. Loading original documents into the Automatic Document Feeder You can load A4-, letter-, or legal-size paper into the ADF. Loading paper...
Place these items on the scanner glass. 1 Adjust the paper guide on the scanned image. Notes: • Use only new, unwrinkled paper that is not curled. • Do not load postcards, photos, small items, transparencies, photo paper, or thin ... the original document. 2 Fan the original document. You can load up to the width of an original document into the Automatic Document Feeder (ADF) for scanning, copying, and faxing. Loading original documents into the Automatic Document Feeder You can load A4-, letter-, or legal-size paper into the ADF. Loading paper...
User's Guide
Page 91
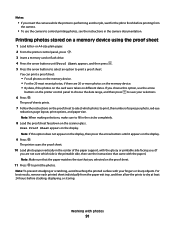
...flash drive. 4 Press the arrow buttons until it appears on the scanner glass. Note: When making selections, make sure to print the photos. The printer scans the proof sheet. 10 Load photo paper vertically in the circles completely. 8 Load the proof sheet facedown on the display. 9 Press . Notes: &#...8226; If you insert the camera while the printer is the printable side, then see the instructions that came with the paper.) Note: Make sure that the paper matches the size that you ...
...flash drive. 4 Press the arrow buttons until it appears on the scanner glass. Note: When making selections, make sure to print the photos. The printer scans the proof sheet. 10 Load photo paper vertically in the circles completely. 8 Load the proof sheet facedown on the display. 9 Press . Notes: &#...8226; If you insert the camera while the printer is the printable side, then see the instructions that came with the paper.) Note: Make sure that the paper matches the size that you ...
User's Guide
Page 93
...(such as magazine clippings) into the Automatic Document Feeder (ADF) or facedown on scanning and customizing scanned images, see the Help associated with the programs installed with the printer software. You can send the scanned image to a computer, flash drive, memory card, or to a computer over a...8226; If you choose to send the scanned image to appears on the scanned image. 2 From the printer control panel, press . e Press . each time you want appears, and then press . b Wait until the application that you make Scanning 93 You can scan and then print photos, text documents, ...
...(such as magazine clippings) into the Automatic Document Feeder (ADF) or facedown on scanning and customizing scanned images, see the Help associated with the programs installed with the printer software. You can send the scanned image to a computer, flash drive, memory card, or to a computer over a...8226; If you choose to send the scanned image to appears on the scanned image. 2 From the printer control panel, press . e Press . each time you want appears, and then press . b Wait until the application that you make Scanning 93 You can scan and then print photos, text documents, ...
User's Guide
Page 94
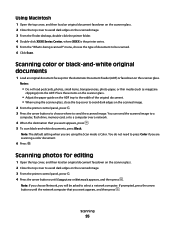
...earlier, click Start. 4 Click All Programs or Programs, and then select the printer program folder from the list. 5 Click Lexmark Productivity Studio. 6 From the main screen, click Scan. 7 Follow the instructions on the computer screen. Scanning 94 Note: Do not remove the memory device until the application that the ... memory device is 0000) in the PIN, and then press each time you choose to send the scanned image to decrease or increase the value for the printer software associated with your printer has a numeric keypad, enter the PIN using the keypad, and then press . - You may ...
...earlier, click Start. 4 Click All Programs or Programs, and then select the printer program folder from the list. 5 Click Lexmark Productivity Studio. 6 From the main screen, click Scan. 7 Follow the instructions on the computer screen. Scanning 94 Note: Do not remove the memory device until the application that the ... memory device is 0000) in the PIN, and then press each time you choose to send the scanned image to decrease or increase the value for the printer software associated with your printer has a numeric keypad, enter the PIN using the keypad, and then press . - You may ...
User's Guide
Page 95
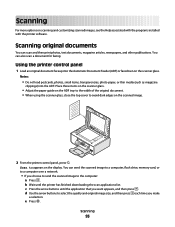
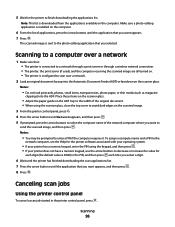
...as magazine clippings) into the Automatic Document Feeder (ADF) or facedown on the scanned image. 2 From the printer control panel, press . 3 Press the arrow buttons to choose where to send the scanned image. You can send the scanned image to a computer, flash drive, memory card, or to a computer ... avoid dark edges on the scanned image. 3 From the printer control panel, press . 4 Press the arrow buttons until the network computer that you are scanning a color document. 6 Press . You do not need to press Color if you will be scanned. 6 Click Scan. Scanning color or black-and-white...
...as magazine clippings) into the Automatic Document Feeder (ADF) or facedown on the scanned image. 2 From the printer control panel, press . 3 Press the arrow buttons to choose where to send the scanned image. You can send the scanned image to a computer, flash drive, memory card, or to a computer ... avoid dark edges on the scanned image. 3 From the printer control panel, press . 4 Press the arrow buttons until the network computer that you are scanning a color document. 6 Press . You do not need to press Color if you will be scanned. 6 Click Scan. Scanning color or black-and-white...
User's Guide
Page 96
...press the arrow buttons to a network through a print server or through a wireless network connection. • The printer, the print server (if used), and the computer receiving the scanned image are all turned on the computer. 6 From the list of the network computer where you selected. To ... on the computer. Notes: • You may be prompted to finish downloading the applications list. Scanning to a computer over a network 1 Make sure that: • The printer is connected to select the computer name of applications, press the arrow buttons until the application that you...
...press the arrow buttons to a network through a print server or through a wireless network connection. • The printer, the print server (if used), and the computer receiving the scanned image are all turned on the computer. 6 From the list of the network computer where you selected. To ... on the computer. Notes: • You may be prompted to finish downloading the applications list. Scanning to a computer over a network 1 Make sure that: • The printer is connected to select the computer name of applications, press the arrow buttons until the application that you...

User's Guide
Page 97
Scanning 97 Using Macintosh To cancel a scan job started in -One Center, click Cancel on the computer screen. Using Windows To cancel a scan job started in the Lexmark All-in the Lexmark Productivity Studio, click Stop on the computer screen.
Scanning 97 Using Macintosh To cancel a scan job started in -One Center, click Cancel on the computer screen. Using Windows To cancel a scan job started in the Lexmark All-in the Lexmark Productivity Studio, click Stop on the computer screen.


