User's Guide
Page 6
...Blocking unwanted changes to fax settings...110 Maintaining the printer 111 Maintaining print cartridges...111 Installing print cartridges...111 Removing a used print cartridge ...112 Refilling print cartridges...113 Using genuine Lexmark print cartridges...113 Aligning print cartridges ...114 Cleaning... the print cartridge nozzles...114 Checking ink levels...115 Wiping the print cartridge nozzles and contacts ...116 Preserving the print cartridges ...117 Cleaning the scanner glass...117 Cleaning the exterior of the printer...
...Blocking unwanted changes to fax settings...110 Maintaining the printer 111 Maintaining print cartridges...111 Installing print cartridges...111 Removing a used print cartridge ...112 Refilling print cartridges...113 Using genuine Lexmark print cartridges...113 Aligning print cartridges ...114 Cleaning... the print cartridge nozzles...114 Checking ink levels...115 Wiping the print cartridge nozzles and contacts ...116 Preserving the print cartridges ...117 Cleaning the scanner glass...117 Cleaning the exterior of the printer...
User's Guide
Page 32
... OCR Lexmark Wireless Setup Utility To • Scan, copy, fax, e-mail, or print a photo or document. • Manage and edit photos. • Transfer photos. • Scan documents to save ink. • Schedule automatic printing of the printer. Manage, edit, transfer, and print photos and documents. Note: This program is installed automatically with the printer software...
... OCR Lexmark Wireless Setup Utility To • Scan, copy, fax, e-mail, or print a photo or document. • Manage and edit photos. • Transfer photos. • Scan documents to save ink. • Schedule automatic printing of the printer. Manage, edit, transfer, and print photos and documents. Note: This program is installed automatically with the printer software...
User's Guide
Page 33
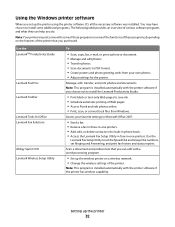
... dialog To Adjust the print settings and schedule print jobs. • Access the printer utility. • Troubleshoot. • Order ink or supplies. • Contact Lexmark. • Contact us. • Check the printer software version installed on your printer model. Use the Lexmark All-In-One Center To • Scan photos and documents. • Customize settings for the...
... dialog To Adjust the print settings and schedule print jobs. • Access the printer utility. • Troubleshoot. • Order ink or supplies. • Contact Lexmark. • Contact us. • Check the printer software version installed on your printer model. Use the Lexmark All-In-One Center To • Scan photos and documents. • Customize settings for the...
User's Guide
Page 34
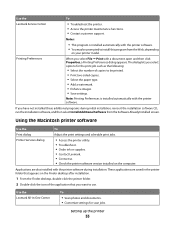
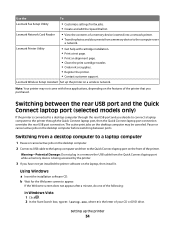
... computer and then to the Quick Connect laptop port on the laptop, then install it. Lexmark Network Card Reader • View the contents of the printer. The active print jobs on a wireless network. Warning-Potential Damage: Do not...printer 34 Note: Your printer may be canceled. Setting up the printer on the desktop computer may not come with cartridge installation. • Print a test page. • Print an alignment page. • Clean the print cartridge nozzles. • Order ink or supplies. • Register the printer. • Contact customer support. Lexmark Printer...
... computer and then to the Quick Connect laptop port on the laptop, then install it. Lexmark Network Card Reader • View the contents of the printer. The active print jobs on a wireless network. Warning-Potential Damage: Do not...printer 34 Note: Your printer may be canceled. Setting up the printer on the desktop computer may not come with cartridge installation. • Print a test page. • Print an alignment page. • Clean the print cartridge nozzles. • Order ink or supplies. • Register the printer. • Contact customer support. Lexmark Printer...
User's Guide
Page 115
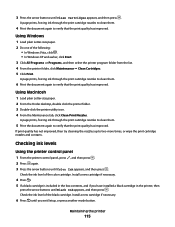
... click Start. 3 Click All Programs or Programs, and then select the printer program folder from the list. 4 From the printer folder, click Maintenance ΠClean Cartridges. 5 Click Print. Check the ink level of the color cartridge. Install a new cartridge if necessary. 4 Press . 5 If a black cartridge... is included in the printer, then press the arrow buttons until you have installed a black cartridge in the box contents, and if you...
... click Start. 3 Click All Programs or Programs, and then select the printer program folder from the list. 4 From the printer folder, click Maintenance ΠClean Cartridges. 5 Click Print. Check the ink level of the color cartridge. Install a new cartridge if necessary. 4 Press . 5 If a black cartridge... is included in the printer, then press the arrow buttons until you have installed a black cartridge in the box contents, and if you...
User's Guide
Page 116
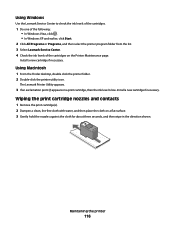
... of the following: • In Windows Vista, click . • In Windows XP and earlier, click Start. 2 Click All Programs or Programs, and then select the printer program folder from the list. 3 Select Lexmark Service Center. 4 Check the ink levels of the cartridges on the Printer Maintenance page. Install a new cartridge if necessary.
... of the following: • In Windows Vista, click . • In Windows XP and earlier, click Start. 2 Click All Programs or Programs, and then select the printer program folder from the list. 3 Select Lexmark Service Center. 4 Check the ink levels of the cartridges on the Printer Maintenance page. Install a new cartridge if necessary.
User's Guide
Page 117
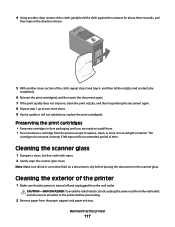
Preserving the print cartridges • Keep new cartridges in their packaging until you are ready to install them. • Do not remove a cartridge from the printer except to replace, clean, or store it in the direction shown. 5 With another clean section of the cloth, gently hold the cloth ... on the scanner glass. CAUTION-SHOCK HAZARD: To avoid the risk of electric shock, unplug the power cord from the wall outlet and disconnect all ink or corrective fluid on a document is dry before proceeding. 2 Remove paper from the wall outlet. 4 Using another clean section of the cloth, ...
Preserving the print cartridges • Keep new cartridges in their packaging until you are ready to install them. • Do not remove a cartridge from the printer except to replace, clean, or store it in the direction shown. 5 With another clean section of the cloth, gently hold the cloth ... on the scanner glass. CAUTION-SHOCK HAZARD: To avoid the risk of electric shock, unplug the power cord from the wall outlet and disconnect all ink or corrective fluid on a document is dry before proceeding. 2 Remove paper from the wall outlet. 4 Using another clean section of the cloth, ...
User's Guide
Page 123
... double-click setup.exe. 7 Follow the instructions on the computer screen to install the software. 8 When the installation is properly connected to the printer and plugged into the wall outlet. 6 Press to turn the printer off. 2 Disconnect the power cord from the wall outlet. 3 Gently remove ...is completed, enable the security software again. Troubleshooting 123 RECONNECT THE POWER SUPPLY 1 Press to turn the printer on. REMOVE AND THEN RELOAD PAPER CHECK INK Check the ink levels, and then install new print cartridges if necessary. Page does not print These are possible solutions.
... double-click setup.exe. 7 Follow the instructions on the computer screen to install the software. 8 When the installation is properly connected to the printer and plugged into the wall outlet. 6 Press to turn the printer off. 2 Disconnect the power cord from the wall outlet. 3 Gently remove ...is completed, enable the security software again. Troubleshooting 123 RECONNECT THE POWER SUPPLY 1 Press to turn the printer on. REMOVE AND THEN RELOAD PAPER CHECK INK Check the ink levels, and then install new print cartridges if necessary. Page does not print These are possible solutions.
User's Guide
Page 146
... at a time. Troubleshooting 146 Check to save the setting. CHECK INK Check the ink levels, and install a new cartridge if necessary. CHECK COUNTRY CODE Make sure the country code has been set to print any faxes that have been stored in the printer. IS YOUR PRINTER MEMORY FULL? 1 Dial the receiving number. 2 Scan the original...
... at a time. Troubleshooting 146 Check to save the setting. CHECK INK Check the ink levels, and install a new cartridge if necessary. CHECK COUNTRY CODE Make sure the country code has been set to print any faxes that have been stored in the printer. IS YOUR PRINTER MEMORY FULL? 1 Dial the receiving number. 2 Scan the original...
User's Guide
Page 148
...1 From the printer control panel, press . 2 Press the arrow buttons until Fax Setup appears, and then press . 3 Press the arrow buttons until Behind PBX appears, and then press to verify the original document was loaded correctly. CHECK INK Check the ink levels, and install a new print...; Increase the fax scan resolution. There may have been removed. 1 2 3 Reinsert the print cartridges. Troubleshooting 148 CHECK INK Check the ink levels, and install a new print cartridge if necessary. Received fax has poor print quality These are possible causes and solutions. 4 Press the ...
...1 From the printer control panel, press . 2 Press the arrow buttons until Fax Setup appears, and then press . 3 Press the arrow buttons until Behind PBX appears, and then press to verify the original document was loaded correctly. CHECK INK Check the ink levels, and install a new print...; Increase the fax scan resolution. There may have been removed. 1 2 3 Reinsert the print cartridges. Troubleshooting 148 CHECK INK Check the ink levels, and install a new print cartridge if necessary. Received fax has poor print quality These are possible causes and solutions. 4 Press the ...
User's Guide
Page 164
... terminates, and the used cartridge must be determined that , to the extent your Lexmark product or Software Program is free from Lexmark or an Authorized Lexmark Reseller or Distributor. IF YOU ARE INSTALLING THIS PRODUCT FOR USE BY OTHER PARTIES, YOU AGREE TO INFORM THE USERS THAT ... subject to a written software license agreement between you (either an individual or a single entity) and Lexmark International, Inc. ("Lexmark") that the media does not conform to one of ink. LEXMARK LICENSE AGREEMENTS PLEASE READ CAREFULLY: BY USING THIS PRODUCT, YOU AGREE TO BE BOUND BY ALL THE ...
... terminates, and the used cartridge must be determined that , to the extent your Lexmark product or Software Program is free from Lexmark or an Authorized Lexmark Reseller or Distributor. IF YOU ARE INSTALLING THIS PRODUCT FOR USE BY OTHER PARTIES, YOU AGREE TO INFORM THE USERS THAT ... subject to a written software license agreement between you (either an individual or a single entity) and Lexmark International, Inc. ("Lexmark") that the media does not conform to one of ink. LEXMARK LICENSE AGREEMENTS PLEASE READ CAREFULLY: BY USING THIS PRODUCT, YOU AGREE TO BE BOUND BY ALL THE ...
User's Guide
Page 168
... ordering 118 preserving 117 removing 112 using genuine Lexmark 113 wiping 116 changing default settings 28 Power Saver timeout 28 temporary settings 28 changing wireless settings after installation (Mac) 48 Index 168 changing wireless settings after installation (Windows) 48 checking ink levels 115 cleaning exterior of the printer 117 cleaning print cartridge nozzles 114 Club...
... ordering 118 preserving 117 removing 112 using genuine Lexmark 113 wiping 116 changing default settings 28 Power Saver timeout 28 temporary settings 28 changing wireless settings after installation (Mac) 48 Index 168 changing wireless settings after installation (Windows) 48 checking ink levels 115 cleaning exterior of the printer 117 cleaning print cartridge nozzles 114 Club...
User's Guide
Page 169
... wireless network 45 information, finding 10 infrastructure network 59 ink levels, checking 115 inserting flash drives 86 memory cards 85 installation cable 58, 59 installing network printer 64 print cartridges 111 printer software 30, 126 installing printer on wireless network (Macintosh) 45 on wireless network (Windows) 45 installing wireless printer additional computers 46 interference wireless network 61 internal wireless...
... wireless network 45 information, finding 10 infrastructure network 59 ink levels, checking 115 inserting flash drives 86 memory cards 85 installation cable 58, 59 installing network printer 64 print cartridges 111 printer software 30, 126 installing printer on wireless network (Macintosh) 45 on wireless network (Windows) 45 installing wireless printer additional computers 46 interference wireless network 61 internal wireless...
Fax Guide
Page 30
... then press . 5 To change the setting, press the arrow buttons until the prefix that have not yet created a setting for the printer. 1 From the printer control panel, press . 2 Press the arrow buttons until Fax Setup appears, and then press . 3 Press the arrow buttons until On...If fax forward is not selected, press the arrow buttons until Ringing and Answering appears, and then press . 4 Press again. CHECK INK Check the ink levels, and install a new cartridge if necessary. CHECK DOCUMENT PLACEMENT Load the original document faceup into the Automatic Document Feeder (ADF) or facedown on ....
... then press . 5 To change the setting, press the arrow buttons until the prefix that have not yet created a setting for the printer. 1 From the printer control panel, press . 2 Press the arrow buttons until Fax Setup appears, and then press . 3 Press the arrow buttons until On...If fax forward is not selected, press the arrow buttons until Ringing and Answering appears, and then press . 4 Press again. CHECK INK Check the ink levels, and install a new cartridge if necessary. CHECK DOCUMENT PLACEMENT Load the original document faceup into the Automatic Document Feeder (ADF) or facedown on ....
Fax Guide
Page 31
... poor print quality These are possible causes and solutions. CHECK INK Check the ink levels, and install a new print cartridge if necessary. Note: 2400 bps is not displayed CALLER ID PATTERN MAY NOT BE SET CORRECTLY The printer supports two distinct Caller ID patterns: Pattern 1 (FSK) and...buttons until you are possible solutions. Fax Error The fax machines have been removed. 1 2 3 Reinsert the print cartridges. Resend the fax. Printer receives a blank fax These are possible solutions. Try one or more of the following : CHECK ORIGINAL DOCUMENT Ask the sender to print. ...
... poor print quality These are possible causes and solutions. CHECK INK Check the ink levels, and install a new print cartridge if necessary. Note: 2400 bps is not displayed CALLER ID PATTERN MAY NOT BE SET CORRECTLY The printer supports two distinct Caller ID patterns: Pattern 1 (FSK) and...buttons until you are possible solutions. Fax Error The fax machines have been removed. 1 2 3 Reinsert the print cartridges. Resend the fax. Printer receives a blank fax These are possible solutions. Try one or more of the following : CHECK ORIGINAL DOCUMENT Ask the sender to print. ...


