User's Guide
Page 4
...Windows only 49 Switching between USB and wireless connections (Macintosh only 50 Advanced wireless setup...51 Creating an ad hoc wireless network ...51 Adding a printer to an existing ad hoc wireless network 53 Using WPS (Wi-Fi Protected Setup)...54 Frequently asked questions...54 Where do I find my WEP ... documents on the scanner glass 70 Loading original documents into the Automatic Document Feeder 71 Using the automatic paper type sensor...73 Printing 74 Printing basic documents...74 Printing a document...74 Printing Web pages...74 Printing multiple copies of a document...75 Contents 4
...Windows only 49 Switching between USB and wireless connections (Macintosh only 50 Advanced wireless setup...51 Creating an ad hoc wireless network ...51 Adding a printer to an existing ad hoc wireless network 53 Using WPS (Wi-Fi Protected Setup)...54 Frequently asked questions...54 Where do I find my WEP ... documents on the scanner glass 70 Loading original documents into the Automatic Document Feeder 71 Using the automatic paper type sensor...73 Printing 74 Printing basic documents...74 Printing a document...74 Printing Web pages...74 Printing multiple copies of a document...75 Contents 4
User's Guide
Page 5
......85 Inserting a memory card ...85 Inserting a flash drive ...86 Printing photos...87 Printing photos using the printer control panel ...87 Printing photos from the computer using the printer software 88 Printing photos from a memory device using the printer software 88 Printing photos from a PictBridge-enabled digital camera 90 Printing photos stored on a memory device using the proof sheet 91...
......85 Inserting a memory card ...85 Inserting a flash drive ...86 Printing photos...87 Printing photos using the printer control panel ...87 Printing photos from the computer using the printer software 88 Printing photos from a memory device using the printer software 88 Printing photos from a PictBridge-enabled digital camera 90 Printing photos stored on a memory device using the proof sheet 91...
User's Guide
Page 6
... to fax settings...110 Maintaining the printer 111 Maintaining print cartridges...111 Installing print cartridges...111 Removing a used print cartridge ...112 Refilling print cartridges...113 Using genuine Lexmark print cartridges...113 Aligning print cartridges ...114 Cleaning the print cartridge nozzles...114 Checking ink levels...115 Wiping the print cartridge nozzles and contacts ...116 Preserving the print cartridges ...117 Cleaning the scanner...
... to fax settings...110 Maintaining the printer 111 Maintaining print cartridges...111 Installing print cartridges...111 Removing a used print cartridge ...112 Refilling print cartridges...113 Using genuine Lexmark print cartridges...113 Aligning print cartridges ...114 Cleaning the print cartridge nozzles...114 Checking ink levels...115 Wiping the print cartridge nozzles and contacts ...116 Preserving the print cartridges ...117 Cleaning the scanner...
User's Guide
Page 7
......121 Incorrect language appears on the display...121 Power button is not lit ...122 Software did not install...122 Page does not print...123 Solving printer power problems ...126 Removing and reinstalling the software ...126 Enabling the USB port in Windows ...127 Wireless troubleshooting...128 Wireless troubleshooting ...is a firewall on the computer ...134 Wi-Fi indicator light is not lit...134 Wi-Fi indicator light is green but the printer does not print (Windows only 135 Wi-Fi indicator light is blinking orange during installation (Windows only 137 Wi-Fi indicator light is blinking orange...
......121 Incorrect language appears on the display...121 Power button is not lit ...122 Software did not install...122 Page does not print...123 Solving printer power problems ...126 Removing and reinstalling the software ...126 Enabling the USB port in Windows ...127 Wireless troubleshooting...128 Wireless troubleshooting ...is a firewall on the computer ...134 Wi-Fi indicator light is not lit...134 Wi-Fi indicator light is green but the printer does not print (Windows only 135 Wi-Fi indicator light is blinking orange during installation (Windows only 137 Wi-Fi indicator light is blinking orange...

User's Guide
Page 10
.... 1 From the Finder desktop, double-click the printer folder. 2 Double-click the application. 3 From the application, click Help on the menu bar to use is not active. Printed Networking Guide / Fax Guide Additional setup instructions. Note: Your printer may not have this Help. Mac Help Note: ...Your printer may not have several applications open, then make it the active application. Note: If...
.... 1 From the Finder desktop, double-click the printer folder. 2 Double-click the application. 3 From the application, click Help on the menu bar to use is not active. Printed Networking Guide / Fax Guide Additional setup instructions. Note: Your printer may not have this Help. Mac Help Note: ...Your printer may not have several applications open, then make it the active application. Note: If...
User's Guide
Page 11
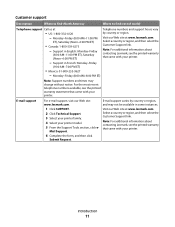
... vary by country or region, and may change without notice. Note: For additional information about contacting Lexmark, see the printed warranty that came with your printer. Select a country or region, and then select the Customer Support link. Visit our Web site at www... - Select a country or region, and then select the Customer Support link. Note: For additional information about contacting Lexmark, see the printed warranty statement that came with your printer model. 5 From the Support Tools section, click e- For the most recent telephone numbers available, see the...
... vary by country or region, and may change without notice. Note: For additional information about contacting Lexmark, see the printed warranty that came with your printer. Select a country or region, and then select the Customer Support link. Visit our Web site at www... - Select a country or region, and then select the Customer Support link. Note: For additional information about contacting Lexmark, see the printed warranty statement that came with your printer model. 5 From the Support Tools section, click e- For the most recent telephone numbers available, see the...
User's Guide
Page 12
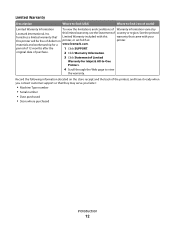
...the following information (located on the store receipt and the back of country or region. this printer will be free of Limited Warranty for a www.lexmark.com. See the printed furnishes a limited warranty that Limited Warranty included with this warranty that came with your this limited ...warranty, see the Statement of the printer), and have it ready when you contact customer support so ...
...the following information (located on the store receipt and the back of country or region. this printer will be free of Limited Warranty for a www.lexmark.com. See the printed furnishes a limited warranty that Limited Warranty included with this warranty that came with your this limited ...warranty, see the Statement of the printer), and have it ready when you contact customer support so ...
User's Guide
Page 13
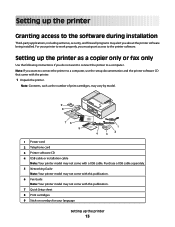
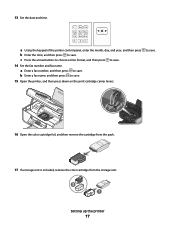
... publication. 7 Quick Setup sheet 8 Print cartridges 9 Stick-on overlays for your printer to work properly, you do not want to connect the printer to a computer, use the setup documentation and the printer software CD that came with the printer. 1 Unpack the printer. For your language Setting up the printer 13 Setting up the printer Granting access to the...
... publication. 7 Quick Setup sheet 8 Print cartridges 9 Stick-on overlays for your printer to work properly, you do not want to connect the printer to a computer, use the setup documentation and the printer software CD that came with the printer. 1 Unpack the printer. For your language Setting up the printer 13 Setting up the printer Granting access to the...
User's Guide
Page 17
a Using the keypad of the printer control panel, enter the month, day, and year, and then press b Enter the time, and then press to save. a Enter a fax number, and then press ... is included, remove the color cartridge from the storage unit. 2 1 Setting up the printer 17 c Press the arrow buttons to choose a time format, and then press to save . to save . 15 Open the printer, and then press down on the print cartridge carrier levers. 13 Set the date and time. b Enter a fax name...
a Using the keypad of the printer control panel, enter the month, day, and year, and then press b Enter the time, and then press to save. a Enter a fax number, and then press ... is included, remove the color cartridge from the storage unit. 2 1 Setting up the printer 17 c Press the arrow buttons to choose a time format, and then press to save . to save . 15 Open the printer, and then press down on the print cartridge carrier levers. 13 Set the date and time. b Enter a fax name...
User's Guide
Page 18
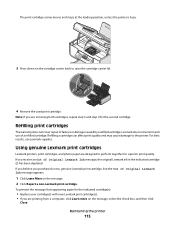
18 Remove the tape from the color print cartridge, insert the cartridge in the right carrier, and then close the color cartridge carrier lid. 19 If a black print cartridge is included in the box contents, open the black cartridge foil, and then remove the cartridge from the pack. Setting up the printer 18 Note: You may need to purchase a black print cartridge separately.
18 Remove the tape from the color print cartridge, insert the cartridge in the right carrier, and then close the color cartridge carrier lid. 19 If a black print cartridge is included in the box contents, open the black cartridge foil, and then remove the cartridge from the pack. Setting up the printer 18 Note: You may need to purchase a black print cartridge separately.
User's Guide
Page 19
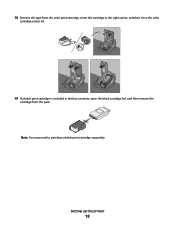
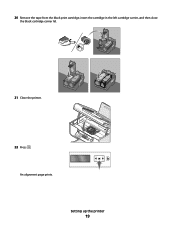
Setting up the printer 19 20 Remove the tape from the black print cartridge, insert the cartridge in the left cartridge carrier, and then close the black cartridge carrier lid. 21 Close the printer. 22 Press . An alignment page prints.
Setting up the printer 19 20 Remove the tape from the black print cartridge, insert the cartridge in the left cartridge carrier, and then close the black cartridge carrier lid. 21 Close the printer. 22 Press . An alignment page prints.
User's Guide
Page 20
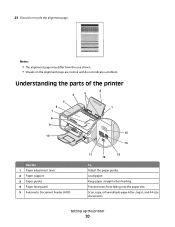
..., or fax multiple-page letter-, legal-, and A4-size documents. 23 Discard or recycle the alignment page. Load paper. Understanding the parts of the printer 2 4 3 5 6 1 7 8 9 10 W I F I PRINTING WI F I PRINTING 15 14 Use the 1 Paper adjustment lever 2 Paper support 3 Paper guides 4 Paper feed guard 5 Automatic Document Feeder (ADF) 11 13 12 To Adjust the...
..., or fax multiple-page letter-, legal-, and A4-size documents. 23 Discard or recycle the alignment page. Load paper. Understanding the parts of the printer 2 4 3 5 6 1 7 8 9 10 W I F I PRINTING WI F I PRINTING 15 14 Use the 1 Paper adjustment lever 2 Paper support 3 Paper guides 4 Paper feed guard 5 Automatic Document Feeder (ADF) 11 13 12 To Adjust the...
User's Guide
Page 22
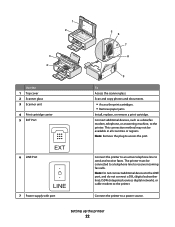
...method may not be connected to a telephone line to a power source. 1 2 3 4 Use the 1 Top cover 2 Scanner glass 3 Scanner unit 4 Print cartridge carrier 5 EXT Port 6 LINE Port EXT LINE 7 Power supply with port 5 6 7 8 9 To Access the scanner glass. Note: Do not ...and receive faxes. Connect the printer to an active telephone line to the printer. Setting up the printer 22 The printer must be available in all countries or regions. Connect the printer to receive incoming fax calls. Scan and copy photos and documents. • Access the print cartridges. • Remove paper...
...method may not be connected to a telephone line to a power source. 1 2 3 4 Use the 1 Top cover 2 Scanner glass 3 Scanner unit 4 Print cartridge carrier 5 EXT Port 6 LINE Port EXT LINE 7 Power supply with port 5 6 7 8 9 To Access the scanner glass. Note: Do not ...and receive faxes. Connect the printer to an active telephone line to the printer. Setting up the printer 22 The printer must be available in all countries or regions. Connect the printer to receive incoming fax calls. Scan and copy photos and documents. • Access the print cartridges. • Remove paper...
User's Guide
Page 23
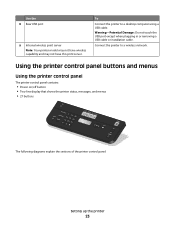
... that shows the printer status, messages, and menus • 27 buttons ON COPY SCAN FAX PHOTO The following diagrams explain the sections of the printer control panel: Setting up the printer 23 Use the 8 Rear USB port 9 Internal wireless print server Note: Your printer model may not ...have wireless capability and may not have this print server. To Connect the printer to a wireless network.
... that shows the printer status, messages, and menus • 27 buttons ON COPY SCAN FAX PHOTO The following diagrams explain the sections of the printer control panel: Setting up the printer 23 Use the 8 Rear USB port 9 Internal wireless print server Note: Your printer model may not ...have wireless capability and may not have this print server. To Connect the printer to a wireless network.
User's Guide
Page 24
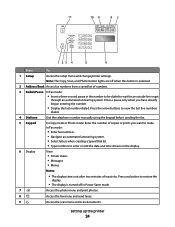
... saved list of numbers. 3 Redial/Pause In Fax mode: • Insert a three-second pause in Power Saver mode. 7 Access the photo menu and print photos. 8 Access the fax menu and send faxes. 9 Access the scan menu and scan documents. Note: The Copy, Scan, and Photo button lights are ...when you want to enter or edit the date and time shown on the display. 6 Display View: • Printer status • Messages • Menus Notes: • The display times out after two minutes of copies or prints you have already begun entering the number. • Display the last number dialed.
... saved list of numbers. 3 Redial/Pause In Fax mode: • Insert a three-second pause in Power Saver mode. 7 Access the photo menu and print photos. 8 Access the fax menu and send faxes. 9 Access the scan menu and scan documents. Note: The Copy, Scan, and Photo button lights are ...when you want to enter or edit the date and time shown on the display. 6 Display View: • Printer status • Messages • Menus Notes: • The display times out after two minutes of copies or prints you have already begun entering the number. • Display the last number dialed.
User's Guide
Page 26
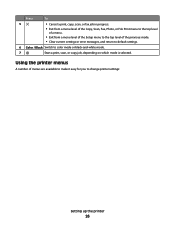
..., scan, or fax job in progress. • Exit from a menu level of the Copy, Scan, Fax, Photo, or File Print menu to the top level of a menu. • Exit from a menu level of the Setup menu to the top level of menus are available to ...make it easy for you to color mode or black-and-white mode. 7 Start a print, scan, or copy job, depending on which mode is selected. Using the printer menus A number of the previous mode. • Clear current settings or error messages, and return to default settings. 6 Color...
..., scan, or fax job in progress. • Exit from a menu level of the Copy, Scan, Fax, Photo, or File Print menu to the top level of a menu. • Exit from a menu level of the Setup menu to the top level of menus are available to ...make it easy for you to color mode or black-and-white mode. 7 Start a print, scan, or copy job, depending on which mode is selected. Using the printer menus A number of the previous mode. • Clear current settings or error messages, and return to default settings. 6 Color...
User's Guide
Page 27
... Maintenance Note: The Photo menu is enabled only when you insert a memory • Ink Levels device into the printer. • Clean Cartridges • Align Cartridges • Print Test Page Device Setup Easy Photo • Print • Paper Size • Photo Size • Language • Country • Date/Time • Host Fax Settings •...
... Maintenance Note: The Photo menu is enabled only when you insert a memory • Ink Levels device into the printer. • Clean Cartridges • Align Cartridges • Print Test Page Device Setup Easy Photo • Print • Paper Size • Photo Size • Language • Country • Date/Time • Host Fax Settings •...
User's Guide
Page 106
... values or settings: • Off-(Default) • Forward-The printer sends the fax to the designated fax number. • Print & Forward-The printer prints the fax and then sends it to the designated fax number. 1 Make sure the printer is on and is connected to receive your Address Book: a Press... the arrow buttons until Forward or Print & Forward appears, and then press . 6...
... values or settings: • Off-(Default) • Forward-The printer sends the fax to the designated fax number. • Print & Forward-The printer prints the fax and then sends it to the designated fax number. 1 Make sure the printer is on and is connected to receive your Address Book: a Press... the arrow buttons until Forward or Print & Forward appears, and then press . 6...
User's Guide
Page 113
... click Close. Note: If you are removing both cartridges, repeat step 3 and step 4 for superior print quality. Refilling a cartridge can affect print quality and may cause damage to raise the cartridge carrier lid. Using genuine Lexmark print cartridges Lexmark printers, print cartridges, and photo paper are designed to perform together for the second cartridge. If you believe...
... click Close. Note: If you are removing both cartridges, repeat step 3 and step 4 for superior print quality. Refilling a cartridge can affect print quality and may cause damage to raise the cartridge carrier lid. Using genuine Lexmark print cartridges Lexmark printers, print cartridges, and photo paper are designed to perform together for the second cartridge. If you believe...
Fax Guide
Page 22
..., the fax numbers are three fax-forwarding values or settings: • Off-(Default) • Forward-The printer sends the fax to the designated fax number. • Print & Forward-The printer prints the fax and then sends it to your faxes. Forwarding faxes Use the fax-forwarding feature if you set... the answering machine to answer calls after three rings, set the printer to answer calls after you want appears, ...
..., the fax numbers are three fax-forwarding values or settings: • Off-(Default) • Forward-The printer sends the fax to the designated fax number. • Print & Forward-The printer prints the fax and then sends it to your faxes. Forwarding faxes Use the fax-forwarding feature if you set... the answering machine to answer calls after three rings, set the printer to answer calls after you want appears, ...


