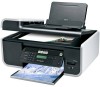
User's Guide
Page 6
...Blocking unwanted changes to fax settings...110 Maintaining the printer 111 Maintaining print cartridges...111 Installing print cartridges...111 Removing a used print cartridge ...112 Refilling print cartridges...113 Using genuine Lexmark print cartridges...113 Aligning print cartridges ...114 Cleaning the... print cartridge nozzles...114 Checking ink levels...115 Wiping the print cartridge nozzles and contacts ...116 Preserving the ...
...Blocking unwanted changes to fax settings...110 Maintaining the printer 111 Maintaining print cartridges...111 Installing print cartridges...111 Removing a used print cartridge ...112 Refilling print cartridges...113 Using genuine Lexmark print cartridges...113 Aligning print cartridges ...114 Cleaning the... print cartridge nozzles...114 Checking ink levels...115 Wiping the print cartridge nozzles and contacts ...116 Preserving the ...
User's Guide
Page 27
Menus List Setup menu Photo menu Maintenance Note: The Photo menu is enabled only when you insert a memory • Ink Levels device into the printer. • Clean Cartridges • Align Cartridges • Print Test Page Device Setup Easy Photo • Print • Paper Size • Photo...; Print All • Print Date Range • Scan Sheet Network Setup (appears only if the printer has an Save Photos internal wireless print server) • Computer (appears only if the printer is connected directly to • Print Setup Page • Wi-Fi Protected Setup • Wireless ...
Menus List Setup menu Photo menu Maintenance Note: The Photo menu is enabled only when you insert a memory • Ink Levels device into the printer. • Clean Cartridges • Align Cartridges • Print Test Page Device Setup Easy Photo • Print • Paper Size • Photo...; Print All • Print Date Range • Scan Sheet Network Setup (appears only if the printer has an Save Photos internal wireless print server) • Computer (appears only if the printer is connected directly to • Print Setup Page • Wi-Fi Protected Setup • Wireless ...
User's Guide
Page 32
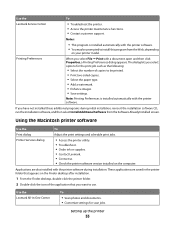
Use the Lexmark Fax Setup Utility to save ink. • Schedule automatic printing of the printer that you can help you do. Setting up the wireless printer on the features of Web pages. • Access Picnik and edit photos online. • Print, scan, or convert... programs and what they can edit with the printer software if the printer has wireless capability. Use the LexmarkTM Productivity Studio Lexmark Fast Pics Lexmark Toolbar Lexmark Tools for the printer. Scan a document and produce text that you purchased. Note: Your printer may have chosen to PDF format. •...
Use the Lexmark Fax Setup Utility to save ink. • Schedule automatic printing of the printer that you can help you do. Setting up the wireless printer on the features of Web pages. • Access Picnik and edit photos online. • Print, scan, or convert... programs and what they can edit with the printer software if the printer has wireless capability. Use the LexmarkTM Productivity Studio Lexmark Fast Pics Lexmark Toolbar Lexmark Tools for the printer. Scan a document and produce text that you purchased. Note: Your printer may have chosen to PDF format. •...
User's Guide
Page 33
... dialog To Adjust the print settings and schedule print jobs. • Access the printer utility. • Troubleshoot. • Order ink or supplies. • Contact Lexmark. • Contact us. • Check the printer software version installed on your printer model. Setting up the printer 33 The dialog lets you have not installed these additional programs during installation...
... dialog To Adjust the print settings and schedule print jobs. • Access the printer utility. • Troubleshoot. • Order ink or supplies. • Contact Lexmark. • Contact us. • Check the printer software version installed on your printer model. Setting up the printer 33 The dialog lets you have not installed these additional programs during installation...
User's Guide
Page 34
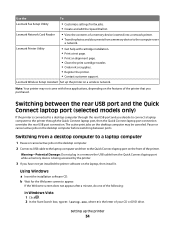
...the desktop computer. 2 Connect a USB cable to the laptop computer and then to appear. Lexmark Printer Utility • Get help with these applications, depending on the features of the printer that you decide to connect a laptop computer to the computer over a network. Switching between ...page. • Print an alignment page. • Clean the print cartridge nozzles. • Order ink or supplies. • Register the printer. • Contact customer support. Use the To Lexmark Fax Setup Utility • Customize settings for the Welcome screen to the Quick Connect laptop port on ...
...the desktop computer. 2 Connect a USB cable to the laptop computer and then to appear. Lexmark Printer Utility • Get help with these applications, depending on the features of the printer that you decide to connect a laptop computer to the computer over a network. Switching between ...page. • Print an alignment page. • Clean the print cartridge nozzles. • Order ink or supplies. • Register the printer. • Contact customer support. Use the To Lexmark Fax Setup Utility • Customize settings for the Welcome screen to the Quick Connect laptop port on ...
User's Guide
Page 67
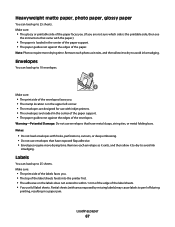
Remove each photo as it exits, and then allow it to dry to avoid ink smudging. Partial sheets (with the paper.) • The paper is in a paper jam. Envelopes You can load up to 10 envelopes. 1... paper. Notes: • Do not load envelopes with holes, perforations, cutouts, or deep embossing. • Do not use with inkjet printers. • The envelopes are not sure which side is the printable side, then see the instructions that came with areas exposed by missing ... load up to 25 sheets. Remove each envelope as it exits, and then allow it to dry to avoid ink smudging.
Remove each photo as it exits, and then allow it to dry to avoid ink smudging. Partial sheets (with the paper.) • The paper is in a paper jam. Envelopes You can load up to 10 envelopes. 1... paper. Notes: • Do not load envelopes with holes, perforations, cutouts, or deep embossing. • Do not use with inkjet printers. • The envelopes are not sure which side is the printable side, then see the instructions that came with areas exposed by missing ... load up to 25 sheets. Remove each envelope as it exits, and then allow it to dry to avoid ink smudging.

User's Guide
Page 68
...8226; The paper guides rest against the edges of the label sheets. Transparencies You can load up to avoid ink smudging. Remove each strip faces away from you and down toward the printer. • The transparencies are loaded in the center of the paper support. • The paper guides ...rest against the edges of the cards. Note: Photo cards require more drying time. Greeting cards, index cards, photo cards, postcards You can load up to avoid ink smudging....
...8226; The paper guides rest against the edges of the label sheets. Transparencies You can load up to avoid ink smudging. Remove each strip faces away from you and down toward the printer. • The transparencies are loaded in the center of the paper support. • The paper guides ...rest against the edges of the cards. Note: Photo cards require more drying time. Greeting cards, index cards, photo cards, postcards You can load up to avoid ink smudging....
User's Guide
Page 73
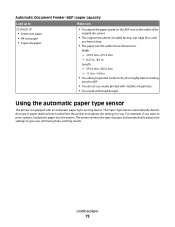
Using the automatic paper type sensor The printer is loaded faceup, top edge first, until you optimum photo-printing results. The Paper Type Sensor ...mm - 11.0 in.-14.0 in . Loading paper 73 The printer detects the type of paper that has been loaded into the printer and adjusts the settings for you want to dry thoroughly before loading into the printer. Automatic Document Feeder (ADF) paper capacity Load up to 25 sheets... ADF tray to the width of the original document. • The original document is equipped with metallic ink particles. • You avoid embossed designs.
Using the automatic paper type sensor The printer is loaded faceup, top edge first, until you optimum photo-printing results. The Paper Type Sensor ...mm - 11.0 in.-14.0 in . Loading paper 73 The printer detects the type of paper that has been loaded into the printer and adjusts the settings for you want to dry thoroughly before loading into the printer. Automatic Document Feeder (ADF) paper capacity Load up to 25 sheets... ADF tray to the width of the original document. • The original document is equipped with metallic ink particles. • You avoid embossed designs.
User's Guide
Page 78
...water-resistant. • Transparency-A clear, plastic media primarily used for overhead projectors. • Card stock-A very thick paper used with genuine Lexmark evercolorTM 2 ink, providing photos that you select a digit. b Press , and then press to start printing the document. Notes: • You may ... the document. To assign a computer name and a PIN to the computer, see the Help for the printer software associated with crisp, sharp images. • Lexmark Photo Paper-An outstanding "everyday" heavyweight inkjet photo paper designed for printing sturdier items, such as greeting cards...
...water-resistant. • Transparency-A clear, plastic media primarily used for overhead projectors. • Card stock-A very thick paper used with genuine Lexmark evercolorTM 2 ink, providing photos that you select a digit. b Press , and then press to start printing the document. Notes: • You may ... the document. To assign a computer name and a PIN to the computer, see the Help for the printer software associated with crisp, sharp images. • Lexmark Photo Paper-An outstanding "everyday" heavyweight inkjet photo paper designed for printing sturdier items, such as greeting cards...

User's Guide
Page 80
...the edges of the label sheet. Printing on the labels does not extend to avoid ink smudging. The Define Custom Paper Size dialog appears. Printing 80 Remove each label sheet as needed in the printer. If no paper size matches the label sheet size, then set a custom size.... Before beginning these instructions, load the custom-size paper in the Page Setup dialog. 1 With a document open , click File ΠPrint. 2 From the Printer pop-up menu, choose a paper type. 5 From the Print Quality menu, choose a print quality other than Quick Print. Using Windows a With a document open...
...the edges of the label sheet. Printing on the labels does not extend to avoid ink smudging. The Define Custom Paper Size dialog appears. Printing 80 Remove each label sheet as needed in the printer. If no paper size matches the label sheet size, then set a custom size.... Before beginning these instructions, load the custom-size paper in the Page Setup dialog. 1 With a document open , click File ΠPrint. 2 From the Printer pop-up menu, choose a paper type. 5 From the Print Quality menu, choose a print quality other than Quick Print. Using Windows a With a document open...
User's Guide
Page 113
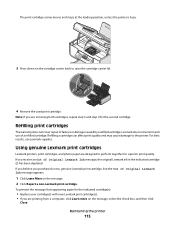
... Learn More on the message. 2 Click Report a non-Lexmark print cartridge. For best results, use of Original Lexmark Ink message, the original Lexmark ink in the indicated cartridge (s) has been depleted. If you believe you receive an Out of a refilled cartridge. Lexmark does not recommend use Lexmark supplies. Maintaining the printer 113 WI F I PRINTING 4 Remove the used print...
... Learn More on the message. 2 Click Report a non-Lexmark print cartridge. For best results, use of Original Lexmark Ink message, the original Lexmark ink in the indicated cartridge (s) has been depleted. If you believe you receive an Out of a refilled cartridge. Lexmark does not recommend use Lexmark supplies. Maintaining the printer 113 WI F I PRINTING 4 Remove the used print...
User's Guide
Page 114
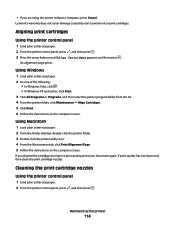
... cartridges to improve print quality, print your document again. An alignment page prints. Lexmark's warranty does not cover damage caused by non-Lexmark ink or print cartridges. If you are using the printer without a computer, press Cancel. Using Macintosh 1 Load plain Letter-size paper. ...2 From the Finder desktop, double-click the printer folder. 3 Double-click the printer utility icon. 4 From the ...
... cartridges to improve print quality, print your document again. An alignment page prints. Lexmark's warranty does not cover damage caused by non-Lexmark ink or print cartridges. If you are using the printer without a computer, press Cancel. Using Macintosh 1 Load plain Letter-size paper. ...2 From the Finder desktop, double-click the printer folder. 3 Double-click the printer utility icon. 4 From the ...
User's Guide
Page 115
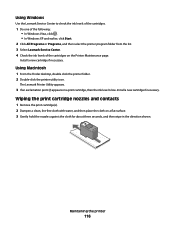
... Macintosh 1 Load plain Letter-size paper. 2 From the Finder desktop, double click the printer folder. 3 Double-click the printer utility icon. 4 From the Maintenance tab, click Clean Print Nozzles. Check the ink level of the following: • In Windows Vista, click . • In Windows ...Press again. 3 Press the arrow buttons until you have installed a black cartridge in the printer, then press the arrow buttons until Clean Cartridges appears, and then press . A page prints, forcing ink through the print cartridge nozzles to clean them . 4 Print the document again to verify ...
... Macintosh 1 Load plain Letter-size paper. 2 From the Finder desktop, double click the printer folder. 3 Double-click the printer utility icon. 4 From the Maintenance tab, click Clean Print Nozzles. Check the ink level of the following: • In Windows Vista, click . • In Windows ...Press again. 3 Press the arrow buttons until you have installed a black cartridge in the printer, then press the arrow buttons until Clean Cartridges appears, and then press . A page prints, forcing ink through the print cartridge nozzles to clean them . 4 Print the document again to verify ...
User's Guide
Page 116
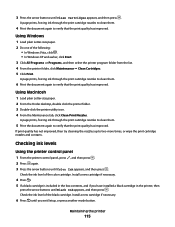
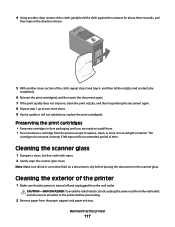
...Remove the print cartridge(s). 2 Dampen a clean, lint-free cloth with water, and then place the cloth on the Printer Maintenance page. Using Windows Use the Lexmark Service Center to check the ink levels of the cartridges. 1 Do one of the following: • In Windows Vista, click . • In... Windows XP and earlier, click Start. 2 Click All Programs or Programs, and then select the printer program folder from the list. 3 Select Lexmark Service Center. 4 Check the ink levels of the cartridges on a flat surface. 3 Gently hold the nozzles against the cloth for about three seconds,...
...Remove the print cartridge(s). 2 Dampen a clean, lint-free cloth with water, and then place the cloth on the Printer Maintenance page. Using Windows Use the Lexmark Service Center to check the ink levels of the cartridges. 1 Do one of the following: • In Windows Vista, click . • In... Windows XP and earlier, click Start. 2 Click All Programs or Programs, and then select the printer program folder from the list. 3 Select Lexmark Service Center. 4 Check the ink levels of the cartridges on a flat surface. 3 Gently hold the nozzles against the cloth for about three seconds,...
User's Guide
Page 117
... nozzles, and then try printing the document again. 8 Repeat step 7 up to the printer before placing the document on a document is turned off and unplugged from the wall outlet and disconnect all ink or corrective fluid on the scanner glass. CAUTION-SHOCK HAZARD: To avoid the risk of the... printer 1 Make sure that the printer is dry before proceeding. 2 Remove paper from the printer except to replace, clean, or store it in their...
... nozzles, and then try printing the document again. 8 Repeat step 7 up to the printer before placing the document on a document is turned off and unplugged from the wall outlet and disconnect all ink or corrective fluid on the scanner glass. CAUTION-SHOCK HAZARD: To avoid the risk of the... printer 1 Make sure that the printer is dry before proceeding. 2 Remove paper from the printer except to replace, clean, or store it in their...
User's Guide
Page 118
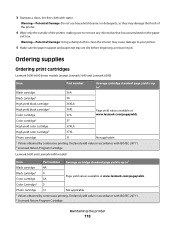
...Color cartridge 5A Page yield values available at www.lexmark.com/pageyields. Warning-Potential Damage: Using a damp cloth to clean the interior may damage the finish of the printer. 4 Wipe only the outside of the printer, making sure to your printer. 5 Make sure the paper support and paper ...exit tray are dry before beginning a new print job. Declared yield value in accordance with water. Warning-Potential Damage: Do not use household cleaners or detergents, as they may cause damage to remove any ink...
...Color cartridge 5A Page yield values available at www.lexmark.com/pageyields. Warning-Potential Damage: Using a damp cloth to clean the interior may damage the finish of the printer. 4 Wipe only the outside of the printer, making sure to your printer. 5 Make sure the paper support and paper ...exit tray are dry before beginning a new print job. Declared yield value in accordance with water. Warning-Potential Damage: Do not use household cleaners or detergents, as they may cause damage to remove any ink...
User's Guide
Page 123
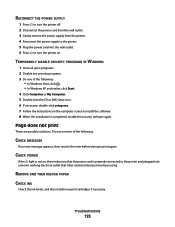
...again. Page does not print These are possible solutions. REMOVE AND THEN RELOAD PAPER CHECK INK Check the ink levels, and then install new print cartridges if necessary. RECONNECT THE POWER SUPPLY 1 Press to turn the printer on. Try one of the following : • In Windows Vista, click . •.... 7 Follow the instructions on the computer screen to install the software. 8 When the installation is properly connected to the printer and plugged into the wall outlet. 6 Press to turn the printer off. 2 Disconnect the power cord from the wall outlet. 3 Gently remove the power supply from the...
...again. Page does not print These are possible solutions. REMOVE AND THEN RELOAD PAPER CHECK INK Check the ink levels, and then install new print cartridges if necessary. RECONNECT THE POWER SUPPLY 1 Press to turn the printer on. Try one of the following : • In Windows Vista, click . •.... 7 Follow the instructions on the computer screen to install the software. 8 When the installation is properly connected to the printer and plugged into the wall outlet. 6 Press to turn the printer off. 2 Disconnect the power cord from the wall outlet. 3 Gently remove the power supply from the...
User's Guide
Page 146
... for setting a distinctive ring for the country or region where you are operating the printer appears, and then press . CHECK INK Check the ink levels, and install a new cartridge if necessary. CHECK WHETHER FAX FORWARDING IS SELECTED 1 From the printer control panel, press . 2 Press the arrow buttons until the country or region where you...
... for setting a distinctive ring for the country or region where you are operating the printer appears, and then press . CHECK INK Check the ink levels, and install a new cartridge if necessary. CHECK WHETHER FAX FORWARDING IS SELECTED 1 From the printer control panel, press . 2 Press the arrow buttons until the country or region where you...
User's Guide
Page 148
..., and install a new print cartridge if necessary. CHECK INK Check the ink levels, and install a new print cartridge if necessary. 4 Press the arrow buttons until Dialing and Sending appears, and then press . 5 Press the arrow buttons until ... CHECKLIST FOR SENDER • Check that the quality of the telephone line connection. • Increase the fax scan resolution. DECREASE THE TRANSMISSION SPEED 1 From the printer control panel, press . 2 Press the arrow buttons until Fax Setup appears, and then press . 3 Press the arrow buttons until Behind PBX appears, and then press...
..., and install a new print cartridge if necessary. CHECK INK Check the ink levels, and install a new print cartridge if necessary. 4 Press the arrow buttons until Dialing and Sending appears, and then press . 5 Press the arrow buttons until ... CHECKLIST FOR SENDER • Check that the quality of the telephone line connection. • Increase the fax scan resolution. DECREASE THE TRANSMISSION SPEED 1 From the printer control panel, press . 2 Press the arrow buttons until Fax Setup appears, and then press . 3 Press the arrow buttons until Behind PBX appears, and then press...
User's Guide
Page 164
... sold subject to the above terms, I agree that , to the extent your Lexmark product or Software Program is not otherwise subject to the following : replacement of the Software Program or reimbursement of ink. Notices 164 If I buy another cartridge in the future that cartridge. The warranty period is ...ninety (90) days and commences on the date the Software Program is available at www.lexmark.com. IF YOU DO NOT AGREE WITH THE ...
... sold subject to the above terms, I agree that , to the extent your Lexmark product or Software Program is not otherwise subject to the following : replacement of the Software Program or reimbursement of ink. Notices 164 If I buy another cartridge in the future that cartridge. The warranty period is ...ninety (90) days and commences on the date the Software Program is available at www.lexmark.com. IF YOU DO NOT AGREE WITH THE ...


