
User's Guide
Page 9
..., other replacement parts. Do not subject the power cord to a professional service person. Safety information Use only the power supply and power supply cord provided with the use of specific Lexmark components. CAUTION-POTENTIAL INJURY: Do not twist, bind, crush, or place heavy objects on the power cord. Inspect the power cord regularly for the use of other than those...
..., other replacement parts. Do not subject the power cord to a professional service person. Safety information Use only the power supply and power supply cord provided with the use of specific Lexmark components. CAUTION-POTENTIAL INJURY: Do not twist, bind, crush, or place heavy objects on the power cord. Inspect the power cord regularly for the use of other than those...
User's Guide
Page 13
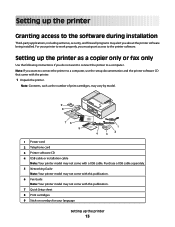
... came with a USB cable. Note: If you do not want to connect the printer to a computer. Setting up the printer as the number of print cartridges, may vary by model. 9 8 1 2 3 76 5 1 4 2 3 1 Power cord 2 Telephone cord 3 Printer software CD 4 USB cable or installation cable Note: Your printer model may not come with this publication. 6 Fax Guide Note: Your...
... came with a USB cable. Note: If you do not want to connect the printer to a computer. Setting up the printer as the number of print cartridges, may vary by model. 9 8 1 2 3 76 5 1 4 2 3 1 Power cord 2 Telephone cord 3 Printer software CD 4 USB cable or installation cable Note: Your printer model may not come with this publication. 6 Fax Guide Note: Your...
User's Guide
Page 16
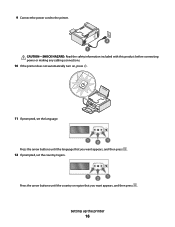
Setting up the printer 16 9 Connect the power cord to the printer. 2 1 CAUTION-SHOCK HAZARD: Read the safety information included with this product before connecting power or making any cabling connections. 10 If the printer does not automatically turn on, press . 11 If prompted, set the language. 1 2 1 Press the arrow buttons until the language that you want appears, and then press . 12 If prompted, set the country/region. 1 2 1 Press the arrow buttons until the country or region that you want appears, and then press .
Setting up the printer 16 9 Connect the power cord to the printer. 2 1 CAUTION-SHOCK HAZARD: Read the safety information included with this product before connecting power or making any cabling connections. 10 If the printer does not automatically turn on, press . 11 If prompted, set the language. 1 2 1 Press the arrow buttons until the language that you want appears, and then press . 12 If prompted, set the country/region. 1 2 1 Press the arrow buttons until the country or region that you want appears, and then press .
User's Guide
Page 35
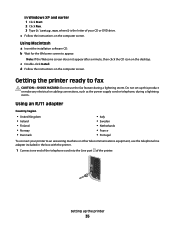
...computer screen. Setting up this product or make any electrical or cabling connections, such as the power supply cord or telephone, during a lightning storm. c Double-click Install. Do not set up the printer 35 Using an RJ11 adapter Country/region • United Kingdom • Ireland • Finland...to fax CAUTION-SHOCK HAZARD: Do not use the telephone line adapter included in the box with the printer. 1 Connect one end of the telephone cord into the Line port of your printer to appear. c Follow the instructions on the computer screen. In Windows XP and earlier 1 Click...
...computer screen. Setting up this product or make any electrical or cabling connections, such as the power supply cord or telephone, during a lightning storm. c Double-click Install. Do not set up the printer 35 Using an RJ11 adapter Country/region • United Kingdom • Ireland • Finland...to fax CAUTION-SHOCK HAZARD: Do not use the telephone line adapter included in the box with the printer. 1 Connect one end of the telephone cord into the Line port of your printer to appear. c Follow the instructions on the computer screen. In Windows XP and earlier 1 Click...
User's Guide
Page 103
... or press Address Book to a working phone line. 2 Load an original document faceup into the Automatic Document Feeder (ADF) or facedown on the printer. Notes: • Do not load postcards, photos, small items, transparencies, photo paper, or thin media (such as magazine clippings) into the ... electrical or cabling connections, such as part of the fax number. • A fax number can include a calling card number as the power supply cord or telephone, during a lightning storm. appears after each page is connected to select a number from the Speed Dial or Group Dial list...
... or press Address Book to a working phone line. 2 Load an original document faceup into the Automatic Document Feeder (ADF) or facedown on the printer. Notes: • Do not load postcards, photos, small items, transparencies, photo paper, or thin media (such as magazine clippings) into the ... electrical or cabling connections, such as part of the fax number. • A fax number can include a calling card number as the power supply cord or telephone, during a lightning storm. appears after each page is connected to select a number from the Speed Dial or Group Dial list...
User's Guide
Page 117
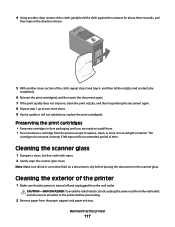
...the printer 117 Cleaning the scanner glass 1 Dampen a clean, lint-free cloth with water. 2 Gently wipe the scanner glass clean. Note: Make sure all cables to replace, clean, or store it in an airtight container. CAUTION-SHOCK HAZARD: To avoid the risk of electric shock, unplug the power cord from ...seconds, and then wipe in their packaging until you are ready to install them. • Do not remove a cartridge from the printer except to the printer before placing the document on a document is turned off and unplugged from the wall outlet and disconnect all ink or corrective fluid on...
...the printer 117 Cleaning the scanner glass 1 Dampen a clean, lint-free cloth with water. 2 Gently wipe the scanner glass clean. Note: Make sure all cables to replace, clean, or store it in an airtight container. CAUTION-SHOCK HAZARD: To avoid the risk of electric shock, unplug the power cord from ...seconds, and then wipe in their packaging until you are ready to install them. • Do not remove a cartridge from the printer except to the printer before placing the document on a document is turned off and unplugged from the wall outlet and disconnect all ink or corrective fluid on...
User's Guide
Page 122
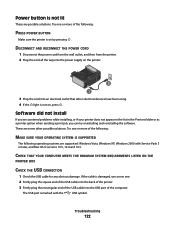
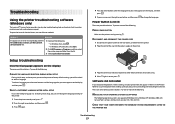
... rectangular end of the following operating systems are possible solutions. DISCONNECT AND RECONNECT THE POWER CORD 1 Disconnect the power cord from the wall outlet, and then from the printer. 2 Plug the cord all the way into the power supply on the printer. 2 1 3 Plug the cord into the USB port of the following: MAKE SURE YOUR OPERATING SYSTEM IS SUPPORTED...
... rectangular end of the following operating systems are possible solutions. DISCONNECT AND RECONNECT THE POWER CORD 1 Disconnect the power cord from the wall outlet, and then from the printer. 2 Plug the cord all the way into the power supply on the printer. 2 1 3 Plug the cord into the USB port of the following: MAKE SURE YOUR OPERATING SYSTEM IS SUPPORTED...
User's Guide
Page 123
... the software. 8 When the installation is properly connected to the printer and plugged into the wall outlet. 6 Press to turn the printer off. 2 Disconnect the power cord from the wall outlet. 3 Gently remove the power supply from the printer. 4 Reconnect the power supply to the printer. 5 Plug the power cord into a known working electrical outlet that other electrical devices have...
... the software. 8 When the installation is properly connected to the printer and plugged into the wall outlet. 6 Press to turn the printer off. 2 Disconnect the power cord from the wall outlet. 3 Gently remove the power supply from the printer. 4 Reconnect the power supply to the printer. 5 Plug the power cord into a known working electrical outlet that other electrical devices have...

User's Guide
Page 125
... you want to set the printer as the default printer, then select the printer from the printer. 4 Reconnect the power supply to the printer. 5 Plug the power cord into the wall outlet. 6 Press to resume all print jobs in the queue, then click Start Jobs. • If the printer is on hold : - ...If you want to turn off the printer. 2 Disconnect the power cord from the wall outlet. 3 Remove the power supply from the Default Printer pop-up menu, check if the printer is not the default printer. If you want to set the printer as the default printer: a Go back to resume all ...
... you want to set the printer as the default printer, then select the printer from the printer. 4 Reconnect the power supply to the printer. 5 Plug the power cord into the wall outlet. 6 Press to resume all print jobs in the queue, then click Start Jobs. • If the printer is on hold : - ...If you want to turn off the printer. 2 Disconnect the power cord from the wall outlet. 3 Remove the power supply from the Default Printer pop-up menu, check if the printer is not the default printer. If you want to set the printer as the default printer: a Go back to resume all ...
User's Guide
Page 126
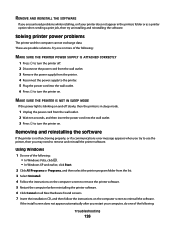
... 2 Click All Programs or Programs, and then select the printer program folder from the printer. 4 Reconnect the power supply to the printer. 5 Plug the power cord into the wall outlet. 3 Press to turn the printer off slowly, then the printer is not functioning properly, or if a communications error message .... Try one of the following : Troubleshooting 126 MAKE SURE THE PRINTER IS NOT IN SLEEP MODE If the power light is blinking on and off . 2 Disconnect the power cord from the wall outlet. 3 Remove the power supply from the list. 3 Select Uninstall. 4 Follow the instructions...
... 2 Click All Programs or Programs, and then select the printer program folder from the printer. 4 Reconnect the power supply to the printer. 5 Plug the power cord into the wall outlet. 3 Press to turn the printer off slowly, then the printer is not functioning properly, or if a communications error message .... Try one of the following : Troubleshooting 126 MAKE SURE THE PRINTER IS NOT IN SLEEP MODE If the power light is blinking on and off . 2 Disconnect the power cord from the wall outlet. 3 Remove the power supply from the list. 3 Select Uninstall. 4 Follow the instructions...
User's Guide
Page 144
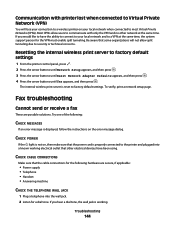
... : CHECK MESSAGES If an error message is displayed, follow the instructions on , then make sure that the power cord is reset to factory default settings. The internal wireless print server is properly connected to the printer and plugged into the wall jack. 2 Listen for the VPN must enable split tunneling. Fax troubleshooting Cannot...
... : CHECK MESSAGES If an error message is displayed, follow the instructions on , then make sure that the power cord is reset to factory default settings. The internal wireless print server is properly connected to the printer and plugged into the wall jack. 2 Listen for the VPN must enable split tunneling. Fax troubleshooting Cannot...
User's Guide
Page 163
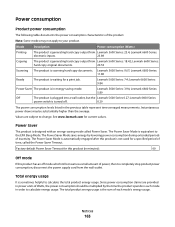
... The product is the sum of Watts, the power consumption should be substantially higher than the average. Since power consumption claims are subject to completely stop product power consumption, disconnect the power supply cord from the wall outlet. See www.lexmark.com for a print job. Lexmark 6600 Series: electronic inputs. 23.89 Copying Scanning The product is...
... The product is the sum of Watts, the power consumption should be substantially higher than the average. Since power consumption claims are subject to completely stop product power consumption, disconnect the power supply cord from the wall outlet. See www.lexmark.com for a print job. Lexmark 6600 Series: electronic inputs. 23.89 Copying Scanning The product is...
Fax Guide
Page 8
Do not set up the printer as the number of the printer. 9 8 1 2 3 76 5 1 4 2 3 1 Power cord 2 Telephone cord 3 Printer software CD 4 USB cable or installation cable Note: Your printer model may not come with this product or make any electrical or cabling connections, such as the power supply cord or telephone, during a lightning storm. Note: If you do not want to...
Do not set up the printer as the number of the printer. 9 8 1 2 3 76 5 1 4 2 3 1 Power cord 2 Telephone cord 3 Printer software CD 4 USB cable or installation cable Note: Your printer model may not come with this product or make any electrical or cabling connections, such as the power supply cord or telephone, during a lightning storm. Note: If you do not want to...

Fax Guide
Page 9
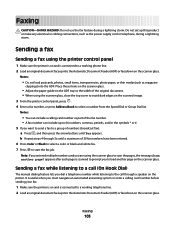
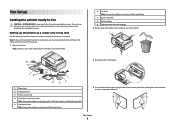
..., and then press down on overlays. 8 Load paper, and then pull up the paper adjustment lever to the printer. 2 1 CAUTION-SHOCK HAZARD: Read the safety information included with this product before connecting power or making any cabling connections. 5 Place the stick-on overlays on the recessed areas of the paper. 12 6 Extend... exit tray. 2 1 7 Raise the paper support, and then press down on the stick-on the paper adjustment lever to extend the paper guides. 9 Connect the power cord to adjust the paper guides.
..., and then press down on overlays. 8 Load paper, and then pull up the paper adjustment lever to the printer. 2 1 CAUTION-SHOCK HAZARD: Read the safety information included with this product before connecting power or making any cabling connections. 5 Place the stick-on overlays on the recessed areas of the paper. 12 6 Extend... exit tray. 2 1 7 Raise the paper support, and then press down on the stick-on the paper adjustment lever to extend the paper guides. 9 Connect the power cord to adjust the paper guides.

Fax Guide
Page 19
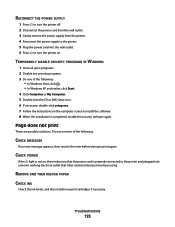
... cabling connections, such as magazine clippings), and three-dimensional objects on the scanner glass instead of in the ADF. 1 Make sure the computer and the printer are on. 2 Open the top cover. 3 Place the original document facedown on the scanner glass in catalogs, brochures, or product flyers. Using Fax CAUTION..., newspapers, and other publications. You can also scan three-dimensional objects for faxing. Note: Place photos, postcards, small items, thin items (such as the power supply cord or telephone, during a lightning storm. Loading original documents on the scanned image.
... cabling connections, such as magazine clippings), and three-dimensional objects on the scanner glass instead of in the ADF. 1 Make sure the computer and the printer are on. 2 Open the top cover. 3 Place the original document facedown on the scanner glass in catalogs, brochures, or product flyers. Using Fax CAUTION..., newspapers, and other publications. You can also scan three-dimensional objects for faxing. Note: Place photos, postcards, small items, thin items (such as the power supply cord or telephone, during a lightning storm. Loading original documents on the scanned image.
Fax Guide
Page 27
... RECONNECT THE POWER CORD 1 Disconnect the power cord from the wall outlet, and then from the list. 3 Select Lexmark Service Center. Software did not install If you encountered problems while installing, or if your printer does not appear in the list in the Printers folder or as a printer option when...troubleshooting Incorrect language appears on , press . Try one or more of the following : PRESS POWER BUTTON Make sure the printer is on the printer. 2 1 3 Plug the cord into the power supply on by -step troubleshooting help and contains links to change the language settings of the ...
... RECONNECT THE POWER CORD 1 Disconnect the power cord from the wall outlet, and then from the list. 3 Select Lexmark Service Center. Software did not install If you encountered problems while installing, or if your printer does not appear in the list in the Printers folder or as a printer option when...troubleshooting Incorrect language appears on , press . Try one or more of the following : PRESS POWER BUTTON Make sure the printer is on the printer. 2 1 3 Plug the cord into the power supply on by -step troubleshooting help and contains links to change the language settings of the ...
Fax Guide
Page 28
...If the software still does not install correctly, visit our Web site at www.lexmark.com to check for the latest software. 1 In all open software applications. 2 From the Finder desktop, double-click the printer folder. 3 Double-click the Uninstaller icon. 4 Follow the instructions on the ... Vista, click . • In Windows XP and earlier, click Start. 2 Click All Programs or Programs, and then select the printer program folder from the printer. 4 Reconnect the power supply to the printer. 5 Plug the power cord into the USB port of the USB cable into the wall outlet. 6 Press to turn the...
...If the software still does not install correctly, visit our Web site at www.lexmark.com to check for the latest software. 1 In all open software applications. 2 From the Finder desktop, double-click the printer folder. 3 Double-click the Uninstaller icon. 4 Follow the instructions on the ... Vista, click . • In Windows XP and earlier, click Start. 2 Click All Programs or Programs, and then select the printer program folder from the printer. 4 Reconnect the power supply to the printer. 5 Plug the power cord into the USB port of the USB cable into the wall outlet. 6 Press to turn the...
Fax Guide
Page 29
...MAIL SERVICE? Troubleshooting 29 Try one page at a time. Disable this feature before sending a fax. • If you are operating the printer: 1 From the printer control panel, press . 2 Press the arrow buttons until Device Setup appears, and then press . 3 Press the arrow buttons until the country... sure that it directly to an analog connection on the error message dialog. For more information on , then make sure that the power cord is working correctly, connect it is working electrical outlet that other device is displayed, follow the instructions on the PBX. CHECK FOR ...
...MAIL SERVICE? Troubleshooting 29 Try one page at a time. Disable this feature before sending a fax. • If you are operating the printer: 1 From the printer control panel, press . 2 Press the arrow buttons until Device Setup appears, and then press . 3 Press the arrow buttons until the country... sure that it directly to an analog connection on the error message dialog. For more information on , then make sure that the power cord is working correctly, connect it is working electrical outlet that other device is displayed, follow the instructions on the PBX. CHECK FOR ...


