User's Guide
Page 4
...only 49 Switching between USB and wireless connections (Macintosh only 50 Advanced wireless setup...51 Creating an ad hoc wireless network ...51 Adding a printer to an existing ad hoc wireless network 53 Using WPS (Wi-Fi Protected Setup)...54 Frequently asked questions...54 Where do I find my...?...64 What is a key index?...64 Loading paper 66 Loading paper...66 Loading various paper types...66 Loading original documents on the scanner glass 70 Loading original documents into the Automatic Document Feeder 71 Using the automatic paper type sensor...73 Printing 74 Printing basic documents......
...only 49 Switching between USB and wireless connections (Macintosh only 50 Advanced wireless setup...51 Creating an ad hoc wireless network ...51 Adding a printer to an existing ad hoc wireless network 53 Using WPS (Wi-Fi Protected Setup)...54 Frequently asked questions...54 Where do I find my...?...64 What is a key index?...64 Loading paper 66 Loading paper...66 Loading various paper types...66 Loading original documents on the scanner glass 70 Loading original documents into the Automatic Document Feeder 71 Using the automatic paper type sensor...73 Printing 74 Printing basic documents......
User's Guide
Page 6
...Blocking unwanted changes to fax settings...110 Maintaining the printer 111 Maintaining print cartridges...111 Installing print cartridges...111 Removing a used print cartridge ...112 Refilling print cartridges...113 Using genuine Lexmark print cartridges...113 Aligning print cartridges ...114 Cleaning... the print cartridge nozzles...114 Checking ink levels...115 Wiping the print cartridge nozzles and contacts ...116 Preserving the print cartridges ...117 Cleaning the scanner glass...117 Cleaning the exterior of the printer...
...Blocking unwanted changes to fax settings...110 Maintaining the printer 111 Maintaining print cartridges...111 Installing print cartridges...111 Removing a used print cartridge ...112 Refilling print cartridges...113 Using genuine Lexmark print cartridges...113 Aligning print cartridges ...114 Cleaning... the print cartridge nozzles...114 Checking ink levels...115 Wiping the print cartridge nozzles and contacts ...116 Preserving the print cartridges ...117 Cleaning the scanner glass...117 Cleaning the exterior of the printer...
User's Guide
Page 21
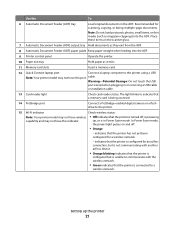
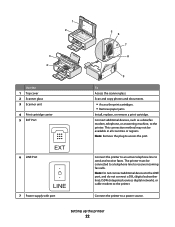
... Do not touch the USB port except when plugging in Power Saver mode. indicates that the printer is unable to a wireless network. In Power Saver mode, the power light pulses on the scanner glass. 7 Automatic Document Feeder (ADF) output tray Hold documents as they exit from the ADF.... 8 Automatic Document Feeder (ADF) paper guide Keep paper straight when feeding into the ADF. 9 Printer control panel Operate the printer. 10 Paper exit tray Hold ...
... Do not touch the USB port except when plugging in Power Saver mode. indicates that the printer is unable to a wireless network. In Power Saver mode, the power light pulses on the scanner glass. 7 Automatic Document Feeder (ADF) output tray Hold documents as they exit from the ADF.... 8 Automatic Document Feeder (ADF) paper guide Keep paper straight when feeding into the ADF. 9 Printer control panel Operate the printer. 10 Paper exit tray Hold ...
User's Guide
Page 22
... line to a power source. Note: Remove the plug to the printer. Connect additional devices, such as a data/fax modem, telephone, or answering machine, to access the port. 1 2 3 4 Use the 1 Top cover 2 Scanner glass 3 Scanner unit 4 Print cartridge carrier 5 EXT Port 6 LINE Port EXT ...LINE 7 Power supply with port 5 6 7 8 9 To Access the scanner glass. Scan and copy photos and documents. • Access the print cartridges. •...
... line to a power source. Note: Remove the plug to the printer. Connect additional devices, such as a data/fax modem, telephone, or answering machine, to access the port. 1 2 3 4 Use the 1 Top cover 2 Scanner glass 3 Scanner unit 4 Print cartridge carrier 5 EXT Port 6 LINE Port EXT ...LINE 7 Power supply with port 5 6 7 8 9 To Access the scanner glass. Scan and copy photos and documents. • Access the print cartridges. •...
User's Guide
Page 70
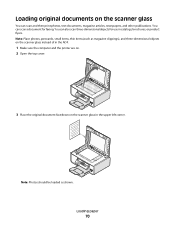
...be loaded as magazine clippings), and three-dimensional objects on the scanner glass instead of in the ADF. 1 Make sure the computer and the printer are on. 2 Open the top cover. 3 Place the original document facedown on the scanner glass You can scan a document for use in the upper left... corner. Note: Place photos, postcards, small items, thin items (such as shown. Loading original documents on the scanner glass in catalogs...
...be loaded as magazine clippings), and three-dimensional objects on the scanner glass instead of in the ADF. 1 Make sure the computer and the printer are on. 2 Open the top cover. 3 Place the original document facedown on the scanner glass You can scan a document for use in the upper left... corner. Note: Place photos, postcards, small items, thin items (such as shown. Loading original documents on the scanner glass in catalogs...

User's Guide
Page 71
4 Close the top cover to 25 sheets of the original document. 2 Fan the original document. Place these items on the scanner glass. 1 Adjust the paper guide on the scanned image. Loading original documents into the Automatic Document Feeder You can load A4-, letter-, or legal-size ...
4 Close the top cover to 25 sheets of the original document. 2 Fan the original document. Place these items on the scanner glass. 1 Adjust the paper guide on the scanned image. Loading original documents into the Automatic Document Feeder You can load A4-, letter-, or legal-size ...
User's Guide
Page 72
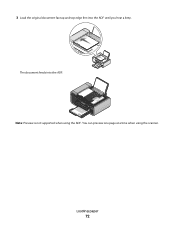
Loading paper 72 WI F I PRINTING Note: Preview is not supported when using the scanner. You can preview one page at a time when using the ADF. The document feeds into the ADF until you hear a beep. 3 Load the original document faceup and top edge first into the ADF.
Loading paper 72 WI F I PRINTING Note: Preview is not supported when using the scanner. You can preview one page at a time when using the ADF. The document feeds into the ADF until you hear a beep. 3 Load the original document faceup and top edge first into the ADF.
User's Guide
Page 91
...Press . or A4-size plain paper. 2 From the printer control panel, press . 3 Insert a memory card or flash drive. 4 Press the arrow buttons until it appears on the scanner glass. If you are 20 or more photos on ...the memory device. • By date, if the photos on the card were taken on the printer control panel to ...the center of copies per photo, red-eye reduction, page layout, print options, and paper size. The printer scans the proof sheet. 10 Load photo paper vertically in the circles completely. 8 Load the proof sheet...
...Press . or A4-size plain paper. 2 From the printer control panel, press . 3 Insert a memory card or flash drive. 4 Press the arrow buttons until it appears on the scanner glass. If you are 20 or more photos on ...the memory device. • By date, if the photos on the card were taken on the printer control panel to ...the center of copies per photo, red-eye reduction, page layout, print options, and paper size. The printer scans the proof sheet. 10 Load photo paper vertically in the circles completely. 8 Load the proof sheet...
User's Guide
Page 93
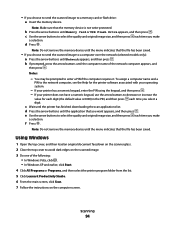
... flash drive, memory card, or to a computer over a network. • If you choose to send the scanned image to avoid dark edges on the scanner glass. b Wait until the application that you make Scanning 93 e Press . Scan to select the quality and original image size, and then press a selection.... paper, or thin media (such as magazine clippings) into the Automatic Document Feeder (ADF) or facedown on the scanned image. 2 From the printer control panel, press . You can scan and then print photos, text documents, magazine articles, newspapers, and other publications. Using the...
... flash drive, memory card, or to a computer over a network. • If you choose to send the scanned image to avoid dark edges on the scanner glass. b Wait until the application that you make Scanning 93 e Press . Scan to select the quality and original image size, and then press a selection.... paper, or thin media (such as magazine clippings) into the Automatic Document Feeder (ADF) or facedown on the scanned image. 2 From the printer control panel, press . You can scan and then print photos, text documents, magazine articles, newspapers, and other publications. Using the...
User's Guide
Page 94
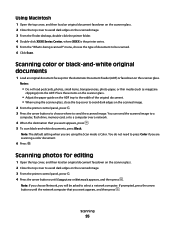
...Windows Vista, click . • In Windows XP and earlier, click Start. 4 Click All Programs or Programs, and then select the printer program folder from the list. 5 Click Lexmark Productivity Studio. 6 From the main screen, click Scan. 7 Follow the instructions on the computer screen. e Use the arrow buttons to... avoid dark edges on the scanner glass. 2 Close the top cover to select the quality and original image size, and...
...Windows Vista, click . • In Windows XP and earlier, click Start. 4 Click All Programs or Programs, and then select the printer program folder from the list. 5 Click Lexmark Productivity Studio. 6 From the main screen, click Scan. 7 Follow the instructions on the computer screen. e Use the arrow buttons to... avoid dark edges on the scanner glass. 2 Close the top cover to select the quality and original image size, and...
User's Guide
Page 95
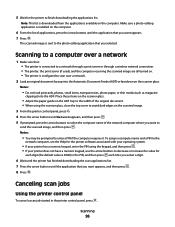
... press . Scanning 95 You do not need to avoid dark edges on the scanned image. 3 From the printer control panel, press . 4 Press the arrow buttons until the network computer that you are using the scanner glass, close the top cover to avoid dark edges on the scanned image. 2 From the... printer control panel, press . 3 Press the arrow buttons to choose where to avoid dark edges on the scanner glass. Scanning photos for editing 1 Open the top...
... press . Scanning 95 You do not need to avoid dark edges on the scanned image. 3 From the printer control panel, press . 4 Press the arrow buttons until the network computer that you are using the scanner glass, close the top cover to avoid dark edges on the scanned image. 2 From the... printer control panel, press . 3 Press the arrow buttons to choose where to avoid dark edges on the scanner glass. Scanning photos for editing 1 Open the top...
User's Guide
Page 96
... the network computer, see the Help for the printer to finish downloading the applications list. 5 Wait for the printer software associated with your operating system. • If your printer has a numeric keypad, enter the PIN using the scanner glass, close the top cover to avoid dark... edges on the scanner glass. Notes: • Do not load postcards...
... the network computer, see the Help for the printer to finish downloading the applications list. 5 Wait for the printer software associated with your operating system. • If your printer has a numeric keypad, enter the PIN using the scanner glass, close the top cover to avoid dark... edges on the scanner glass. Notes: • Do not load postcards...
User's Guide
Page 98
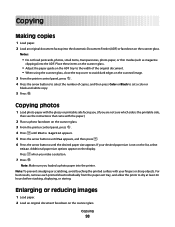
... 24 hours before stacking, displaying, or storing. Enlarging or reducing images 1 Load paper. 2 Load an original document facedown on the scanner glass. 3 From the printer control panel, press . 4 Press until Photo Reprint appears. 5 Press the arrow buttons until Yes appears, and then press . 6... sharp objects. Note: To prevent smudging or scratching, avoid touching the printed surface with the paper.) 2 Place a photo facedown on the scanner glass. Additional paper size options appear on the list, select Other. Notes: • Do not load postcards, photos, small items, transparencies...
... 24 hours before stacking, displaying, or storing. Enlarging or reducing images 1 Load paper. 2 Load an original document facedown on the scanner glass. 3 From the printer control panel, press . 4 Press until Photo Reprint appears. 5 Press the arrow buttons until Yes appears, and then press . 6... sharp objects. Note: To prevent smudging or scratching, avoid touching the printed surface with the paper.) 2 Place a photo facedown on the scanner glass. Additional paper size options appear on the list, select Other. Notes: • Do not load postcards, photos, small items, transparencies...
User's Guide
Page 99
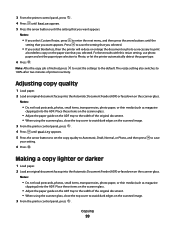
.... Adjusting copy quality 1 Load paper. 2 Load an original document faceup into the Automatic Document Feeder (ADF) or facedown on the scanner glass. 3 From the printer control panel, press . 4 Press until Resize appears. 5 Press the arrow buttons until the setting that you want appears. Note:...original document faceup into the Automatic Document Feeder (ADF) or facedown on the scanner glass. Place these items on the scanner glass. • Adjust the paper guide on the ADF tray to the width of printer inactivity. Notes: • Do not load postcards, photos, small items, ...
.... Adjusting copy quality 1 Load paper. 2 Load an original document faceup into the Automatic Document Feeder (ADF) or facedown on the scanner glass. 3 From the printer control panel, press . 4 Press until Resize appears. 5 Press the arrow buttons until the setting that you want appears. Note:...original document faceup into the Automatic Document Feeder (ADF) or facedown on the scanner glass. Place these items on the scanner glass. • Adjust the paper guide on the ADF tray to the width of printer inactivity. Notes: • Do not load postcards, photos, small items, ...

User's Guide
Page 100
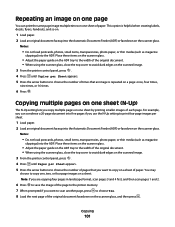
...right arrow button makes the copy darker. 6 Press . Place these items on the scanner glass. • Adjust the paper guide on the ADF tray to the width of the original document. • When using the printer control panel If you print multiple copies of a document, then you want to ...another page, press . 9 Load the next page of the original document facedown on the scanner glass. Collating copies using the scanner glass, close the top cover to avoid dark edges on the scanned image. 3 From the printer control panel, press . 4 Press the arrow buttons to select the number of copies, and...
...right arrow button makes the copy darker. 6 Press . Place these items on the scanner glass. • Adjust the paper guide on the ADF tray to the width of the original document. • When using the printer control panel If you print multiple copies of a document, then you want to ...another page, press . 9 Load the next page of the original document facedown on the scanner glass. Collating copies using the scanner glass, close the top cover to avoid dark edges on the scanned image. 3 From the printer control panel, press . 4 Press the arrow buttons to select the number of copies, and...
User's Guide
Page 101
... times that you use the N-Up setting to print four page images per Sheet appears. 5 Press the arrow buttons to avoid dark edges on the scanner glass. Notes: • Do not load postcards, photos, small items, transparencies, photo paper, or thin media (such as magazine clippings) into the ADF.... the paper guide on the ADF tray to the width of the original document. • When using the scanner glass, close the top cover to avoid dark edges on the scanned image. 3 From the printer control panel, press . 4 Press until Copies per sheet. 1 Load paper. 2 Load an original document faceup ...
... times that you use the N-Up setting to print four page images per Sheet appears. 5 Press the arrow buttons to avoid dark edges on the scanner glass. Notes: • Do not load postcards, photos, small items, transparencies, photo paper, or thin media (such as magazine clippings) into the ADF.... the paper guide on the ADF tray to the width of the original document. • When using the scanner glass, close the top cover to avoid dark edges on the scanned image. 3 From the printer control panel, press . 4 Press until Copies per sheet. 1 Load paper. 2 Load an original document faceup ...
User's Guide
Page 102
Scanning stops and the scanner bar returns to its home position. 2 Press to start printing. Copying 102 Canceling a copy job 1 Press . 9 Repeat steps 7 and 8 until all the pages that you want to copy have been saved to the printer memory. 10 When asked if you want to scan another page, press the arrow buttons until No appears, and then press to turn off the printer.
Scanning stops and the scanner bar returns to its home position. 2 Press to start printing. Copying 102 Canceling a copy job 1 Press . 9 Repeat steps 7 and 8 until all the pages that you want to copy have been saved to the printer memory. 10 When asked if you want to scan another page, press the arrow buttons until No appears, and then press to turn off the printer.
User's Guide
Page 103
...; Adjust the paper guide on the ADF tray to the width of the original document. • When using the scanner glass, close the top cover to avoid dark edges on the printer. Notes: • You can include a calling card number as part of 30 fax numbers have been entered. 6... a working phone line. 2 Load an original document faceup into the Automatic Document Feeder (ADF) or facedown on the scanner glass. b Repeat steps 4 through a speaker on the scanned image. 3 From the printer control panel, press . 4 Enter a fax number, or press Address Book to scan the pages, the message Scan ...
...; Adjust the paper guide on the ADF tray to the width of the original document. • When using the scanner glass, close the top cover to avoid dark edges on the printer. Notes: • You can include a calling card number as part of 30 fax numbers have been entered. 6... a working phone line. 2 Load an original document faceup into the Automatic Document Feeder (ADF) or facedown on the scanner glass. b Repeat steps 4 through a speaker on the scanned image. 3 From the printer control panel, press . 4 Enter a fax number, or press Address Book to scan the pages, the message Scan ...

User's Guide
Page 104
...the paper guide on the ADF tray to the width of the original document. • When using the scanner glass, close the top cover to avoid dark edges on the scanned image. 3 From the printer control panel, press . 4 Press until Schedule Fax appears. 5 Press the arrow buttons until Fax to navigate... then enter the number of the recipient. You can be active only when the fax modem is idle, or when the printer is connected to avoid dark edges on the scanner glass. Faxing 104 Notes: • You can include a calling card number as part of the telephone line. Notes: • Do...
...the paper guide on the ADF tray to the width of the original document. • When using the scanner glass, close the top cover to avoid dark edges on the scanned image. 3 From the printer control panel, press . 4 Press until Schedule Fax appears. 5 Press the arrow buttons until Fax to navigate... then enter the number of the recipient. You can be active only when the fax modem is idle, or when the printer is connected to avoid dark edges on the scanner glass. Faxing 104 Notes: • You can include a calling card number as part of the telephone line. Notes: • Do...
User's Guide
Page 112
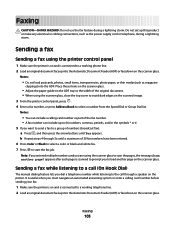
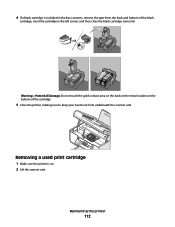
Removing a used print cartridge 1 Make sure the printer is included in the left carrier, and then close the black cartridge carrier lid. Maintaining the printer 112 Warning-Potential Damage: Do not touch the gold contact area on the back or the metal nozzles on . 2 Lift the scanner unit. 4 If a black cartridge is on the bottom of the cartridge. 5 Close the printer, making sure to keep your hands out from the back and bottom of the black cartridge, insert the cartridge in the box contents, remove the tape from underneath the scanner unit.
Removing a used print cartridge 1 Make sure the printer is included in the left carrier, and then close the black cartridge carrier lid. Maintaining the printer 112 Warning-Potential Damage: Do not touch the gold contact area on the back or the metal nozzles on . 2 Lift the scanner unit. 4 If a black cartridge is on the bottom of the cartridge. 5 Close the printer, making sure to keep your hands out from the back and bottom of the black cartridge, insert the cartridge in the box contents, remove the tape from underneath the scanner unit.


