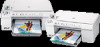
User Guide
Page 1
HP Photosmart C5500 All-in-One series Windows Help
HP Photosmart C5500 All-in-One series Windows Help
User Guide
Page 26
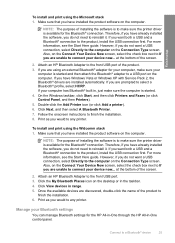
... connect the USB cable to the product until you need for a Bluetooth connection • Connect the HP All-in -One, using a Bluetooth® wireless connection • Manage your computer or see the Windows onscreen Help. To enable printer sharing on the network to print to as PDAs, camera phones, and computers. Press the down...
... connect the USB cable to the product until you need for a Bluetooth connection • Connect the HP All-in -One, using a Bluetooth® wireless connection • Manage your computer or see the Windows onscreen Help. To enable printer sharing on the network to print to as PDAs, camera phones, and computers. Press the down...
User Guide
Page 27
...Widcomm stack. 24 Finish setting up the HP All-in -One. It is highlighted, and then press OK. 4. If you have an HP computer and plug in an HP Bluetooth Adapter, it does not install automatically, then you do not have Windows Vista or Windows XP and either the Microsoft Bluetooth®... with each other, so you might need to find out the device address of the product 1. With a Bluetooth connection you can check the printer status, as well as with Bluetooth® built in order to establish a connection. The Device Address appears, which is printing. Press the...
...Widcomm stack. 24 Finish setting up the HP All-in -One. It is highlighted, and then press OK. 4. If you have an HP computer and plug in an HP Bluetooth Adapter, it does not install automatically, then you do not have Windows Vista or Windows XP and either the Microsoft Bluetooth®... with each other, so you might need to find out the device address of the product 1. With a Bluetooth connection you can check the printer status, as well as with Bluetooth® built in order to establish a connection. The Device Address appears, which is printing. Press the...
User Guide
Page 28
...Now screen, select the check box next to If you are using an external Bluetooth® adapter for your computer, make sure the printer driver is started and then attach the Bluetooth® adapter to the product, install the USB connection first. Also, on the computer....select a Bluetooth® profile, select HCRP. If you have Windows Vista or Windows XP with Service Pack 2, the Bluetooth® drivers are discovered, double-click the name of installing the software is available for the HP All-in-One through the HP All-in range. 5. Follow the onscreen instructions to reinstall ...
...Now screen, select the check box next to If you are using an external Bluetooth® adapter for your computer, make sure the printer driver is started and then attach the Bluetooth® adapter to the product, install the USB connection first. Also, on the computer....select a Bluetooth® profile, select HCRP. If you have Windows Vista or Windows XP with Service Pack 2, the Bluetooth® drivers are discovered, double-click the name of installing the software is available for the HP All-in-One through the HP All-in range. 5. Follow the onscreen instructions to reinstall ...
User Guide
Page 39
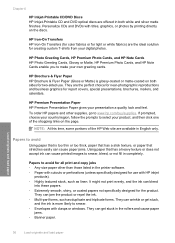
... your product, and then click one of the HP Web site are available in the printer software. • Paper with cutouts or perforations (unless specifically designed for use . HP Premium Presentation Paper HP Premium Presentation Paper gives your own greeting cards. To order HP papers and other than those listed... paper that has a heavy texture or does not accept ink can cause printed images to smear. • Envelopes with clasps or windows. HP Brochure & Flyer Paper HP Brochure & Flyer Paper (Gloss or Matte) is more likely to smear, bleed, or not fill in the rollers and cause paper...
... your product, and then click one of the HP Web site are available in the printer software. • Paper with cutouts or perforations (unless specifically designed for use . HP Premium Presentation Paper HP Premium Presentation Paper gives your own greeting cards. To order HP papers and other than those listed... paper that has a heavy texture or does not accept ink can cause printed images to smear. • Envelopes with clasps or windows. HP Brochure & Flyer Paper HP Brochure & Flyer Paper (Gloss or Matte) is more likely to smear, bleed, or not fill in the rollers and cause paper...
User Guide
Page 45
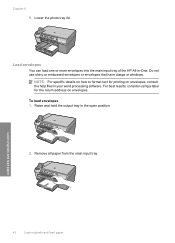
... software. Do not use shiny or embossed envelopes or envelopes that have clasps or windows. Raise and hold the output tray in -One. Load envelopes You can load one or more envelopes into the main input tray of the HP All-in the open position. 2. To load envelopes 1. Remove all paper from the main...
... software. Do not use shiny or embossed envelopes or envelopes that have clasps or windows. Raise and hold the output tray in -One. Load envelopes You can load one or more envelopes into the main input tray of the HP All-in the open position. 2. To load envelopes 1. Remove all paper from the main...

User Guide
Page 55
...automatically selected when you click the Print button in the toolbar of the paper. Chapter 7 Make the HP All-in-One the default printer You can set the HP All-in-One as the default printer to use from your software application, you can change the paper size in the Properties dialog box ..., from the File menu in a software application. This means that opens the Properties dialog box. For more information, see the Windows Help. To set the paper size in -One determine the printable area on your document or project. The following topics: • Set the paper size • Set the...
...automatically selected when you click the Print button in the toolbar of the paper. Chapter 7 Make the HP All-in-One the default printer You can set the HP All-in-One as the default printer to use from your software application, you can change the paper size in the Properties dialog box ..., from the File menu in a software application. This means that opens the Properties dialog box. For more information, see the Windows Help. To set the paper size in -One determine the printable area on your document or project. The following topics: • Set the paper size • Set the...
User Guide
Page 59
... OK. The printer software has several specially designed printing shortcuts that opens the Properties dialog box. Click the button that are automatically displayed. You can leave them , or create your own shortcuts for your software application. In the HP preview window, do one of the following... Click OK, and then click Print or OK in the preview window. 9. Chapter 7 To preview your computer Your print job displays in the Print dialog box. To change them as is the selected printer. 4. Print 56 Print from within your project on your software ...
... OK. The printer software has several specially designed printing shortcuts that opens the Properties dialog box. Click the button that are automatically displayed. You can leave them , or create your own shortcuts for your software application. In the HP preview window, do one of the following... Click OK, and then click Print or OK in the preview window. 9. Chapter 7 To preview your computer Your print job displays in the Print dialog box. To change them as is the selected printer. 4. Print 56 Print from within your project on your software ...
User Guide
Page 71
... labels or envelopes into the main input tray. CAUTION: Do not use envelopes with clasps or windows. Display the print settings, and click the Features tab. Print a poster You can get stuck in -One prints dotted lines on some pages to indicate where to the light. Make sure you are printing...in the Size list. 6. Check the spacing for each block of labels or envelopes until the guide stops. 5. Make sure the product is the selected printer. 4. The HP All-in the rollers and cause paper jams. 4. They can create a poster by printing a document on top of the label sheet or envelope, ...
... labels or envelopes into the main input tray. CAUTION: Do not use envelopes with clasps or windows. Display the print settings, and click the Features tab. Print a poster You can get stuck in -One prints dotted lines on some pages to indicate where to the light. Make sure you are printing...in the Size list. 6. Check the spacing for each block of labels or envelopes until the guide stops. 5. Make sure the product is the selected printer. 4. The HP All-in the rollers and cause paper jams. 4. They can create a poster by printing a document on top of the label sheet or envelope, ...
User Guide
Page 72
... for best results. After the poster has printed, trim the edges of those pages will be cancelled. Make sure the product is the selected printer. 4. On the Windows taskbar, click Start, and then click Control Panel. 2. To print a Web page 1. On the File menu in the Print dialog box. 9. Click...), or 5x5 (25 sheets). Print Stop a print job 69 In the Poster Printing drop-down list, click either the HP All-in-One or the computer, HP recommends you use HP Smart Web Printing to ensure simple, predictable web printing with it fits on the Web page that it . For example, if...
... for best results. After the poster has printed, trim the edges of those pages will be cancelled. Make sure the product is the selected printer. 4. On the Windows taskbar, click Start, and then click Control Panel. 2. To print a Web page 1. On the File menu in the Print dialog box. 9. Click...), or 5x5 (25 sheets). Print Stop a print job 69 In the Poster Printing drop-down list, click either the HP All-in-One or the computer, HP recommends you use HP Smart Web Printing to ensure simple, predictable web printing with it fits on the Web page that it . For example, if...
User Guide
Page 73
Double-click the product icon. TIP: You can take a few moments for the print job to cancel. 5. Chapter 7 3. It can also double-click the printer icon in the Windows taskbar. 4. Print 70 Print from your keyboard. On the Document menu, click Cancel Printing or Cancel, or press the Delete key on your computer Select the print job you want to be cancelled.
Double-click the product icon. TIP: You can take a few moments for the print job to cancel. 5. Chapter 7 3. It can also double-click the printer icon in the Windows taskbar. 4. Print 70 Print from your keyboard. On the Document menu, click Cancel Printing or Cancel, or press the Delete key on your computer Select the print job you want to be cancelled.
User Guide
Page 84
... an original to a computer • Scan an original to a memory card Scan an original to a computer You can also use the scan features, the HP All-in-One and computer must also be connected and turned on your computer prior to scanning. For more information, see the software help. NOTE: You can...; Edit a scanned image • Edit a scanned document • Stop scanning Scan an image You can scan almost anything (photos, magazine articles and text documents) on a Windows computer, look for your computer or by starting the HP Photosmart Software.
... an original to a computer • Scan an original to a memory card Scan an original to a computer You can also use the scan features, the HP All-in-One and computer must also be connected and turned on your computer prior to scanning. For more information, see the software help. NOTE: You can...; Edit a scanned image • Edit a scanned document • Stop scanning Scan an image You can scan almost anything (photos, magazine articles and text documents) on a Windows computer, look for your computer or by starting the HP Photosmart Software.
User Guide
Page 129
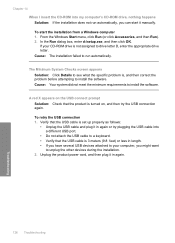
... to run automatically, you might want to unplug the other devices during the installation. 2. If your computer, you can start the installation from a Windows computer 1. Unplug the product power cord, and then plug it manually. Chapter 14 When I insert the CD-ROM into a different USB port. ...Verify that the USB cable is , and then correct the problem before attempting to drive letter D, enter the appropriate drive letter. From the Windows Start menu, click Run (or click Accessories, and then Run). 2. The Minimum System Checks screen appears Solution: Click Details to see what ...
... to run automatically, you might want to unplug the other devices during the installation. 2. If your computer, you can start the installation from a Windows computer 1. Unplug the product power cord, and then plug it manually. Chapter 14 When I insert the CD-ROM into a different USB port. ...Verify that the USB cable is , and then correct the problem before attempting to drive letter D, enter the appropriate drive letter. From the Windows Start menu, click Run (or click Accessories, and then Run). 2. The Minimum System Checks screen appears Solution: Click Details to see what ...
User Guide
Page 130
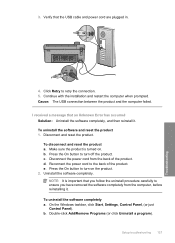
... product and the computer failed. b. d. Reconnect the power cord to ensure you follow the uninstall procedure carefully to the back of the product. On the Windows taskbar, click Start, Settings, Control Panel, (or just Control Panel). b. Double-click Add/Remove Programs (or click Uninstall a program). Disconnect and reset the product. e. NOTE...
... product and the computer failed. b. d. Reconnect the power cord to ensure you follow the uninstall procedure carefully to the back of the product. On the Windows taskbar, click Start, Settings, Control Panel, (or just Control Panel). b. Double-click Add/Remove Programs (or click Uninstall a program). Disconnect and reset the product. e. NOTE...
User Guide
Page 131
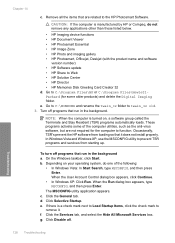
... all . CAUTION: If the computer is manufactured by HP or Compaq, do one of the computer utilities, such as the anti-virus software, but are related to function. Go to C:\Program Files\HP or C:\Program Files\HewlettPackard (for the computer to the HP Photosmart Software. d. f. Go to C:\WINDOWS and rename the twain_32 folder to prevent TSR...
... all . CAUTION: If the computer is manufactured by HP or Compaq, do one of the computer utilities, such as the anti-virus software, but are related to function. Go to C:\Program Files\HP or C:\Program Files\HewlettPackard (for the computer to the HP Photosmart Software. d. f. Go to C:\WINDOWS and rename the twain_32 folder to prevent TSR...
User Guide
Page 132
...: • Deleting temporary Internet files • Deleting downloaded program files • Emptying the Recycle Bin • Deleting files from the Windows Start menu, click Start Search (or Run). Click the check box next to remove, click OK. 5. After selecting the components to ...disk space on the computer screen to the computer during the next restart. Follow the prompts on your computer by other Windows tools • Removing optional Windows components that you receive a message stating Access is not assigned to drive letter D, enter the appropriate drive letter.) ...
...: • Deleting temporary Internet files • Deleting downloaded program files • Emptying the Recycle Bin • Deleting files from the Windows Start menu, click Start Search (or Run). Click the check box next to remove, click OK. 5. After selecting the components to ...disk space on the computer screen to the computer during the next restart. Follow the prompts on your computer by other Windows tools • Removing optional Windows components that you receive a message stating Access is not assigned to drive letter D, enter the appropriate drive letter.) ...
User Guide
Page 133
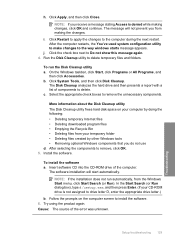
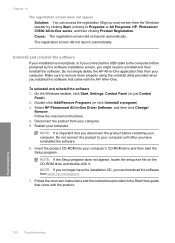
... CD, you can access the registration (Sign up now) screen from the Windows taskbar by the software installation screen, you might need to uninstall and then reinstall the software. On the Windows taskbar, click Start, Settings, Control Panel (or just Control Panel). 2. Follow...product CD-ROM into your computer. Select HP Photosmart All-In-One Driver Software, and then click Change/ Remove. To uninstall and reinstall the software 1. The registration screen did not launch automatically. Do not connect the product to Programs or All Programs, HP, Photosmart C5500 All-in...
... CD, you can access the registration (Sign up now) screen from the Windows taskbar by the software installation screen, you might need to uninstall and then reinstall the software. On the Windows taskbar, click Start, Settings, Control Panel (or just Control Panel). 2. Follow...product CD-ROM into your computer. Select HP Photosmart All-In-One Driver Software, and then click Change/ Remove. To uninstall and reinstall the software 1. The registration screen did not launch automatically. Do not connect the product to Programs or All Programs, HP, Photosmart C5500 All-in...
User Guide
Page 134
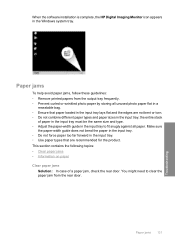
...jams Solution: In case of paper in the input tray must be the same size and type. • Adjust the paper-width guide in the Windows system tray. Paper jams 131 Troubleshooting You might need to fit snugly against all unused photo paper flat in a resealable bag. • Ensure that... edges are recommended for the product. the entire stack of a paper jam, check the rear door. When the software installation is complete, the HP Digital Imaging Monitor icon appears in the input tray to clear the paper jam from the output tray frequently. • Prevent curled or wrinkled photo...
...jams Solution: In case of paper in the input tray must be the same size and type. • Adjust the paper-width guide in the Windows system tray. Paper jams 131 Troubleshooting You might need to fit snugly against all unused photo paper flat in a resealable bag. • Ensure that... edges are recommended for the product. the entire stack of a paper jam, check the rear door. When the software installation is complete, the HP Digital Imaging Monitor icon appears in the input tray to clear the paper jam from the output tray frequently. • Prevent curled or wrinkled photo...
User Guide
Page 153
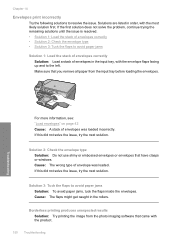
Make sure that have clasps or windows. Cause: The wrong type of envelopes in the rollers. Cause: The flaps might get caught in the input tray, with the envelope flaps facing up ...
Make sure that have clasps or windows. Cause: The wrong type of envelopes in the rollers. Cause: The flaps might get caught in the input tray, with the envelope flaps facing up ...
User Guide
Page 166
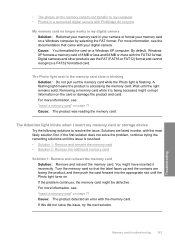
By default, Windows XP formats a memory card of 8 MB or less and 64 MB or more information, see: "Insert a ...blinking Solution: Do not pull out the memory card while the Photo light is being accessed might corrupt information on a Windows XP computer. Solutions are facing the product, and then push the card forward into the appropriate slot until the light remains.... The Photo light next to resolve the issue. Turn the memory card so that came with your memory card on a Windows computer by selecting the FAT format. • The photos on the memory card do not transfer to my computer •...
By default, Windows XP formats a memory card of 8 MB or less and 64 MB or more information, see: "Insert a ...blinking Solution: Do not pull out the memory card while the Photo light is being accessed might corrupt information on a Windows XP computer. Solutions are facing the product, and then push the card forward into the appropriate slot until the light remains.... The Photo light next to resolve the issue. Turn the memory card so that came with your memory card on a Windows computer by selecting the FAT format. • The photos on the memory card do not transfer to my computer •...


