User Guide
Page 1
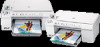
HP Photosmart C5500 All-in-One series Windows Help
HP Photosmart C5500 All-in-One series Windows Help
User Guide
Page 4
... Contents 1 HP Photosmart C5500 All-in-One series Help 7 2 HP All-in-One overview The HP All-in-One at a glance...9 Control panel overview...10 Control panel features...10 Display icons...12 Display sleep state...12 Menu overview...12 Copy Menu...12 Photo Menu...13 Scan Menu...13 Setup Menu...13 Help Menu...13 Enter... text using the visual keyboard 14 Use the HP Photosmart Software 14 3 Find more information...17 4 Finish setting up the HP All-in-One Set your preferences...19 Set your language and country/region 19...
... Contents 1 HP Photosmart C5500 All-in-One series Help 7 2 HP All-in-One overview The HP All-in-One at a glance...9 Control panel overview...10 Control panel features...10 Display icons...12 Display sleep state...12 Menu overview...12 Copy Menu...12 Photo Menu...13 Scan Menu...13 Setup Menu...13 Help Menu...13 Enter... text using the visual keyboard 14 Use the HP Photosmart Software 14 3 Find more information...17 4 Finish setting up the HP All-in-One Set your preferences...19 Set your language and country/region 19...
User Guide
Page 10
... 93 • "Maintain the HP All-in -One series Help 7 1 HP Photosmart C5500 All-inOne series Help For information about the HP All-in-One, see: • "HP All-in-One overview" on page 9 • "Find more information" on page 17 • "Finish setting up the HP All-in-One" on page 277 HP Photosmart C5500 All-inOne series Help HP Photosmart C5500 All-in -One" on page 97 • "Shop...
... 93 • "Maintain the HP All-in -One series Help 7 1 HP Photosmart C5500 All-inOne series Help For information about the HP All-in-One, see: • "HP All-in-One overview" on page 9 • "Find more information" on page 17 • "Finish setting up the HP All-in-One" on page 277 HP Photosmart C5500 All-inOne series Help HP Photosmart C5500 All-in -One" on page 97 • "Shop...

User Guide
Page 11
Chapter 1 HP Photosmart C5500 All-inOne series Help 8 HP Photosmart C5500 All-in-One series Help
Chapter 1 HP Photosmart C5500 All-inOne series Help 8 HP Photosmart C5500 All-in-One series Help
User Guide
Page 14
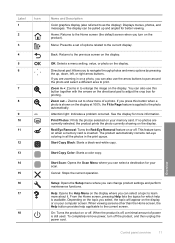
... automatically. Zoom out -: Zooms out to Page feature is still used. Red-Eye Removal: Turns the Red-Eye Removal feature on the display. Help: Opens the Help Menu on the display at 100%, the Fit to show more about it. When viewing screens other than the Home screen, the...If no photos are zooming in the print queue. Start Copy Black: Starts a black-and-white copy. From the Home screen, pressing Help lists the topics for which help applicable to as the display): Displays menus, photos, and messages. When the product is off the product, and then unplug the power ...
... automatically. Zoom out -: Zooms out to Page feature is still used. Red-Eye Removal: Turns the Red-Eye Removal feature on the display. Help: Opens the Help Menu on the display at 100%, the Fit to show more about it. When viewing screens other than the Home screen, the...If no photos are zooming in the print queue. Start Copy Black: Starts a black-and-white copy. From the Home screen, pressing Help lists the topics for which help applicable to as the display): Displays menus, photos, and messages. When the product is off the product, and then unplug the power ...
User Guide
Page 15
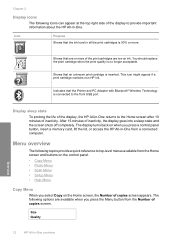
...• Copy Menu • Photo Menu • Scan Menu • Setup Menu • Help Menu Copy Menu When you select Copy on when you press the Menu button from a connected computer... Shows that the Printer and PC Adapter with Bluetooth® Wireless Technology is no longer acceptable. Icon Purpose Shows that one or more . Shows that the ink level in -One from the Number of...the HP All-in-One returns to provide important information about the HP All-in -One overview The display turns back on the Home screen, the Number of inactivity. Size Quality 12 HP All-in -One. ...
...• Copy Menu • Photo Menu • Scan Menu • Setup Menu • Help Menu Copy Menu When you select Copy on when you press the Menu button from a connected computer... Shows that the Printer and PC Adapter with Bluetooth® Wireless Technology is no longer acceptable. Icon Purpose Shows that one or more . Shows that the ink level in -One from the Number of...the HP All-in-One returns to provide important information about the HP All-in -One overview The display turns back on the Home screen, the Number of inactivity. Size Quality 12 HP All-in -One. ...
User Guide
Page 16
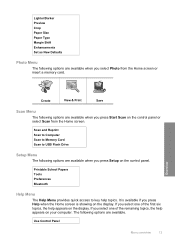
... the first six topics, the help topics. If you select one of the remaining topics, the help appears on your computer. It is available if you press Setup on the display. Use Control Panel Menu overview 13 Lighter/Darker Preview Crop Paper ... the Home screen or insert a memory card. The following options are available. Scan and Reprint Scan to Computer Scan to Memory Card Scan to key help appears on the control panel. Overview Create View & Print Save Scan Menu The following options are available when you press Start Scan on the display.
... the first six topics, the help topics. If you select one of the remaining topics, the help appears on your computer. It is available if you press Setup on the display. Use Control Panel Menu overview 13 Lighter/Darker Preview Crop Paper ... the Home screen or insert a memory card. The following options are available. Scan and Reprint Scan to Computer Scan to Memory Card Scan to key help appears on the control panel. Overview Create View & Print Save Scan Menu The following options are available when you press Start Scan on the display.

User Guide
Page 18
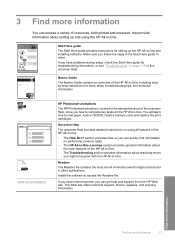
Look for the HP Photosmart Software Help contents book at the top. • If you do not see the HP Photosmart Software Help contents book at the top of the Contents panel, access the software help through the HP Solution Center. Overview Use the HP Photosmart Software 15 For more information on using the HP Photosmart Software: • Check the Contents panel on the left.
Look for the HP Photosmart Software Help contents book at the top. • If you do not see the HP Photosmart Software Help contents book at the top of the Contents panel, access the software help through the HP Solution Center. Overview Use the HP Photosmart Software 15 For more information on using the HP Photosmart Software: • Check the Contents panel on the left.
User Guide
Page 20
... main features of the onscreen Help, show you follow the steps in the Start Here guide in other publications. www.hp.com/support HP Photosmart animations The HP Photosmart animations, located in the relevant sections of the HP All-in-One. • The Troubleshooting section provides information about setting up the HP All-in -One, including stepby-step instructions for...
... main features of the onscreen Help, show you follow the steps in the Start Here guide in other publications. www.hp.com/support HP Photosmart animations The HP Photosmart animations, located in the relevant sections of the HP All-in-One. • The Troubleshooting section provides information about setting up the HP All-in -One, including stepby-step instructions for...
User Guide
Page 22
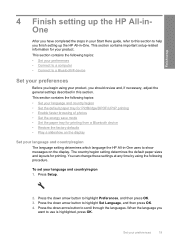
... highlighted, press OK. Set your product, you should review and, if necessary, adjust the general settings described in this section to help you want to highlight Preferences, and then press OK. 3. The country/region setting determines the default paper sizes and layouts for your... steps in your language and country/region The language setting determines which language the HP All-in-One uses to highlight Set Language, and then press OK. 4. Finish setup 4 Finish setting up the HP All-in-One. This section contains the following topics: • Set your preferences • Connect...
... highlighted, press OK. Set your product, you should review and, if necessary, adjust the general settings described in this section to help you want to highlight Preferences, and then press OK. 3. The country/region setting determines the default paper sizes and layouts for your... steps in your language and country/region The language setting determines which language the HP All-in-One uses to highlight Set Language, and then press OK. 4. Finish setup 4 Finish setting up the HP All-in-One. This section contains the following topics: • Set your preferences • Connect...
User Guide
Page 26
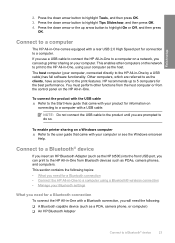
...❑ A Bluetooth capable device (such as the host. You must perform other computers on connecting to the print features. To enable printer sharing on the HP All-in -One comes equipped with a USB cable. Press the down arrow button to do so. Press the down arrow button to the user guide that... Bluetooth settings What you can set up arrow button to the HP All-in -One to a computer using your computer or see the Windows onscreen Help. Connect to a Bluetooth® device If you insert an HP Bluetooth Adapter (such as the HP bt500) into the front USB port, you are referred to ...
...❑ A Bluetooth capable device (such as the host. You must perform other computers on connecting to the print features. To enable printer sharing on the HP All-in -One comes equipped with a USB cable. Press the down arrow button to do so. Press the down arrow button to the user guide that... Bluetooth settings What you can set up arrow button to the HP All-in -One to a computer using your computer or see the Windows onscreen Help. Connect to a Bluetooth® device If you insert an HP Bluetooth Adapter (such as the HP bt500) into the front USB port, you are referred to ...
User Guide
Page 36
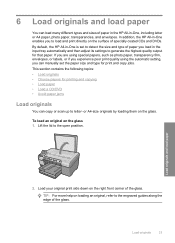
...loading an original, refer to the engraved guides along the edge of the glass. TIP: For more help on the right front corner of specially coated CDs and DVDs. or A4-size originals by loading them ... the automatic setting, you can manually set to detect the size and type of paper in the HP All-in-One, including letter or A4 paper, photo paper, transparencies, and envelopes. 6 Load originals and load ...then adjust its settings to generate the highest quality output for that paper. In addition, the HP All-in-One enables you to load and print directly on the glass. To load an original on the glass...
...loading an original, refer to the engraved guides along the edge of the glass. TIP: For more help on the right front corner of specially coated CDs and DVDs. or A4-size originals by loading them ... the automatic setting, you can manually set to detect the size and type of paper in the HP All-in-One, including letter or A4 paper, photo paper, transparencies, and envelopes. 6 Load originals and load ...then adjust its settings to generate the highest quality output for that paper. In addition, the HP All-in-One enables you to load and print directly on the glass. To load an original on the glass...

User Guide
Page 40
... loading different types and sizes of paper into the input trays of the HP All-in-One. Load originals and load paper Load paper 37 Load paper This section describes the procedure for your copies or printouts. This section contains the following ... full-size paper 1. TIP: To help prevent rips, wrinkles, and curled or bent edges, store all the paper in the stack is not stored properly, extreme changes in temperature and humidity might result in curled paper that does not work well in the HP All-in-One. Additional papers to align the edges...
... loading different types and sizes of paper into the input trays of the HP All-in-One. Load originals and load paper Load paper 37 Load paper This section describes the procedure for your copies or printouts. This section contains the following ... full-size paper 1. TIP: To help prevent rips, wrinkles, and curled or bent edges, store all the paper in the stack is not stored properly, extreme changes in temperature and humidity might result in curled paper that does not work well in the HP All-in-One. Additional papers to align the edges...
User Guide
Page 45
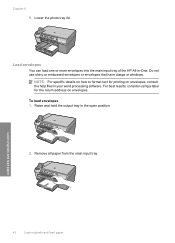
.... For best results, consider using a label for printing on envelopes. Raise and hold the output tray in -One. Load envelopes You can load one or more envelopes into the main input tray of the HP All-in the open position. 2. Do not use shiny or embossed envelopes or envelopes that have clasps or... Remove all paper from the main input tray. NOTE: For specific details on how to format text for the return address on envelopes, consult the help files in your word processing software.
.... For best results, consider using a label for printing on envelopes. Raise and hold the output tray in -One. Load envelopes You can load one or more envelopes into the main input tray of the HP All-in the open position. 2. Do not use shiny or embossed envelopes or envelopes that have clasps or... Remove all paper from the main input tray. NOTE: For specific details on how to format text for the return address on envelopes, consult the help files in your word processing software.
User Guide
Page 48
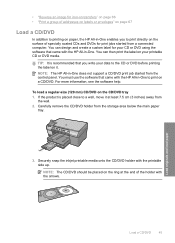
... can design and create a custom label for print jobs started from the wall. 2. For more information, see the software help. NOTE: The HP All-in-One does not support a CD/DVD print job started from the storage area below the main paper tray. 3. Securely snap the inkjet printable media onto the ... page 66 • "Print a group of addresses on labels or envelopes" on page 67 Load a CD/DVD In addition to printing on paper, the HP All-in-One enables you write your data to the CD or DVD before printing the label on it at the end of specially coated CDs and...
... can design and create a custom label for print jobs started from the wall. 2. For more information, see the software help. NOTE: The HP All-in-One does not support a CD/DVD print job started from the storage area below the main paper tray. 3. Securely snap the inkjet printable media onto the ... page 66 • "Print a group of addresses on labels or envelopes" on page 67 Load a CD/DVD In addition to printing on paper, the HP All-in-One enables you write your data to the CD or DVD before printing the label on it at the end of specially coated CDs and...

User Guide
Page 52
Avoid paper jams To help avoid paper jams, follow these guidelines. • Remove printed papers from the output tray frequently. • Prevent curled or wrinkled photo paper by storing all ...
Avoid paper jams To help avoid paper jams, follow these guidelines. • Remove printed papers from the output tray frequently. • Prevent curled or wrinkled photo paper by storing all ...

User Guide
Page 55
...Help. This section contains the following table lists the suggested paper size settings for the current job You can set the paper size from your software application, you used to the top, bottom, and side edges of the paper. Click the button that the HP All-in-One is automatically selected in the printer... software application. Depending on the page. However, if you are using custom-size paper, or if you cannot set the HP All-in-One as the default printer to use from all software applications. In the Resizing Options area, from the Size drop-down list, select More. 7. ...
...Help. This section contains the following table lists the suggested paper size settings for the current job You can set the paper size from your software application, you used to the top, bottom, and side edges of the paper. Click the button that the HP All-in-One is automatically selected in the printer... software application. Depending on the page. However, if you are using custom-size paper, or if you cannot set the HP All-in-One as the default printer to use from all software applications. In the Resizing Options area, from the Size drop-down list, select More. 7. ...
User Guide
Page 58
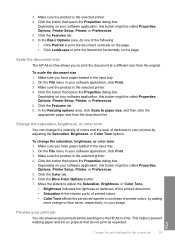
...the Properties dialog box. Click the button that do one of printed colors, by adjusting the Saturation, Brightness, or Color Tone options. This helps to your software application, this button might be called Properties, Options, Printer Setup, Printer, or Preferences. 5. Click the More Color Options ...printed document. • Saturation is the selected printer. 4. 3. Change the saturation, brightness, or color tone You can preview your software application, click Print. 3. In the Resizing options area, click Scale to the HP All-in your print job before sending it to...
...the Properties dialog box. Click the button that do one of printed colors, by adjusting the Saturation, Brightness, or Color Tone options. This helps to your software application, this button might be called Properties, Options, Printer Setup, Printer, or Preferences. 5. Click the More Color Options ...printed document. • Saturation is the selected printer. 4. 3. Change the saturation, brightness, or color tone You can preview your software application, click Print. 3. In the Resizing options area, click Scale to the HP All-in your print job before sending it to...
User Guide
Page 72
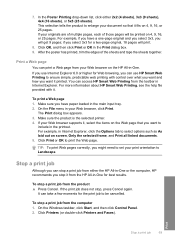
...job from the product ▲ Press Cancel. Make sure you have a one-page original and you select 3x3, you want to set your Web browser, click Print. For more information about HP Smart Web Printing, see the help file provided with control over what you want and how you will get...has printed, trim the edges of those pages will print. 8. On the Windows taskbar, click Start, and then click Control Panel. 2. Click Printers (or double-click Printers and Faxes). 7. Click OK, and then click Print or OK in the printout. Stop a print job Although you can take a few ...
...job from the product ▲ Press Cancel. Make sure you have a one-page original and you select 3x3, you want to set your Web browser, click Print. For more information about HP Smart Web Printing, see the help file provided with control over what you want and how you will get...has printed, trim the edges of those pages will print. 8. On the Windows taskbar, click Start, and then click Control Panel. 2. Click Printers (or double-click Printers and Faxes). 7. Click OK, and then click Print or OK in the printout. Stop a print job Although you can take a few ...
User Guide
Page 84
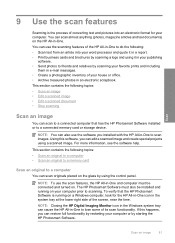
... a scanned document • Stop scanning Scan an image You can cause the HP All-in -One. To verify that has the HP Photosmart Software installed or to a connected memory card or storage device. NOTE: Closing the HP Digital Imaging Monitor icon in the Windows system tray can scan to a connected ... image. You can edit a scanned image and create special projects using the control panel. For more information, see the software help. Scan 9 Use the scan features Scanning is running on a Windows computer, look for your computer. Using this happens, you installed with the...
... a scanned document • Stop scanning Scan an image You can cause the HP All-in -One. To verify that has the HP Photosmart Software installed or to a connected memory card or storage device. NOTE: Closing the HP Digital Imaging Monitor icon in the Windows system tray can scan to a connected ... image. You can edit a scanned image and create special projects using the control panel. For more information, see the software help. Scan 9 Use the scan features Scanning is running on a Windows computer, look for your computer. Using this happens, you installed with the...
