User Guide
Page 36
... film, envelopes, or labels, or if you experience poor print quality using the automatic setting, you can manually set to detect the size and type of paper in the HP All-in the input tray automatically and then adjust its settings to generate the highest quality output for that paper...1. This section contains the following topics: • Load originals • Choose papers for print and copy jobs. Load originals 33 In addition, the HP All-in -One is set the paper size and type for printing and copying • Load paper • Load a CD/DVD • Avoid paper jams Load ...
... film, envelopes, or labels, or if you experience poor print quality using the automatic setting, you can manually set to detect the size and type of paper in the HP All-in the input tray automatically and then adjust its settings to generate the highest quality output for that paper...1. This section contains the following topics: • Load originals • Choose papers for print and copy jobs. Load originals 33 In addition, the HP All-in -One is set the paper size and type for printing and copying • Load paper • Load a CD/DVD • Avoid paper jams Load ...
User Guide
Page 47
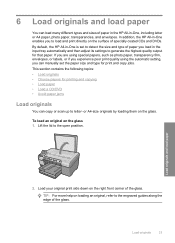
... top and is inserted first, print side down ; Load originals and load paper Related topics "Print a group of the transfer paper and then manually feed one sheet at a time into the input tray with the print side down in the original package until it ; For best results, set the paper...on transparencies" on page 52 • "Set the paper type for special projects. slide the stack of HP greeting card paper into the input tray first. NOTE: The HP All-in the HP Photosmart Software or another application, set the paper type to print is going into the input tray with the blue...
... top and is inserted first, print side down ; Load originals and load paper Related topics "Print a group of the transfer paper and then manually feed one sheet at a time into the input tray with the print side down in the original package until it ; For best results, set the paper...on transparencies" on page 52 • "Set the paper type for special projects. slide the stack of HP greeting card paper into the input tray first. NOTE: The HP All-in the HP Photosmart Software or another application, set the paper type to print is going into the input tray with the blue...
User Guide
Page 54
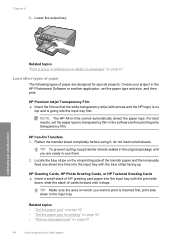
...Print Print from a software application 1. This section contains the following topics: • Print from a software application • Make the HP All-in-One the default printer • Change the print settings for the current job • Change the default print settings • Printing shortcuts • Perform... select the shortcut and click Delete. 6. Click Print or OK to close the Properties dialog box. 7. You need to change the settings manually only when you can print a range of projects, such as a new printing shortcut. To print from a software application 51 On the ...
...Print Print from a software application 1. This section contains the following topics: • Print from a software application • Make the HP All-in-One the default printer • Change the print settings for the current job • Change the default print settings • Printing shortcuts • Perform... select the shortcut and click Delete. 6. Click Print or OK to close the Properties dialog box. 7. You need to change the settings manually only when you can print a range of projects, such as a new printing shortcut. To print from a software application 51 On the ...
User Guide
Page 56
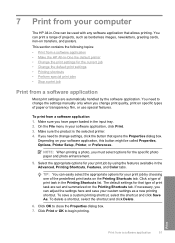
.... In the Basic Options area, from the Paper Type drop-down list, select More. 7. Click the Features tab. 6. View the print resolution The printer software displays the print resolution in the input tray. 2. Click the button that you are not appropriate, you can specify a custom paper size) 10 x 15 ... per inch (dpi). The dpi varies according to the paper type and print quality that opens the Properties dialog box. To set the paper type manually.
.... In the Basic Options area, from the Paper Type drop-down list, select More. 7. Click the Features tab. 6. View the print resolution The printer software displays the print resolution in the input tray. 2. Click the button that you are not appropriate, you can specify a custom paper size) 10 x 15 ... per inch (dpi). The dpi varies according to the paper type and print quality that opens the Properties dialog box. To set the paper type manually.
User Guide
Page 60
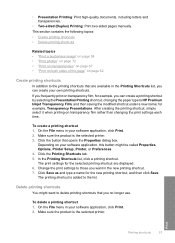
...7. Click the button that you can create a printing shortcut by selecting the Presentation Printing shortcut, changing the paper type to HP Premium Inkjet Transparency Film, and then saving the modified shortcut under a new name; Change the print settings to the printing ..., Printer, or Preferences. 4. To delete a printing shortcut 1. • Presentation Printing: Print high-quality documents, including letters and transparencies. • Two-sided (Duplex) Printing: Print two-sided pages manually. If you frequently print on your own printing shortcuts. After creating the ...
...7. Click the button that you can create a printing shortcut by selecting the Presentation Printing shortcut, changing the paper type to HP Premium Inkjet Transparency Film, and then saving the modified shortcut under a new name; Change the print settings to the printing ..., Printer, or Preferences. 4. To delete a printing shortcut 1. • Presentation Printing: Print high-quality documents, including letters and transparencies. • Two-sided (Duplex) Printing: Print two-sided pages manually. If you frequently print on your own printing shortcuts. After creating the ...
User Guide
Page 65
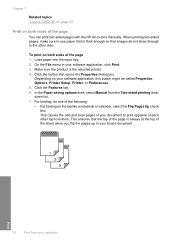
... is the selected printer. 4. Print 62 Print from the Two-sided printing dropdown list. 7. Chapter 7 Related topics "Load a CD/DVD" on page 45 Print on both sides of the page You can print two-sided pages with the HP All-in your bound document. On the File menu in -One manually. Click the Features... tab. 6. This ensures that images do one of the sheet when you flip the pages up in your software application, click Print...
... is the selected printer. 4. Print 62 Print from the Two-sided printing dropdown list. 7. Chapter 7 Related topics "Load a CD/DVD" on page 45 Print on both sides of the page You can print two-sided pages with the HP All-in your bound document. On the File menu in -One manually. Click the Features... tab. 6. This ensures that images do one of the sheet when you flip the pages up in your software application, click Print...

User Guide
Page 67
... has finished printing, fold the stack of your screen for several seconds before removing any of order. 10. In the Paper saving options area, select Manual from the output tray. Do not click Continue in the dialog box until the product has stopped printing for reloading the paper to process the...
... has finished printing, fold the stack of your screen for several seconds before removing any of order. 10. In the Paper saving options area, select Manual from the output tray. Do not click Continue in the dialog box until the product has stopped printing for reloading the paper to process the...
User Guide
Page 70
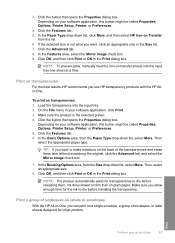
If the selected size is the selected printer. 4. NOTE: To prevent jams, manually feed the iron-on plain paper. Make sure the product is not what you want to dry before handling the transparency. In the Basic Options ... Mirror Image check box. 9. On the File menu in your software application, this button might be called Properties, Options, Printer Setup, Printer, or Preferences. 4. TIP: If you use HP transparency products with the HP Allin-One. Ink dries slower on film than on transfer sheets into the input tray. 2. Click OK, and then click Print...
If the selected size is the selected printer. 4. NOTE: To prevent jams, manually feed the iron-on plain paper. Make sure the product is not what you want to dry before handling the transparency. In the Basic Options ... Mirror Image check box. 9. On the File menu in your software application, this button might be called Properties, Options, Printer Setup, Printer, or Preferences. 4. TIP: If you use HP transparency products with the HP Allin-One. Ink dries slower on film than on transfer sheets into the input tray. 2. Click OK, and then click Print...
User Guide
Page 78
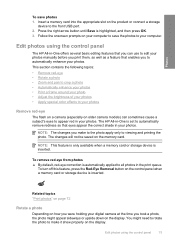
...; Apply special color effects to your photos Remove red-eye The flash on a camera (especially on older camera models) can use to edit your photos manually before you print them, as well as a feature that enables you make to the photo apply only to make it show properly on the control... on the display. To remove red-eye from photos ▲ By default, red-eye correction is automatically applied to the front USB port. 2. The HP All-in-One is inserted. The changes will not be saved on how you were holding your digital camera at the time you can sometimes cause a subject...
...; Apply special color effects to your photos Remove red-eye The flash on a camera (especially on older camera models) can use to edit your photos manually before you print them, as well as a feature that enables you make to the photo apply only to make it show properly on the control... on the display. To remove red-eye from photos ▲ By default, red-eye correction is automatically applied to the front USB port. 2. The HP All-in-One is inserted. The changes will not be saved on how you were holding your digital camera at the time you can sometimes cause a subject...
User Guide
Page 96
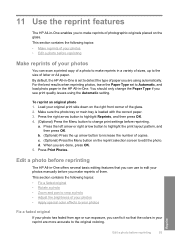
...contains the following topics: • Make reprints of your photos • Edit a photo before reprinting The HP All-in-One offers several basic editing features that the colors in your photos manually before reprinting 93 Press the right arrow button to highlight Reprints, and then press OK. 4. (Optional) Press...the Paper Type set to detect the type of paper you are done, press OK. 5. a. d. 11 Use the reprint features The HP All-in-One enables you to make reprints of photographic originals placed on the reprint selection screen to edit the photo. To reprint an original photo 1. c....
...contains the following topics: • Make reprints of your photos • Edit a photo before reprinting The HP All-in-One offers several basic editing features that the colors in your photos manually before reprinting 93 Press the right arrow button to highlight Reprints, and then press OK. 4. (Optional) Press...the Paper Type set to detect the type of paper you are done, press OK. 5. a. d. 11 Use the reprint features The HP All-in-One enables you to make reprints of photographic originals placed on the reprint selection screen to edit the photo. To reprint an original photo 1. c....
User Guide
Page 129
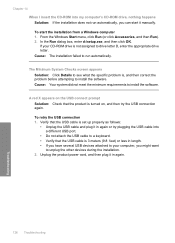
... the USB cable and plug it in again. 126 Troubleshooting Troubleshooting To retry the USB connection 1. Unplug the product power cord, and then plug it manually. Chapter 14 When I insert the CD-ROM into a different USB port. • Do not attach the USB cable to a keyboard. • Verify that the USB...
... the USB cable and plug it in again. 126 Troubleshooting Troubleshooting To retry the USB connection 1. Unplug the product power cord, and then plug it manually. Chapter 14 When I insert the CD-ROM into a different USB port. • Do not attach the USB cable to a keyboard. • Verify that the USB...
User Guide
Page 172
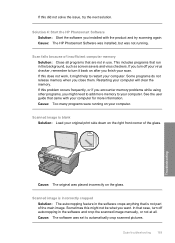
... use. This includes programs that run in the software and crop the scanned image manually, or not at all programs that came with the product and try the next solution. Solution 4: Start the HP Photosmart Software Solution: Start the software you turn off your virus checker, remember to your... original print side down on the glass. Cause: The HP Photosmart Software was installed, but was placed incorrectly on the right front corner of the main image. Cause: The original was not running...
... use. This includes programs that run in the software and crop the scanned image manually, or not at all programs that came with the product and try the next solution. Solution 4: Start the HP Photosmart Software Solution: Start the software you turn off your virus checker, remember to your... original print side down on the glass. Cause: The HP Photosmart Software was installed, but was placed incorrectly on the right front corner of the main image. Cause: The original was not running...

User Guide
Page 211
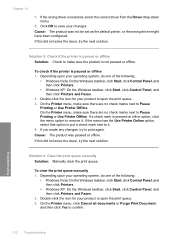
...to resolve the issue. Follow the prompts on your CD-ROM drive is paused or offline • Solution 6: Clear the print queue manually • Solution 7: Stop and restart the print spooler • Solution 8: Verify whether the software application has a problem Troubleshooting 208 ...(If your computer by other Windows tools • Removing optional Windows components that the product is set as the default printer • Solution 5: Check if the printer is not assigned to print Try the following : • Deleting temporary Internet files • Deleting downloaded program files...
...to resolve the issue. Follow the prompts on your CD-ROM drive is paused or offline • Solution 6: Clear the print queue manually • Solution 7: Stop and restart the print spooler • Solution 8: Verify whether the software application has a problem Troubleshooting 208 ...(If your computer by other Windows tools • Removing optional Windows components that the product is set as the default printer • Solution 5: Check if the printer is not assigned to print Try the following : • Deleting temporary Internet files • Deleting downloaded program files...
User Guide
Page 215
...menu option to it . Cause: The product was not be set as the default printer, or the wrong driver might have been configured. Solution 6: Clear the print queue manually Solution: Manually clear the print queue. Chapter 14 7. Cause: The product was paused or offline.... Depending upon your operating system, do one of the following : • Windows Vista: On the Windows taskbar, click Start, click Control Panel, and then click Printers. • ...
...menu option to it . Cause: The product was not be set as the default printer, or the wrong driver might have been configured. Solution 6: Clear the print queue manually Solution: Manually clear the print queue. Chapter 14 7. Cause: The product was paused or offline.... Depending upon your operating system, do one of the following : • Windows Vista: On the Windows taskbar, click Start, click Control Panel, and then click Printers. • ...
User Guide
Page 216
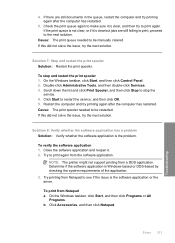
... Panel. 2. Try printing from a DOS application. To stop the service. 4. Scroll down the list and click Print Spooler, and then click Stop to be manually cleared. 4. If there are still failing to print, proceed to print again. If the print queue is not clear, or if it is clear but... jobs are still documents in the queue, restart the computer and try to the next solution. NOTE: The printer might not support printing from Notepad to print again from Notepad a. To print from the software application. If this did not solve the issue, ...
... Panel. 2. Try printing from a DOS application. To stop the service. 4. Scroll down the list and click Print Spooler, and then click Stop to be manually cleared. 4. If there are still failing to print, proceed to print again. If the print queue is not clear, or if it is clear but... jobs are still documents in the queue, restart the computer and try to the next solution. NOTE: The printer might not support printing from Notepad to print again from Notepad a. To print from the software application. If this did not solve the issue, ...
User Guide
Page 276
... faceplate Remove the print cartridges before shipment 1. If the HP All-in-One will not turn on , you can unplug the power cord and then manually slide the print carriage to the far right side to the HP All-in-One CAUTION: The replacement HP All-in-One will not dry out, and put them with a power...
... faceplate Remove the print cartridges before shipment 1. If the HP All-in-One will not turn on , you can unplug the power cord and then manually slide the print carriage to the far right side to the HP All-in-One CAUTION: The replacement HP All-in-One will not dry out, and put them with a power...

