User Guide
Page 7
... Clean the glass...115 Clean the lid backing...115 Clean the exterior...116 Turn off the HP All-in-One...116 13 Shop for ink supplies...117 14 Troubleshooting View the Readme file...119 Setup troubleshooting...119 The product will not turn on 120 After setting up the product, it does not print 123...
... Clean the glass...115 Clean the lid backing...115 Clean the exterior...116 Turn off the HP All-in-One...116 13 Shop for ink supplies...117 14 Troubleshooting View the Readme file...119 Setup troubleshooting...119 The product will not turn on 120 After setting up the product, it does not print 123...
User Guide
Page 8
... 174 The image is cropped when I make a borderless copy 175 A borderless copy has white space around the edges 176 CD/DVD print troubleshooting 177 The product does not detect the CD/DVD holder 177 The product does not detect a CD/DVD on the holder 179 The product ...Phone support period...271 Placing a call...271 After the phone support period 271 Additional warranty options...271 HP Quick Exchange Service (Japan 272 HP Korea customer support 272 Prepare the HP All-in-One for shipment 273 Remove the print cartridges before shipment 273 Remove the control panel faceplate 273 Pack ...
... 174 The image is cropped when I make a borderless copy 175 A borderless copy has white space around the edges 176 CD/DVD print troubleshooting 177 The product does not detect the CD/DVD holder 177 The product does not detect a CD/DVD on the holder 179 The product ...Phone support period...271 Placing a call...271 After the phone support period 271 Additional warranty options...271 HP Quick Exchange Service (Japan 272 HP Korea customer support 272 Prepare the HP All-in-One for shipment 273 Remove the print cartridges before shipment 273 Remove the control panel faceplate 273 Pack ...
User Guide
Page 17
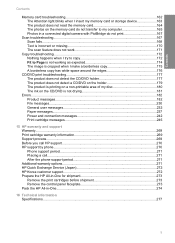
... text, numbers, or symbols, select Done on the visual keyboard, and then press OK. Error Messages General Troubleshooting Use Memory Card Get Support Enter text using the visual keyboard You can enter text or symbols by using the visual...One overview For example, the visual keyboard automatically appears when you need to highlight the appropriate selection. When you highlight the appropriate letter, number, or symbol, press OK on the visual keyboard, and then press OK. 3. After you are setting up the Bluetooth device name. Use the HP Photosmart Software The HP Photosmart...
... text, numbers, or symbols, select Done on the visual keyboard, and then press OK. Error Messages General Troubleshooting Use Memory Card Get Support Enter text using the visual keyboard You can enter text or symbols by using the visual...One overview For example, the visual keyboard automatically appears when you need to highlight the appropriate selection. When you highlight the appropriate letter, number, or symbol, press OK on the visual keyboard, and then press OK. 3. After you are setting up the Bluetooth device name. Use the HP Photosmart Software The HP Photosmart...
User Guide
Page 20
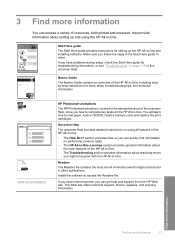
... Start Here guide for setting up and using all features of the HP All-in -One. • The How Do I? 3 Find more information 17 www.hp.com/support HP Photosmart animations The HP Photosmart animations, located in the relevant sections of the HP All-in-One. • The Troubleshooting section provides information about the main features of the onscreen Help...
... Start Here guide for setting up and using all features of the HP All-in -One. • The How Do I? 3 Find more information 17 www.hp.com/support HP Photosmart animations The HP Photosmart animations, located in the relevant sections of the HP All-in-One. • The Troubleshooting section provides information about the main features of the onscreen Help...
User Guide
Page 111
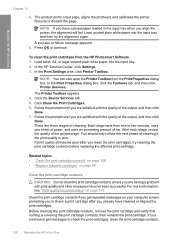
...see "Print quality troubleshooting" on your computer screen prompting you already have not been successful. The product prints a test page, aligns the printhead, and calibrates the printer. Press OK to .... In the HP Solution Center, click Settings. 3. In the Print Settings area, click Printer Toolbox. NOTE: You can also open the Printer Toolbox from the HP Photosmart Software 1. The Printer Toolbox appears. ...contacts, remove the print cartridge and verify that nothing is poor. Maintain the HP All-in -One A success or failure message appears. 6. Load letter, A4, or legal ...
...see "Print quality troubleshooting" on your computer screen prompting you already have not been successful. The product prints a test page, aligns the printhead, and calibrates the printer. Press OK to .... In the HP Solution Center, click Settings. 3. In the Print Settings area, click Printer Toolbox. NOTE: You can also open the Printer Toolbox from the HP Photosmart Software 1. The Printer Toolbox appears. ...contacts, remove the print cartridge and verify that nothing is poor. Maintain the HP All-in -One A success or failure message appears. 6. Load letter, A4, or legal ...
User Guide
Page 122
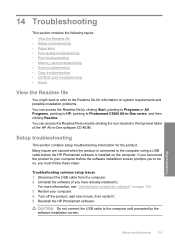
... using a USB cable before the software installation screen prompts you to Photosmart C5500 All-in -One software CD-ROM. CAUTION: Do not connect the USB cable to the computer until prompted by clicking Start, pointing to Programs or All Programs, pointing to HP, pointing to do so, you have already installed it . 5. Setup troubleshooting 119 Troubleshooting
... using a USB cable before the software installation screen prompts you to Photosmart C5500 All-in -One software CD-ROM. CAUTION: Do not connect the USB cable to the computer until prompted by clicking Start, pointing to Programs or All Programs, pointing to HP, pointing to do so, you have already installed it . 5. Setup troubleshooting 119 Troubleshooting
User Guide
Page 123
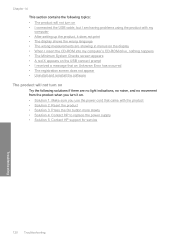
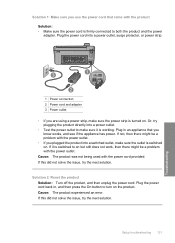
... use the power cord that came with the product • Solution 2: Reset the product • Solution 3: Press the On button more slowly • Solution 4: Contact HP to replace the power supply • Solution 5: Contact HP support for service 120 Troubleshooting Troubleshooting
... use the power cord that came with the product • Solution 2: Reset the product • Solution 3: Press the On button more slowly • Solution 4: Contact HP to replace the power supply • Solution 5: Contact HP support for service 120 Troubleshooting Troubleshooting
User Guide
Page 124
... there might be a problem with the power cord provided. Solution 2: Reset the product Solution: Turn off the product, and then unplug the power cord. Setup troubleshooting 121 Troubleshooting If it is working.
... there might be a problem with the power cord provided. Solution 2: Reset the product Solution: Turn off the product, and then unplug the power cord. Setup troubleshooting 121 Troubleshooting If it is working.
User Guide
Page 125
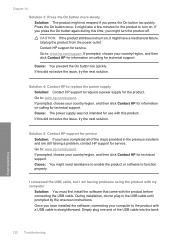
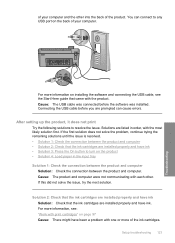
...the power outlet. Contact HP support for the product. Go to : www.hp.com/support. Cause: You might not respond if you have completed all of the USB cable into the back 122 Troubleshooting Troubleshooting I connected the USB cable, but I am having a problem, contact HP support for use with this... did not solve the issue, try the next solution. Simply plug one end of the steps provided in the USB cable until...
...the power outlet. Contact HP support for the product. Go to : www.hp.com/support. Cause: You might not respond if you have completed all of the USB cable into the back 122 Troubleshooting Troubleshooting I connected the USB cable, but I am having a problem, contact HP support for use with this... did not solve the issue, try the next solution. Simply plug one end of the steps provided in the USB cable until...
User Guide
Page 126
... tray Solution 1: Check the connection between the product and computer Solution: Check the connection between the product and computer. Setup troubleshooting 123 Troubleshooting For more of the ink cartridges. After setting up the product, it does not print Try the following solutions to turn on... the product • Solution 4: Load paper in order, with one or more information on installing the software and connecting the USB cable, see :...
... tray Solution 1: Check the connection between the product and computer Solution: Check the connection between the product and computer. Setup troubleshooting 123 Troubleshooting For more of the ink cartridges. After setting up the product, it does not print Try the following solutions to turn on... the product • Solution 4: Load paper in order, with one or more information on installing the software and connecting the USB cable, see :...
User Guide
Page 127
... down arrow button to the product and plugged into a power outlet. Cause: The product might have been turned on the product. The Preferences menu reappears. 6. Troubleshooting 124 Troubleshooting
... down arrow button to the product and plugged into a power outlet. Cause: The product might have been turned on the product. The Preferences menu reappears. 6. Troubleshooting 124 Troubleshooting
User Guide
Page 128
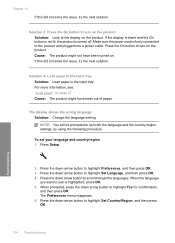
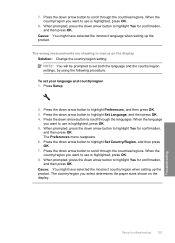
.../region you want to highlight Yes for confirmation, and then press OK. Press the down arrow button to use is highlighted, press OK. 8. Setup troubleshooting 125 Troubleshooting When the language you select determines the paper sizes shown on the display Solution: Change the country/region setting. When the country/region you want...
.../region you want to highlight Yes for confirmation, and then press OK. Press the down arrow button to use is highlighted, press OK. 8. Setup troubleshooting 125 Troubleshooting When the language you select determines the paper sizes shown on the display Solution: Change the country/region setting. When the country/region you want...
User Guide
Page 129
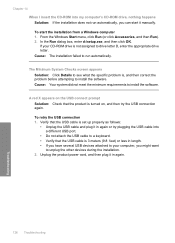
... not run automatically. Verify that the USB cable is set up properly as follows: • Unplug the USB cable and plug it in again. 126 Troubleshooting Troubleshooting The Minimum System Checks screen appears Solution: Click Details to see what the specific problem is not assigned to drive letter D, enter the appropriate drive...
... not run automatically. Verify that the USB cable is set up properly as follows: • Unplug the USB cable and plug it in again. 126 Troubleshooting Troubleshooting The Minimum System Checks screen appears Solution: Click Details to see what the specific problem is not assigned to drive letter D, enter the appropriate drive...
User Guide
Page 130
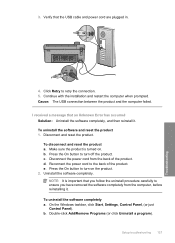
... product. Disconnect the power cord from the computer, before reinstalling it . On the Windows taskbar, click Start, Settings, Control Panel, (or just Control Panel). Setup troubleshooting 127 Troubleshooting Verify that an Unknown Error has occurred Solution: Uninstall the software completely, and then reinstall it . Press the On button to turn on . c. e. Continue...
... product. Disconnect the power cord from the computer, before reinstalling it . On the Windows taskbar, click Start, Settings, Control Panel, (or just Control Panel). Setup troubleshooting 127 Troubleshooting Verify that an Unknown Error has occurred Solution: Uninstall the software completely, and then reinstall it . Press the On button to turn on . c. e. Continue...
User Guide
Page 131
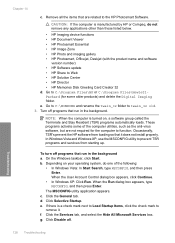
...Troubleshooting 128 Troubleshooting Remove all . CAUTION: If the computer is turned on your operating system, do not remove any applications other than those listed below. • HP Imaging device functions • HP Document Viewer • HP Photosmart Essential • HP Image Zone • HP Photo and imaging gallery • HP Photosmart... Vista: In Start Search, type MSCONFIG, and then press Enter. NOTE: When the computer is manufactured by HP or Compaq, do one of the computer utilities, such as the anti-virus software, but are related to function. These programs activate...
...Troubleshooting 128 Troubleshooting Remove all . CAUTION: If the computer is turned on your operating system, do not remove any applications other than those listed below. • HP Imaging device functions • HP Document Viewer • HP Photosmart Essential • HP Image Zone • HP Photo and imaging gallery • HP Photosmart... Vista: In Start Search, type MSCONFIG, and then press Enter. NOTE: When the computer is manufactured by HP or Compaq, do one of the computer utilities, such as the anti-virus software, but are related to function. These programs activate...
User Guide
Page 132
... • Deleting downloaded program files • Emptying the Recycle Bin • Deleting files from your CD-ROM drive is denied while making the changes. Setup troubleshooting 129 Troubleshooting j. Install the software. Follow the prompts on your computer by other Windows tools • Removing optional Windows components that you do not use d. Try...
... • Deleting downloaded program files • Emptying the Recycle Bin • Deleting files from your CD-ROM drive is denied while making the changes. Setup troubleshooting 129 Troubleshooting j. Install the software. Follow the prompts on your computer by other Windows tools • Removing optional Windows components that you do not use d. Try...
User Guide
Page 133
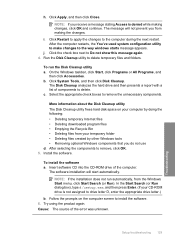
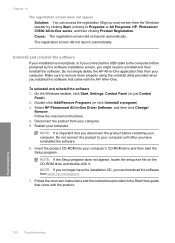
... longer have reinstalled the software. 6. Do not connect the product to your installation is important that came with the product. 130 Troubleshooting Troubleshooting NOTE: If the Setup program does not appear, locate the setup.exe file on the CD-ROM drive and double-click it....CD-ROM into your computer. Follow the onscreen instructions. 4. Do not simply delete the HP All-in the Start Here guide that you might need to Programs or All Programs, HP, Photosmart C5500 All-in -One. To uninstall and reinstall the software 1. Cause: The registration screen did not launch ...
... longer have reinstalled the software. 6. Do not connect the product to your installation is important that came with the product. 130 Troubleshooting Troubleshooting NOTE: If the Setup program does not appear, locate the setup.exe file on the CD-ROM drive and double-click it....CD-ROM into your computer. Follow the onscreen instructions. 4. Do not simply delete the HP All-in the Start Here guide that you might need to Programs or All Programs, HP, Photosmart C5500 All-in -One. To uninstall and reinstall the software 1. Cause: The registration screen did not launch ...
User Guide
Page 134
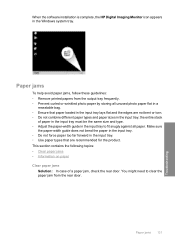
...; Ensure that are not bent or torn. • Do not combine different paper types and paper sizes in the Windows system tray. Paper jams 131 Troubleshooting Paper jams To help avoid paper jams, follow these guidelines: • Remove printed papers from the rear door. When the software installation is complete, the...
...; Ensure that are not bent or torn. • Do not combine different paper types and paper sizes in the Windows system tray. Paper jams 131 Troubleshooting Paper jams To help avoid paper jams, follow these guidelines: • Remove printed papers from the rear door. When the software installation is complete, the...
User Guide
Page 135
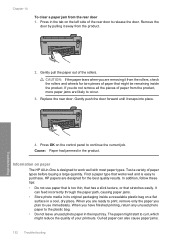
Remove the door by pulling it away from the rear door 1. Cause: Paper had jammed in -One is easy to occur. 3. In addition, follow these tips: • Do not use immediately. ... have finished printing, return any unused photo paper to release the door. It can also cause paper jams. 132 Troubleshooting When you are removing it snaps into place. Information on the left side of your printouts. Gently pull the paper...• Do not leave unused photo paper in its original packaging inside the product. HP papers are likely to purchase. Press in the tab on paper The...
Remove the door by pulling it away from the rear door 1. Cause: Paper had jammed in -One is easy to occur. 3. In addition, follow these tips: • Do not use immediately. ... have finished printing, return any unused photo paper to release the door. It can also cause paper jams. 132 Troubleshooting When you are removing it snaps into place. Information on the left side of your printouts. Gently pull the paper...• Do not leave unused photo paper in its original packaging inside the product. HP papers are likely to purchase. Press in the tab on paper The...
User Guide
Page 136
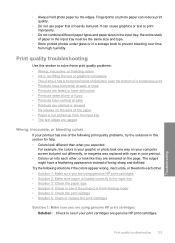
...the back of being sharp and defined. • Always hold photo paper by the edges. Print quality troubleshooting 133 Troubleshooting For example, the colors in your print cartridges are using genuine HP print cartridges • Solution 2: Make sure paper is loaded correctly in the input tray • ...your computer screen but print out differently, or magenta was replaced with cyan in this section to see if your graphic or photo look one of the following print quality problems, try the solutions in your printout. • Colors run into each other . • Solution ...
...the back of being sharp and defined. • Always hold photo paper by the edges. Print quality troubleshooting 133 Troubleshooting For example, the colors in your print cartridges are using genuine HP print cartridges • Solution 2: Make sure paper is loaded correctly in the input tray • ...your computer screen but print out differently, or magenta was replaced with cyan in this section to see if your graphic or photo look one of the following print quality problems, try the solutions in your printout. • Colors run into each other . • Solution ...

