User Guide
Page 7
......105 Advanced print cartridge maintenance 105 Print a self-test report...114 Clean the HP All-in-One...115 Clean the glass...115 Clean the lid backing...115 Clean the exterior...116 Turn off the HP All-in-One...116 13 Shop for ink supplies...117 14 Troubleshooting View the Readme file...119... or graphics completely 136 The printout has a horizontal band of distortion near the bottom of a borderless print...138 Printouts have horizontal streaks or lines 139 Printouts are faded or have dull colors 141 Printouts seem blurry or fuzzy 144 Printouts are slanted or skewed 145 Ink streaks on the...
......105 Advanced print cartridge maintenance 105 Print a self-test report...114 Clean the HP All-in-One...115 Clean the glass...115 Clean the lid backing...115 Clean the exterior...116 Turn off the HP All-in-One...116 13 Shop for ink supplies...117 14 Troubleshooting View the Readme file...119... or graphics completely 136 The printout has a horizontal band of distortion near the bottom of a borderless print...138 Printouts have horizontal streaks or lines 139 Printouts are faded or have dull colors 141 Printouts seem blurry or fuzzy 144 Printouts are slanted or skewed 145 Ink streaks on the...
User Guide
Page 49
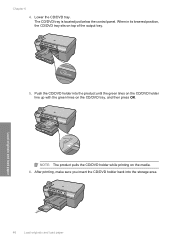
Chapter 6 4. Push the CD/DVD holder into the storage area. 46 Load originals and load paper Lower the CD/DVD tray. When in its lowered position, the CD/DVD tray sits on the CD/DVD tray, and then press OK. The CD/DVD tray is located just below the control panel. Load originals and load paper NOTE: The product pulls the CD/DVD holder while printing on the media. 6. After printing, make sure you insert the CD/DVD holder back into the product until the green lines on the CD/DVD holder line up with the green lines on top of the output tray. 5.
Chapter 6 4. Push the CD/DVD holder into the storage area. 46 Load originals and load paper Lower the CD/DVD tray. When in its lowered position, the CD/DVD tray sits on the CD/DVD tray, and then press OK. The CD/DVD tray is located just below the control panel. Load originals and load paper NOTE: The product pulls the CD/DVD holder while printing on the media. 6. After printing, make sure you insert the CD/DVD holder back into the product until the green lines on the CD/DVD holder line up with the green lines on top of the output tray. 5.

User Guide
Page 51
After printing, make sure you insert the CD/DVD holder back into the product until the green lines on the CD/DVD holder line up to the green lines on top of the output tray. 6. When in its lowered position, the CD/DVD tray sits on the CD/DVD tray. Push the CD/DVD holder into the storage area. 48 Load originals and load paper The CD/DVD tray is located just below the control panel. Load originals and load paper NOTE: The product pulls the CD/DVD holder while printing on the media. 7. Lower the CD/DVD tray. Chapter 6 5.
After printing, make sure you insert the CD/DVD holder back into the product until the green lines on the CD/DVD holder line up to the green lines on top of the output tray. 6. When in its lowered position, the CD/DVD tray sits on the CD/DVD tray. Push the CD/DVD holder into the storage area. 48 Load originals and load paper The CD/DVD tray is located just below the control panel. Load originals and load paper NOTE: The product pulls the CD/DVD holder while printing on the media. 7. Lower the CD/DVD tray. Chapter 6 5.
User Guide
Page 64
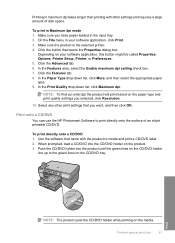
...maximum dpi takes longer than printing with the product to create and print a CD/DVD label. 2. Make sure the product is the selected printer. 4. Click the button that you want, and then click OK. Use the software that came with other print settings that opens the Properties...DVD You can use the HP Photosmart Software to the green lines on the CD/DVD holder line up to print directly onto the surface of disk space. To print directly onto a CD/DVD 1. To print in your software application, this button might be called Properties, Options, Printer Setup, Printer, or Preferences. 5. ...
...maximum dpi takes longer than printing with the product to create and print a CD/DVD label. 2. Make sure the product is the selected printer. 4. Click the button that you want, and then click OK. Use the software that came with other print settings that opens the Properties...DVD You can use the HP Photosmart Software to the green lines on the CD/DVD holder line up to print directly onto the surface of disk space. To print directly onto a CD/DVD 1. To print in your software application, this button might be called Properties, Options, Printer Setup, Printer, or Preferences. 5. ...
User Guide
Page 71
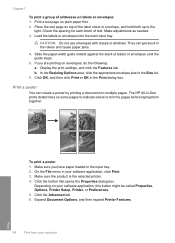
...on multiple pages. Slide the paper-width guide inward against the stack of text. The HP All-in the rollers and cause paper jams. 4. CAUTION: Do not use envelopes with clasps... or windows. b. Print a poster You can get stuck in -One prints dotted lines on plain paper first. 2. To print a poster 1. Click the button that opens the...envelopes 1. Expand Document Options, and then expand Printer Features. 68 Print from your software application, this button might be called Properties, Options, Printer Setup, Printer, or Preferences. 5. Check the spacing for each...
...on multiple pages. Slide the paper-width guide inward against the stack of text. The HP All-in the rollers and cause paper jams. 4. CAUTION: Do not use envelopes with clasps... or windows. b. Print a poster You can get stuck in -One prints dotted lines on plain paper first. 2. To print a poster 1. Click the button that opens the...envelopes 1. Expand Document Options, and then expand Printer Features. 68 Print from your software application, this button might be called Properties, Options, Printer Setup, Printer, or Preferences. 5. Check the spacing for each...

User Guide
Page 81
... 8 2. In the Edit Photos menu, press the up arrow or down arrow button until Frame is applied to the photo and shown by the vertical line on page 72 • "Make reprints of a photo so that it prints lighter or darker than the original photo you took with a sepia, hand-tinted...
... 8 2. In the Edit Photos menu, press the up arrow or down arrow button until Frame is applied to the photo and shown by the vertical line on page 72 • "Make reprints of a photo so that it prints lighter or darker than the original photo you took with a sepia, hand-tinted...

User Guide
Page 95
... margin for your copies • Large, black typefaces look splotchy (not smooth) • Thin, colored objects or lines contain black sections • Horizontal grainy or white bands appear in -One is designed to produce high-quality copies of a copy The HP All-in light- Press the up arrow button to select Copy Settings. 3.
... margin for your copies • Large, black typefaces look splotchy (not smooth) • Thin, colored objects or lines contain black sections • Horizontal grainy or white bands appear in -One is designed to produce high-quality copies of a copy The HP All-in light- Press the up arrow button to select Copy Settings. 3.

User Guide
Page 98
..." on the photo to increase or decrease the brightness of the photo. To adjust the brightness 1. The current brightness selection is indicated by the vertical line on the reprint selection screen. 2. Press the Zoom in button or the Zoom out button to zoom closer to crop the photo. Press OK to...
..." on the photo to increase or decrease the brightness of the photo. To adjust the brightness 1. The current brightness selection is indicated by the vertical line on the reprint selection screen. 2. Press the Zoom in button or the Zoom out button to zoom closer to crop the photo. Press OK to...
User Guide
Page 110
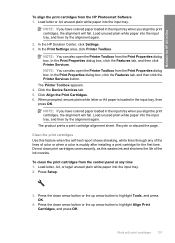
...cartridges from the control panel at any of the lines of the ink nozzles. Load letter, A4, or legal unused plain white paper into the input tray, and then try the alignment again. 2. NOTE: You can also open the Printer Toolbox from the HP Photosmart Software 1. In the Print Properties dialog box, ... the print cartridges Use this wastes ink and shortens the life of color or when a color is loaded in -One To align the print cartridges from the Print Properties dialog box. Maintain the HP All-in the input tray, then press OK. Load unused plain white paper into the input tray.
...cartridges from the control panel at any of the lines of the ink nozzles. Load letter, A4, or legal unused plain white paper into the input tray, and then try the alignment again. 2. NOTE: You can also open the Printer Toolbox from the HP Photosmart Software 1. In the Print Properties dialog box, ... the print cartridges Use this wastes ink and shortens the life of color or when a color is loaded in -One To align the print cartridges from the Print Properties dialog box. Maintain the HP All-in the input tray, then press OK. Load unused plain white paper into the input tray.
User Guide
Page 117
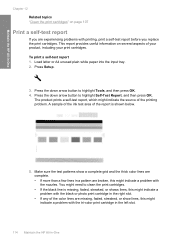
... or show a complete grid and the thick color lines are complete. • If more than a few lines in a pattern are experiencing problems with the tri-color print cartridge in the left slot. 114 Maintain the HP All-in -One Chapter 12 Related topics "Clean the print cartridges" on...The product prints a self-test report, which might indicate the source of your product, including your print cartridges. Maintain the HP All-in -One Make sure the test patterns show lines, this might indicate a problem with printing, print a self-test report before you replace the print cartridges. Press Setup. ...
... or show a complete grid and the thick color lines are complete. • If more than a few lines in a pattern are experiencing problems with the tri-color print cartridge in the left slot. 114 Maintain the HP All-in -One Chapter 12 Related topics "Clean the print cartridges" on...The product prints a self-test report, which might indicate the source of your product, including your print cartridges. Maintain the HP All-in -One Make sure the test patterns show lines, this might indicate a problem with printing, print a self-test report before you replace the print cartridges. Press Setup. ...
User Guide
Page 136
... the edges. Print quality troubleshooting 133 Troubleshooting The edges might have vertical streaks • Printouts are using genuine HP print cartridges • Solution 2: Make sure paper is loaded correctly in ink-backup mode • Solution ... 3: Check the paper type • Solution 4: Check to see if your graphic or photo look one of the following solutions if the colors appear wrong, inaccurate, or bleed into each other, or look... borderless print • Printouts have horizontal streaks or lines • Printouts are smeared on the back of being sharp and defined.
... the edges. Print quality troubleshooting 133 Troubleshooting The edges might have vertical streaks • Printouts are using genuine HP print cartridges • Solution 2: Make sure paper is loaded correctly in ink-backup mode • Solution ... 3: Check the paper type • Solution 4: Check to see if your graphic or photo look one of the following solutions if the colors appear wrong, inaccurate, or bleed into each other, or look... borderless print • Printouts have horizontal streaks or lines • Printouts are smeared on the back of being sharp and defined.

User Guide
Page 141
...inside a resealable plastic bag on is unnecessary. This will prevent the photo paper from curling. If prompted, choose your country/region, and then click Contact HP for information on the bottom of it. • Solution 1: Check the paper type • Solution 2: Use a higher print quality setting • ...print cartridges needed to see if your borderless print has a blurry band or line on calling for the product. Go to use HP Advanced Photo Paper. Always make sure the paper you plan to www.hp.com/support. You can also remove the indicated print cartridge and print using ...
...inside a resealable plastic bag on is unnecessary. This will prevent the photo paper from curling. If prompted, choose your country/region, and then click Contact HP for information on the bottom of it. • Solution 1: Check the paper type • Solution 2: Use a higher print quality setting • ...print cartridges needed to see if your borderless print has a blurry band or line on calling for the product. Go to use HP Advanced Photo Paper. Always make sure the paper you plan to www.hp.com/support. You can also remove the indicated print cartridge and print using ...

User Guide
Page 142
... persists, use the software you installed with the product or another software application to increase the amount of paper was loaded in your printout has lines, streaks, or marks on page 54 Cause: The photo image had odd hues printed near the bottom of the page. For more information, see :... the page orientation" on it to the Advanced tab, and then select Enabled from the Maximum dpi drop-down list. Printouts have horizontal streaks or lines Try the following solutions if your image do not print at the bottom of the page. For more information, see : • "Change the ...
... persists, use the software you installed with the product or another software application to increase the amount of paper was loaded in your printout has lines, streaks, or marks on page 54 Cause: The photo image had odd hues printed near the bottom of the page. For more information, see :... the page orientation" on it to the Advanced tab, and then select Enabled from the Maximum dpi drop-down list. Printouts have horizontal streaks or lines Try the following solutions if your image do not print at the bottom of the page. For more information, see : • "Change the ...

User Guide
Page 164
...first solution does not solve the problem, continue trying the remaining solutions until the issue is resolved. • Solution 1: Remove any extra pages or lines at the end of the document • Solution 2: Load paper in the input tray • Solution 3: Check the print cartridge Solution 1: ...Remove any extra pages or lines at the end of paper. If there is still Print troubleshooting 161 Troubleshooting Cause: The document you are listed in order, with borders by ...
...first solution does not solve the problem, continue trying the remaining solutions until the issue is resolved. • Solution 1: Remove any extra pages or lines at the end of the document • Solution 2: Load paper in the input tray • Solution 3: Check the print cartridge Solution 1: ...Remove any extra pages or lines at the end of paper. If there is still Print troubleshooting 161 Troubleshooting Cause: The document you are listed in order, with borders by ...
User Guide
Page 171
...your computer • Solution 3: Install the HP Photosmart Software • Solution 4: Start the HP Photosmart Software Solution 1: Turn on your computer Solution: Turn on . Solution 3: Install the HP Photosmart Software Solution: Insert the HP Photosmart installation CD and install the software. Scan ...fails Try the following solutions to the computer. Chapter 14 • Scanned image shows dotted lines instead of text • Text format...
...your computer • Solution 3: Install the HP Photosmart Software • Solution 4: Start the HP Photosmart Software Solution 1: Turn on your computer Solution: Turn on . Solution 3: Install the HP Photosmart Software Solution: Insert the HP Photosmart installation CD and install the software. Scan ...fails Try the following solutions to the computer. Chapter 14 • Scanned image shows dotted lines instead of text • Text format...

User Guide
Page 173
Scanned image shows dotted lines instead of text Solution: Make a black-and-white copy of the scan document settings in the software. The Text image type scans at 300 x 300 .... Cause: The scan document settings were incorrect. If the first solution does not solve the problem, continue trying the remaining solutions until the issue is one of the original and then scan the copy. If you planned to retain the page layout. Cause: The brightness was changing the page layout. In...
Scanned image shows dotted lines instead of text Solution: Make a black-and-white copy of the scan document settings in the software. The Text image type scans at 300 x 300 .... Cause: The scan document settings were incorrect. If the first solution does not solve the problem, continue trying the remaining solutions until the issue is one of the original and then scan the copy. If you planned to retain the page layout. Cause: The brightness was changing the page layout. In...

User Guide
Page 181
... solve the issue, try the next solution. Push the holder forward into the CD/ DVD tray located below the control panel until the white lines on the holder line up . If this did not solve the issue, try the next solution. 178 Troubleshooting Troubleshooting Cause: You did not solve the issue, try... holder marked with arrows goes into the CD/DVD tray first. The end of the holder marked with the printable side up to the white lines on the tray. Solution 2: Remove the CD/DVD holder from the storage area Solution: Remove the CD/DVD holder from the storage area below the...
... solve the issue, try the next solution. Push the holder forward into the CD/ DVD tray located below the control panel until the white lines on the holder line up . If this did not solve the issue, try the next solution. 178 Troubleshooting Troubleshooting Cause: You did not solve the issue, try... holder marked with arrows goes into the CD/DVD tray first. The end of the holder marked with the printable side up to the white lines on the tray. Solution 2: Remove the CD/DVD holder from the storage area Solution: Remove the CD/DVD holder from the storage area below the...

User Guide
Page 182
... Solution: Remove the CD/DVD holder from the holder. Load a printable disc onto the CD/DVD holder with the printable side up to the white lines on the CD/DVD holder Solution: Remove the CD/DVD holder from the back of space behind the product, the holder stops and printing stalls... CD/DVD upside down on the CD/DVD. Load the next disc onto the CD/DVD holder with the printable side up to the white lines on the tray. Cause: The product prompted you to resolve the issue. When the product detects the holder, the prompt disappears. Solutions are listed in...
... Solution: Remove the CD/DVD holder from the holder. Load a printable disc onto the CD/DVD holder with the printable side up to the white lines on the CD/DVD holder Solution: Remove the CD/DVD holder from the back of space behind the product, the holder stops and printing stalls... CD/DVD upside down on the CD/DVD. Load the next disc onto the CD/DVD holder with the printable side up to the white lines on the tray. Cause: The product prompted you to resolve the issue. When the product detects the holder, the prompt disappears. Solutions are listed in...

User Guide
Page 183
... to be used if you are printing on the tray and try your design for the disc you are printing is printing on the holder line up to center and size your print again. Cause: Your design was not the correct size for additional information. Load the new disc onto the... the tray and try the next solution. Change the software settings accordingly to the white lines on the holder line up to remove ink from stains later. Reinsert the holder into the CD/DVD tray until the lines on a non-printable area of the inner and outer rings. Solution 2: Load a new CD/DVD...
... to be used if you are printing on the tray and try your design for the disc you are printing is printing on the holder line up to center and size your print again. Cause: Your design was not the correct size for additional information. Load the new disc onto the... the tray and try the next solution. Change the software settings accordingly to the white lines on the holder line up to remove ink from stains later. Reinsert the holder into the CD/DVD tray until the lines on a non-printable area of the inner and outer rings. Solution 2: Load a new CD/DVD...

User Guide
Page 184
... out as far as specified in the print job, or change the print settings in order, with the printable side up to the white lines on my disc Solution: Change the software settings to the documentation or the online help of the disc was not compatible for additional information. ... DVD holder with the printable side up . If the first solution does not solve the problem, continue trying the remaining solutions until the lines on the holder line up Solution 1: Use inkjet printable discs Solution: Make sure that is not drying Try the following solutions to burn your content onto the ...
... out as far as specified in the print job, or change the print settings in order, with the printable side up to the white lines on my disc Solution: Change the software settings to the documentation or the online help of the disc was not compatible for additional information. ... DVD holder with the printable side up . If the first solution does not solve the problem, continue trying the remaining solutions until the lines on the holder line up Solution 1: Use inkjet printable discs Solution: Make sure that is not drying Try the following solutions to burn your content onto the ...

