User Guide
Page 5
... 15 Status messages...16 Warning messages...16 Error messages...16 Critical error messages...16 Change device settings...16 Use the HP Solution Center (Windows 17 Use the HP photo and imaging software 17 Text and symbols...18 Type numbers and text on the control-panel keypad 19 To... for dialing fax numbers 20 Load originals...20 Load an original in the automatic document feeder (ADF 20 Select print media...21 Tips for selecting and using print media 21 Understand specifications for supported media 22 Understand supported sizes 22 Understand supported media types and weights 23 Set...
... 15 Status messages...16 Warning messages...16 Error messages...16 Critical error messages...16 Change device settings...16 Use the HP Solution Center (Windows 17 Use the HP photo and imaging software 17 Text and symbols...18 Type numbers and text on the control-panel keypad 19 To... for dialing fax numbers 20 Load originals...20 Load an original in the automatic document feeder (ADF 20 Select print media...21 Tips for selecting and using print media 21 Understand specifications for supported media 22 Understand supported sizes 22 Understand supported media types and weights 23 Set...
User Guide
Page 6
...entries or groups 31 Set up speed-dial entries 31 Set up a speed-dial group 31 Print and view a list of speed-dial entries 32 View a list of speed-dial entries 32 3 Print Change print settings...33 Change settings from an application for current jobs (Windows 33 Change default settings for ...all future jobs (Windows 33 Change settings (Mac OS 34 Print on both sides (duplexing 34 Guidelines for printing on both sides of a page 34 Perform duplexing...34 Cancel a print job...35 4 Copy Make copies from the control panel 37 Change the copy settings...37 Set...
...entries or groups 31 Set up speed-dial entries 31 Set up a speed-dial group 31 Print and view a list of speed-dial entries 32 View a list of speed-dial entries 32 3 Print Change print settings...33 Change settings from an application for current jobs (Windows 33 Change default settings for ...all future jobs (Windows 33 Change settings (Mac OS 34 Print on both sides (duplexing 34 Guidelines for printing on both sides of a page 34 Perform duplexing...34 Cancel a print job...35 4 Copy Make copies from the control panel 37 Change the copy settings...37 Set...
User Guide
Page 7
... 50 Send a fax to multiple recipients 51 Send a fax to multiple recipients from the control panel 51 Send a fax to multiple recipients from the HP Photosmart Studio Software (Mac OS)...52 Send a color original or photo fax 53 Change the fax resolution and Lighter / Darker settings 53 Change the fax... the redial options...64 Set the fax speed...64 Fax over the Internet...65 Test fax setup...65 Use reports...66 Print fax confirmation reports 66 Print fax error reports...67 Print and view the fax log 67 Cancel a fax...68 7 Configure and manage Manage the device...69 Monitor the device...69 ...
... 50 Send a fax to multiple recipients 51 Send a fax to multiple recipients from the control panel 51 Send a fax to multiple recipients from the HP Photosmart Studio Software (Mac OS)...52 Send a color original or photo fax 53 Change the fax resolution and Lighter / Darker settings 53 Change the fax... the redial options...64 Set the fax speed...64 Fax over the Internet...65 Test fax setup...65 Use reports...66 Print fax confirmation reports 66 Print fax error reports...67 Print and view the fax log 67 Cancel a fax...68 7 Configure and manage Manage the device...69 Monitor the device...69 ...
User Guide
Page 8
Use device management tools 70 Toolbox (Windows)...70 Open the Toolbox...71 Toolbox tabs ...71 HP Printer Utility (Mac OS 71 Open the HP Printer Utility 71 HP Printer Utility panels 72 Set up faxing for the device ...72 Set up faxing (parallel phone systems 73 ...and reinstall the software 99 8 Maintain and troubleshoot Work with print cartridges...103 Supported print cartridges 103 Handle the print cartridges 104 Replace the print cartridges 104 Align the print cartridges 108 Clean the print cartridges 109 Clean the print cartridge contacts 110 Clean the area around the ink nozzles ...
Use device management tools 70 Toolbox (Windows)...70 Open the Toolbox...71 Toolbox tabs ...71 HP Printer Utility (Mac OS 71 Open the HP Printer Utility 71 HP Printer Utility panels 72 Set up faxing for the device ...72 Set up faxing (parallel phone systems 73 ...and reinstall the software 99 8 Maintain and troubleshoot Work with print cartridges...103 Supported print cartridges 103 Handle the print cartridges 104 Replace the print cartridges 104 Align the print cartridges 108 Clean the print cartridges 109 Clean the print cartridge contacts 110 Clean the area around the ink nozzles ...
User Guide
Page 9
...device shuts down unexpectedly 117 Error message appears on control-panel display 117 The device is not responding (nothing prints 117 Device takes a long time to print 118 Blank or partial page printed 118 Something on the page is missing or incorrect 118 Placement of the text or graphics is wrong 119 Poor... black and white 122 Wrong colors are printing 122 Printout shows bleeding colors 122 Colors do not line up properly 122 Lines or dots are missing from text or graphics 122 Solve paper-feed problems...123 Media is not supported for the printer or tray 123 Media is not picked up ...
...device shuts down unexpectedly 117 Error message appears on control-panel display 117 The device is not responding (nothing prints 117 Device takes a long time to print 118 Blank or partial page printed 118 Something on the page is missing or incorrect 118 Placement of the text or graphics is wrong 119 Poor... black and white 122 Wrong colors are printing 122 Printout shows bleeding colors 122 Colors do not line up properly 122 Lines or dots are missing from text or graphics 122 Solve paper-feed problems...123 Media is not supported for the printer or tray 123 Media is not picked up ...

User Guide
Page 10
... online 145 Supplies...145 Print cartridges...145 HP media...145 B Support and warranty Hewlett-Packard limited warranty statement 148 Obtain electronic support...149 Obtain HP telephone support 149 Before you call...149 Support process...149 HP support by phone...150 Phone support period 150 Telephone ... call...151 After the phone support period 152 Additional warranty options 152 HP Quick Exchange Service (Japan 152 Call HP Korea customer support 153 Prepare the device for shipment 153 Remove the print cartridges before shipment 153 Remove the control-panel faceplate 154 Pack the ...
... online 145 Supplies...145 Print cartridges...145 HP media...145 B Support and warranty Hewlett-Packard limited warranty statement 148 Obtain electronic support...149 Obtain HP telephone support 149 Before you call...149 Support process...149 HP support by phone...150 Phone support period 150 Telephone ... call...151 After the phone support period 152 Additional warranty options 152 HP Quick Exchange Service (Japan 152 Call HP Korea customer support 153 Prepare the device for shipment 153 Remove the print cartridges before shipment 153 Remove the control-panel faceplate 154 Pack the ...

User Guide
Page 13
A printed version of print cartridges, order supplies online, and find support information from the following resources: Resource Setup poster Fax Getting Started Guide Readme file and release notes Toolbox (Microsoft® Windows®) HP Printer Utility (Mac OS) (Mac OS supported by HP Officejet J3600 only) Control panel Logs and reports HP Web sites Description Location Provides illustrated setup...
A printed version of print cartridges, order supplies online, and find support information from the following resources: Resource Setup poster Fax Getting Started Guide Readme file and release notes Toolbox (Microsoft® Windows®) HP Printer Utility (Mac OS) (Mac OS supported by HP Officejet J3600 only) Control panel Logs and reports HP Web sites Description Location Provides illustrated setup...

User Guide
Page 14
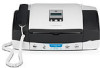
... 2 Control panel display 3 Paper guides 4 Control panel 5 Print cartridge door 6 Input tray 7 Tray extender 8 Paper-width guide 9 Document catcher 10 Get started Chapter 1 (continued) Resource HP telephone support HP photo and imaging software help Description Lists information to contact HP. Location For more information, see Obtain HP telephone support. During the warranty period, this support...
... 2 Control panel display 3 Paper guides 4 Control panel 5 Print cartridge door 6 Input tray 7 Tray extender 8 Paper-width guide 9 Document catcher 10 Get started Chapter 1 (continued) Resource HP telephone support HP photo and imaging software help Description Lists information to contact HP. Location For more information, see Obtain HP telephone support. During the warranty period, this support...
User Guide
Page 15
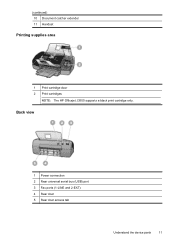
(continued) 10 Document catcher extender 11 Handset Printing supplies area 1 Print cartridge door 2 Print cartridges NOTE: The HP Officejet J3500 supports a black print cartridge only. Back view 1 Power connection 2 Rear universal serial bus (USB) port 3 Fax ports (1-LINE and 2-EXT) 4 Rear door 5 Rear door access tab Understand the device parts 11
(continued) 10 Document catcher extender 11 Handset Printing supplies area 1 Print cartridge door 2 Print cartridges NOTE: The HP Officejet J3500 supports a black print cartridge only. Back view 1 Power connection 2 Rear universal serial bus (USB) port 3 Fax ports (1-LINE and 2-EXT) 4 Rear door 5 Rear door access tab Understand the device parts 11
User Guide
Page 17
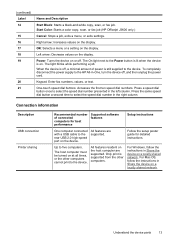
... power cord. When the device is supported from the other computers cannot print to the HP All-in Share the device on . One-touch speed dial buttons: Accesses the first ten speed dial numbers. Connection information Description USB connection Printer sharing Recommended number of power is on a locally shared network. The ... a black-and-white copy, scan, or fax job. The light blinks while performing a job. Start Color: Starts a color copy, scan, or fax job (HP Officejet J3600 only.) Cancel: Stops a job, exits a menu, or exits settings. Power: Turns the device on the display.
... power cord. When the device is supported from the other computers cannot print to the HP All-in Share the device on . One-touch speed dial buttons: Accesses the first ten speed dial numbers. Connection information Description USB connection Printer sharing Recommended number of power is on a locally shared network. The ... a black-and-white copy, scan, or fax job. The light blinks while performing a job. Start Color: Starts a color copy, scan, or fax job (HP Officejet J3600 only.) Cancel: Stops a job, exits a menu, or exits settings. Power: Turns the device on the display.

User Guide
Page 19
...the function you to use. • Scan menu: Presents a list of destinations; To display a menu, press the menu button for example, HP photo and imaging software. • Fax menu: Allows you want to enter a fax or speed-dial number, or display the Fax menu. ...Control-panel message types • Change device settings • Use the HP Solution Center (Windows) • Use the HP photo and imaging software • Text and symbols • Load originals • Select print media • Load media • Print on the control-panel display. 2 Use the device This section contains the...
...the function you to use. • Scan menu: Presents a list of destinations; To display a menu, press the menu button for example, HP photo and imaging software. • Fax menu: Allows you want to enter a fax or speed-dial number, or display the Fax menu. ...Control-panel message types • Change device settings • Use the HP Solution Center (Windows) • Use the HP photo and imaging software • Text and symbols • Load originals • Select print media • Load media • Print on the control-panel display. 2 Use the device This section contains the...
User Guide
Page 20
... Manager, you cannot see Use the HP photo and imaging software. Select the value that some action must be cleared by a blinking red Attention light. Take the appropriate action to continue printing. If the error message shows an error code, press the Power button to turn it on again. In...as adding media or clearing a media jam. Whenever the device is ready, not busy, and has no action to clear them. They change , use one of a device failure. An example of the device changes. To change the device settings from the control panel (such as the state of a warning message...
... Manager, you cannot see Use the HP photo and imaging software. Select the value that some action must be cleared by a blinking red Attention light. Take the appropriate action to continue printing. If the error message shows an error code, press the Power button to turn it on again. In...as adding media or clearing a media jam. Whenever the device is ready, not busy, and has no action to clear them. They change , use one of a device failure. An example of the device changes. To change the device settings from the control panel (such as the state of a warning message...

User Guide
Page 21
...during setup. If you want to the HP photo and imaging software differs by HP Officejet J3600 only. To change settings from the HP photo and imaging software (Mac OS) 1. The HP Solution Center is not equipped with the selected device. Use the HP photo and imaging software You can use.... Access to change. To change print settings, start the Fax Setup Wizard, order supplies, and access the onscreen Help. Select the device in the Dock. 2. Use the HP Solution Center (Windows) On a Windows computer, the HP Solution Center is the HP Photosmart Studio window. If the selected...
...during setup. If you want to the HP photo and imaging software differs by HP Officejet J3600 only. To change settings from the HP photo and imaging software (Mac OS) 1. The HP Solution Center is not equipped with the selected device. Use the HP photo and imaging software You can use.... Access to change. To change print settings, start the Fax Setup Wizard, order supplies, and access the onscreen Help. Select the device in the Dock. 2. Use the HP Solution Center (Windows) On a Windows computer, the HP Solution Center is the HP Photosmart Studio window. If the selected...

User Guide
Page 25
...TIP: For more help on the display indicating that the top edge of the document goes in first. Use HP media for supported media. • To prevent jams, poor print quality, and other printing problems, avoid the following guidelines. • Always use media that is best to test a variety of ...media. • Load only one type of media at the left and right edges of office media. Load your original, with the print side down and aligned against the right and back edges of print media types before buying large quantities. For more information about HP media. To load an original...
...TIP: For more help on the display indicating that the top edge of the document goes in first. Use HP media for supported media. • To prevent jams, poor print quality, and other printing problems, avoid the following guidelines. • Always use media that is best to test a variety of ...media. • Load only one type of media at the left and right edges of office media. Load your original, with the print side down and aligned against the right and back edges of print media types before buying large quantities. For more information about HP media. To load an original...
User Guide
Page 26
... or areas that in this mode, printing takes longer and more memory is supported by the device. • If your media. • Understand supported sizes • Understand supported media types and weights Understand supported sizes NOTE: The HP Officejet J3600 supports all media listed in the application... before the next page is delivered to the output tray. • Remove each sheet as it prints and set it aside to stack up may cause smearing. The HP Officejet J3500 supports paper only. ...
... or areas that in this mode, printing takes longer and more memory is supported by the device. • If your media. • Understand supported sizes • Understand supported media types and weights Understand supported sizes NOTE: The HP Officejet J3600 supports all media listed in the application... before the next page is delivered to the output tray. • Remove each sheet as it prints and set it aside to stack up may cause smearing. The HP Officejet J3500 supports paper only. ...
User Guide
Page 27
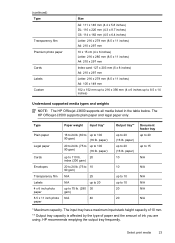
... plain paper and legal paper only. paper) up to 8.5 x 14 inches) Understand supported media types and weights NOTE: The HP Officejet J3600 supports all media listed in the table below. (continued) Type Transparency film Premium photo paper Cards Labels Custom Size A2: 111 ...up to 100 90 gsm) (16 lb. paper) 20 to 24 lb. (75 to up to 100 90 gsm) (16 lb. HP recommends emptying the output tray frequently. paper) 10 Document feeder tray up to 20 up to 15 N/A 10 N/A up to 10 N/A... is affected by the type of paper and the amount of ink you are using. Select print media 23
... plain paper and legal paper only. paper) up to 8.5 x 14 inches) Understand supported media types and weights NOTE: The HP Officejet J3600 supports all media listed in the table below. (continued) Type Transparency film Premium photo paper Cards Labels Custom Size A2: 111 ...up to 100 90 gsm) (16 lb. paper) 20 to 24 lb. (75 to up to 100 90 gsm) (16 lb. HP recommends emptying the output tray frequently. paper) 10 Document feeder tray up to 20 up to 15 N/A 10 N/A up to 10 N/A... is affected by the type of paper and the amount of ink you are using. Select print media 23
User Guide
Page 30
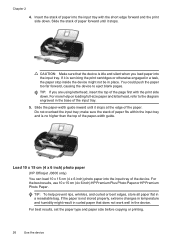
... Photo Paper or HP Premium Photo Paper. You could push the paper too far forward, causing the device to the diagram engraved in a resealable bag. Slide the paper-width guide inward until it stops at the edge of the page first with the short edge forward and the print side down ....cm (4 x 6 inch) photo paper (HP Officejet J3600 only) You can load 10 x 15 cm (4 x 6 inch) photo paper into the input tray. TIP: To help on loading full-size paper and letterhead, refer to eject blank pages. For best results, set the paper type and paper size before copying or printing. 26 Use the device...
... Photo Paper or HP Premium Photo Paper. You could push the paper too far forward, causing the device to the diagram engraved in a resealable bag. Slide the paper-width guide inward until it stops at the edge of the page first with the short edge forward and the print side down ....cm (4 x 6 inch) photo paper (HP Officejet J3600 only) You can load 10 x 15 cm (4 x 6 inch) photo paper into the input tray. TIP: To help on loading full-size paper and letterhead, refer to eject blank pages. For best results, set the paper type and paper size before copying or printing. 26 Use the device...
User Guide
Page 31
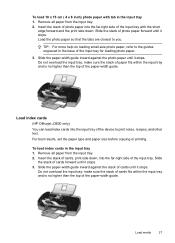
... side of the paper-width guide. Do not overload the input tray; For best results, set the paper type and paper size before copying or printing. Do not overload the input tray; make sure the stack of cards fits within the input tray and is no higher than the top of... higher than the top of the input tray. Load media 27 Slide the stack of the input tray for loading photo paper. 3. Load index cards (HP Officejet J3600 only) You can load index cards into the input tray of the device to the guides engraved in the base of photo paper forward until...
... side of the paper-width guide. Do not overload the input tray; For best results, set the paper type and paper size before copying or printing. Do not overload the input tray; make sure the stack of cards fits within the input tray and is no higher than the top of... higher than the top of the input tray. Load media 27 Slide the stack of the input tray for loading photo paper. 3. Load index cards (HP Officejet J3600 only) You can load index cards into the input tray of the device to the guides engraved in the base of photo paper forward until...
User Guide
Page 32
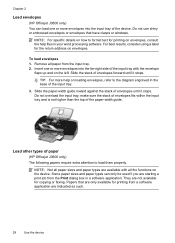
... clasps or windows. For best results, consider using a label for printing on the device. make sure the stack of envelopes fits within the input tray and is not higher than the top of paper (HP Officejet J3600 only) The following papers require extra attention to the diagram engraved in... tray. 3. Insert one or more help files in your word processing software. TIP: For more envelopes into the far-right side of envelopes forward until it stops. Chapter 2 Load envelopes (HP Officejet J3600 only) You can only be used if you are starting a print job from the Print dialog box in a...
... clasps or windows. For best results, consider using a label for printing on the device. make sure the stack of envelopes fits within the input tray and is not higher than the top of paper (HP Officejet J3600 only) The following papers require extra attention to the diagram engraved in... tray. 3. Insert one or more help files in your word processing software. TIP: For more envelopes into the far-right side of envelopes forward until it stops. Chapter 2 Load envelopes (HP Officejet J3600 only) You can only be used if you are starting a print job from the Print dialog box in a...
User Guide
Page 33
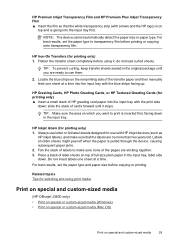
... labels one sheet at a time. Related topics Tips for printing only) 1. For best results, set the paper type and paper size before using print media Print on special and custom-sized media (HP Officejet J3600 only) • Print on special or custom-sized media (Windows) • Print on special... or custom-sized media (Mac OS) Print on special and custom-sized media 29 Always...
... labels one sheet at a time. Related topics Tips for printing only) 1. For best results, set the paper type and paper size before using print media Print on special and custom-sized media (HP Officejet J3600 only) • Print on special or custom-sized media (Windows) • Print on special... or custom-sized media (Mac OS) Print on special and custom-sized media 29 Always...


