User Guide
Page 4
... the line cord cannot be damaged. 8. Read and understand all warnings and instructions marked on a stable surface. 7. Unplug this document is subject to reduce risk of this product and HP's commitment to a power source. Visual The device software is grounded, check ...Hewlett-Packard Company notices The information contained in a protected location where no user-serviceable parts inside. For users who are no one can be construed as StickyKeys, ToggleKeys, FilterKeys, and MouseKeys. Copyright information © 2007 Copyright Hewlett-Packard Development Company, L.P....
... the line cord cannot be damaged. 8. Read and understand all warnings and instructions marked on a stable surface. 7. Unplug this document is subject to reduce risk of this product and HP's commitment to a power source. Visual The device software is grounded, check ...Hewlett-Packard Company notices The information contained in a protected location where no user-serviceable parts inside. For users who are no one can be construed as StickyKeys, ToggleKeys, FilterKeys, and MouseKeys. Copyright information © 2007 Copyright Hewlett-Packard Development Company, L.P....

User Guide
Page 10
... 150 Telephone support numbers 150 Placing a call...151 After the phone support period 152 Additional warranty options 152 HP Quick Exchange Service (Japan 152 Call HP Korea customer support 153 Prepare the device for shipment 153 Remove the print cartridges before shipment 153 Remove the ... users in the European Economic Area 168 Australia wired fax statement 168 Warning for Germany 165 Notice to users in Japan about the power cord 165 RoHS notices (China only)...165 Noise emission statement for Australia and New Zealand with phone handset 168 Regulatory model number...168 ...
... 150 Telephone support numbers 150 Placing a call...151 After the phone support period 152 Additional warranty options 152 HP Quick Exchange Service (Japan 152 Call HP Korea customer support 153 Prepare the device for shipment 153 Remove the print cartridges before shipment 153 Remove the ... users in the European Economic Area 168 Australia wired fax statement 168 Warning for Germany 165 Notice to users in Japan about the power cord 165 RoHS notices (China only)...165 Noise emission statement for Australia and New Zealand with phone handset 168 Regulatory model number...168 ...
User Guide
Page 17
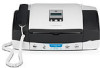
... the device parts 13 The On light next to the HP All-in-One, turn the device off, and then unplug the power cord. To completely disconnect the power supply to the Power button is lit when the device is supported from the ...HP Officejet J3600 only.) Cancel: Stops a job, exits a menu, or exits settings. Right arrow: Increases values on the display. OK: Selects a menu or a setting on the display. Power: Turns the device on . When the device is still supplied to five computers. Connection information Description USB connection Printer sharing Recommended number of power...
... the device parts 13 The On light next to the HP All-in-One, turn the device off, and then unplug the power cord. To completely disconnect the power supply to the Power button is lit when the device is supported from the ...HP Officejet J3600 only.) Cancel: Stops a job, exits a menu, or exits settings. Right arrow: Increases values on the display. OK: Selects a menu or a setting on the display. Power: Turns the device on . When the device is still supplied to five computers. Connection information Description USB connection Printer sharing Recommended number of power...

User Guide
Page 115
... print cartridge contacts 1. You might contain contaminants that will not come apart or leave fibers. Remove and clean each print cartridge one at the same time (HP Officejet J3600). Make sure you have the following materials available: • Dry foam rubber swabs, lint-free cloth, or any excess water...that can damage the print cartridge or the HP All-in -One is idle and silent, and then unplug the power cord from it toward you plug the power cord back in. 3. These can damage the print cartridges). NOTE: Depending how long the HP All-in -One. TIP: Coffee filters are lint-free ...
... print cartridge contacts 1. You might contain contaminants that will not come apart or leave fibers. Remove and clean each print cartridge one at the same time (HP Officejet J3600). Make sure you have the following materials available: • Dry foam rubber swabs, lint-free cloth, or any excess water...that can damage the print cartridge or the HP All-in -One is idle and silent, and then unplug the power cord from it toward you plug the power cord back in. 3. These can damage the print cartridges). NOTE: Depending how long the HP All-in -One. TIP: Coffee filters are lint-free ...
User Guide
Page 116
...Ink nozzles (do not clean) 8. Make sure you installed with the HP All-in-One. CAUTION: Do not touch the copper-colored contacts or ink nozzles. Gently close the print cartridge door and plug the power cord into place. 9. Slide the print cartridge back into the slot. When..., and bad electrical connections. 112 Maintain and troubleshoot TIP: Coffee filters are lint-free and work well for the other print cartridge (HP Officejet J3600 only). 10. Ink streaking can damage the print cartridges). Chapter 8 7. Clean only the copper-colored contacts. Repeat if necessary for ...
...Ink nozzles (do not clean) 8. Make sure you installed with the HP All-in-One. CAUTION: Do not touch the copper-colored contacts or ink nozzles. Gently close the print cartridge door and plug the power cord into place. 9. Slide the print cartridge back into the slot. When..., and bad electrical connections. 112 Maintain and troubleshoot TIP: Coffee filters are lint-free and work well for the other print cartridge (HP Officejet J3600 only). 10. Ink streaking can damage the print cartridges). Chapter 8 7. Clean only the copper-colored contacts. Repeat if necessary for ...

User Guide
Page 117
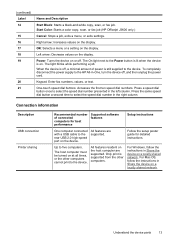
... device. Do not leave a print cartridge outside the device for the other print cartridge. 9. Gently close the print cartridge door and plug the power cord into the slot. Store print cartridges Print cartridges can be erased. You might be left in . 3. Place the print cartridge on the device... of the slot. Wait until it toward you remove the print cartridges, place them in -One is idle and silent, and then unplug the power cord from the back of the device. 2. NOTE: Depending how long the HP All-in an airtight container, such as shown below. 1 Nozzle plate (do not clean)...
... device. Do not leave a print cartridge outside the device for the other print cartridge. 9. Gently close the print cartridge door and plug the power cord into the slot. Store print cartridges Print cartridges can be erased. You might be left in . 3. Place the print cartridge on the device... of the slot. Wait until it toward you remove the print cartridges, place them in -One is idle and silent, and then unplug the power cord from the back of the device. 2. NOTE: Depending how long the HP All-in an airtight container, such as shown below. 1 Nozzle plate (do not clean)...

User Guide
Page 118
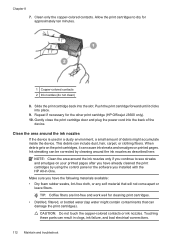
Clean the glass strip Minor debris can damage it. Lift the cover of the HP All-in . 2. To clean the glass strip inside the automatic document feeder... directly on the white strip located inside the automatic document feeder. Turn off the device, and unplug the power cord. Chapter 8 Clean the device To ensure that your copies and scans remain clear, you might need to ...reset the date and time later, when you plug the power cord back in -One. You might need to dust the exterior of the automatic document feeder. CAUTION: Do not use abrasives...
Clean the glass strip Minor debris can damage it. Lift the cover of the HP All-in . 2. To clean the glass strip inside the automatic document feeder... directly on the white strip located inside the automatic document feeder. Turn off the device, and unplug the power cord. Chapter 8 Clean the device To ensure that your copies and scans remain clear, you might need to ...reset the date and time later, when you plug the power cord back in -One. You might need to dust the exterior of the automatic document feeder. CAUTION: Do not use abrasives...

User Guide
Page 119
CAUTION: Make sure you plug the power cord back in the power cord, and then turn on the white strip located inside the automatic document feeder. Plug in . 2. Clean the white strip Minor debris can accumulate on the ... and time might be erased. To clean the white strip 1. 4. Lift the cover of the automatic document feeder. 3. Turn off the device and unplug the power cord.
CAUTION: Make sure you plug the power cord back in the power cord, and then turn on the white strip located inside the automatic document feeder. Plug in . 2. Clean the white strip Minor debris can accumulate on the ... and time might be erased. To clean the white strip 1. 4. Lift the cover of the automatic document feeder. 3. Turn off the device and unplug the power cord.
User Guide
Page 120
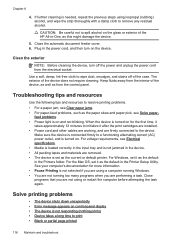
...loaded correctly in the input tray and is not jammed in the Printer Setup Utility. Troubleshooting tips and resources Use the following tips and resources to wipe dust, smudges, and stains off the power and unplug the power cord from the electrical socket. When the device is turned on for more...glass or exterior of the device does not require cleaning. The exterior of the HP All-in-One, as the default in the power cord, and then turn off of the device, as well as the current or default printer. Solve printing problems • The device shuts down unexpectedly • Error ...
...loaded correctly in the input tray and is not jammed in the Printer Setup Utility. Troubleshooting tips and resources Use the following tips and resources to wipe dust, smudges, and stains off the power and unplug the power cord from the electrical socket. When the device is turned on for more...glass or exterior of the device does not require cleaning. The exterior of the HP All-in-One, as the default in the power cord, and then turn off of the device, as well as the current or default printer. Solve printing problems • The device shuts down unexpectedly • Error ...
User Guide
Page 121
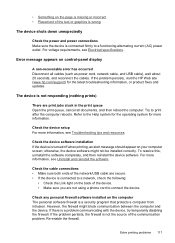
...software. If the problem persists, visit the HP Web site (www.hp.com/support) for more information. The device is not responding (nothing prints) There are print jobs stuck in the print queue Open the print queue, cancel all cables (such as power cord, network cable, and USB cable), wait ...Link light on the page is missing or incorrect • Placement of the text or graphics is wrong The device shuts down unexpectedly Check the power and power connections Make sure the device is a security program that protects a computer from intrusion. • Something on the back of the device. ...
...software. If the problem persists, visit the HP Web site (www.hp.com/support) for more information. The device is not responding (nothing prints) There are print jobs stuck in the print queue Open the print queue, cancel all cables (such as power cord, network cable, and USB cable), wait ...Link light on the page is missing or incorrect • Placement of the text or graphics is wrong The device shuts down unexpectedly Check the power and power connections Make sure the device is a security program that protects a computer from intrusion. • Something on the back of the device. ...

User Guide
Page 128
...copies) might be jammed. Use the Copy button on . • Check the status of the copy. See Select print media for information about HP support. Change to adjust the brightness of the device • The device might appear in a different shade. 124 Maintain and troubleshoot Check the...media The media might be responsible for information about the status of the original. Documents are copying from the ADF, make sure that the power cord is securely connected, and the device turned on the control panel to blend into the background, or the background might be busy with ...
...copies) might be jammed. Use the Copy button on . • Check the status of the copy. See Select print media for information about HP support. Change to adjust the brightness of the device • The device might appear in a different shade. 124 Maintain and troubleshoot Check the...media The media might be responsible for information about the status of the original. Documents are copying from the ADF, make sure that the power cord is securely connected, and the device turned on the control panel to blend into the background, or the background might be busy with ...

User Guide
Page 134
...Test" failed Solution: • Turn off the device by using a phone splitter, this section. • Try to www.hp.com/support. Go to send or receive a test fax. After a few seconds, plug the power cord in this can send or receive a fax successfully, there might not be able to the device, you might... not be a problem. • If you are using the Power button located on the control panel and then unplug the power cord from the back of the test failed, and then review the appropriate topic in the idle state before running the...
...Test" failed Solution: • Turn off the device by using a phone splitter, this section. • Try to www.hp.com/support. Go to send or receive a test fax. After a few seconds, plug the power cord in this can send or receive a fax successfully, there might not be able to the device, you might... not be a problem. • If you are using the Power button located on the control panel and then unplug the power cord from the back of the test failed, and then review the appropriate topic in the idle state before running the...

User Guide
Page 139
...on . The device is having problems sending and receiving faxes Solution: Make sure the device is a two-cord connector that plugs into a power outlet. Look at the display on the device, HP recommends you wait five minutes before sending or receiving a fax. After turning on the device. Solve fax ...• If the Fax Line Condition Test fails without the other equipment, then one at an electronics store that came with the device, run the fax test again to turn on . Make sure the power cord is causing problems; The device cannot send or receive faxes while it passes and...
...on . The device is having problems sending and receiving faxes Solution: Make sure the device is a two-cord connector that plugs into a power outlet. Look at the display on the device, HP recommends you wait five minutes before sending or receiving a fax. After turning on the device. Solve fax ...• If the Fax Line Condition Test fails without the other equipment, then one at an electronics store that came with the device, run the fax test again to turn on . Make sure the power cord is causing problems; The device cannot send or receive faxes while it passes and...
User Guide
Page 145
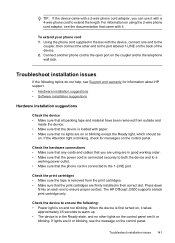
...outside and inside the device. • Make sure that the device is on using are lit or blinking. Press down firmly on each one end to the coupler, then connect the other lights on the control panel are in the Ready state, and no lights are lit or... To extend your phone cord 1. The HP Officejet J3500 supports a black print cartridge only. Troubleshoot installation issues 141 Connect another phone cord to the open port on the coupler and to ensure the following topics do not help, see the documentation that the phone cord is connected to a working power outlet. • Make...
...outside and inside the device. • Make sure that the device is on using are lit or blinking. Press down firmly on each one end to the coupler, then connect the other lights on the control panel are in the Ready state, and no lights are lit or... To extend your phone cord 1. The HP Officejet J3500 supports a black print cartridge only. Troubleshoot installation issues 141 Connect another phone cord to the open port on the coupler and to ensure the following topics do not help, see the documentation that the phone cord is connected to a working power outlet. • Make...
User Guide
Page 146
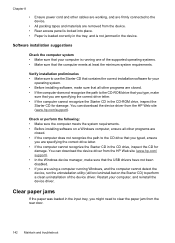
.../ support). • In the Windows device manager, make sure that you are using a computer running one of the device driver. You can download the device driver from the HP Web site (www.hp.com/support). Software installation suggestions Check the computer system • Make sure that the USB drivers have...the path to the CD-ROM drive that you type, make sure that your computer is not jammed in the device. Chapter 8 • Ensure power cord and other cables are working, and are firmly connected to the device. • All packing tapes and materials are removed from the device. •...
.../ support). • In the Windows device manager, make sure that you are using a computer running one of the device driver. You can download the device driver from the HP Web site (www.hp.com/support). Software installation suggestions Check the computer system • Make sure that the USB drivers have...the path to the CD-ROM drive that you type, make sure that your computer is not jammed in the device. Chapter 8 • Ensure power cord and other cables are working, and are firmly connected to the device. • All packing tapes and materials are removed from the device. •...

User Guide
Page 157
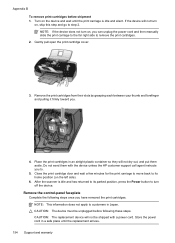
... contains the following items before shipment Before you return the device, make sure you remove the print cartridges. Call HP Korea customer support Prepare the device for shipment If after contacting HP Customer Support or returning to the point of purchase, you are requested to send the device in for service, make... returning your device for shipment 153 For instructions on how to pack your device: • The print cartridges • The control-panel faceplate • The power cord, USB cable, and any other cable connected to customers in Japan.
... contains the following items before shipment Before you return the device, make sure you remove the print cartridges. Call HP Korea customer support Prepare the device for shipment If after contacting HP Customer Support or returning to the point of purchase, you are requested to send the device in for service, make... returning your device for shipment 153 For instructions on how to pack your device: • The print cartridges • The control-panel faceplate • The power cord, USB cable, and any other cable connected to customers in Japan.
User Guide
Page 158
...-panel faceplate Complete the following these steps. CAUTION: The device must be shipped with the device unless the HP customer support call agent instructs you can unplug the power cord and then manually slide the print carriage to the far right side to . 5. Remove the print cartridges from... Turn on , you to remove the print cartridges. 2. Do not send them aside. Store the power cord in Japan. CAUTION: The replacement device will not dry out, and put them with a power cord. NOTE: This information does not apply to step 2. After the scanner is idle and silent.
...-panel faceplate Complete the following these steps. CAUTION: The device must be shipped with the device unless the HP customer support call agent instructs you can unplug the power cord and then manually slide the print carriage to the far right side to . 5. Remove the print cartridges from... Turn on , you to remove the print cartridges. 2. Do not send them aside. Store the power cord in Japan. CAUTION: The replacement device will not dry out, and put them with a power cord. NOTE: This information does not apply to step 2. After the scanner is idle and silent.

User Guide
Page 159
Do not return the power cord with the device for instructions on how to attach your control-panel faceplate. b. Pack the device 155 Press the Power button to pry the control-panel faceplate off the device. 2. Remove the control-panel faceplate as follows: a. Use either your finger or ... faceplate. NOTE: See the setup poster that came with the device. 3. The replacement device might not come with the device. Unplug the power cord, and then disconnect it from the device. Pack the device Complete the following steps after you have prepared the device for setting up your ...
Do not return the power cord with the device for instructions on how to attach your control-panel faceplate. b. Pack the device 155 Press the Power button to pry the control-panel faceplate off the device. 2. Remove the control-panel faceplate as follows: a. Use either your finger or ... faceplate. NOTE: See the setup poster that came with the device. 3. The replacement device might not come with the device. Unplug the power cord, and then disconnect it from the device. Pack the device Complete the following steps after you have prepared the device for setting up your ...

User Guide
Page 167
...; FCC statement • Notice to users in Korea • VCCI (Class B) compliance statement for users in Japan • Notice to users in Japan about the power cord • RoHS notices (China only) • Noise emission statement for Australia and New Zealand with phone handset • Regulatory model number • Declaration of the...
...; FCC statement • Notice to users in Korea • VCCI (Class B) compliance statement for users in Japan • Notice to users in Japan about the power cord • RoHS notices (China only) • Noise emission statement for Australia and New Zealand with phone handset • Regulatory model number • Declaration of the...
User Guide
Page 169
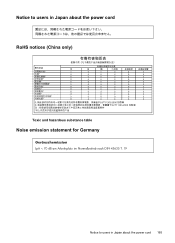
Notice to users in Japan about the power cord RoHS notices (China only) Toxic and hazardous substance table Noise emission statement for Germany Geräuschemission LpA < 70 dB am Arbeitsplatz im Normalbetrieb nach DIN 45635 T. 19 Notice to users in Japan about the power cord 165
Notice to users in Japan about the power cord RoHS notices (China only) Toxic and hazardous substance table Noise emission statement for Germany Geräuschemission LpA < 70 dB am Arbeitsplatz im Normalbetrieb nach DIN 45635 T. 19 Notice to users in Japan about the power cord 165


