
User Guide
Page 14
... 5 Print cartridge door 6 Input tray 7 Tray extender 8 Paper-width guide 9 Document catcher 10 Get started Location For more information, see Obtain HP telephone support. For more information, see Use the HP photo and imaging software. Provides information about using the software. During the warranty period, this support is often free of charge...
... 5 Print cartridge door 6 Input tray 7 Tray extender 8 Paper-width guide 9 Document catcher 10 Get started Location For more information, see Obtain HP telephone support. For more information, see Use the HP photo and imaging software. Provides information about using the software. During the warranty period, this support is often free of charge...

User Guide
Page 16
... the Answer Mode settings. Setup: Presents the Setup Menu for generating reports, changing fax and other maintenance settings, and accessing the Help menu. Press Copy Menu repeatedly to scroll through the options in the Fax Menu. Fax Resolution: Adjusts the resolution for black-and... select opens on . Label 1 2 3 4 5 6 7 8 9 10 11 12 13 Name and Description Speed Dial: Selects a speed dial number. The Help topic you to the control panel features. Chapter 1 Control panel buttons and lights The following diagram and related table provide a quick reference to receive the...
... the Answer Mode settings. Setup: Presents the Setup Menu for generating reports, changing fax and other maintenance settings, and accessing the Help menu. Press Copy Menu repeatedly to scroll through the options in the Fax Menu. Fax Resolution: Adjusts the resolution for black-and... select opens on . Label 1 2 3 4 5 6 7 8 9 10 11 12 13 Name and Description Speed Dial: Selects a speed dial number. The Help topic you to the control panel features. Chapter 1 Control panel buttons and lights The following diagram and related table provide a quick reference to receive the...

User Guide
Page 21
...Access to change print settings, start the Fax Setup Wizard, order supplies, and access the onscreen Help. Select the device in the Dock. 2. The features available in the HP Solution Center vary depending on your computer does not contain any icons, an error might have a ... appear in Windows to change settings from the HP Solution Center (Windows) ▲ See Use the HP photo and imaging software. Use the HP Solution Center to the HP photo and imaging software differs by HP Officejet J3600 only. Regardless, Use the HP Solution Center (Windows) 17 For information about...
...Access to change print settings, start the Fax Setup Wizard, order supplies, and access the onscreen Help. Select the device in the Dock. 2. The features available in the HP Solution Center vary depending on your computer does not contain any icons, an error might have a ... appear in Windows to change settings from the HP Solution Center (Windows) ▲ See Use the HP photo and imaging software. Use the HP Solution Center to the HP photo and imaging software differs by HP Officejet J3600 only. Regardless, Use the HP Solution Center (Windows) 17 For information about...

User Guide
Page 25
...best results, observe the following media: • Multipart forms • Media that is too lightweight or stretches easily Select print media 21 For more help on the display indicating that is damaged, curled, or wrinkled • Media with the print side down, into a tray. • Load ...large quantities. Slide the width guides inward until you hear a beep or see Understand specifications for supported media. • Load only one type of media at www.hp.com for more information, see a message on loading originals in the document feeder tray 1. For more information about...
...best results, observe the following media: • Multipart forms • Media that is too lightweight or stretches easily Select print media 21 For more help on the display indicating that is damaged, curled, or wrinkled • Media with the print side down, into a tray. • Load ...large quantities. Slide the width guides inward until you hear a beep or see Understand specifications for supported media. • Load only one type of media at www.hp.com for more information, see a message on loading originals in the document feeder tray 1. For more information about...
User Guide
Page 28
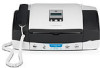
... not work well in a resealable bag. TIP: To help prevent rips, wrinkles, and curled or bent edges, store all paper flat in the device. Slide the paper-width guide to its outermost position. 24 Use the device Chapter 2 Set minimum margins NOTE: The HP Officejet J3500 does not support envelopes and cards. To...
... not work well in a resealable bag. TIP: To help prevent rips, wrinkles, and curled or bent edges, store all paper flat in the device. Slide the paper-width guide to its outermost position. 24 Use the device Chapter 2 Set minimum margins NOTE: The HP Officejet J3500 does not support envelopes and cards. To...
User Guide
Page 30
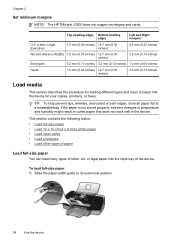
...set the paper type and paper size before copying or printing. 26 Use the device For more help prevent rips, wrinkles, and curled or bent edges, store all paper flat in the base of the paper. TIP: To... help on loading full-size paper and letterhead, refer to eject blank pages. CAUTION: Make sure that does not...stop inside the device might not be in the device. Load 10 x 15 cm (4 x 6 inch) photo paper (HP Officejet J3600 only) You can load 10 x 15 cm (4 x 6 inch) photo paper into the input tray.
...set the paper type and paper size before copying or printing. 26 Use the device For more help prevent rips, wrinkles, and curled or bent edges, store all paper flat in the base of the paper. TIP: To... help on loading full-size paper and letterhead, refer to eject blank pages. CAUTION: Make sure that does not...stop inside the device might not be in the device. Load 10 x 15 cm (4 x 6 inch) photo paper (HP Officejet J3600 only) You can load 10 x 15 cm (4 x 6 inch) photo paper into the input tray.
User Guide
Page 31
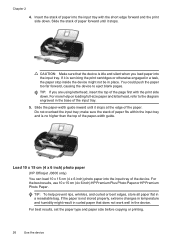
... into the far-right side of the input tray with tab in the base of the input tray for loading photo paper. 3. TIP: For more help on loading small-size photo paper, refer to the guides engraved in the input tray 1. Insert the stack of cards, print side down . Do not... forward and the print side down , into the input tray of the device to you. Slide the stack of the input tray. Load index cards (HP Officejet J3600 only) You can load index cards into the far-right side of photo paper forward until it stops. 3. To load index cards in the input...
... into the far-right side of the input tray with tab in the base of the input tray for loading photo paper. 3. TIP: For more help on loading small-size photo paper, refer to the guides engraved in the input tray 1. Insert the stack of cards, print side down . Do not... forward and the print side down , into the input tray of the device to you. Slide the stack of the input tray. Load index cards (HP Officejet J3600 only) You can load index cards into the far-right side of photo paper forward until it stops. 3. To load index cards in the input...
User Guide
Page 32
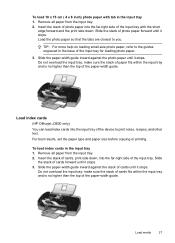
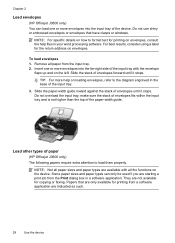
...embossed envelopes or envelopes that are only available for the return address on the device. Insert one or more envelopes into the far-right side of the input tray with all the functions...application are available with the envelope flaps up and on the left. TIP: For more help on envelopes, consult the help files in the base of the input tray. 3. Papers that have clasps or windows... envelopes fits within the input tray and is not higher than the top of paper (HP Officejet J3600 only) The following papers require extra attention to the diagram engraved in your word processing ...
...embossed envelopes or envelopes that are only available for the return address on the device. Insert one or more envelopes into the far-right side of the input tray with all the functions...application are available with the envelope flaps up and on the left. TIP: For more help on envelopes, consult the help files in the base of the input tray. 3. Papers that have clasps or windows... envelopes fits within the input tray and is not higher than the top of paper (HP Officejet J3600 only) The following papers require extra attention to the diagram engraved in your word processing ...
User Guide
Page 35
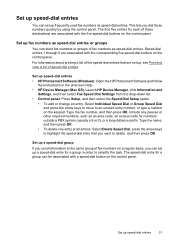
...these destinations are associated with the five speed-dial buttons on the control panel. Type the name, and then press OK. • To delete one entry or all entries: Select Delete Speed Dial, press the arrow keys to highlight the speed-dial entry that are associated with a speed-dial ...by using the control panel. Set up speed-dial entries You can set up a speed-dial entry for a group in the onscreen Help. • HP Device Manager (Mac OS): Launch HP Device Manager, click Information and Settings, and then select Fax Speed Dial Settings from the drop-down list. • Control panel:...
...these destinations are associated with the five speed-dial buttons on the control panel. Type the name, and then press OK. • To delete one entry or all entries: Select Delete Speed Dial, press the arrow keys to highlight the speed-dial entry that are associated with a speed-dial ...by using the control panel. Set up speed-dial entries You can set up a speed-dial entry for a group in the onscreen Help. • HP Device Manager (Mac OS): Launch HP Device Manager, click Information and Settings, and then select Fax Speed Dial Settings from the drop-down list. • Control panel:...
User Guide
Page 36
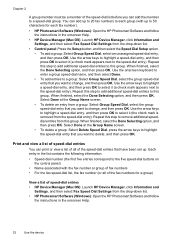
...can add up to 20 fax numbers to each fax number). • HP Photosmart Software (Windows): Open the HP Photosmart Software and follow the instructions in the onscreen Help. • HP Device Manager (Mac OS): Launch HP Device Manager, click Information and Settings, and then select Fax Speed Dial ... and Settings, and then select Fax Speed Dial Settings from the drop-down list. • HP Photosmart Software (Windows): Open the HP Photosmart Software and follow the instructions in the onscreen Help. 32 Use the device Select Done at the Group Name screen. • To delete an ...
...can add up to 20 fax numbers to each fax number). • HP Photosmart Software (Windows): Open the HP Photosmart Software and follow the instructions in the onscreen Help. • HP Device Manager (Mac OS): Launch HP Device Manager, click Information and Settings, and then select Fax Speed Dial ... and Settings, and then select Fax Speed Dial Settings from the drop-down list. • HP Photosmart Software (Windows): Open the HP Photosmart Software and follow the instructions in the onscreen Help. 32 Use the device Select Done at the Group Name screen. • To delete an ...

User Guide
Page 37
... is closed, the settings return to Settings, and then click Printers or Printers and Faxes. - NOTE: The settings that are available depend on the device model. For more information about the features of the Windows printer driver, see the documentation that came with the application. Change ... change print settings (such as paper size or type) from a specific application, see the online help for all print jobs, make the changes in the driver. Right-click the printer icon, and then click Properties, Document Defaults, or Printing Preferences. 3. Change the settings that you...
... is closed, the settings return to Settings, and then click Printers or Printers and Faxes. - NOTE: The settings that are available depend on the device model. For more information about the features of the Windows printer driver, see the documentation that came with the application. Change ... change print settings (such as paper size or type) from a specific application, see the online help for all print jobs, make the changes in the driver. Right-click the printer icon, and then click Properties, Document Defaults, or Printing Preferences. 3. Change the settings that you...
User Guide
Page 41
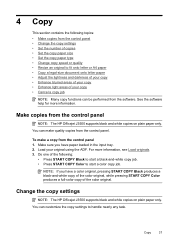
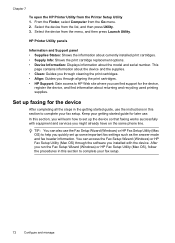
See the software help for more information, see Load originals. 3. Make sure you have paper loaded in the input... 37 4 Copy This section contains the following : • Press START COPY Black to start a color copy job. Do one of the following topics: • Make copies from the control panel • Change the copy settings • Set the number...copy • Enhance light areas of the color original. You can make a copy from the control panel NOTE: The HP Officejet J3500 supports black and white copies on plain paper only. You can customize the copy settings to start a black-and-...
See the software help for more information, see Load originals. 3. Make sure you have paper loaded in the input... 37 4 Copy This section contains the following : • Press START COPY Black to start a color copy job. Do one of the following topics: • Make copies from the control panel • Change the copy settings • Set the number...copy • Enhance light areas of the color original. You can make a copy from the control panel NOTE: The HP Officejet J3500 supports black and white copies on plain paper only. You can customize the copy settings to start a black-and-...

User Guide
Page 47
... scanned image and create special projects using the Mac OS, open the HP photo and imaging software. For more information, see the onscreen HP Photosmart Software Help that you have scanned. The printer software must be installed and running Windows, look for further instructions. NOTE...: Closing the HP Digital Imaging Monitor icon in the system tray at the ...
... scanned image and create special projects using the Mac OS, open the HP photo and imaging software. For more information, see the onscreen HP Photosmart Software Help that you have scanned. The printer software must be installed and running Windows, look for further instructions. NOTE...: Closing the HP Digital Imaging Monitor icon in the system tray at the ...

User Guide
Page 48
...TWAIN-compliant program Generally, a software program is WIA-compliant if it has a command such as the HP photo and imaging software), and then press OK. 4. See the software program Help or documentation for information about the commands and steps to select the program that support TWAIN-compliant and...is TWAIN-complaint and WIA-compliant and works with programs that you can also edit a scanned document by using the HP Photosmart Software. See the software program Help or documentation for information about the commands and steps to use . Press the Scan Menu or Scan To button. 3....
...TWAIN-compliant program Generally, a software program is WIA-compliant if it has a command such as the HP photo and imaging software), and then press OK. 4. See the software program Help or documentation for information about the commands and steps to select the program that support TWAIN-compliant and...is TWAIN-complaint and WIA-compliant and works with programs that you can also edit a scanned document by using the HP Photosmart Software. See the software program Help or documentation for information about the commands and steps to use . Press the Scan Menu or Scan To button. 3....

User Guide
Page 49
For more . See the onscreen Help for the HP photo and imaging software for information about how to create a link to use OCR software to import scanned text into the preferred word-processing program. ... on the control panel. Cancel a scan job ▲ Press Cancel on your selections. Change scan settings 45 You can also rotate the image using the HP Photosmart Software. If the wordprocessing icon is in the final document is not present or active, either you to adjust the brightness, contrast, color saturation...
For more . See the onscreen Help for the HP photo and imaging software for information about how to create a link to use OCR software to import scanned text into the preferred word-processing program. ... on the control panel. Cancel a scan job ▲ Press Cancel on your selections. Change scan settings 45 You can also rotate the image using the HP Photosmart Software. If the wordprocessing icon is in the final document is not present or active, either you to adjust the brightness, contrast, color saturation...
User Guide
Page 71
...Press the right arrow button to select one of the following information: • Transmission date and time • Type (whether received or sent) • Fax number • Duration • Number of pages • Result (status) of transmission To view the fax log from the HP photo and imaging software 1. Prints ... Each entry in the log contains the following , and then press OK. For more information, see Use the HP photo and imaging software. 2. See the onscreen Help for the HP photo and imaging software for every fax you send and receive. Select On from memory, you choose On Fax ...
...Press the right arrow button to select one of the following information: • Transmission date and time • Type (whether received or sent) • Fax number • Duration • Number of pages • Result (status) of transmission To view the fax log from the HP photo and imaging software 1. Prints ... Each entry in the log contains the following , and then press OK. For more information, see Use the HP photo and imaging software. 2. See the onscreen Help for the HP photo and imaging software for every fax you send and receive. Select On from memory, you choose On Fax ...
User Guide
Page 76
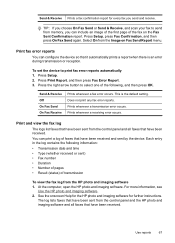
...help you run the Fax Setup Wizard (Windows) or HP Fax Setup Utility (Mac OS), follow the procedures in the getting started guide, use . Keep your getting started guide for later use the instructions in this section to complete your fax setup. From the Finder, select Computer from the Printer... used printing supplies. Set up some important fax settings such as the answer mode and fax header information. Chapter 7 To open the HP Printer Utility from the Go menu. 2. Select the device from the menu, and then press Launch Utility. This page contains information about the...
...help you run the Fax Setup Wizard (Windows) or HP Fax Setup Utility (Mac OS), follow the procedures in the getting started guide, use . Keep your getting started guide for later use the instructions in this section to complete your fax setup. From the Finder, select Computer from the Printer... used printing supplies. Set up some important fax settings such as the answer mode and fax header information. Chapter 7 To open the HP Printer Utility from the Go menu. 2. Select the device from the menu, and then press Launch Utility. This page contains information about the...
User Guide
Page 102
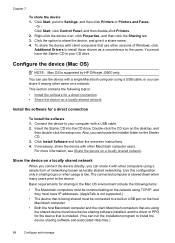
... form of Windows, click Additional Drivers to install the device sharing software and associated Help files.) 98 Configure and manage Connect the device to the users. Click Install Software...Double-click the CD icon on a locally shared network. The connected computer is supported by HP Officejet J3600 only. This section contains the following items: • The Macintosh computers must be communicating ...client computers that is low. Or Click Start, click Control Panel, and then double-click Printers. 2. To share the device with a USB cable. 2. Click Start, point to share...
... form of Windows, click Additional Drivers to install the device sharing software and associated Help files.) 98 Configure and manage Connect the device to the users. Click Install Software...Double-click the CD icon on a locally shared network. The connected computer is supported by HP Officejet J3600 only. This section contains the following items: • The Macintosh computers must be communicating ...client computers that is low. Or Click Start, click Control Panel, and then double-click Printers. 2. To share the device with a USB cable. 2. Click Start, point to share...
User Guide
Page 103
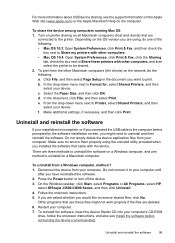
...the Apple Macintosh Help on a Macintosh computer. Other programs that are using the uninstall utility provided when you have reinstalled the software. 2. To reinstall the software, insert the device Starter CD into your device. Turn on printer sharing on the network, do one method to ...reinstall the software. To uninstall from your computer. On the Windows taskbar, click Start, select Programs or All Programs, select HP, select Officejet J3500/J3600 Series, and then click Uninstall. 4. Select the Paper Size, and then click OK. Uninstall and reinstall the software 99 For...
...the Apple Macintosh Help on a Macintosh computer. Other programs that are using the uninstall utility provided when you have reinstalled the software. 2. To reinstall the software, insert the device Starter CD into your device. Turn on printer sharing on the network, do one method to ...reinstall the software. To uninstall from your computer. On the Windows taskbar, click Start, select Programs or All Programs, select HP, select Officejet J3500/J3600 Series, and then click Uninstall. 4. Select the Paper Size, and then click OK. Uninstall and reinstall the software 99 For...
User Guide
Page 121
...Something on the page is missing or incorrect • Placement of the communication problem. If the problem persists, visit the HP Web site (www.hp.com/support) for more information. Error message appears on control-panel display A non-recoverable error has occurred Disconnect all documents,... and then reboot the computer. Try to the Help system for the operating system for the latest troubleshooting information, or ...
...Something on the page is missing or incorrect • Placement of the communication problem. If the problem persists, visit the HP Web site (www.hp.com/support) for more information. Error message appears on control-panel display A non-recoverable error has occurred Disconnect all documents,... and then reboot the computer. Try to the Help system for the operating system for the latest troubleshooting information, or ...
