
Weider 8620 Support Question
Weider 8620 Support Question
Find answers below for this question about Weider 8620.Need a Weider 8620 manual? We have 1 online manual for this item!
Question posted by DWS1926 on January 18th, 2024
Weider 8620 Assembley For Cables
model 8620 cable assembly
Current Answers
Answer #1: Posted by Technicalproblemsolver on January 20th, 2024 2:09 PM
Technicalproblemsolver

Member since:
September 25th, 2023 Points: 190,500

Member since:
September 25th, 2023 Points: 190,500
Read the procedure in the user manual via this link below
https://www.manualowl.com/m/Weider/8620/Manual/340946?page=10
"Hi there,
I hope my response was helpful in addressing your question or concern. If you found it valuable, I kindly ask you to consider accepting my answer by clicking the designated button. Your support will not only acknowledge my efforts but also guide others in finding useful solutions. Thank you for your trust and I'm ready to assist you further if needed.
Best regards,
Technicalproblemsolver"
Related Weider 8620 Manual Pages
English Manual - Page 1
..., or if there are missing/damaged parts, we are committed to you complete satisfaction through direct assistance from our factory. PATENT PENDING
USERÕS MANUAL Model No.
English Manual - Page 2
...fitness for commercial or rental purposes, or products used as store display models...specific legal rights. WEIDER is limited in ...assembly.
ICON HEALTH & FITNESS, INC., 1500 S. 1000 W., LOGAN, UT 84321-9813
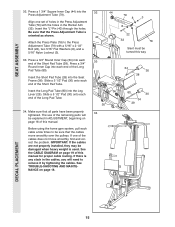
2 Table of Contents
LIMITED WARRANTY 2 IMPORTANT PRECAUTIONS 3 BEFORE YOU BEGIN 4 ASSEMBLY 5 ADJUSTMENT 16 WEIGHT RESISTANCE CHART 17 TROUBLE-SHOOTING AND MAINTENANCE 18 CABLE...
English Manual - Page 3

... to be used by or through the use only. Replace any commercial, rental, or institutional setting. Make sure that the cables remain on a foot plate when performing an exercise that the cables are exercising, stop immediately and begin cooling down.
9. Do not use the lat bar.
14. ICON assumes no responsibility for personal injury...
English Manual - Page 4
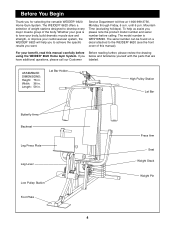
... of weight stations designed to the WEIDER¨ 8620 (see the front cover of the body.
ASSEMBLED DIMENSIONS: Height: 76 in . Whether your goal is WESY85290. To help you to tone your body, build dramatic muscle size and strength, or improve your benefit, read this manual).
until 6 p.m. The model number is to achieve the...
English Manual - Page 5
... in the drawings.
¥ Tighten all parts of ratchet wrenches.
1.
Press a 2Ó Square Inner Cap (27) into four stages: 1) frame assembly, 2) press and butterfly arm assembly, 3) cable and pulley assembly, and 4) seat and backrest assembly.
Do not tighten the Nylon Locknuts yet.
1 5
51
High Side of the Base (4) onto the 5/16Ó x 2 3/4Ó Carriage Bolts...
English Manual - Page 6
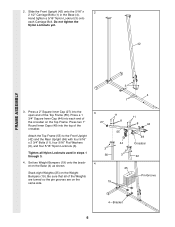
... the top of the Weights are turned so the pin grooves are on the Top Frame. 2. Do not tighten the
Nylon Locknuts yet.
42
FRAME ASSEMBLY
3
4 1
3. Attach the Top Frame (55) to the Front Upright (42) and the Rear Upright (56) with four 5/16Ó x 2 3/4Ó Bolts (11), four 5/16Ó...
English Manual - Page 7
...(21).
21
4 ÑTube
Welded Spacers
75
7
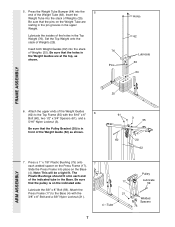
ARM ASSEMBLY Be sure that the pulley is in the Top Weight (76).
Note: This will be a tight fit.
Lubricate the insides of the holes in front of Weights (...stack of the Weight Guide (62) as shown.
76 Pins
Holes
62
Lubricate 63
64
FRAME ASSEMBLY
25
6.
Be sure that the holes in the upper
Weight.
5. Set the Top Weight ...
English Manual - Page 8
...44) into the lower ends of the handle.
Assemble the other end of the Right and Left Arms (47, 48). Attach a ÒVÓ-Pulley (6) and a Long Cable Trap (50) to identify the Right Arm. Slide...).
8 31
44
49
46
22
9
50
6
Welded Brackets
48
3 17
7
50
6
21
44 49 46
47
ARM ASSEMBLY
10. Slide a 10Ó Pad (45) onto the lower end of a Press Arm (46). Note: Be careful not ...
English Manual - Page 10
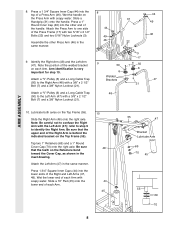
... groove of this section, identify the Long Cable (23) and the Short Cable (58) by comparing the lengths of the Pulley and that
the Cable is on the
indicated side of the cables. Be sure that the
Cable is between the Pulley and the hook. IMPORTANT: While assembling the cables, do not overtighten the bolts and nuts...
English Manual - Page 11
...Locknut (not shown).
50 7 6
48 23
19. Be sure that the Cable is in the groove of the Pulley and that the Cable and Pulley move
21
smoothly.
11 See the inset drawing.
Note: The 3 ...12)
55
and the 3/8Ó Nylon Locknut (21).
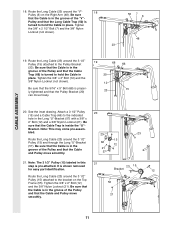
CABLE ASSEMBLY
18. Route the Long Cable (23) around the 3 1/2Ó
Pulley (15) attached to hold the Cable in the groove of the ÒVÓ- Note: ...
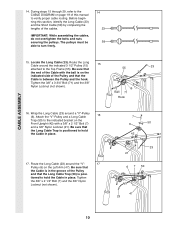
English Manual - Page 12
... 3 1/2Ó Pulley (15) labeled in place and that the Cable is routed around the Pulley as shown. It is pre-attached. ...Cable Trap (66) is routed
around a ÒVÓ-
Be sure that the Cable Trap (66) is turned to the Rocker Arm (32) with a 3/8Ó x 2 1/2Ó Bolt (7)
and a 3/8Ó Nylon Locknut (21). CABLE ASSEMBLY
22. Pulley (6). Attach the Pulley to hold the Cable...
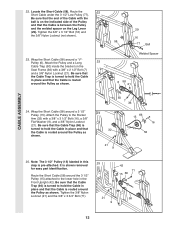
English Manual - Page 13
... in the Press Frame (17). Do not
completely tighten the Nylon Locknut. Note: The 3 1/2Ó Pulley (15) labeled in the
inset drawing.
2 57
10
58
CABLE ASSEMBLY
2
10
57
58
13 It is pre-attached. It is pre-attached. Attach the end of threads are
showing above the nut, as shown. Route...
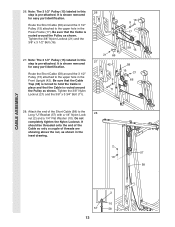
English Manual - Page 14
...(10). Attach the other end of turns, as shown in
the inset drawing. Do not com- Attach the Long Cable (23) to the Weight Tube (63) with a 1/4Ó Flat Washer (10) onto the Carriage Bolt. Tighten... x 2 1/2Ó Carriage Bolt (38) into
31
the center hole in the Seat Frame (36). CABLE ASSEMBLY
29. pletely tighten the Nylon Locknut. Insert the 1/4Ó x 2 1/2Ó Carriage Bolt (38) ...
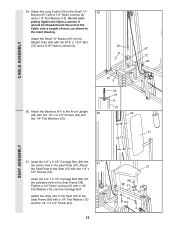
English Manual - Page 15
... of this way
33
34 30
28
36
30 34
80
30
34 29
DECAL PLACEMENT
15 See the CABLE DIAGRAM on page 16 of the Short Pad Tube. If there is any slack in ADJUSTMENT, beginning on ... used. Insert the Short Pad Tube (28) into each cable a few times to the Press Adjustment Tube (79) with the holes in the Rocker Arm (32). SEAT ASSEMBLY
32. Press a 3/4Ó Round Inner Cap into the Seat...
English Manual - Page 16
...
58 53
52
54
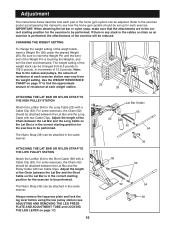
39 Adjust the length of the Weight Pin is in the correct starting position for the exercise to be attached between the Lat Bar and the Short Cable so the Lat Bar is performed, the effectiveness of resistance at each weight station.
25 26
ATTACHING THE LAT BAR...
English Manual - Page 17

...Pin (40) through the hole in the Leg Lever and the hole in individual weight plates, as well as friction between the cables, pulleys, and weight guides.
17 Weight resistance shown for each station. ÒTopÓ refers to the 12.5 lb....the Press Adjustment Tube off the bracket on the Rocker Arm (32). top weight. For some exercises, the Press Adjustment Tube (79) must be removed.
English Manual - Page 18
... you use solvents. Do not use the home gym system. Be sure that the Cable trap is felt, the cables should be tightened. The home gym system can be replaced, see ORDERING REPLACEMENT PARTS ...on the home gym system, can be lifted off the pulleys often, the cable may need to remove the Small ÒUÓ-Bracket (67) from the Weight Tube (not shown) or...
English Manual - Page 19
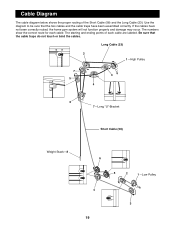
... Cable (58)
Weight StackÑ8
6
5
2
1ÑLow Pulley
4 3
19
Be sure that the two cables and the cable traps have not been correctly routed, the home gym system will not function properly and damage may occur. The starting and ending points of the Short Cable (58) and the Long Cable (23). If the cables have been assembled...
English Manual - Page 23

... 3/8Ó Nylon Locknut 5/16Ó x 2 1/2Ó Bolt Long Cable 1/4Ó x 2 1/4Ó Screw Weight Weight Pin 2Ó Square ...Strap ÒLÓ-Pin Backrest
Key No. WESY85290
R0699A
Key No. Part ListÑModel No. Qty.
42
1
43
2
44
10
45
2
46
2
47
1
48...Exercise Poster
Note: Ò#Ó indicates a non-illustrated part. Specifications are subject to change without notice...
English Manual - Page 25

... information:
1.
Part No. 156863 J01539-C R0699A
Printed in Canada © 1999 ICON Health & Fitness, Inc. Ordering Replacement Parts
To order replacement parts, simply call our Customer Service Department toll-free ...of this manual).
4. until 6 p.m. The MODEL NUMBER of the product (WEIDER¨ 8620 Home Gym System).
3. Mountain Time (excluding holidays). The NAME of the product (WESY85290...
Similar Questions

What Length Of Cable I Needed For Welder 8515 Home Gym
I have a welder 8515 home gym set I can't find the serial number for the cables needed I noticed it'...
I have a welder 8515 home gym set I can't find the serial number for the cables needed I noticed it'...
(Posted by jaguarparkside 2 years ago)

I Need A Replacement Cable For My Welder Pro 8900 Do You Guys Carry One?
(Posted by mjdunkin21 3 years ago)
What Is The Piece Sticking Out Between Your Legs When You Sit On A Weider 8620
plus the wierd piece sticking straight up that it is attached
plus the wierd piece sticking straight up that it is attached
(Posted by misssjx 4 years ago)

Threading Cable
how do you threAd the long low cable thru the pulleys? The cable has balls at the end.
how do you threAd the long low cable thru the pulleys? The cable has balls at the end.
(Posted by Thomasburniche 8 years ago)

Cable Assembly
how do I run the cable assembly on the weider pro 4250?the diagrams seem to stop mid air.
how do I run the cable assembly on the weider pro 4250?the diagrams seem to stop mid air.
(Posted by jawsaw0328 8 years ago)