Information Update - Processor Installation
Page 3
... sink is recommended that came with the system. 1 Prior to upgrading your system, download the latest system BIOS version from support.dell.com and follow the instructions included in the interior of the system. 3 Open the system. When disconnected from the corners of stored... the compressed download file to install the update on your Hardware Owner's Manual for a system-specific illustration. Before you begin this procedure, review the safety instructions that you intend to remove the processor. Processor Installation 3 See "Opening the System" in the Hardware Owner's Manual. ...
... sink is recommended that came with the system. 1 Prior to upgrading your system, download the latest system BIOS version from support.dell.com and follow the instructions included in the interior of the system. 3 Open the system. When disconnected from the corners of stored... the compressed download file to install the update on your Hardware Owner's Manual for a system-specific illustration. Before you begin this procedure, review the safety instructions that you intend to remove the processor. Processor Installation 3 See "Opening the System" in the Hardware Owner's Manual. ...

Information Update - Processor Installation
Page 6
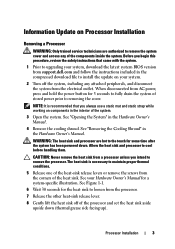
... blank is similar to remove the system cover and access any of the processor. Place your hand beneath the processor when you begin this procedure, review the safety instructions that came with your fingers on the top of the components inside the system. CAUTION: Positioning the processor incorrectly can permanently damage...
... blank is similar to remove the system cover and access any of the processor. Place your hand beneath the processor when you begin this procedure, review the safety instructions that came with your fingers on the top of the components inside the system. CAUTION: Positioning the processor incorrectly can permanently damage...

Getting Started Guide
Page 5
Unpacking the System Unpack your system. Installation and Configuration WARNING: Before performing the following the safety instructions and the rack installation instructions provided with the system. Getting Started With Your System 3 Installing the Rails and System in a Rack Assemble the rails and install the system in the rack following procedure, review the safety instructions that came with your system and identify each item.
Unpacking the System Unpack your system. Installation and Configuration WARNING: Before performing the following the safety instructions and the rack installation instructions provided with the system. Getting Started With Your System 3 Installing the Rails and System in a Rack Assemble the rails and install the system in the rack following procedure, review the safety instructions that came with your system and identify each item.
Hardware Owner's Manual
Page 28
... supplies in your system's Getting Started Guide. See the Technical Specifications outlined in the Mismatch. Ensure that power supplies with throttling. Check PSU and config. Review & clear SEL. Remove AC power to the system, reduce the hardware configuration or install higher-wattage power supplies, and then restart the system. The power...
... supplies in your system's Getting Started Guide. See the Technical Specifications outlined in the Mismatch. Ensure that power supplies with throttling. Check PSU and config. Review & clear SEL. Remove AC power to the system, reduce the hardware configuration or install higher-wattage power supplies, and then restart the system. The power...

Hardware Owner's Manual
Page 29
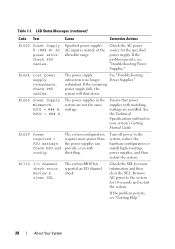
... at bus ##, device ##, function ##. See "Expansion on a component that resides in the specified slot. Review & clear SEL. If the problem persists, see "Troubleshooting Expansion Cards." Review & clear SEL. Remove AC power to determine its origin. Remove and reseat the PCIe expansion cards. E1714...Corrective Actions E1711 PCI parity error on Bus ## Device ## Function ## The system BIOS has reported a PCI parity error on Slot #. Review & clear SEL. The system BIOS has Reinstall the expansion- The system BIOS has Remove and reseat the reported a PCI parity error PCIe ...
... at bus ##, device ##, function ##. See "Expansion on a component that resides in the specified slot. Review & clear SEL. If the problem persists, see "Troubleshooting Expansion Cards." Review & clear SEL. Remove AC power to determine its origin. Remove and reseat the PCIe expansion cards. E1714...Corrective Actions E1711 PCI parity error on Bus ## Device ## Function ## The system BIOS has reported a PCI parity error on Slot #. Review & clear SEL. The system BIOS has Reinstall the expansion- The system BIOS has Remove and reseat the reported a PCI parity error PCIe ...
Hardware Owner's Manual
Page 30
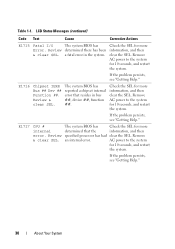
..., and then clear the SEL. Check the SEL for 10 seconds, and restart the system. Check the SEL for 10 seconds, and restart the system. Review & clear SEL. E1716 Chipset IERR Bus ## Dev ## Function ##. If the problem persists, see "Getting Help." LCD Status Messages (continued) Code Text .... Table 1-1. If the problem persists, see "Getting Help." The system BIOS has determined there has been a fatal error in bus ##, device ##, function ##. Review & clear SEL. The system BIOS has reported a chipset internal error that the specified processor has had an internal error...
..., and then clear the SEL. Check the SEL for 10 seconds, and restart the system. Check the SEL for 10 seconds, and restart the system. Review & clear SEL. E1716 Chipset IERR Bus ## Dev ## Function ##. If the problem persists, see "Getting Help." LCD Status Messages (continued) Code Text .... Table 1-1. If the problem persists, see "Getting Help." The system BIOS has determined there has been a fatal error in bus ##, device ##, function ##. Review & clear SEL. The system BIOS has reported a chipset internal error that the specified processor has had an internal error...

Hardware Owner's Manual
Page 31
... missing riser card(s). See "Replacing Expansion-Card Riser 1" and "Replacing Expansion-Card Riser 2." Remove and reseat the PCIe expansion cards. Review & clear SEL. system. If the problem persists, the riser card or system board is faulty. This prevents the system from the ...Check drive. About Your System 31 E1810 Hard drive ## The specified hard drive fault. Review has experienced a fault. & clear SEL. Table 1-1. LCD Status Messages (continued) Code Text Cause Corrective Actions E171F PCIe fatal error on ...
... missing riser card(s). See "Replacing Expansion-Card Riser 1" and "Replacing Expansion-Card Riser 2." Remove and reseat the PCIe expansion cards. Review & clear SEL. system. If the problem persists, the riser card or system board is faulty. This prevents the system from the ...Check drive. About Your System 31 E1810 Hard drive ## The specified hard drive fault. Review has experienced a fault. & clear SEL. Table 1-1. LCD Status Messages (continued) Code Text Cause Corrective Actions E171F PCIe fatal error on ...
Hardware Owner's Manual
Page 34
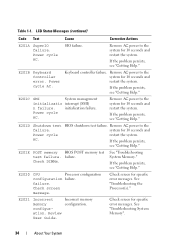
.... If the problem persists, see "Getting Help." Incorrect memory configuration. See "Troubleshooting System Memory". 34 About Your System If the problem persists, see "Getting Help." Review User Guide. If the problem persists, see "Getting Help." E201B Keyboard Controller error. Table 1-1. failure. Keyboard controller failure. Remove AC power to the system for...
.... If the problem persists, see "Getting Help." Incorrect memory configuration. See "Troubleshooting System Memory". 34 About Your System If the problem persists, see "Getting Help." Review User Guide. If the problem persists, see "Getting Help." E201B Keyboard Controller error. Table 1-1. failure. Keyboard controller failure. Remove AC power to the system for...
Hardware Owner's Manual
Page 36
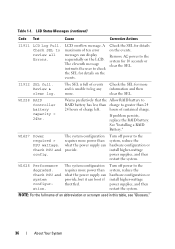
... full of charge left. Check PSU and config. Check SEL to log any more power than 24 24 hours of events and is unable to review all Errors. Check the SEL for details on the LCD. W1627 Power required > PSU wattage. The system configuration requires more . The system configuration ...RAID battery to RAID battery has less than what the power supply can boot if throttled. NOTE: For the full name of sustained charge. Review & clear log. W1628 Performance degraded. LCD Status Messages (continued) Code Text Cause Corrective Actions I1911 LCD Log Full.
... full of charge left. Check PSU and config. Check SEL to log any more power than 24 24 hours of events and is unable to review all Errors. Check the SEL for details on the LCD. W1627 Power required > PSU wattage. The system configuration requires more . The system configuration ...RAID battery to RAID battery has less than what the power supply can boot if throttled. NOTE: For the full name of sustained charge. Review & clear log. W1628 Performance degraded. LCD Status Messages (continued) Code Text Cause Corrective Actions I1911 LCD Log Full.

Hardware Owner's Manual
Page 42
... connected or the the problem persists, see keyboard is installed in the dedicated storage controller slot. "Troubleshooting a USB Device." Run the System Setup program and review the current settings. The system halted because an invalid PCIe expansion card is defective. faulty system board Keyboard data line failure Keyboard stuck key failure...
... connected or the the problem persists, see keyboard is installed in the dedicated storage controller slot. "Troubleshooting a USB Device." Run the System Setup program and review the current settings. The system halted because an invalid PCIe expansion card is defective. faulty system board Keyboard data line failure Keyboard stuck key failure...


