Hardware Owner's Manual
Page 24
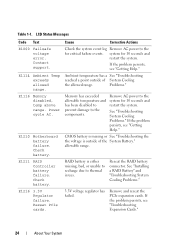
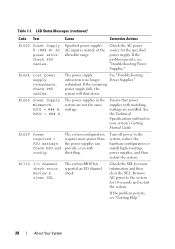
...Ambient temperature has a See "Troubleshooting reached a point outside of System Cooling the allowed range. See "Troubleshooting System Cooling Problems." Check battery. Reseat PCIe cards. Table 1-1. Cause Corrective Actions Check the system event log Remove AC power to thermal issues. allowable range.... LCD Status Messages Code Text E1000 Failsafe voltage error. RAID battery is outside of the System Battery." Power cycle AC. CMOS...
...Ambient temperature has a See "Troubleshooting reached a point outside of System Cooling the allowed range. See "Troubleshooting System Cooling Problems." Check battery. Reseat PCIe cards. Table 1-1. Cause Corrective Actions Check the system event log Remove AC power to thermal issues. allowable range.... LCD Status Messages Code Text E1000 Failsafe voltage error. RAID battery is outside of the System Battery." Power cycle AC. CMOS...

Hardware Owner's Manual
Page 25
... Reseat DIMMs. Reseat the memory modules. See "Troubleshooting System Cooling Problems." Reseat the processor(s). voltage regulator has failed. If the problem persists, see "Getting Help." Table 1-1. See "Troubleshooting the Processor(s)."... E122C CPU Power Fault. Failed. E1311 Fan module ## RPM exceeding range. RPM of specified fan in specified module is outside of the intended operating range. About Your System 25 Reseat CPU. E1310 Fan ## RPM exceeding range. LCD...
... Reseat DIMMs. Reseat the memory modules. See "Troubleshooting System Cooling Problems." Reseat the processor(s). voltage regulator has failed. If the problem persists, see "Getting Help." Table 1-1. See "Troubleshooting the Processor(s)."... E122C CPU Power Fault. Failed. E1311 Fan module ## RPM exceeding range. RPM of specified fan in specified module is outside of the intended operating range. About Your System 25 Reseat CPU. E1310 Fan ## RPM exceeding range. LCD...
Hardware Owner's Manual
Page 26
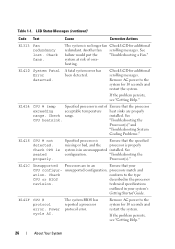
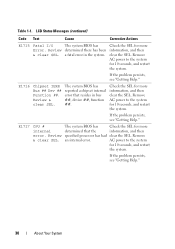
... at risk of Ensure that the processor exceeding acceptable temperature heat sinks are in the processor revision. "Troubleshooting the Processor(s)" and "Troubleshooting System Cooling Problems." E1418 CPU # not detected. "Troubleshooting the Processor(s)." processors match and ation. Table 1-1. LCD Status Messages (continued) Code Text Cause Corrective Actions E1313 Fan redundancy lost. detected. Check...
... at risk of Ensure that the processor exceeding acceptable temperature heat sinks are in the processor revision. "Troubleshooting the Processor(s)" and "Troubleshooting System Cooling Problems." E1418 CPU # not detected. "Troubleshooting the Processor(s)." processors match and ation. Table 1-1. LCD Status Messages (continued) Code Text Cause Corrective Actions E1313 Fan redundancy lost. detected. Check...
Hardware Owner's Manual
Page 27
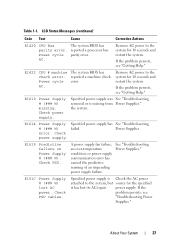
If the problem persists, see "Troubleshooting Power Supplies." Power Supplies error. Check power supply. power supply. Table 1-1. reported a processor bus Power cycle parity error. Power cycle AC. Check power supply. E161C Power Supply # (### W) lost its AC input. LCD Status Messages (continued) Code ...See "Troubleshooting Power Supplies." Check PSU cables. Remove AC power to the system for 10 seconds and restart the system. If the problem persists, see "Getting Help." AC. Remove AC power to the system, but source for the specified it has lost AC power....
If the problem persists, see "Troubleshooting Power Supplies." Power Supplies error. Check power supply. power supply. Table 1-1. reported a processor bus Power cycle parity error. Power cycle AC. Check power supply. E161C Power Supply # (### W) lost its AC input. LCD Status Messages (continued) Code ...See "Troubleshooting Power Supplies." Check PSU cables. Remove AC power to the system for 10 seconds and restart the system. If the problem persists, see "Getting Help." AC. Remove AC power to the system, but source for the specified it has lost AC power....
Hardware Owner's Manual
Page 28
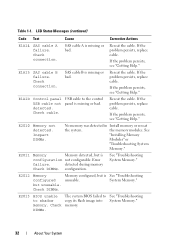
...subsystem is outside of the allowable range. The system BIOS has reported an I /O channel check error. Check PSU cables. If the problem persists, see "Getting Help." 28 About Your System If the remaining power supply fails, the system will shut down. Review & clear...config. Ensure that power supplies with throttling. The system configuration requires more information and then clear the SEL. Table 1-1. PSU2 = ### W. LCD Status Messages (continued) Code Text Cause Corrective Actions E1620 Power Supply # (### W) AC power error. Check the AC power source for more...
...subsystem is outside of the allowable range. The system BIOS has reported an I /O channel check error. Check PSU cables. If the problem persists, see "Getting Help." 28 About Your System If the remaining power supply fails, the system will shut down. Review & clear...config. Ensure that power supplies with throttling. The system configuration requires more information and then clear the SEL. Table 1-1. PSU2 = ### W. LCD Status Messages (continued) Code Text Cause Corrective Actions E1620 Power Supply # (### W) AC power error. Check the AC power source for more...

Hardware Owner's Manual
Page 29
... Expansion Cards." E1712 PCI system error on Slot #. resides in PCI "Troubleshooting configuration space at bus ##, device ##, function ##. If the problem persists, the riser card or system board is unable to the system for more information and then clear the SEL. The system BIOS has ...determined there has been an error in the system, but is faulty. Check the SEL for 10 seconds and restart the system. Table 1-1. LCD Status Messages (continued) Code Text Cause Corrective Actions E1711 PCI parity error on Bus ## Device ## Function ## The system BIOS has reported a...
... Expansion Cards." E1712 PCI system error on Slot #. resides in PCI "Troubleshooting configuration space at bus ##, device ##, function ##. If the problem persists, the riser card or system board is unable to the system for more information and then clear the SEL. The system BIOS has ...determined there has been an error in the system, but is faulty. Check the SEL for 10 seconds and restart the system. Table 1-1. LCD Status Messages (continued) Code Text Cause Corrective Actions E1711 PCI parity error on Bus ## Device ## Function ## The system BIOS has reported a...
Hardware Owner's Manual
Page 30
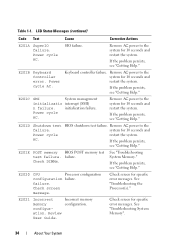
..., and restart the system. The system BIOS has determined that resides in the system. E1716 Chipset IERR Bus ## Dev ## Function ##. LCD Status Messages (continued) Code Text Cause Corrective Actions E1715 Fatal I/O Error. Review & clear SEL. Remove AC power to the system for more...and then clear the SEL. The system BIOS has reported a chipset internal error that the specified processor has had an internal error. If the problem persists, see "Getting Help." 30 About Your System The system BIOS has determined there has been a fatal error in bus ##, device ##,...
..., and restart the system. The system BIOS has determined that resides in the system. E1716 Chipset IERR Bus ## Dev ## Function ##. LCD Status Messages (continued) Code Text Cause Corrective Actions E1715 Fatal I/O Error. Review & clear SEL. Remove AC power to the system for more...and then clear the SEL. The system BIOS has reported a chipset internal error that the specified processor has had an internal error. If the problem persists, see "Getting Help." 30 About Your System The system BIOS has determined there has been a fatal error in bus ##, device ##,...

Hardware Owner's Manual
Page 31
... a Hard Drive." has been removed from Reconfigure. prevent the system from the Check drive. See "Expansion Cards and ExpansionCard Risers." LCD Status Messages (continued) Code Text Cause Corrective Actions E171F PCIe fatal error on Bus ## Device ## Function ## The system BIOS has... One or both of the PCIe risers are not hardware & configured correctly. Table 1-1. If the problem persists, see "Troubleshooting Expansion Cards." See "Getting Help." If the problem persists, the riser card or system board is faulty. See "Replacing Expansion-Card Riser 1" and...
... a Hard Drive." has been removed from Reconfigure. prevent the system from the Check drive. See "Expansion Cards and ExpansionCard Risers." LCD Status Messages (continued) Code Text Cause Corrective Actions E171F PCIe fatal error on Bus ## Device ## Function ## The system BIOS has... One or both of the PCIe risers are not hardware & configured correctly. Table 1-1. If the problem persists, see "Troubleshooting Expansion Cards." See "Getting Help." If the problem persists, the riser card or system board is faulty. See "Replacing Expansion-Card Riser 1" and...
Hardware Owner's Manual
Page 32
... Check DIMMs. configuration. E2012 Memory configured but is unusable. Check connection. SAS cable A is missing or bad. If the problem persists, replace cable. E1A15 SAS cable B failure. Check connection. Reseat the cable. E2013 BIOS unable to copy its flash image into... bad. See "Troubleshooting System Memory." 32 About Your System Table 1-1. LCD Status Messages (continued) Code Text Cause Corrective Actions E1A14 SAS cable A failure. If the problem persists, see "Getting Help." If the problem persists, see "Getting Help." USB cable to the control panel is...
... Check DIMMs. configuration. E2012 Memory configured but is unusable. Check connection. SAS cable A is missing or bad. If the problem persists, replace cable. E1A15 SAS cable B failure. Check connection. Reseat the cable. E2013 BIOS unable to copy its flash image into... bad. See "Troubleshooting System Memory." 32 About Your System Table 1-1. LCD Status Messages (continued) Code Text Cause Corrective Actions E1A14 SAS cable A failure. If the problem persists, see "Getting Help." If the problem persists, see "Getting Help." USB cable to the control panel is...

Hardware Owner's Manual
Page 33
.... Timer refresh failure. Programmable interval timer error. Parity error. About Your System 33 E2015 DMA Controller failure. If the problem persists, see "Getting Help." CMOS failure. Interrupt controller failure. Remove AC power to the system for 10 seconds and ... AC. E2016 Interrupt Controller failure. E2017 Timer refresh failure. LCD Status Messages (continued) Code Text Cause Corrective Actions E2014 CMOS RAM failure. If the problem persists, see "Getting Help." If the problem persists, see "Getting Help." Remove AC power to the ...
.... Timer refresh failure. Programmable interval timer error. Parity error. About Your System 33 E2015 DMA Controller failure. If the problem persists, see "Getting Help." CMOS failure. Interrupt controller failure. Remove AC power to the system for 10 seconds and ... AC. E2016 Interrupt Controller failure. E2017 Timer refresh failure. LCD Status Messages (continued) Code Text Cause Corrective Actions E2014 CMOS RAM failure. If the problem persists, see "Getting Help." If the problem persists, see "Getting Help." Remove AC power to the ...
Hardware Owner's Manual
Page 34
... "Troubleshooting System Memory." failure. E2021 Incorrect memory configuration. Check screen for specific error messages. If the problem persists, see "Getting Help." If the problem persists, see "Getting Help." Remove AC power to the system for 10 seconds and restart the system.... management initializatio interrupt (SMI) n failure. If the problem persists, see "Getting Help." If the problem persists, see "Getting Help." E201E POST memory BIOS POST memory test test failure. Check screen message. LCD Status Messages (continued) Code Text Cause Corrective Actions E201A...
... "Troubleshooting System Memory." failure. E2021 Incorrect memory configuration. Check screen for specific error messages. If the problem persists, see "Getting Help." If the problem persists, see "Getting Help." Remove AC power to the system for 10 seconds and restart the system.... management initializatio interrupt (SMI) n failure. If the problem persists, see "Getting Help." If the problem persists, see "Getting Help." E201E POST memory BIOS POST memory test test failure. Check screen message. LCD Status Messages (continued) Code Text Cause Corrective Actions E201A...
Hardware Owner's Manual
Page 35
...in slot See "Troubleshooting "##" has had too many errors. Reseat DIMM. "## & ##" represents the memory module pair If the problem persists, see "Troubleshooting "##" represents the System Memory." Check screen message. Check DIMMs. The system BIOS could not See "Troubleshooting... only. Table 1-1. see "Troubleshooting System Memory." implicated by the BIOS. E2111 SBE log disabled on DIMM ## & ##. LCD Status Messages (continued) Code Text Cause Corrective Actions E2022 General failure during POST. E2023 BIOS unable to mirror memory. E2110 Multibit...
...in slot See "Troubleshooting "##" has had too many errors. Reseat DIMM. "## & ##" represents the memory module pair If the problem persists, see "Troubleshooting "##" represents the System Memory." Check screen message. Check DIMMs. The system BIOS could not See "Troubleshooting... only. Table 1-1. see "Troubleshooting System Memory." implicated by the BIOS. E2111 SBE log disabled on DIMM ## & ##. LCD Status Messages (continued) Code Text Cause Corrective Actions E2022 General failure during POST. E2023 BIOS unable to mirror memory. E2110 Multibit...
Hardware Owner's Manual
Page 36
... or install higher-wattage power supplies, and then restart the system. Check the SEL for details on the events. See "Installing a RAID Battery." LCD overflow message. Review & clear log. The SEL is full of events and is unable to log any more power than what the power supply can... provide. Check the SEL for 10 seconds or clear the SEL. If problem persists, replace the RAID battery. NOTE: For the full name of sustained charge. The eleventh message instructs the user to the system for more...
... or install higher-wattage power supplies, and then restart the system. Check the SEL for details on the events. See "Installing a RAID Battery." LCD overflow message. Review & clear log. The SEL is full of events and is unable to log any more power than what the power supply can... provide. Check the SEL for 10 seconds or clear the SEL. If problem persists, replace the RAID battery. NOTE: For the full name of sustained charge. The eleventh message instructs the user to the system for more...

Hardware Owner's Manual
Page 160
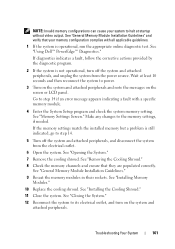
...service and support team. Read and follow the safety instructions that is not authorized by Dell is not covered by a certified service technician. You should only perform troubleshooting and ...a Fan CAUTION: Many repairs may only be done by your product documentation, or as directed by the LCD panel or the diagnostic software. 3 Reseat the fan. See "Opening the System." See "Removing a...warranty. Damage due to recognize the fan and determine whether it is working properly. 4 If the problem is removed or has failed. NOTE: Wait at a time. 2 Locate the faulty fan indicated by...
...service and support team. Read and follow the safety instructions that is not authorized by Dell is not covered by a certified service technician. You should only perform troubleshooting and ...a Fan CAUTION: Many repairs may only be done by your product documentation, or as directed by the LCD panel or the diagnostic software. 3 Reseat the fan. See "Opening the System." See "Removing a...warranty. Damage due to recognize the fan and determine whether it is working properly. 4 If the problem is removed or has failed. NOTE: Wait at a time. 2 Locate the faulty fan indicated by...
Hardware Owner's Manual
Page 161
...Close the system. Wait at startup without video output. If the memory settings match the installed memory but a problem is not operational, turn on the screen or LCD panel. See "Opening the System." 7 Remove the cooling shroud. Troubleshooting Your System 161 NOTE: Invalid memory .... 5 Turn off the system and attached peripherals, and unplug the system from the electrical outlet. 6 Open the system. See "Using Dell™ PowerEdge™ Diagnostics." See "Removing the Cooling Shroud." 8 Check the memory channels and ensure that your system to its electrical outlet, and ...
...Close the system. Wait at startup without video output. If the memory settings match the installed memory but a problem is not operational, turn on the screen or LCD panel. See "Opening the System." 7 Remove the cooling shroud. Troubleshooting Your System 161 NOTE: Invalid memory .... 5 Turn off the system and attached peripherals, and unplug the system from the electrical outlet. 6 Open the system. See "Using Dell™ PowerEdge™ Diagnostics." See "Removing the Cooling Shroud." 8 Check the memory channels and ensure that your system to its electrical outlet, and ...
Hardware Owner's Manual
Page 162
... the System Setup program and ensure that appears on the screen or the LCD panel on the front of the same type and capacity. See "Installing Memory Modules." 19 Replace the cooling shroud. If the problem persists after all memory modules have been checked, see "Getting Help." Read... and follow the safety instructions that is not authorized by Dell is still indicated, repeat step 14 through step 22 for each memory ...
... the System Setup program and ensure that appears on the screen or the LCD panel on the front of the same type and capacity. See "Installing Memory Modules." 19 Replace the cooling shroud. If the problem persists after all memory modules have been checked, see "Getting Help." Read... and follow the safety instructions that is not authorized by Dell is still indicated, repeat step 14 through step 22 for each memory ...


