
Information Update - Intel Xeon 5600 Series Processors
Page 1
R410 - R710 - T610 - M710 NOTE: The PowerEdge R410, T410, and R510 systems do not support 130 W Intel Xeon 5600 series processors. NOTE: The PowerEdge R610 and M710 systems ... limited feature set of the Intel Xeon 5600 series processor. • The following new Dell PowerEdge systems marked with the Roman Numeral II on the chassis support the complete feature set of ...with the Intel Xeon 5600 series processors support memory sparing. T410 - T710 - Information Update Important Information • Your system requires a BIOS and iDRAC firmware upgrade to support the 130 W Intel Xeon 5600...
R410 - R710 - T610 - M710 NOTE: The PowerEdge R410, T410, and R510 systems do not support 130 W Intel Xeon 5600 series processors. NOTE: The PowerEdge R610 and M710 systems ... limited feature set of the Intel Xeon 5600 series processor. • The following new Dell PowerEdge systems marked with the Roman Numeral II on the chassis support the complete feature set of ...with the Intel Xeon 5600 series processors support memory sparing. T410 - T710 - Information Update Important Information • Your system requires a BIOS and iDRAC firmware upgrade to support the 130 W Intel Xeon 5600...
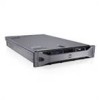
Getting Started Guide
Page 10
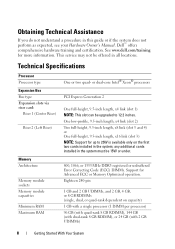
...UDIMMs, and 2 GB, 4 GB, or 8 GB RDIMMs (single, dual, or quad-rank dependent on the first two cards installed in the system must be upgraded to 25W is available only on capacity) 1 GB with a single processor (1 DIMM per processor) 96 GB (with quad-rank 8 GB RDIMM), 144 GB (...GB RDIMM), or 24 GB (with 2 GB UDIMMs) 8 Getting Started With Your System any additional cards installed in the system; See www.dell.com/training for Advanced ECC or Memory Optimized operation. or dual-core Intel® Xeon® processors PCI Express Generation 2 One full-height, 9.5-inch length, x4 link (slot...
...UDIMMs, and 2 GB, 4 GB, or 8 GB RDIMMs (single, dual, or quad-rank dependent on the first two cards installed in the system must be upgraded to 25W is available only on capacity) 1 GB with a single processor (1 DIMM per processor) 96 GB (with quad-rank 8 GB RDIMM), 144 GB (...GB RDIMM), or 24 GB (with 2 GB UDIMMs) 8 Getting Started With Your System any additional cards installed in the system; See www.dell.com/training for Advanced ECC or Memory Optimized operation. or dual-core Intel® Xeon® processors PCI Express Generation 2 One full-height, 9.5-inch length, x4 link (slot...
Hardware Owner's Manual
Page 39
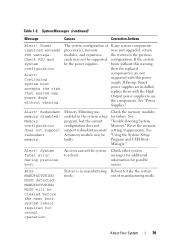
... (continued) Message Causes Corrective Actions Alert! Check PSU and system configuration. Alert! See "Troubleshooting System Memory." The system configuration of manufacturing mode. If any system components were just upgraded, return the system to reboot. Redundant memory disabled! Memory configuration does not support redundant memory. A memory module may not be cleared before the next boot. Check the...
... (continued) Message Causes Corrective Actions Alert! Check PSU and system configuration. Alert! See "Troubleshooting System Memory." The system configuration of manufacturing mode. If any system components were just upgraded, return the system to reboot. Redundant memory disabled! Memory configuration does not support redundant memory. A memory module may not be cleared before the next boot. Check the...
Hardware Owner's Manual
Page 52
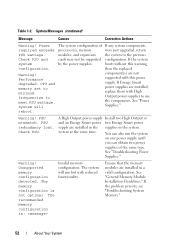
... the system to meet PSU wattage. You can obtain two power supplies of If any system components required exceeds processor(s), memory were just upgraded, return PSU wattage. The memory configuration is : Invalid memory configuration. See "General Memory Module Installation Guidelines." then the replaced Warning! See "Troubleshooting Power Supplies." If the problem persists, see "Troubleshooting System...
... the system to meet PSU wattage. You can obtain two power supplies of If any system components required exceeds processor(s), memory were just upgraded, return PSU wattage. The memory configuration is : Invalid memory configuration. See "General Memory Module Installation Guidelines." then the replaced Warning! See "Troubleshooting Power Supplies." If the problem persists, see "Troubleshooting System...

Hardware Owner's Manual
Page 56
... system is booting, make are recorded but do not take effect until the USB keyboard is normal for correcting errors. NOTE: After installing a memory upgrade, it is active. In many right arrows fields, you can also type the appropriate value. If your operating system begins to load before you... a note of the options, any changes were made. Exits the System Setup program and restarts the system if any changes that the system memory size has changed the first time you start your system. Down arrow or Moves to the next field. Displays the System Setup program's help...
... system is booting, make are recorded but do not take effect until the USB keyboard is normal for correcting errors. NOTE: After installing a memory upgrade, it is active. In many right arrows fields, you can also type the appropriate value. If your operating system begins to load before you... a note of the options, any changes were made. Exits the System Setup program and restarts the system if any changes that the system memory size has changed the first time you start your system. Down arrow or Moves to the next field. Displays the System Setup program's help...
Hardware Owner's Manual
Page 137
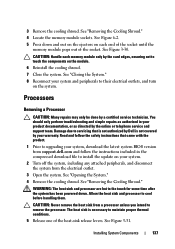
.... Damage due to servicing that came with the product. 1 Prior to upgrading your system, download the latest system BIOS version from support.dell.com and follow the safety instructions that is not authorized by Dell is necessary to their electrical outlets, and turn on the system. See ...Press down . CAUTION: Never remove the heat sink from the electrical outlet. 3 Open the system. See "Removing the Cooling Shroud." 4 Locate the memory module sockets. WARNING: The heat sink and processor are hot to the touch for some time after the system has been powered down and out...
.... Damage due to servicing that came with the product. 1 Prior to upgrading your system, download the latest system BIOS version from support.dell.com and follow the safety instructions that is not authorized by Dell is necessary to their electrical outlets, and turn on the system. See ...Press down . CAUTION: Never remove the heat sink from the electrical outlet. 3 Open the system. See "Removing the Cooling Shroud." 4 Locate the memory module sockets. WARNING: The heat sink and processor are hot to the touch for some time after the system has been powered down and out...

Hardware Owner's Manual
Page 205
... power supplies indicators, 21 removing, 86 replacing, 87 troubleshooting, 158 power supply blank, 88 processor installing, 140 removing, 137 troubleshooting, 170 upgrades, 137 PSU See power supply. R RAID battery installing, 117 removing, 116 removing cable retention bracket, 118 control panel board, 144 control panel...card, 95 information tag, 78 integrated storage controller, 112 internal SD flash card, 90 internal SD module, 90 internal USB cable, 93 memory modules, 136 optical drive, 104 PCIe expansion cards, 122 power supply, 86 power supply blank, 88 processor, 137 RAID battery, 116 ...
... power supplies indicators, 21 removing, 86 replacing, 87 troubleshooting, 158 power supply blank, 88 processor installing, 140 removing, 137 troubleshooting, 170 upgrades, 137 PSU See power supply. R RAID battery installing, 117 removing, 116 removing cable retention bracket, 118 control panel board, 144 control panel...card, 95 information tag, 78 integrated storage controller, 112 internal SD flash card, 90 internal SD module, 90 internal USB cable, 93 memory modules, 136 optical drive, 104 PCIe expansion cards, 122 power supply, 86 power supply blank, 88 processor, 137 RAID battery, 116 ...
Hardware Owner's Manual
Page 207
...removing, 110 troubleshooting, 165 TPM security, 66 troubleshooting cooling fans, 160 damaged system, 157 external connections, 153 hard drive, 166 internal USB memory key, 163 keyboard, 154 memory, 160 NIC, 155 optical drive, 164 PCIe expansion cards, 168 power supplies, 158 processor(s), 170 SD card, 162 storage controller, 167 ..., 156 U UEFI Boot Manager entering, 68 main screen, 69 System Utilities screen, 69 UEFI Boot Settings screen, 69 UEFI boot mode, 55 upgrades processor, 137 USB back-panel connectors, 20 front-panel connectors, 12 USB cable internal installing, 93 removing, 93 USB...
...removing, 110 troubleshooting, 165 TPM security, 66 troubleshooting cooling fans, 160 damaged system, 157 external connections, 153 hard drive, 166 internal USB memory key, 163 keyboard, 154 memory, 160 NIC, 155 optical drive, 164 PCIe expansion cards, 168 power supplies, 158 processor(s), 170 SD card, 162 storage controller, 167 ..., 156 U UEFI Boot Manager entering, 68 main screen, 69 System Utilities screen, 69 UEFI Boot Settings screen, 69 UEFI boot mode, 55 upgrades processor, 137 USB back-panel connectors, 20 front-panel connectors, 12 USB cable internal installing, 93 removing, 93 USB...


