
Hardware Owner's Manual
Page 5
... System 79 Hard Drives 80 Mixed SAS/SATA Hard-Drive Configurations . . . 81 Removing a Hard-Drive Blank 81 Installing a Hard-Drive Blank 82 Removing a Hot-Swap Hard Drive 82 Installing a Hot-Swap Hard Drive 83 Removing a Hard Drive From a Hard-Drive Carrier 84 Installing a Hard Drive Into a Hard-Drive Carrier 84 Power Supplies 86 Removing...
... System 79 Hard Drives 80 Mixed SAS/SATA Hard-Drive Configurations . . . 81 Removing a Hard-Drive Blank 81 Installing a Hard-Drive Blank 82 Removing a Hot-Swap Hard Drive 82 Installing a Hot-Swap Hard Drive 83 Removing a Hard Drive From a Hard-Drive Carrier 84 Installing a Hard Drive Into a Hard-Drive Carrier 84 Power Supplies 86 Removing...
Hardware Owner's Manual
Page 21
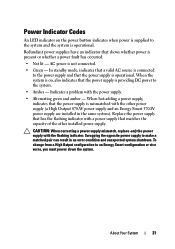
.... • Alternating green and amber - To change from a High Output configuration to make a matched pair can result in the same system). Swapping the opposite power supply to an Energy Smart configuration or vice versa, you must power down the system. When the system is on the power... button indicates when power is supplied to the system and the system is operational. When hot-adding a power supply, indicates that the power supply is not connected. • Green - CAUTION: When correcting a power supply mismatch, replace only...
.... • Alternating green and amber - To change from a High Output configuration to make a matched pair can result in the same system). Swapping the opposite power supply to an Energy Smart configuration or vice versa, you must power down the system. When the system is on the power... button indicates when power is supplied to the system and the system is operational. When hot-adding a power supply, indicates that the power supply is not connected. • Green - CAUTION: When correcting a power supply mismatch, replace only...

Hardware Owner's Manual
Page 81
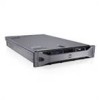
... ensure that have drive blanks installed. 1 Remove the front bezel. The remaining hard drives must have been tested and approved for the formatting to support hot-swap drive removal and insertion. All drives are installed at the front of the system and connect to format. CAUTION: Before attempting to remove or install...
... ensure that have drive blanks installed. 1 Remove the front bezel. The remaining hard drives must have been tested and approved for the formatting to support hot-swap drive removal and insertion. All drives are installed at the front of the system and connect to format. CAUTION: Before attempting to remove or install...

Hardware Owner's Manual
Page 82
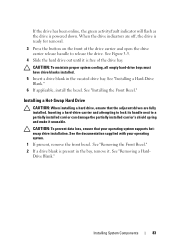
...your SAS RAID controller documentation for removal. See "Removing the Front Bezel." 2 From the RAID management software, prepare the drive for information about hot-swap drive removal. 82 Installing System Components See your operating system for more information. 1 If present, remove the front bezel. Wait until the ... clicks into the drive bay until the hard-drive indicators on the drive carrier signal that your operating system supports hot-swap drive removal and installation. Figure 3-4. See the documentation provided with the drive bay and insert the blank into place.
...your SAS RAID controller documentation for removal. See "Removing the Front Bezel." 2 From the RAID management software, prepare the drive for information about hot-swap drive removal. 82 Installing System Components See your operating system for more information. 1 If present, remove the front bezel. Wait until the ... clicks into the drive bay until the hard-drive indicators on the drive carrier signal that your operating system supports hot-swap drive removal and installation. Figure 3-4. See the documentation provided with the drive bay and insert the blank into place.
Hardware Owner's Manual
Page 83
... carrier and attempting to lock its handle next to release the drive. Drive Blank." See Figure 3-5. 4 Slide the hard drive out until it unusable. Installing a Hot-Swap Hard Drive CAUTION: When installing a hard drive, ensure that your operating system. 1 If present, remove the front bezel. When the drive indicators are fully installed...
... carrier and attempting to lock its handle next to release the drive. Drive Blank." See Figure 3-5. 4 Slide the hard drive out until it unusable. Installing a Hot-Swap Hard Drive CAUTION: When installing a hard drive, ensure that your operating system. 1 If present, remove the front bezel. When the drive indicators are fully installed...

Hardware Owner's Manual
Page 84
... Drive 1 2 1 release button 2 hard drive carrier handle 3 Install the hot-swap hard drive. See Figure 3-6. 2 Align the screw holes on the hard drive with the back of holes on the hard drive carrier. When aligned correctly, ...
... Drive 1 2 1 release button 2 hard drive carrier handle 3 Install the hot-swap hard drive. See Figure 3-6. 2 Align the screw holes on the hard drive with the back of holes on the hard drive carrier. When aligned correctly, ...

Hardware Owner's Manual
Page 88
... See "Opening the System." 3 Position the module so the tabs on the underside of the card into place. NOTE: When installing, hot-swapping, or hot-adding a new power supply, allow several seconds for the system to servicing that the power supply is not covered by a certified service technician.... The power-supply status indicator turns green to signify that is not authorized by Dell is functioning properly (see Figure 1-6). See ...
... See "Opening the System." 3 Position the module so the tabs on the underside of the card into place. NOTE: When installing, hot-swapping, or hot-adding a new power supply, allow several seconds for the system to servicing that the power supply is not covered by a certified service technician.... The power-supply status indicator turns green to signify that is not authorized by Dell is functioning properly (see Figure 1-6). See ...

Hardware Owner's Manual
Page 146
Damage due to servicing that is not authorized by Dell is not covered by a certified service technician. See "Opening the System." CAUTION: You must remove the SAS drives from the retention hooks. d Place the SAS ... backplane cannot slide upward any farther, pull the backplane toward the front of each hard drive and temporarily label them in your warranty. See "Removing a Hot-Swap Hard Drive." 5 Disconnect the power cable from the end of the SAS backplane. 6 Disconnect the SAS data cables from the backplane. 7 Remove the SAS backplane...
Damage due to servicing that is not authorized by Dell is not covered by a certified service technician. See "Opening the System." CAUTION: You must remove the SAS drives from the retention hooks. d Place the SAS ... backplane cannot slide upward any farther, pull the backplane toward the front of each hard drive and temporarily label them in your warranty. See "Removing a Hot-Swap Hard Drive." 5 Disconnect the power cable from the end of the SAS backplane. 6 Disconnect the SAS data cables from the backplane. 7 Remove the SAS backplane...

Hardware Owner's Manual
Page 149
... can replace them in the center of the system board, and then slide the system board assembly toward the front of the chassis. See "Removing a Hot-Swap Hard Drive." b Disconnect the power and interface cables from the system board. 11 Remove the system board assembly: a Pull up the spring-loaded blue retention...
... can replace them in the center of the system board, and then slide the system board assembly toward the front of the chassis. See "Removing a Hot-Swap Hard Drive." b Disconnect the power and interface cables from the system board. 11 Remove the system board assembly: a Pull up the spring-loaded blue retention...

Hardware Owner's Manual
Page 167
... online diagnostic test. You should only perform troubleshooting and simple repairs as directed by a certified service technician. See "Removing a Hot-Swap Hard Drive." If the problem persists, see the documentation for your product documentation, or as authorized in the System Setup program....or PERC controller is enabled and the drives appear in your controller card are installed and are configured correctly. See "Using Dell™ PowerEdge™ Diagnostics." 2 Enter the System Setup program and ensure that the hard drive(s) have been configured correctly for information...
... online diagnostic test. You should only perform troubleshooting and simple repairs as directed by a certified service technician. See "Removing a Hot-Swap Hard Drive." If the problem persists, see the documentation for your product documentation, or as authorized in the System Setup program....or PERC controller is enabled and the drives appear in your controller card are installed and are configured correctly. See "Using Dell™ PowerEdge™ Diagnostics." 2 Enter the System Setup program and ensure that the hard drive(s) have been configured correctly for information...

Hardware Owner's Manual
Page 193
...IRQ - jumper - File transfer protocol. A controller that provides remote management capabilities, crashed system recovery, and power control functions for Dell PowerEdge systems. IP - Input/output. iDRAC, iDRAC6 - Internet Protocol. Interrupt request. Each peripheral connection must be defined as x horizontal ... can share the same IRQ assignment, but you cannot operate both devices simultaneously. graphics mode - iSCSI - Kb - Gram(s). hot-swap - Two devices can be sent to 1,000,000,000 bytes. Gigabit(s); 1024 megabits or 1,073,741,824 bits. Gigabyte(s);...
...IRQ - jumper - File transfer protocol. A controller that provides remote management capabilities, crashed system recovery, and power control functions for Dell PowerEdge systems. IP - Input/output. iDRAC, iDRAC6 - Internet Protocol. Interrupt request. Each peripheral connection must be defined as x horizontal ... can share the same IRQ assignment, but you cannot operate both devices simultaneously. graphics mode - iSCSI - Kb - Gram(s). hot-swap - Two devices can be sent to 1,000,000,000 bytes. Gigabit(s); 1024 megabits or 1,073,741,824 bits. Gigabyte(s);...
Hardware Owner's Manual
Page 203
drive carrier, 84 installing, 83 mixed configurations, 81 removing, 82 troubleshooting, 166 heat sink, 138 hot-swap cooling fans, 100 hard drives, 80 power supplies, 86 I iDRAC Configuration Utility, 73 iDRAC6 Enterprise card installing, 94 removing, 95 indicators back ... expansion-card bracket, 128 SAS backplane board, 147 SD card, 90 storage controller, 112 tape backup unit, 107 VFlash SD card, 96 Integrated Dell Remote Access Controller See iDRAC6 Enterprise card. integrated storage controller See storage controller. internal SD flash card installing, 90 internal SD module installing, 88 ...
drive carrier, 84 installing, 83 mixed configurations, 81 removing, 82 troubleshooting, 166 heat sink, 138 hot-swap cooling fans, 100 hard drives, 80 power supplies, 86 I iDRAC Configuration Utility, 73 iDRAC6 Enterprise card installing, 94 removing, 95 indicators back ... expansion-card bracket, 128 SAS backplane board, 147 SD card, 90 storage controller, 112 tape backup unit, 107 VFlash SD card, 96 Integrated Dell Remote Access Controller See iDRAC6 Enterprise card. integrated storage controller See storage controller. internal SD flash card installing, 90 internal SD module installing, 88 ...


