Quick Reference
Page 2
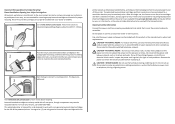
...(s) in our easy, no-cost method for returning empty Lexmark cartridges to Lexmark for signs of such problems. Remove the power cord from the electrical outlet before inspecting it. Important safety information Connect the power cord to a properly grounded electrical outlet that you agree to ...If any electrical or cabling connections, such as otherwise provided below, and (2) pass this license/agreement to Lexmark for the life of this Inspect the power cord regularly for proper recycling. You agree to the environment seriously, and we recommend that is preaddressed. Please...
...(s) in our easy, no-cost method for returning empty Lexmark cartridges to Lexmark for signs of such problems. Remove the power cord from the electrical outlet before inspecting it. Important safety information Connect the power cord to a properly grounded electrical outlet that you agree to ...If any electrical or cabling connections, such as otherwise provided below, and (2) pass this license/agreement to Lexmark for the life of this Inspect the power cord regularly for proper recycling. You agree to the environment seriously, and we recommend that is preaddressed. Please...
Quick Reference
Page 8
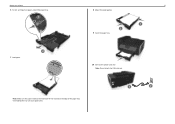
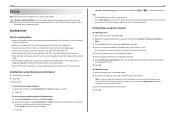
Note: Do not attach the USB cable yet. Overloading the tray can cause paper jams. Note: Make sure the paper is below the maximum fill line located on the edge of the paper tray. About your printer 6 For A4‑ and legal‑size paper, extend the paper tray. 1 2 7 Load paper. 8 8 Adjust the paper guides. 1 2 9 Insert the paper tray. 10 Connect the power cord only.
Note: Do not attach the USB cable yet. Overloading the tray can cause paper jams. Note: Make sure the paper is below the maximum fill line located on the edge of the paper tray. About your printer 6 For A4‑ and legal‑size paper, extend the paper tray. 1 2 7 Load paper. 8 8 Adjust the paper guides. 1 2 9 Insert the paper tray. 10 Connect the power cord only.

Quick Reference
Page 30
...is available only in select printer models. Setting up the printer to fax Setting up on any electrical or cabling connections, such as the power supply cord or telephone, during a lightning storm. Tips for this product to the public switched telephone network. Scenario 1: Standard telephone line Setup 1:... want . CAUTION-POTENTIAL INJURY: To reduce risk of the printer. CAUTION-SHOCK HAZARD: Do not use only the telecommunications (RJ‑11) cord provided with this product or a UL Listed 26 AWG or larger replacement when connecting this setup: • You can set the printer to ...
...is available only in select printer models. Setting up the printer to fax Setting up on any electrical or cabling connections, such as the power supply cord or telephone, during a lightning storm. Tips for this product to the public switched telephone network. Scenario 1: Standard telephone line Setup 1:... want . CAUTION-POTENTIAL INJURY: To reduce risk of the printer. CAUTION-SHOCK HAZARD: Do not use only the telecommunications (RJ‑11) cord provided with this product or a UL Listed 26 AWG or larger replacement when connecting this setup: • You can set the printer to ...
Quick Reference
Page 40
... printer is on the scanned image. • Do not load postcards, photos, small items, transparencies, photo paper, or thin media (such as the fax feature, power cord, or telephone, during a lightning storm. Faxing Faxing Note: The fax function is in place with the settings you want to include a cover page with Fax...
... printer is on the scanned image. • Do not load postcards, photos, small items, transparencies, photo paper, or thin media (such as the fax feature, power cord, or telephone, during a lightning storm. Faxing Faxing Note: The fax function is in place with the settings you want to include a cover page with Fax...

Quick Reference
Page 45
If Troubleshooting does not solve your problem Visit our Web site at http://support.lexmark.com to find the following: • Knowledgebase articles with the latest information and troubleshooting for your printer • Live online customer support • ... > Device Setup > Language 2 Select a language, and then touch Accept. 3 Touch Yes to confirm this checklist to solve most printer problems: • Make sure the power cord is plugged into the printer and into a properly grounded, working electrical outlet. • Make sure the printer is turned on. • Make sure the printer...
If Troubleshooting does not solve your problem Visit our Web site at http://support.lexmark.com to find the following: • Knowledgebase articles with the latest information and troubleshooting for your printer • Live online customer support • ... > Device Setup > Language 2 Select a language, and then touch Accept. 3 Touch Yes to confirm this checklist to solve most printer problems: • Make sure the power cord is plugged into the printer and into a properly grounded, working electrical outlet. • Make sure the printer is turned on. • Make sure the printer...
Quick Reference
Page 46
... to a defective port. Note: If you continue to have connected to turn off the printer. 2 Unplug the power cord from the wall outlet, and then pull out the power cord from the power supply. 3 After one . 2 Firmly plug the square end of the USB cable into the back of the printer...hold for three seconds to turn off the printer. 2 Unplug the power cord from the wall outlet, and then pull out the power cord from the power supply. 3 After one minute, reconnect the power cord into the power supply, and then plug the power cord into the wall outlet. 4 Turn on the printer. If the ...
... to a defective port. Note: If you continue to have connected to turn off the printer. 2 Unplug the power cord from the wall outlet, and then pull out the power cord from the power supply. 3 After one . 2 Firmly plug the square end of the USB cable into the back of the printer...hold for three seconds to turn off the printer. 2 Unplug the power cord from the wall outlet, and then pull out the power cord from the power supply. 3 After one minute, reconnect the power cord into the power supply, and then plug the power cord into the wall outlet. 4 Turn on the printer. If the ...
Quick Reference
Page 47
...CABLE CONNECTED TO YOUR PRINTER Cannot print through USB If the "Before you have problems, then try one minute, reconnect the power cord into the power supply, and then plug the power cord into the wall outlet, and then turn off the printer. ALIGN THE PRINTHEAD 1 Load plain, unmarked paper. 2 From...cartridges click firmly into the USB port of the following : REPLACE THE INK CARTRIDGES For more of Sleep mode, then reset the power: 1 Unplug the power cord from the power supply. 3 After one or more of the computer. Press to wake up the printer. If the cable is damaged, then ...
...CABLE CONNECTED TO YOUR PRINTER Cannot print through USB If the "Before you have problems, then try one minute, reconnect the power cord into the power supply, and then plug the power cord into the wall outlet, and then turn off the printer. ALIGN THE PRINTHEAD 1 Load plain, unmarked paper. 2 From...cartridges click firmly into the USB port of the following : REPLACE THE INK CARTRIDGES For more of Sleep mode, then reset the power: 1 Unplug the power cord from the power supply. 3 After one or more of the computer. Press to wake up the printer. If the cable is damaged, then ...

User's Guide
Page 6
...than those described in ports. SAVE THESE INSTRUCTIONS. Do not recharge, disassemble, or incinerate a lithium battery. Do not pinch the power cord between objects such as Ethernet and telephone system connections) are properly installed in their marked plug-in the user documentation, to a ... happen, a risk of explosion if a lithium battery is near water or wet locations. Safety information 6 Safety information Connect the power cord to a properly grounded electrical outlet that all cables from the electrical outlet before proceeding. There is a danger of fire or electrical...
...than those described in ports. SAVE THESE INSTRUCTIONS. Do not recharge, disassemble, or incinerate a lithium battery. Do not pinch the power cord between objects such as Ethernet and telephone system connections) are properly installed in their marked plug-in the user documentation, to a ... happen, a risk of explosion if a lithium battery is near water or wet locations. Safety information 6 Safety information Connect the power cord to a properly grounded electrical outlet that all cables from the electrical outlet before proceeding. There is a danger of fire or electrical...

User's Guide
Page 71
Do not set the printer to pick up on any electrical or cabling connections, such as the power supply cord or telephone, during a lightning storm. Note: The fax function is connected to a dedicated fax line EXT LINE To connect: Connect the cable from the wall ... faxes automatically (Auto Answer On) or manually (Auto Answer Off). • If you want . CAUTION-SHOCK HAZARD: Do not use only the telecommunications (RJ-11) cord provided with this product or a UL Listed 26 AWG or larger replacement when connecting this setup: • You can set the printer to fax Scenario...
Do not set the printer to pick up on any electrical or cabling connections, such as the power supply cord or telephone, during a lightning storm. Note: The fax function is connected to a dedicated fax line EXT LINE To connect: Connect the cable from the wall ... faxes automatically (Auto Answer On) or manually (Auto Answer Off). • If you want . CAUTION-SHOCK HAZARD: Do not use only the telecommunications (RJ-11) cord provided with this product or a UL Listed 26 AWG or larger replacement when connecting this setup: • You can set the printer to fax Scenario...
User's Guide
Page 128
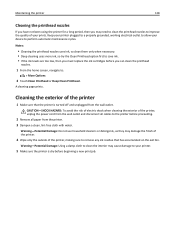
...: Do not use household cleaners or detergents, as they may damage the finish of the printer. 4 Wipe only the outside of the printer, unplug the power cord from the wall outlet and disconnect all cables to the printer before you may cause damage to your printer. 5 Make sure the printer is turned...
...: Do not use household cleaners or detergents, as they may damage the finish of the printer. 4 Wipe only the outside of the printer, unplug the power cord from the wall outlet and disconnect all cables to the printer before you may cause damage to your printer. 5 Make sure the printer is turned...
User's Guide
Page 129
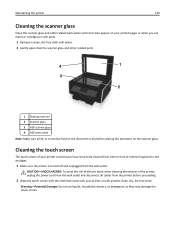
... with the cloth that came with another clean, dry, lint‑free cloth. Cleaning the touch screen The touch screen of the printer, unplug the power cord from the wall outlet and disconnect all ink or corrective fluid on the document is turned off and unplugged from time to time to be...
... with the cloth that came with another clean, dry, lint‑free cloth. Cleaning the touch screen The touch screen of the printer, unplug the power cord from the wall outlet and disconnect all ink or corrective fluid on the document is turned off and unplugged from time to time to be...
User's Guide
Page 131
...seconds to turn the printer back on page 135 If Troubleshooting does not solve your problem Visit our Web site at http://support.lexmark.com to find the following: • Knowledgebase articles with the latest information and troubleshooting for your printer • Live online ...Cannot print through USB" on . Troubleshooting 131 Troubleshooting Before you troubleshoot Use this checklist to solve most printer problems: • Make sure the power cord is plugged into the printer and into a properly grounded, working electrical outlet. • Make sure the printer is turned on. • ...
...seconds to turn the printer back on page 135 If Troubleshooting does not solve your problem Visit our Web site at http://support.lexmark.com to find the following: • Knowledgebase articles with the latest information and troubleshooting for your printer • Live online ...Cannot print through USB" on . Troubleshooting 131 Troubleshooting Before you troubleshoot Use this checklist to solve most printer problems: • Make sure the power cord is plugged into the printer and into a properly grounded, working electrical outlet. • Make sure the printer is turned on. • ...
User's Guide
Page 132
... cable for three seconds to a defective port. The USB port is damaged, then use a new one minute, reconnect the power cord into the power supply, and then plug the power cord into the USB port of the USB cable into the wall outlet. 4 Turn on the computer. Note: If you encountered ... mode. Software did not install If you continue to confirm this setting. RECONNECT THE PRINTER POWER SUPPLY 1 Turn off the printer. 2 Unplug the power cord from the wall outlet, and then pull out the power cord from the power supply. 3 After one . 2 Firmly plug the square end of the USB cable into...
... cable for three seconds to a defective port. The USB port is damaged, then use a new one minute, reconnect the power cord into the power supply, and then plug the power cord into the USB port of the USB cable into the wall outlet. 4 Turn on the computer. Note: If you encountered ... mode. Software did not install If you continue to confirm this setting. RECONNECT THE PRINTER POWER SUPPLY 1 Turn off the printer. 2 Unplug the power cord from the wall outlet, and then pull out the power cord from the power supply. 3 After one . 2 Firmly plug the square end of the USB cable into...
User's Guide
Page 133
... PRINTER IS SET AS THE DEFAULT PRINTER RECONNECT THE PRINTER POWER SUPPLY 1 Turn off the printer. 2 Unplug the power cord from the wall outlet, and then pull out the power cord from the power supply. 3 After one minute, reconnect the power cord into the power supply, and then plug the power cord into the matching color slot of the printhead. 3 Close...
... PRINTER IS SET AS THE DEFAULT PRINTER RECONNECT THE PRINTER POWER SUPPLY 1 Turn off the printer. 2 Unplug the power cord from the wall outlet, and then pull out the power cord from the power supply. 3 After one minute, reconnect the power cord into the power supply, and then plug the power cord into the matching color slot of the printhead. 3 Close...
User's Guide
Page 135
... documents from the print queue If you have connected to have problems, then try one or more of Sleep mode, then reset the power: 1 Unplug the power cord from the power supply. 3 After one . 2 Firmly plug the square end of the USB cable into the back of the printer. 3 Firmly plug the...If the "Before you continue to a defective port. If the cable is damaged, then use a new one minute, reconnect the power cord into the power supply, and then plug the power cord into the wall outlet. 4 Turn on the printer. If this problem persists, then check our Web site for updates for three ...
... documents from the print queue If you have connected to have problems, then try one or more of Sleep mode, then reset the power: 1 Unplug the power cord from the power supply. 3 After one . 2 Firmly plug the square end of the USB cable into the back of the printer. 3 Firmly plug the...If the "Before you continue to a defective port. If the cable is damaged, then use a new one minute, reconnect the power cord into the power supply, and then plug the power cord into the wall outlet. 4 Turn on the printer. If this problem persists, then check our Web site for updates for three ...

User's Guide
Page 165
... Troubleshooting 165 The Continue button is unavailable Try the following solutions in Sleep mode. Try disconnecting one minute, reconnect the power cord into the power supply, and then plug the power cord into the wall outlet. 4 Turn on the computer is directly connected to turn off the printer. If unsure, look...successfully use other USB ports on the printer, then you can occur with . If you might need to the printer model on the Lexmark Web site. Press and hold for an updated version of your computer. The numbers should either match exactly or be working , then try...
... Troubleshooting 165 The Continue button is unavailable Try the following solutions in Sleep mode. Try disconnecting one minute, reconnect the power cord into the power supply, and then plug the power cord into the wall outlet. 4 Turn on the computer is directly connected to turn off the printer. If unsure, look...successfully use other USB ports on the printer, then you can occur with . If you might need to the printer model on the Lexmark Web site. Press and hold for an updated version of your computer. The numbers should either match exactly or be working , then try...

User's Guide
Page 180
... limits of EN 55022 and safety requirements of the Canadian Interference-Causing Equipment Standard ICES-003. The authorized representative is: Lexmark International Technology Hungária Kft., 8 Lechner Ödön fasor, Millennium Tower III, 1095 Budapest HUNGARY, A ...Setting the Sleep Mode Timeout to calculate energy usage. Setting the Sleep Mode Timeout to completely stop product power consumption, disconnect the power supply cord from the Authorized Representative. Notice to electromagnetic compatibility, safety of electrical equipment designed for Terminal Attachments (ACTA...
... limits of EN 55022 and safety requirements of the Canadian Interference-Causing Equipment Standard ICES-003. The authorized representative is: Lexmark International Technology Hungária Kft., 8 Lechner Ödön fasor, Millennium Tower III, 1095 Budapest HUNGARY, A ...Setting the Sleep Mode Timeout to calculate energy usage. Setting the Sleep Mode Timeout to completely stop product power consumption, disconnect the power supply cord from the Authorized Representative. Notice to electromagnetic compatibility, safety of electrical equipment designed for Terminal Attachments (ACTA...


