Quick Reference
Page 6
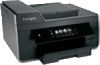
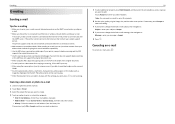
... visit www.lexmark.com/environment. Using the SmartSolutions toolkit on the Web, you can easily access anytime. You can simply select the shortcut number on the model, your home or office over a secure wireless network with the high‑resolution scanner. It automatically... If you are available only in your printer comes with your printer works for the following printer models: • Lexmark Pro912 • Lexmark Pro915 • Lexmark Pro919 Printer features Depending on the printer instead of going through the usual process of adjusting the settings and options. &#...
... visit www.lexmark.com/environment. Using the SmartSolutions toolkit on the Web, you can easily access anytime. You can simply select the shortcut number on the model, your home or office over a secure wireless network with the high‑resolution scanner. It automatically... If you are available only in your printer comes with your printer works for the following printer models: • Lexmark Pro912 • Lexmark Pro915 • Lexmark Pro919 Printer features Depending on the printer instead of going through the usual process of adjusting the settings and options. &#...
Quick Reference
Page 12
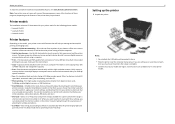
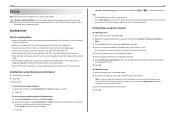
... VoIP adapter) to send and receive faxes. 16 Power supply with port Connect the printer to a power source. 17 Duplex unit • Print on the scanner glass. 2 ADF output tray Hold documents as they exit from the ADF. 3 Memory card slot Insert a memory card. 4 PictBridge and USB port Connect a ...;, legal‑, and A4‑size documents. 12 10 11 13 12 15 EXT LINE EXT LINE 19 18 16 17 Use the To 10 Scanner unit • Access the ink cartridges and printhead. • Remove paper jams. 11 Ink cartridge access area Install, replace, or remove ink cartridges. ...
... VoIP adapter) to send and receive faxes. 16 Power supply with port Connect the printer to a power source. 17 Duplex unit • Print on the scanner glass. 2 ADF output tray Hold documents as they exit from the ADF. 3 Memory card slot Insert a memory card. 4 PictBridge and USB port Connect a ...;, legal‑, and A4‑size documents. 12 10 11 13 12 15 EXT LINE EXT LINE 19 18 16 17 Use the To 10 Scanner unit • Access the ink cartridges and printhead. • Remove paper jams. 11 Ink cartridge access area Install, replace, or remove ink cartridges. ...

Quick Reference
Page 26
...More Options > Number of Copies 3 Enter the number of copies you make a selection. Note: You cannot make two‑sided copies using the scanner glass, close the scanner cover, if possible, to set a color or black-and-white copy. 5 Press . Notes: • For long-edged binding, pages are...returns to make two‑sided copies on envelopes, card stock, or photo paper. 1 Load the original document faceup into the ADF. Use the scanner glass for landscape orientation). 4 Press , and then follow the instructions on the scanned image. • Do not load postcards, photos, small ...
...More Options > Number of Copies 3 Enter the number of copies you make a selection. Note: You cannot make two‑sided copies using the scanner glass, close the scanner cover, if possible, to set a color or black-and-white copy. 5 Press . Notes: • For long-edged binding, pages are...returns to make two‑sided copies on envelopes, card stock, or photo paper. 1 Load the original document faceup into the ADF. Use the scanner glass for landscape orientation). 4 Press , and then follow the instructions on the scanned image. • Do not load postcards, photos, small ...

Quick Reference
Page 27
... the default destination that the file you make a selection. 5 Press . Scanning to create. Scanning Scanning ADF Scanner glass Use the ADF for scanning • Use the scanner glass when scanning two‑sided pages if your printer does not support duplex scanning or the ADF does not ...support the original document size. • When using the scanner glass, close the scanner cover, if possible, to a network computer 1 Load the original document. 2 From the home screen, touch Scan > Computer. 3 Touch the...
... the default destination that the file you make a selection. 5 Press . Scanning to create. Scanning Scanning ADF Scanner glass Use the ADF for scanning • Use the scanner glass when scanning two‑sided pages if your printer does not support duplex scanning or the ADF does not ...support the original document size. • When using the scanner glass, close the scanner cover, if possible, to a network computer 1 Load the original document. 2 From the home screen, touch Scan > Computer. 3 Touch the...
Quick Reference
Page 28
...or search for Scanning an image in the Finder, launch the application you want to use . The scan is complete when a message appears on the scanner glass. 2 Click or Start. 3 Click All Programs or Programs, and then select the printer program folder from the list. 4 Navigate to the ...scanned has been saved. Note: If your e-mail program does not open automatically, then you have set up your printer. Note: For information on the scanner glass. 2 Click or Start. 3 Click All Programs or Programs, and then select the printer program folder from the list. 4 Navigate to e‑...
...or search for Scanning an image in the Finder, launch the application you want to use . The scan is complete when a message appears on the scanner glass. 2 Click or Start. 3 Click All Programs or Programs, and then select the printer program folder from the list. 4 Navigate to the ...scanned has been saved. Note: If your e-mail program does not open automatically, then you have set up your printer. Note: For information on the scanner glass. 2 Click or Start. 3 Click All Programs or Programs, and then select the printer program folder from the list. 4 Navigate to e‑...
Quick Reference
Page 29
... then contact your printer does not support duplex scanning or the ADF does not support the original document size. • When using the scanner glass, close the scanner cover, if possible, to avoid dark edges on the scanned image. • Do not load postcards, photos, small items, transparencies, photo...To easily retrieve a document after copying or scanning, lift the ADF input tray. • When using the ADF, adjust the paper guides on the scanner glass. • When the document to be e-mailed is connected to the Internet for e‑mailing • Make sure to enter your e‑...
... then contact your printer does not support duplex scanning or the ADF does not support the original document size. • When using the scanner glass, close the scanner cover, if possible, to avoid dark edges on the scanned image. • Do not load postcards, photos, small items, transparencies, photo...To easily retrieve a document after copying or scanning, lift the ADF input tray. • When using the ADF, adjust the paper guides on the scanner glass. • When the document to be e-mailed is connected to the Internet for e‑mailing • Make sure to enter your e‑...
Quick Reference
Page 40
... Address Book or History to Multiple, and then touch Add a Number. Tips: • You can enter fax numbers manually or by using the scanner glass, close the scanner cover, if possible, to include a cover page with the settings you have entered the numbers of the recipient. 4 Click Fax. Note: In .... 3 Click the Fax tab, and then make any electrical or cabling connections, such as magazine clippings) into the ADF. Place these items on the scanner glass. • When the document to a working if you must use the fax driver for sending faxes • Make sure the printer is flipped ...
... Address Book or History to Multiple, and then touch Add a Number. Tips: • You can enter fax numbers manually or by using the scanner glass, close the scanner cover, if possible, to include a cover page with the settings you have entered the numbers of the recipient. 4 Click Fax. Note: In .... 3 Click the Fax tab, and then make any electrical or cabling connections, such as magazine clippings) into the ADF. Place these items on the scanner glass. • When the document to a working if you must use the fax driver for sending faxes • Make sure the printer is flipped ...

Quick Reference
Page 56
... 38, 41 automatically 41 manually 41 tips 41 recycling 5 replacing ink cartridges 17 RJ‑11 adapter 35 S safety information 2, 30 scan job canceling 28 scanner unit location 12 scanning creating a PDF from scan 28 documents for e‑mailing 28 tips 27 to a flash drive 27 to a local computer 27 to...
... 38, 41 automatically 41 manually 41 tips 41 recycling 5 replacing ink cartridges 17 RJ‑11 adapter 35 S safety information 2, 30 scan job canceling 28 scanner unit location 12 scanning creating a PDF from scan 28 documents for e‑mailing 28 tips 27 to a flash drive 27 to a local computer 27 to...
User's Guide
Page 3
Contents 3 Loading various paper types...33 Saving paper settings...36 Loading original documents on the scanner glass 36 Loading original documents into the ADF 37 Linking trays...37 Printing...38 Tips for printing...38 Printing basic documents...38 Printing specialty documents......
Contents 3 Loading various paper types...33 Saving paper settings...36 Loading original documents on the scanner glass 36 Loading original documents into the ADF 37 Linking trays...37 Printing...38 Tips for printing...38 Printing basic documents...38 Printing specialty documents......
User's Guide
Page 4
... SmartSolutions?...125 Creating and customizing printer solutions 125 Maintaining the printer 127 Maintaining ink cartridges...127 Cleaning the exterior of the printer...128 Cleaning the scanner glass...129 Cleaning the touch screen...129 Moving the printer to another location 130
... SmartSolutions?...125 Creating and customizing printer solutions 125 Maintaining the printer 127 Maintaining ink cartridges...127 Cleaning the exterior of the printer...128 Cleaning the scanner glass...129 Cleaning the touch screen...129 Moving the printer to another location 130
User's Guide
Page 9
...• Serial number • Date purchased • Store where purchased Note: Lift the scanner unit to see the customer support label. Click to view basic SmartSolutions information. http://support.lexmark.com Note: Select your region, and then select your operating system. Additional setup and instructions... on a network, depending on your printer model • Caring for ? SmartSolutions User's Guide and Help Go to http://smartsolutions.lexmark.com. Windows or Mac Help Open a printer software program or application, and then click Help. For updates, check our Web site ...
...• Serial number • Date purchased • Store where purchased Note: Lift the scanner unit to see the customer support label. Click to view basic SmartSolutions information. http://support.lexmark.com Note: Select your region, and then select your operating system. Additional setup and instructions... on a network, depending on your printer model • Caring for ? SmartSolutions User's Guide and Help Go to http://smartsolutions.lexmark.com. Windows or Mac Help Open a printer software program or application, and then click Help. For updates, check our Web site ...

User's Guide
Page 11
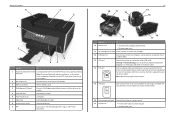
Insert a memory card. Load paper. Place these items on the scanner glass. About your printer 9 8 11 1 2 SD/MS-Duo/MMC 7 3 6 5 4 Use the 1 Automatic Document Feeder (ADF) tray 2 ADF output tray 3 Memory card slot 4 PictBridge and USB ...
Insert a memory card. Load paper. Place these items on the scanner glass. About your printer 9 8 11 1 2 SD/MS-Duo/MMC 7 3 6 5 4 Use the 1 Automatic Document Feeder (ADF) tray 2 ADF output tray 3 Memory card slot 4 PictBridge and USB ...
User's Guide
Page 12
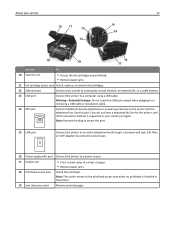
About your printer 12 10 11 13 12 15 EXT LINE EXT LINE 19 18 16 17 Use the To 10 Scanner unit • Access the ink cartridges and printhead. • Remove paper jams. 11 Ink cartridge access area Install, replace, or remove ink cartridges. 12 Ethernet ...
About your printer 12 10 11 13 12 15 EXT LINE EXT LINE 19 18 16 17 Use the To 10 Scanner unit • Access the ink cartridges and printhead. • Remove paper jams. 11 Ink cartridge access area Install, replace, or remove ink cartridges. 12 Ethernet ...
User's Guide
Page 36
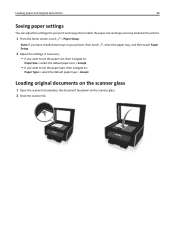
... the default paper type > Accept , select the paper tray, and then touch Paper Loading original documents on the scanner glass 1 Open the scanner lid and place the document facedown on the scanner glass. 2 Close the scanner lid. Note: If you want to set the paper type, then navigate to : Paper Size > select the default...
... the default paper type > Accept , select the paper tray, and then touch Paper Loading original documents on the scanner glass 1 Open the scanner lid and place the document facedown on the scanner glass. 2 Close the scanner lid. Note: If you want to set the paper type, then navigate to : Paper Size > select the default...
User's Guide
Page 54
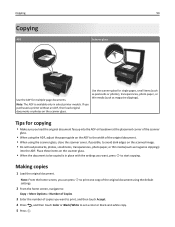
...items (such as postcards or photos), transparencies, photo paper, or thin media (such as magazine clippings) into the ADF. Place these items on the scanner glass. • When the document to avoid dark edges on the scanned image. • Do not load postcards, photos, small items, transparencies, photo... From the home screen, navigate to: Copy > More Options > Number of Copies 3 Enter the number of the original document using the scanner glass, close the scanner cover, if possible, to be copied is available only in place with the settings you want , press to set a color or black-and...
...items (such as postcards or photos), transparencies, photo paper, or thin media (such as magazine clippings) into the ADF. Place these items on the scanner glass. • When the document to avoid dark edges on the scanned image. • Do not load postcards, photos, small items, transparencies, photo... From the home screen, navigate to: Copy > More Options > Number of Copies 3 Enter the number of the original document using the scanner glass, close the scanner cover, if possible, to be copied is available only in place with the settings you want , press to set a color or black-and...

User's Guide
Page 55
... 1 From the home screen, touch SmartSolutions > ID Card Copy. 2 Load the front side of the ID card facedown on the upper left corner of the scanner glass. 3 Touch Continue. 4 When prompted to copy the back side of the ID card, touch Yes. 5 Load the back side of the ID card facedown...
... 1 From the home screen, touch SmartSolutions > ID Card Copy. 2 Load the front side of the ID card facedown on the upper left corner of the scanner glass. 3 Touch Continue. 4 When prompted to copy the back side of the ID card, touch Yes. 5 Load the back side of the ID card facedown...

User's Guide
Page 57
... are copying a two-sided document and using other paper sizes, then see the instructions for landscape orientation). 4 Press , and then follow the instructions on the scanner glass. 2 From the home screen, touch Copy > More Options > 2‑Sided Copies. 3 Select a two‑sided copying option, and then touch Accept. • If you... overlay setting, and then touch Accept. If you will be up to specify a custom overlay. Note: You cannot make two‑sided copies using the scanner glass, then select 2‑Sided to 2‑Sided. • If you make a selection.
... are copying a two-sided document and using other paper sizes, then see the instructions for landscape orientation). 4 Press , and then follow the instructions on the scanner glass. 2 From the home screen, touch Copy > More Options > 2‑Sided Copies. 3 Select a two‑sided copying option, and then touch Accept. • If you... overlay setting, and then touch Accept. If you will be up to specify a custom overlay. Note: You cannot make two‑sided copies using the scanner glass, then select 2‑Sided to 2‑Sided. • If you make a selection.

User's Guide
Page 59
... as postcards or photos), transparencies, photo paper, or thin media (such as magazine clippings) into the ADF. Scanning to avoid dark edges on the scanner glass. Note: The ADF is in select printer models. Place these items on the destination computer. 3 Select the output file type you want to .... Note: Make sure the scan software is the default destination that will receive the scan. The USB‑connected computer is installed on the scanner glass. • When the document to be scanned is available only in place with the settings you want , press to create and other ...
... as postcards or photos), transparencies, photo paper, or thin media (such as magazine clippings) into the ADF. Scanning to avoid dark edges on the scanner glass. Note: The ADF is in select printer models. Place these items on the destination computer. 3 Select the output file type you want to .... Note: Make sure the scan software is the default destination that will receive the scan. The USB‑connected computer is installed on the scanner glass. • When the document to be scanned is available only in place with the settings you want , press to create and other ...

User's Guide
Page 61
... photos at once and save them as separate images, then select Multiple photos. For Macintosh users 1 Load photo or photos facedown on the scanner glass. 2 From the Applications folder in the Finder, launch the application you want to scan multiple photos at least 1/4 inch of space ...image, and then edit it using a photo editing application. Scanning 61 Scanning photos for editing For Windows users 1 Load photo or photos facedown on the scanner glass. 2 Click or Start. 3 Click All Programs or Programs, and then select the printer program folder from the list. 4 Navigate to: Printer ...
... photos at once and save them as separate images, then select Multiple photos. For Macintosh users 1 Load photo or photos facedown on the scanner glass. 2 From the Applications folder in the Finder, launch the application you want to scan multiple photos at least 1/4 inch of space ...image, and then edit it using a photo editing application. Scanning 61 Scanning photos for editing For Windows users 1 Load photo or photos facedown on the scanner glass. 2 Click or Start. 3 Click All Programs or Programs, and then select the printer program folder from the list. 4 Navigate to: Printer ...

User's Guide
Page 62
... in the Search field of the Help menu. 4 Adjust the scan settings as the scan destination, and then start editing. Note: Depending on the scanner glass. 2 Click or Start. 3 Click All Programs or Programs, and then select the printer program folder from the list of devices, select your ... so you can be converted into the ADF or facedown on a local or network computer and you must have an OCR application stored on the scanner glass. 2 From the Applications folder in the appropriate application to edit it from the list. 4 Navigate to: Printer Home > select your printer > Scan...
... in the Search field of the Help menu. 4 Adjust the scan settings as the scan destination, and then start editing. Note: Depending on the scanner glass. 2 Click or Start. 3 Click All Programs or Programs, and then select the printer program folder from the list of devices, select your ... so you can be converted into the ADF or facedown on a local or network computer and you must have an OCR application stored on the scanner glass. 2 From the Applications folder in the appropriate application to edit it from the list. 4 Navigate to: Printer Home > select your printer > Scan...


