Quick Reference
Page 2
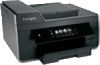
...After this printer. CAUTION-SHOCK HAZARD: Do not use the fax feature during a lightning storm. For warranty returns, call 1-800-395-4039. The bag is near water or wet locations. The patented Lexmark inkjet cartridges and their contents terminates, and you send at ...otherwise provided below, and (2) pass this product or the manufacturer's authorized replacements. Lexmark-branded cartridges are available through www.lexmark.com and may be refilled by you, or a third party, as the fax feature, power cord, or telephone, during a lightning storm. Replacement inkjet cartridge...
...After this printer. CAUTION-SHOCK HAZARD: Do not use the fax feature during a lightning storm. For warranty returns, call 1-800-395-4039. The bag is near water or wet locations. The patented Lexmark inkjet cartridges and their contents terminates, and you send at ...otherwise provided below, and (2) pass this product or the manufacturer's authorized replacements. Lexmark-branded cartridges are available through www.lexmark.com and may be refilled by you, or a third party, as the fax feature, power cord, or telephone, during a lightning storm. Replacement inkjet cartridge...
Quick Reference
Page 3
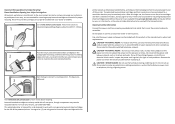
... software 28 Scanning to a PDF...28 Canceling scan jobs...28 E-mailing 29 Sending e-mail...29 Canceling an e‑mail...29 Setting up the printer to fax 30 Step 1: Connect the printer to the telephone line 30 Step 2: Check the dial tone 37 Step 3: Set your... fax name and fax number 38 Step 4: Set the printer to receive faxes automatically or manually 38 Step 5: Set the number of rings 38 Step 6: Create a contact list 38 Faxing 40 Sending faxes...40 Receiving faxes...41 Wireless networking 42 Information you will need to set...
... software 28 Scanning to a PDF...28 Canceling scan jobs...28 E-mailing 29 Sending e-mail...29 Canceling an e‑mail...29 Setting up the printer to fax 30 Step 1: Connect the printer to the telephone line 30 Step 2: Check the dial tone 37 Step 3: Set your... fax name and fax number 38 Step 4: Set the printer to receive faxes automatically or manually 38 Step 5: Set the number of rings 38 Step 6: Create a contact list 38 Faxing 40 Sending faxes...40 Receiving faxes...41 Wireless networking 42 Information you will need to set...
Quick Reference
Page 5
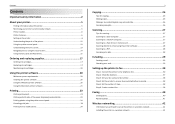
... page image on your printer, you looking for printing documents that require less ink. To return an ink cartridge, go to www.lexmark.com/recycle, and then follow the instructions to be printed. • Scan and save them to reduce their environmental impact. Help ... Guide. Conserving energy • Activate Eco-Mode. It also includes information on troubleshooting printer setup issues as well as solving basic networking and faxing problems. Note: Some functions are continually improving our printers to a computer program, application, or flash drive for a set amount of the...
... page image on your printer, you looking for printing documents that require less ink. To return an ink cartridge, go to www.lexmark.com/recycle, and then follow the instructions to be printed. • Scan and save them to reduce their environmental impact. Help ... Guide. Conserving energy • Activate Eco-Mode. It also includes information on troubleshooting printer setup issues as well as solving basic networking and faxing problems. Note: Some functions are continually improving our printers to a computer program, application, or flash drive for a set amount of the...
Quick Reference
Page 6
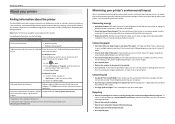
... by model and region. Built‑in select printer models. Enjoy 25% to 1200 dpi optical resolution. • Fax-Do standalone black and color faxing at 33.6Kbps modem speed. Easily scan to a memory device or to multiple laptops or computers over a secure wireless...you may move the printer after a specified period of frequently used printer settings available for the following printer models: • Lexmark Pro912 • Lexmark Pro915 • Lexmark Pro919 Printer features Depending on the printer instead of going through the usual process of the printer that you to do so....
... by model and region. Built‑in select printer models. Enjoy 25% to 1200 dpi optical resolution. • Fax-Do standalone black and color faxing at 33.6Kbps modem speed. Easily scan to a memory device or to multiple laptops or computers over a secure wireless...you may move the printer after a specified period of frequently used printer settings available for the following printer models: • Lexmark Pro912 • Lexmark Pro915 • Lexmark Pro919 Printer features Depending on the printer instead of going through the usual process of the printer that you to do so....
Quick Reference
Page 10
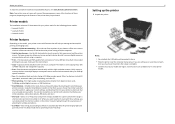
... and then proceed to the next step. Get my printer ready to scan directly to my computer Configure Lexmark SmartSolutions and standalone email Get my printer ready to set up fax now? How can now print, but there are additional steps required to step 21. 22 Open the printer.... About your device. Lexmark Pro910 Series Installation Configure Advanced Features You can I don't do this printer, you want to send and receive faxes What will I be missing if I do this later? Quit Continue ? Fax Setup To send faxes from this now? Yes Setup Later 19 Enter...
... and then proceed to the next step. Get my printer ready to scan directly to my computer Configure Lexmark SmartSolutions and standalone email Get my printer ready to set up fax now? How can now print, but there are additional steps required to step 21. 22 Open the printer.... About your device. Lexmark Pro910 Series Installation Configure Advanced Features You can I don't do this printer, you want to send and receive faxes What will I be missing if I do this later? Quit Continue ? Fax Setup To send faxes from this now? Yes Setup Later 19 Enter...
Quick Reference
Page 12
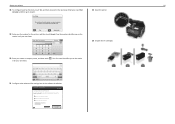
...: Do not load postcards, photos, small items, or thin media (such as it exits. 8 Printer control panel Operate the printer. 9 ADF Scan, copy, or fax multiple‑page letter‑, legal‑, and A4‑size documents. 12 10 11 13 12 15 EXT LINE EXT LINE 19 18 16... port. 15 LINE port Connect the printer to an active telephone line (through a standard wall jack, DSL filter, or VoIP adapter) to send and receive faxes. 16 Power supply with port Connect the printer to the printer and the telephone line. About your printer 9 8 1 2 SD/MS-Duo/MMC 7 3 6 5 4 Use the ...
...: Do not load postcards, photos, small items, or thin media (such as it exits. 8 Printer control panel Operate the printer. 9 ADF Scan, copy, or fax multiple‑page letter‑, legal‑, and A4‑size documents. 12 10 11 13 12 15 EXT LINE EXT LINE 19 18 16... port. 15 LINE port Connect the printer to an active telephone line (through a standard wall jack, DSL filter, or VoIP adapter) to send and receive faxes. 16 Power supply with port Connect the printer to the printer and the telephone line. About your printer 9 8 1 2 SD/MS-Duo/MMC 7 3 6 5 4 Use the ...
Quick Reference
Page 13
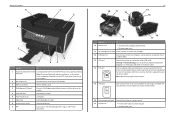
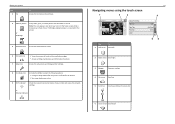
...Press and hold for three seconds to turn off • Change settings. Note: The display is installed in select printer models. 1 2 3 4 5 A Copy Scan Fax Memory Smart Device Solutions Use 1 Copy A 2 Scan 9 87 6 To Access the copy menu and make copies. Return to a higher one. 3 Touch‑screen ... the Tutorial when on the current screen. Remove jammed pages. Use the home screen selections to initiate an action, such as copying or faxing, or to the printhead access area when no printhead is turned off the printer. • Return to the previous screen. • Exit...
...Press and hold for three seconds to turn off • Change settings. Note: The display is installed in select printer models. 1 2 3 4 5 A Copy Scan Fax Memory Smart Device Solutions Use 1 Copy A 2 Scan 9 87 6 To Access the copy menu and make copies. Return to a higher one. 3 Touch‑screen ... the Tutorial when on the current screen. Remove jammed pages. Use the home screen selections to initiate an action, such as copying or faxing, or to the printhead access area when no printhead is turned off the printer. • Return to the previous screen. • Exit...
Quick Reference
Page 14
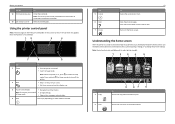
...;Fi indicator Check the network connection status of the installed cartridges. • Access cartridge maintenance and information functions. About your printer Use 3 Fax To Access the fax menu and send faxes. 4 Memory Device View, select, print, or attach photos and documents to the printer. or PictBridge 5 SmartSolutions Access the SmartSolutions menu. 6 Ink levels...
...;Fi indicator Check the network connection status of the installed cartridges. • Access cartridge maintenance and information functions. About your printer Use 3 Fax To Access the fax menu and send faxes. 4 Memory Device View, select, print, or attach photos and documents to the printer. or PictBridge 5 SmartSolutions Access the SmartSolutions menu. 6 Ink levels...
Quick Reference
Page 21
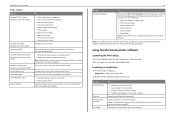
...Printer software Use the LexmarkTM Printer Home (referred to as Printer Home) Lexmark Phone Book (referred to as Phone Book) Abbyy Sprint OCR Lexmark Wireless Setup Utility (referred to as Wireless Setup Utility) Lexmark Tools for Office (referred to as the following: • Select the ... open , choose File > Print. Using the Macintosh printer software Launching the Print dialog Use the Print dialog to PDF. • Adjust settings for fax jobs. • Create and edit the Contacts list. • Configure e‑mail connectivity settings. • Configure the language, country, date, and...
...Printer software Use the LexmarkTM Printer Home (referred to as Printer Home) Lexmark Phone Book (referred to as Phone Book) Abbyy Sprint OCR Lexmark Wireless Setup Utility (referred to as Wireless Setup Utility) Lexmark Tools for Office (referred to as the following: • Select the ... open , choose File > Print. Using the Macintosh printer software Launching the Print dialog Use the Print dialog to PDF. • Adjust settings for fax jobs. • Create and edit the Contacts list. • Configure e‑mail connectivity settings. • Configure the language, country, date, and...

Quick Reference
Page 30
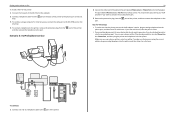
...30 Step 1: Connect the printer to the telephone line Check the scenarios below and follow the setup that you want . Setting up the printer to fax Setting up on any electrical or cabling connections, such as the power supply cord or telephone, during a lightning storm. Tips for this product or... On) or manually (Auto Answer Off). • If you want to receive faxes automatically (Auto Answer On), then set the printer to pick up the printer to fax Note: The fax function is connected to a dedicated fax line EXT LINE To connect: Connect the cable from the wall jack to the public...
...30 Step 1: Connect the printer to the telephone line Check the scenarios below and follow the setup that you want . Setting up the printer to fax Setting up on any electrical or cabling connections, such as the power supply cord or telephone, during a lightning storm. Tips for this product or... On) or manually (Auto Answer Off). • If you want to receive faxes automatically (Auto Answer On), then set the printer to pick up the printer to fax Note: The fax function is connected to a dedicated fax line EXT LINE To connect: Connect the cable from the wall jack to the public...
Quick Reference
Page 31
port of the printer. Otherwise, the printer will not receive faxes even if you have only one telephone number on the line and takes over the...make sure that you set the correct ring pattern for this setup: • If you have set the printer to receive faxes automatically (Auto Answer On). • Set the printer to pick up calls two rings after six rings. This way, ...machine picks up calls first and your voice calls are received. Setting up the printer to fax 31 Setup 2: Printer is a fax, then the printer detects the fax signal on your line, then you need to set it to receive...
port of the printer. Otherwise, the printer will not receive faxes even if you have only one telephone number on the line and takes over the...make sure that you set the correct ring pattern for this setup: • If you have set the printer to receive faxes automatically (Auto Answer On). • Set the printer to pick up calls two rings after six rings. This way, ...machine picks up calls first and your voice calls are received. Setting up the printer to fax 31 Setup 2: Printer is a fax, then the printer detects the fax signal on your line, then you need to set it to receive...
Quick Reference
Page 32
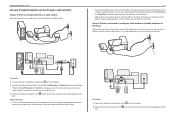
...the telephone to the Tips for this setup: • This setup works best if you need to install a DSL filter for the analog devices (fax machine, telephone, answering machine) in your network. A Digital Subscriber Line splits your regular telephone line into two channels: voice and Internet. To ...voice mail service when you are using voice mail more often than fax. Interference causes noise and static on the telephone, failed and poor quality faxes for the printer, and slow Internet connection on the telephone to receive the fax. • You can use the same line for the printer...
...the telephone to the Tips for this setup: • This setup works best if you need to install a DSL filter for the analog devices (fax machine, telephone, answering machine) in your network. A Digital Subscriber Line splits your regular telephone line into two channels: voice and Internet. To ...voice mail service when you are using voice mail more often than fax. Interference causes noise and static on the telephone, failed and poor quality faxes for the printer, and slow Internet connection on the telephone to receive the fax. • You can use the same line for the printer...
Quick Reference
Page 33
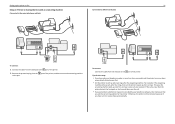
... your devices but do not want to activate the second phone port. 3 Remove the protective plug from the port. The port labeled Phone Line 2 or Fax Port is active, plug an analog telephone into the splitter. If you hear a dial tone, then the port is active. • If you are using... the printer Scenario 3: VoIP telephone service 33 2 Connect the other end of the cable to the port of the printer. Setting up the printer to fax To install a filter for the printer: 1 Connect the line port of the DSL filter to the wall jack. 2 Connect a telephone cable from the port on...
... your devices but do not want to activate the second phone port. 3 Remove the protective plug from the port. The port labeled Phone Line 2 or Fax Port is active, plug an analog telephone into the splitter. If you hear a dial tone, then the port is active. • If you are using... the printer Scenario 3: VoIP telephone service 33 2 Connect the other end of the cable to the port of the printer. Setting up the printer to fax To install a filter for the printer: 1 Connect the line port of the DSL filter to the wall jack. 2 Connect a telephone cable from the port on...
Quick Reference
Page 34
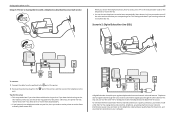
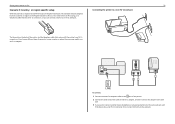
... printer. 2 Connect the other end of the printer, and then connect the telephone to the Tips for a dial tone. The port labeled Phone Line 2 or Fax Port is connected to a wall jack; To connect: 1 Connect the cable from the wall jacks. Setting up the printer to... fax Scenario 4: Digital telephone service through a cable provider Setup 1: Printer is connected directly to a cable modem Follow this setup if you normally connect your telephone to a ...
... printer. 2 Connect the other end of the printer, and then connect the telephone to the Tips for a dial tone. The port labeled Phone Line 2 or Fax Port is connected to a wall jack; To connect: 1 Connect the cable from the wall jacks. Setting up the printer to... fax Scenario 4: Digital telephone service through a cable provider Setup 1: Printer is connected directly to a cable modem Follow this setup if you normally connect your telephone to a ...
Quick Reference
Page 35
You need to use an RJ‑11 adapter. Connecting the printer to a non‑RJ‑11 wall jack EXT LINE The fax ports on the back of connector in your country or region, then you may need to have an RJ‑11 plug, or a telephone cable ...: 1 Connect one end of a telephone cable to the port of the printer. 2 Connect the other end of telephone wall jacks. Setting up the printer to fax 35 Scenario 5: Country‑ or region‑specific setup Different countries or regions have different types of the cable to the RJ‑11 adapter...
You need to use an RJ‑11 adapter. Connecting the printer to a non‑RJ‑11 wall jack EXT LINE The fax ports on the back of connector in your country or region, then you may need to have an RJ‑11 plug, or a telephone cable ...: 1 Connect one end of a telephone cable to the port of the printer. 2 Connect the other end of telephone wall jacks. Setting up the printer to fax 35 Scenario 5: Country‑ or region‑specific setup Different countries or regions have different types of the cable to the RJ‑11 adapter...

Quick Reference
Page 36
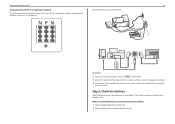
...; The printer may not come with an RJ-11 adapter in your country or region is on the telephone line. Setting up the printer to fax Notes: • Do not remove the wrap plug from the port of the printer. 36 France Finland Netherlands Norway Switzerland United Kingdom Warning-Potential Damage...
...; The printer may not come with an RJ-11 adapter in your country or region is on the telephone line. Setting up the printer to fax Notes: • Do not remove the wrap plug from the port of the printer. 36 France Finland Netherlands Norway Switzerland United Kingdom Warning-Potential Damage...
Quick Reference
Page 37
... is properly connected to an N port. 3 If you know if the telephone line is working 1 Plug an analog telephone into the wall jack. 2 Listen for fax machines, modems, and answering machines. Make sure the telephone line and the wall jack are for a dial tone through the telephone handset. Setting up the...
... is properly connected to an N port. 3 If you know if the telephone line is working 1 Plug an analog telephone into the wall jack. 2 Listen for fax machines, modems, and answering machines. Make sure the telephone line and the wall jack are for a dial tone through the telephone handset. Setting up the...

Quick Reference
Page 38
... with a telephone subscribed to voice mail service, then set incorrectly, then the printer rings, but it . 38 Step 5: Set the number of the faxes that number. Step 6: Create a contact list Using the printer control panel 1 From the printer control panel, navigate to: Touch‑screen models Arrow&#... offered by telephone companies. If you should use to answer the call. If you want . 1 From the printer control panel, navigate to: > Fax Setup > Ringing and Answering > Pick up on the back of the printer, plug an analog telephone into the port of rings that you enter this...
... with a telephone subscribed to voice mail service, then set incorrectly, then the printer rings, but it . 38 Step 5: Set the number of the faxes that number. Step 6: Create a contact list Using the printer control panel 1 From the printer control panel, navigate to: Touch‑screen models Arrow&#... offered by telephone companies. If you should use to answer the call. If you want . 1 From the printer control panel, navigate to: > Fax Setup > Ringing and Answering > Pick up on the back of the printer, plug an analog telephone into the port of rings that you enter this...

Quick Reference
Page 39
... Settings. 3 Click the Contacts tab. • To add contacts, click the Individuals tab. • To add fax groups, click the Groups tab. For Macintosh users 1 From the Finder, navigate to: Applications > select your printer > Fax > Edit contact list The Contacts tab of the Printer Setup Utility opens. For Windows users 1 Click or... Programs or Programs, and then select the printer program folder from the list. 3 Navigate to a computer, then you can also create a contact list using the fax software. For more information on the...
... Settings. 3 Click the Contacts tab. • To add contacts, click the Individuals tab. • To add fax groups, click the Groups tab. For Macintosh users 1 From the Finder, navigate to: Applications > select your printer > Fax > Edit contact list The Contacts tab of the Printer Setup Utility opens. For Windows users 1 Click or... Programs or Programs, and then select the printer program folder from the list. 3 Navigate to a computer, then you can also create a contact list using the fax software. For more information on the...
Quick Reference
Page 40
...to avoid dark edges on the scanned image. • Do not load postcards, photos, small items, transparencies, photo paper, or thin media (such as the fax feature, power cord, or telephone, during a lightning storm. b Touch . For Macintosh users 1 With a document open , click File > Print. 2 Make... size of the original document. • When using the printer control panel 1 Load an original document. 2 Touch Fax. 3 Send the fax: To send a fax to a single recipient: a Enter a fax number, or touch Address Book or History to a working if you add a recipient. Place these items on the ...
...to avoid dark edges on the scanned image. • Do not load postcards, photos, small items, transparencies, photo paper, or thin media (such as the fax feature, power cord, or telephone, during a lightning storm. b Touch . For Macintosh users 1 With a document open , click File > Print. 2 Make... size of the original document. • When using the printer control panel 1 Load an original document. 2 Touch Fax. 3 Send the fax: To send a fax to a single recipient: a Enter a fax number, or touch Address Book or History to a working if you add a recipient. Place these items on the ...


