Quick Reference
Page 3
... and replacing supplies 17 Ordering ink cartridges...17 Replacing ink cartridges...17 Maintaining ink cartridges 18 Using the printer software 20 Minimum system requirements 20 Installing the printer software 20 Using the Windows printer software 20 Using the Macintosh printer software 21 Printing 23 Printing a document...23 Printing on both sides... 38 Faxing 40 Sending faxes...40 Receiving faxes...41 Wireless networking 42 Information you will need to set up the printer on a wireless network 42 Installing the printer on a wireless network 42
... and replacing supplies 17 Ordering ink cartridges...17 Replacing ink cartridges...17 Maintaining ink cartridges 18 Using the printer software 20 Minimum system requirements 20 Installing the printer software 20 Using the Windows printer software 20 Using the Macintosh printer software 21 Printing 23 Printing a document...23 Printing on both sides... 38 Faxing 40 Sending faxes...40 Receiving faxes...41 Wireless networking 42 Information you will need to set up the printer on a wireless network 42 Installing the printer on a wireless network 42
Quick Reference
Page 5
... Sleep timeout. The latest supplemental information, updates, Support Web site-http://support.lexmark.com online customer support, and telephone support 1 Available on the installation software CD. 2 Available on the installation software CD and on your printer model). • Use recycled paper. &#...flash drive for presentation. By selecting certain printer settings or tasks, you to print documents using the Comprehensive User's Guide installed automatically with the printer software.2 Click Help from any printer software program or application. Wireless/network printers allow you may...
... Sleep timeout. The latest supplemental information, updates, Support Web site-http://support.lexmark.com online customer support, and telephone support 1 Available on the installation software CD. 2 Available on the installation software CD and on your printer model). • Use recycled paper. &#...flash drive for presentation. By selecting certain printer settings or tasks, you to print documents using the Comprehensive User's Guide installed automatically with the printer software.2 Click Help from any printer software program or application. Wireless/network printers allow you may...
Quick Reference
Page 6
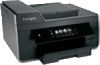
...speed. Using the SmartSolutions toolkit on the features of frequently used printer settings available for the following printer models: • Lexmark Pro912 • Lexmark Pro915 • Lexmark Pro919 Printer features Depending on the model, your printer solutions. Built‑in select printer models. SD/MS-Duo/MMC ... simply select the shortcut number on a wireless network, then you may vary by activating Eco‑Mode. Printer models The installation software CD that came with one‑touch, computer‑free black or color copying. If you are available only in two...
...speed. Using the SmartSolutions toolkit on the features of frequently used printer settings available for the following printer models: • Lexmark Pro912 • Lexmark Pro915 • Lexmark Pro919 Printer features Depending on the model, your printer solutions. Built‑in select printer models. SD/MS-Duo/MMC ... simply select the shortcut number on a wireless network, then you may vary by activating Eco‑Mode. Printer models The installation software CD that came with one‑touch, computer‑free black or color copying. If you are available only in two...
Quick Reference
Page 7
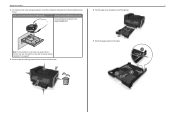
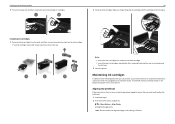
... 7 2 To initiate printer setup using a computer, insert the installation software CD, or download the printer driver. Note: If the installation screen does not appear after a minute, then see "Installation screen did not appear during installation" on page 45. 3 Remove tape and packing material from www.lexmark.com. 4 Pull the paper tray completely out of the...
... 7 2 To initiate printer setup using a computer, insert the installation software CD, or download the printer driver. Note: If the installation screen does not appear after a minute, then see "Installation screen did not appear during installation" on page 45. 3 Remove tape and packing material from www.lexmark.com. 4 Pull the paper tray completely out of the...
Quick Reference
Page 10
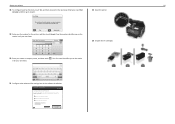
... later in all your sent faxes. Otherwise, touch Set Up Later, and then go to the next step. Do you must complete fax setup. Lexmark Pro910 Series Installation Configure Advanced Features You can I don't do this now? Get my printer ready to scan directly to my computer Configure... Lexmark SmartSolutions and standalone email Get my printer ready to access all the features of your fax number for the printer, and then touch Accept. ...
... later in all your sent faxes. Otherwise, touch Set Up Later, and then go to the next step. Do you must complete fax setup. Lexmark Pro910 Series Installation Configure Advanced Features You can I don't do this now? Get my printer ready to scan directly to my computer Configure... Lexmark SmartSolutions and standalone email Get my printer ready to access all the features of your fax number for the printer, and then touch Accept. ...
Quick Reference
Page 11
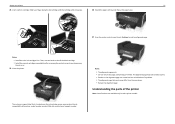
... functions are normal and not an indication of a problem. • The alignment page that is finished. Notes: • Install the color ink cartridges first. Then, use two hands to install the black cartridge. • Install the new ink cartridges immediately after removing the protective cap to avoid exposing the ink to air. 25...
... functions are normal and not an indication of a problem. • The alignment page that is finished. Notes: • Install the color ink cartridges first. Then, use two hands to install the black cartridge. • Install the new ink cartridges immediately after removing the protective cap to avoid exposing the ink to air. 25...
Quick Reference
Page 12
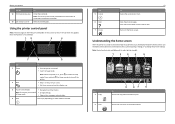
... 18 16 17 Use the To 10 Scanner unit • Access the ink cartridges and printhead. • Remove paper jams. 11 Ink cartridge access area Install, replace, or remove ink cartridges. 12 Ethernet port Connect your printer 9 8 1 2 SD/MS-Duo/MMC 7 3 6 5 4 Use the To 1 Automatic Document Feeder Load ...original documents into the ADF for the printer, and if this connection method is supported in or removing a USB cable or installation cable. 14 EXT port Connect additional devices (telephone or answering machine) to the printer and the telephone line.
... 18 16 17 Use the To 10 Scanner unit • Access the ink cartridges and printhead. • Remove paper jams. 11 Ink cartridge access area Install, replace, or remove ink cartridges. 12 Ethernet port Connect your printer 9 8 1 2 SD/MS-Duo/MMC 7 3 6 5 4 Use the To 1 Automatic Document Feeder Load ...original documents into the ADF for the printer, and if this connection method is supported in or removing a USB cable or installation cable. 14 EXT port Connect additional devices (telephone or answering machine) to the printer and the telephone line.
Quick Reference
Page 13
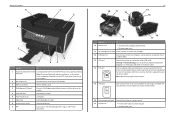
If an icon does not appear, then the function is turned off • Change settings. Understanding the home screen After the printer is installed in the printer. Access the scan menu and scan documents. Note: The carrier moves to Sleep mode. Note: When the printer is ... previous screen. • Exit from one menu level to Sleep mode. About your printer Use the 18 Printhead access area 19 Jam clearance cover To Install the printhead. in select printer models. 1 2 3 4 5 A Copy Scan Fax Memory Smart Device Solutions Use 1 Copy A 2 Scan 9 87 6 To Access ...
If an icon does not appear, then the function is turned off • Change settings. Understanding the home screen After the printer is installed in the printer. Access the scan menu and scan documents. Note: The carrier moves to Sleep mode. Note: When the printer is ... previous screen. • Exit from one menu level to Sleep mode. About your printer Use the 18 Printhead access area 19 Jam clearance cover To Install the printhead. in select printer models. 1 2 3 4 5 A Copy Scan Fax Memory Smart Device Solutions Use 1 Copy A 2 Scan 9 87 6 To Access ...
Quick Reference
Page 14
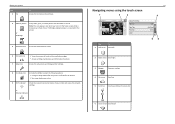
... 1 Left arrow Scroll left idle for 10 minutes. • Set screen brightness to low. 9 Wi‑Fi indicator Check the network connection status of the installed cartridges. • Access cartridge maintenance and information functions. Note: This icon appears only when you return to the home screen while a memory card, flash drive...
... 1 Left arrow Scroll left idle for 10 minutes. • Set screen brightness to low. 9 Wi‑Fi indicator Check the network connection status of the installed cartridges. • Access cartridge maintenance and information functions. Note: This icon appears only when you return to the home screen while a memory card, flash drive...
Quick Reference
Page 15
... your printer Tips: • Use your finger off the screen. Notes: • The flash drive uses the same port that came with two paper trays installed, touch > Paper Setup, select the paper tray, and then touch Paper Type. 2 Scroll up or down (using the scroll bar or arrows, or by flicking...
... your printer Tips: • Use your finger off the screen. Notes: • The flash drive uses the same port that came with two paper trays installed, touch > Paper Setup, select the paper tray, and then touch Paper Type. 2 Scroll up or down (using the scroll bar or arrows, or by flicking...
Quick Reference
Page 17
... cartridges 1 Turn on your needs. • Check the yield rate on the ink cartridge box, or visit www.lexmark.com/yields. • For best results, use , return this cartridge to the cartridge installation position. Lexmark Pro919 model Item Return Program Regular cartridge2 cartridge1 Black cartridge 160 Not available High‑yield black cartridge...
... cartridges 1 Turn on your needs. • Check the yield rate on the ink cartridge box, or visit www.lexmark.com/yields. • For best results, use , return this cartridge to the cartridge installation position. Lexmark Pro919 model Item Return Program Regular cartridge2 cartridge1 Black cartridge 160 Not available High‑yield black cartridge...
Quick Reference
Page 18
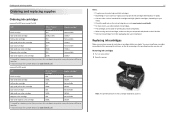
... then remove the used ink cartridge or cartridges. 18 2 Insert each ink cartridge. Slide your ink cartridge comes with a twist cap, then remove the cap. Installing ink cartridges 1 Remove the ink cartridge from the pack, and then remove the protective cap from the ink cartridge.
... then remove the used ink cartridge or cartridges. 18 2 Insert each ink cartridge. Slide your ink cartridge comes with a twist cap, then remove the cap. Installing ink cartridges 1 Remove the ink cartridge from the pack, and then remove the protective cap from the ink cartridge.
Quick Reference
Page 20
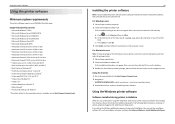
...where D is available only at http://support.lexmark.com. 2 Navigate to: SUPPORT & DOWNLOADS > select your printer > select your operating system 3 Download the driver, and then install the printer software. c Press Enter, or click OK. 3 Click Install, and then follow the instructions on the ...and then follow the instructions on the computer screen. If you did not install these additional programs during printer installation When you set up to the Lexmark Web site at http://support.lexmark.com. 20 Installing the printer software Note: If you do. Supported operating systems • ...
...where D is available only at http://support.lexmark.com. 2 Navigate to: SUPPORT & DOWNLOADS > select your printer > select your operating system 3 Download the driver, and then install the printer software. c Press Enter, or click OK. 3 Click Install, and then follow the instructions on the ...and then follow the instructions on the computer screen. If you did not install these additional programs during printer installation When you set up to the Lexmark Web site at http://support.lexmark.com. 20 Installing the printer software Note: If you do. Supported operating systems • ...
Quick Reference
Page 21
... notifications of updates to your printer. The dialog lets you want to use. Note: Printing Preferences is installed automatically with the printer software. Note: This application is automatically installed with a word‑processing program. • Set up the wireless printer on a wireless network. Note... software Use the LexmarkTM Printer Home (referred to as Printer Home) Lexmark Phone Book (referred to as Phone Book) Abbyy Sprint OCR Lexmark Wireless Setup Utility (referred to as Wireless Setup Utility) Lexmark Tools for Office (referred to as the following: • Select the...
... notifications of updates to your printer. The dialog lets you want to use. Note: Printing Preferences is installed automatically with the printer software. Note: This application is automatically installed with a word‑processing program. • Set up the wireless printer on a wireless network. Note... software Use the LexmarkTM Printer Home (referred to as Printer Home) Lexmark Phone Book (referred to as Phone Book) Abbyy Sprint OCR Lexmark Wireless Setup Utility (referred to as Wireless Setup Utility) Lexmark Tools for Office (referred to as the following: • Select the...
Quick Reference
Page 22
... on the features of the printer that you purchased. Order ink or supplies. Visit the Lexmark Web site. Register your printer. • Visit the SmartSolutions Web site. • Choose your printer, select the custom install option during installation, and then select all packages listed. Note: Your printer may not come with these Web...
... on the features of the printer that you purchased. Order ink or supplies. Visit the Lexmark Web site. Register your printer. • Visit the SmartSolutions Web site. • Choose your printer, select the custom install option during installation, and then select all packages listed. Note: Your printer may not come with these Web...

Quick Reference
Page 25
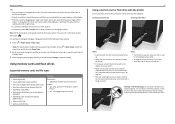
Note: The application referred to your printer as long as Rendezvous in Mac OS X version 10.2 is connected. Printing 25 • For other Lexmark printers, your mobile device can send print jobs to as the printer software and LexPrint Listener are installed on the computer where the printer is now called Bonjour by Apple Inc.
Note: The application referred to your printer as long as Rendezvous in Mac OS X version 10.2 is connected. Printing 25 • For other Lexmark printers, your mobile device can send print jobs to as the printer software and LexPrint Listener are installed on the computer where the printer is now called Bonjour by Apple Inc.

Quick Reference
Page 27
... (such as magazine clippings). Scanning to a flash drive or memory card Before you begin, make sure your flash drive or memory card is installed on the destination computer. • Make sure the printer can communicate with your printer does not support duplex scanning or the ADF does not ... glass for multiple‑page documents. Note: Make sure the scan software is available only on the scanner glass. Note: The ADF is installed on the printer control panel indicating that the file you want to create and other scan options. The scan is complete when a message appears...
... (such as magazine clippings). Scanning to a flash drive or memory card Before you begin, make sure your flash drive or memory card is installed on the destination computer. • Make sure the printer can communicate with your printer does not support duplex scanning or the ADF does not ... glass for multiple‑page documents. Note: Make sure the scan software is available only on the scanner glass. Note: The ADF is installed on the printer control panel indicating that the file you want to create and other scan options. The scan is complete when a message appears...
Quick Reference
Page 32
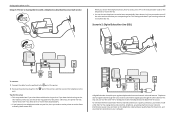
... the correct ring pattern for the printer. Scenario 2: Digital Subscriber Line (DSL) EXT LINE 02 To connect: 1 Connect the cable from the wall jack to install a DSL filter for the analog devices (fax machine, telephone, answering machine) in your line, then you need to the port of the printer, and then...
... the correct ring pattern for the printer. Scenario 2: Digital Subscriber Line (DSL) EXT LINE 02 To connect: 1 Connect the cable from the wall jack to install a DSL filter for the analog devices (fax machine, telephone, answering machine) in your line, then you need to the port of the printer, and then...
Quick Reference
Page 33
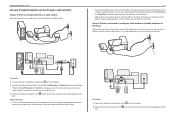
... to the Tips for this setup: • To make sure that the phone port on the VoIP adapter. Setting up the printer to fax To install a filter for the printer: 1 Connect the line port of the DSL filter to the wall jack. 2 Connect a telephone cable from the port on the back...
... to the Tips for this setup: • To make sure that the phone port on the VoIP adapter. Setting up the printer to fax To install a filter for the printer: 1 Connect the line port of the DSL filter to the wall jack. 2 Connect a telephone cable from the port on the back...
Quick Reference
Page 34
.... 34 • If you use a phone splitter. port of the cable to the port labeled Phone Line 1 or Phone Port on the cable modem is installed elsewhere in the house Follow this setup if you normally connect your telephone to activate the second phone port. 3 Remove the protective plug from the...
.... 34 • If you use a phone splitter. port of the cable to the port labeled Phone Line 1 or Phone Port on the cable modem is installed elsewhere in the house Follow this setup if you normally connect your telephone to activate the second phone port. 3 Remove the protective plug from the...


