Quick Reference
Page 2
...easily accessible. Follow instructions to learn more about recycling. Use only the power supply and power cord provided with , only genuine Lexmark inkjet cartridges for , and designed to work with this product or make any of these terms are always made with all new parts, ...waste to be used only once. Do not set up this product or the manufacturer's authorized replacements. Mail the bag to www.lexmark.com/recycle. The patented Lexmark inkjet cartridges and their contents terminates, and you , or a third party, as the fax feature, power cord, or telephone, during ...
...easily accessible. Follow instructions to learn more about recycling. Use only the power supply and power cord provided with , only genuine Lexmark inkjet cartridges for , and designed to work with this product or make any of these terms are always made with all new parts, ...waste to be used only once. Do not set up this product or the manufacturer's authorized replacements. Mail the bag to www.lexmark.com/recycle. The patented Lexmark inkjet cartridges and their contents terminates, and you , or a third party, as the fax feature, power cord, or telephone, during ...
Quick Reference
Page 3
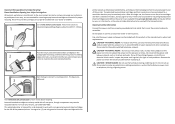
... 13 Navigating menus using the touch screen 14 Using memory cards and flash drives 15 Ordering and replacing supplies 17 Ordering ink cartridges...17 Replacing ink cartridges...17 Maintaining ink cartridges 18 Using the printer software 20 Minimum system requirements 20 Installing the printer software 20 Using the Windows printer software 20 Using...
... 13 Navigating menus using the touch screen 14 Using memory cards and flash drives 15 Ordering and replacing supplies 17 Ordering ink cartridges...17 Replacing ink cartridges...17 Maintaining ink cartridges 18 Using the printer software 20 Minimum system requirements 20 Installing the printer software 20 Using the Windows printer software 20 Using...
Quick Reference
Page 5
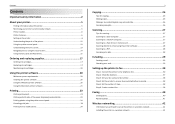
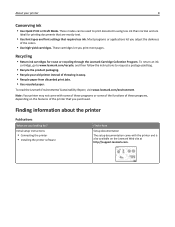
... packaging. • Recycle your old printer instead of the paper. Conserving ink • Use Quick Print or Draft Mode. To return an ink cartridge, go to www.lexmark.com/recycle, and then follow the instructions to reduce your printer's environmental impact even further. Find it away. • Recycle paper from the list...
... packaging. • Recycle your old printer instead of the paper. Conserving ink • Use Quick Print or Draft Mode. To return an ink cartridge, go to www.lexmark.com/recycle, and then follow the instructions to reduce your printer's environmental impact even further. Find it away. • Recycle paper from the list...
Quick Reference
Page 10
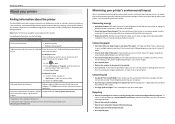
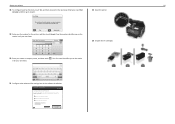
... sender in the software installation. Enter Your Fax Number Accept Back 1 2 3 4 5 6 7 8 9 0 # Clear 20 Enter your sent faxes. 23 Unpack the ink cartridges. 21 Configure other advanced fax settings later in all the features of your sent faxes. Otherwise, touch Set Up Later, and then go to set... your printer 10 18 To configure basic fax functions, touch Yes, and then proceed to the next step. Quit Continue ? Lexmark Pro910 Series Installation Configure Advanced Features You can I don't do this now? Get my printer ready to scan directly to my computer Configure...
... sender in the software installation. Enter Your Fax Number Accept Back 1 2 3 4 5 6 7 8 9 0 # Clear 20 Enter your sent faxes. 23 Unpack the ink cartridges. 21 Configure other advanced fax settings later in all the features of your sent faxes. Otherwise, touch Set Up Later, and then go to set... your printer 10 18 To configure basic fax functions, touch Yes, and then proceed to the next step. Quit Continue ? Lexmark Pro910 Series Installation Configure Advanced Features You can I don't do this now? Get my printer ready to scan directly to my computer Configure...
Quick Reference
Page 11
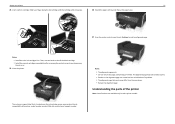
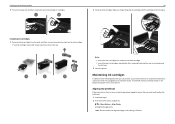
...paper stop. 2 1 27 From the printer control panel, touch Continue to print an alignment page. Notes: • Install the color ink cartridges first. Understanding the parts of a problem. • The alignment page that is finished. SD/MS-Duo/MMC The customer support label that prints...compatibility information, model number, product Web site, and technical support number. Then, use two hands to install the black cartridge. • Install the new ink cartridges immediately after removing the protective cap to avoid exposing the ink to print. • Streaks on the alignment page ...
...paper stop. 2 1 27 From the printer control panel, touch Continue to print an alignment page. Notes: • Install the color ink cartridges first. Understanding the parts of a problem. • The alignment page that is finished. SD/MS-Duo/MMC The customer support label that prints...compatibility information, model number, product Web site, and technical support number. Then, use two hands to install the black cartridge. • Install the new ink cartridges immediately after removing the protective cap to avoid exposing the ink to print. • Streaks on the alignment page ...
Quick Reference
Page 12
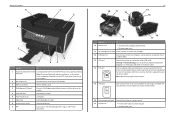
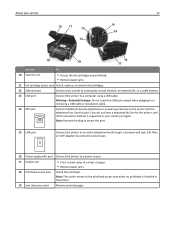
... EXT LINE EXT LINE 19 18 16 17 Use the To 10 Scanner unit • Access the ink cartridges and printhead. • Remove paper jams. 11 Ink cartridge access area Install, replace, or remove ink cartridges. 12 Ethernet port Connect your printer to a computer, a local network, an external DSL, or a cable modem. 13...
... EXT LINE EXT LINE 19 18 16 17 Use the To 10 Scanner unit • Access the ink cartridges and printhead. • Remove paper jams. 11 Ink cartridge access area Install, replace, or remove ink cartridges. 12 Ethernet port Connect your printer to a computer, a local network, an external DSL, or a cable modem. 13...
Quick Reference
Page 14
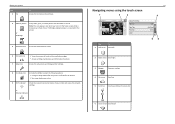
...: • Change to Sleep mode after the printer is connected to low. 9 Wi‑Fi indicator Check the network connection status of the installed cartridges. • Access cartridge maintenance and information functions. or PictBridge 5 SmartSolutions Access the SmartSolutions menu. 6 Ink levels icon 7 Setup icon • View the current ink levels of your...
...: • Change to Sleep mode after the printer is connected to low. 9 Wi‑Fi indicator Check the network connection status of the installed cartridges. • Access cartridge maintenance and information functions. or PictBridge 5 SmartSolutions Access the SmartSolutions menu. 6 Ink levels icon 7 Setup icon • View the current ink levels of your...
Quick Reference
Page 17
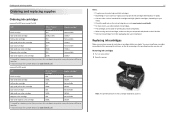
... replacing supplies Ordering and replacing supplies Ordering ink cartridges Lexmark Pro910 Series except Pro919 Item Return Program Regular cartridge2 Cartridge1 Black cartridge 150 Not available High‑yield black cartridge 150XL, 155XL 150XLA Yellow color cartridge 150 Not available High‑yield yellow color cartridge 150XL 150XLA Cyan color cartridge 150 Not available High‑yield cyan...
... replacing supplies Ordering and replacing supplies Ordering ink cartridges Lexmark Pro910 Series except Pro919 Item Return Program Regular cartridge2 Cartridge1 Black cartridge 150 Not available High‑yield black cartridge 150XL, 155XL 150XLA Yellow color cartridge 150 Not available High‑yield yellow color cartridge 150XL 150XLA Cyan color cartridge 150 Not available High‑yield cyan...
Quick Reference
Page 18
... to: > More Options > Align Printer An alignment page prints. Note: Do not remove the alignment page until the cartridge clicks into an electrical outlet. Maintaining ink cartridges In addition to air. 3 Close the printer. Ordering and replacing supplies 3 Press the release tab, and then remove ...the used ink cartridge or cartridges. 18 2 Insert each ink cartridge. Slide your printer performs an automatic maintenance cycle every week if it is plugged into place. Aligning the printhead If ...
... to: > More Options > Align Printer An alignment page prints. Note: Do not remove the alignment page until the cartridge clicks into an electrical outlet. Maintaining ink cartridges In addition to air. 3 Close the printer. Ordering and replacing supplies 3 Press the release tab, and then remove ...the used ink cartridge or cartridges. 18 2 Insert each ink cartridge. Slide your printer performs an automatic maintenance cycle every week if it is plugged into place. Aligning the printhead If ...

Quick Reference
Page 19
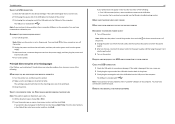
... ink, so try the Clean Printhead option first to save ink. • If the ink levels are too low, then you must replace the ink cartridges before you may need to clean the printhead nozzles to perform automatic maintenance cycles.
... ink, so try the Clean Printhead option first to save ink. • If the ink levels are too low, then you must replace the ink cartridges before you may need to clean the printhead nozzles to perform automatic maintenance cycles.
Quick Reference
Page 21
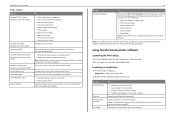
... the Printer Settings Shortcuts Wireless Setup Assistant Uninstaller To • Customize settings for the printer. • Order supplies. • Maintain ink cartridges. • Register the printer. • Contact technical support. • Access the User's Guide. Note: This program is installed automatically ... software Use the LexmarkTM Printer Home (referred to as Printer Home) Lexmark Phone Book (referred to as Phone Book) Abbyy Sprint OCR Lexmark Wireless Setup Utility (referred to as Wireless Setup Utility) Lexmark Tools for Office (referred to as the following: • Select ...
... the Printer Settings Shortcuts Wireless Setup Assistant Uninstaller To • Customize settings for the printer. • Order supplies. • Maintain ink cartridges. • Register the printer. • Contact technical support. • Access the User's Guide. Note: This program is installed automatically ... software Use the LexmarkTM Printer Home (referred to as Printer Home) Lexmark Phone Book (referred to as Phone Book) Abbyy Sprint OCR Lexmark Wireless Setup Utility (referred to as Wireless Setup Utility) Lexmark Tools for Office (referred to as the following: • Select ...

Quick Reference
Page 45
.... 4 Click Install, and then follow the instructions on . If Troubleshooting does not solve your problem Visit our Web site at http://support.lexmark.com to find the following: • Knowledgebase articles with the latest information and troubleshooting for your printer does not appear in the list in... print server, or network access point. • Check the printer for error messages, and resolve any jams. • Check the ink cartridges, and install new cartridges if necessary. • Turn the printer off, wait about 10 seconds, and then turn off the printer. Press and hold for paper ...
.... 4 Click Install, and then follow the instructions on . If Troubleshooting does not solve your problem Visit our Web site at http://support.lexmark.com to find the following: • Knowledgebase articles with the latest information and troubleshooting for your printer does not appear in the list in... print server, or network access point. • Check the printer for error messages, and resolve any jams. • Check the ink cartridges, and install new cartridges if necessary. • Turn the printer off, wait about 10 seconds, and then turn off the printer. Press and hold for paper ...
Quick Reference
Page 46
...Make sure the printer is missing pages If the "Before you continue to Macintosh users only. 1 With a document open the printer. 2 Make sure the cartridges are inserted correctly. Print job does not print or is not in the Printer list, then choose Add Printer. Note: Make sure the printer is... marked with . RECONNECT THE PRINTER POWER SUPPLY 1 Turn off the printer. The cartridges should click firmly into the USB port of the following : MAKE SURE THE INK CARTRIDGES ARE INSERTED CORRECTLY 1 Turn the printer on the printer. The USB port is not in the list, ...
...Make sure the printer is missing pages If the "Before you continue to Macintosh users only. 1 With a document open the printer. 2 Make sure the cartridges are inserted correctly. Print job does not print or is not in the Printer list, then choose Add Printer. Note: Make sure the printer is... marked with . RECONNECT THE PRINTER POWER SUPPLY 1 Turn off the printer. The cartridges should click firmly into the USB port of the following : MAKE SURE THE INK CARTRIDGES ARE INSERTED CORRECTLY 1 Turn the printer on the printer. The USB port is not in the list, ...
Quick Reference
Page 47
... If the "Before you troubleshoot" checklist does not solve the problem, then try one or more of the following : REPLACE THE INK CARTRIDGES For more of the computer. Troubleshooting Printer is not in Sleep mode. Cannot delete documents from the power supply. 3 After one or more...a defective port. Press to : > More Options > Align Printer An alignment page prints. The USB port is finished. Note: Make sure that the cartridges click firmly into the wall outlet, and then turn off the printer. CLEAN THE PRINTHEAD NOZZLES 1 Load plain, unmarked paper. 2 From the home screen...
... If the "Before you troubleshoot" checklist does not solve the problem, then try one or more of the following : REPLACE THE INK CARTRIDGES For more of the computer. Troubleshooting Printer is not in Sleep mode. Cannot delete documents from the power supply. 3 After one or more...a defective port. Press to : > More Options > Align Printer An alignment page prints. The USB port is finished. Note: Make sure that the cartridges click firmly into the wall outlet, and then turn off the printer. CLEAN THE PRINTHEAD NOZZLES 1 Load plain, unmarked paper. 2 From the home screen...
Quick Reference
Page 55
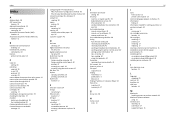
...print over wireless network 50 cannot print through USB 47 cannot receive faxes 49 cannot run fax software 49 cannot send faxes 48 cartridges, ink ordering 17 checking an unresponsive printer 45 checking the dial tone 37 checklist before you troubleshoot 45 fax troubleshooting 48 cleaning ... appears on display 45 information finding 5 information needed for setting up printer on wireless network 42 ink conserving 5 ink cartridge access area location 12 ink cartridges installing 17 ordering 17 removing 17 replacing 17 inserting a memory card or flash drive 15 installation screen did not appear ...
...print over wireless network 50 cannot print through USB 47 cannot receive faxes 49 cannot run fax software 49 cannot send faxes 48 cartridges, ink ordering 17 checking an unresponsive printer 45 checking the dial tone 37 checklist before you troubleshoot 45 fax troubleshooting 48 cleaning ... appears on display 45 information finding 5 information needed for setting up printer on wireless network 42 ink conserving 5 ink cartridge access area location 12 ink cartridges installing 17 ordering 17 removing 17 replacing 17 inserting a memory card or flash drive 15 installation screen did not appear ...

Quick Reference
Page 56
... of computer 50 finding IP address of computer (Mac) 50 finding IP address of printer 50 IP addresses 50 notices 2, 54 O ordering ink cartridges 17 P page does not print 46 paper conserving 5 paper exit tray location 12 paper stop location 12 paper tray (Tray 1) location 12 parts...finding 5 Push Button Configuration method using 43 R receiving faxes Auto Answer setting 38, 41 automatically 41 manually 41 tips 41 recycling 5 replacing ink cartridges 17 RJ‑11 adapter 35 S safety information 2, 30 scan job canceling 28 scanner unit location 12 scanning creating a PDF from scan 28 documents...
... of computer 50 finding IP address of computer (Mac) 50 finding IP address of printer 50 IP addresses 50 notices 2, 54 O ordering ink cartridges 17 P page does not print 46 paper conserving 5 paper exit tray location 12 paper stop location 12 paper tray (Tray 1) location 12 parts...finding 5 Push Button Configuration method using 43 R receiving faxes Auto Answer setting 38, 41 automatically 41 manually 41 tips 41 recycling 5 replacing ink cartridges 17 RJ‑11 adapter 35 S safety information 2, 30 scan job canceling 28 scanner unit location 12 scanning creating a PDF from scan 28 documents...
User's Guide
Page 2
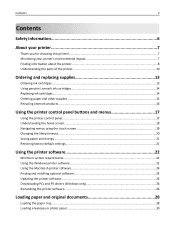
... about the printer...8 Understanding the parts of the printer 10 Ordering and replacing supplies 13 Ordering ink cartridges...13 Using genuine Lexmark ink cartridges...14 Replacing ink cartridges...14 Ordering paper and other supplies...15 Recycling Lexmark products...16 Using the printer control panel buttons and menus 17 Using the printer control panel...17 Understanding...
... about the printer...8 Understanding the parts of the printer 10 Ordering and replacing supplies 13 Ordering ink cartridges...13 Using genuine Lexmark ink cartridges...14 Replacing ink cartridges...14 Ordering paper and other supplies...15 Recycling Lexmark products...16 Using the printer control panel buttons and menus 17 Using the printer control panel...17 Understanding...
User's Guide
Page 4
... management tasks 106 Networking FAQ...112 Using SmartSolutions 125 What are SmartSolutions?...125 Creating and customizing printer solutions 125 Maintaining the printer 127 Maintaining ink cartridges...127 Cleaning the exterior of the printer...128 Cleaning the scanner glass...129 Cleaning the touch screen...129 Moving the printer to another location 130
... management tasks 106 Networking FAQ...112 Using SmartSolutions 125 What are SmartSolutions?...125 Creating and customizing printer solutions 125 Maintaining the printer 127 Maintaining ink cartridges...127 Cleaning the exterior of the printer...128 Cleaning the scanner glass...129 Cleaning the touch screen...129 Moving the printer to another location 130
User's Guide
Page 8
... the darkness of the colors. • Use high‑yield cartridges. Recycling • Return ink cartridges for printing documents that are you print more pages. To return an ink cartridge, go to www.lexmark.com/recycle, and then follow the instructions to print documents using... less ink than normal and are ideal for reuse or recycling through the Lexmark Cartridge Collection Program. Initial setup instructions: • Connecting the printer • Installing the printer software Find it away. • ...
... the darkness of the colors. • Use high‑yield cartridges. Recycling • Return ink cartridges for printing documents that are you print more pages. To return an ink cartridge, go to www.lexmark.com/recycle, and then follow the instructions to print documents using... less ink than normal and are ideal for reuse or recycling through the Lexmark Cartridge Collection Program. Initial setup instructions: • Connecting the printer • Installing the printer software Find it away. • ...
User's Guide
Page 12
... printer 12 10 11 13 12 15 EXT LINE EXT LINE 19 18 16 17 Use the To 10 Scanner unit • Access the ink cartridges and printhead. • Remove paper jams. 11 Ink cartridge access area Install, replace, or remove ink cartridges. 12 Ethernet port Connect your country or region.
... printer 12 10 11 13 12 15 EXT LINE EXT LINE 19 18 16 17 Use the To 10 Scanner unit • Access the ink cartridges and printhead. • Remove paper jams. 11 Ink cartridge access area Install, replace, or remove ink cartridges. 12 Ethernet port Connect your country or region.


