Quick Reference
Page 3
...28 Scanning to a PDF...28 Canceling scan jobs...28 E-mailing 29 Sending e-mail...29 Canceling an e‑mail...29 Setting up the printer to fax 30 Step 1: Connect the printer to the telephone line 30 Step 2: Check the dial tone 37 Step 3: Set your fax name and fax number 38 Step 4: Set... the printer to receive faxes automatically or manually 38 Step 5: Set the number of rings 38 Step 6: Create a contact list 38 Faxing 40 Sending faxes...40 Receiving faxes...41 Wireless ...
...28 Scanning to a PDF...28 Canceling scan jobs...28 E-mailing 29 Sending e-mail...29 Canceling an e‑mail...29 Setting up the printer to fax 30 Step 1: Connect the printer to the telephone line 30 Step 2: Check the dial tone 37 Step 3: Set your fax name and fax number 38 Step 4: Set... the printer to receive faxes automatically or manually 38 Step 5: Set the number of rings 38 Step 6: Create a contact list 38 Faxing 40 Sending faxes...40 Receiving faxes...41 Wireless ...
Quick Reference
Page 5
...Available on the installation software CD and on the Lexmark Support Web site at http://support.lexmark.com. 5 Minimizing your printer. Conserving energy • Activate Eco-Mode. Wireless/network printers allow you to Sleep mode after the printer has been idle for using the Comprehensive User's ...your printer About your printer Finding information about the printer The Quick Reference Guide contains instructions on adding your printer to a wireless network, setting up to 16 page images on one side of a sheet of paper. • Print on both sides of the paper manually or...
...Available on the installation software CD and on the Lexmark Support Web site at http://support.lexmark.com. 5 Minimizing your printer. Conserving energy • Activate Eco-Mode. Wireless/network printers allow you to Sleep mode after the printer has been idle for using the Comprehensive User's ...your printer About your printer Finding information about the printer The Quick Reference Guide contains instructions on adding your printer to a wireless network, setting up to 16 page images on one side of a sheet of paper. • Print on both sides of the paper manually or...
Quick Reference
Page 20
... does not appear after a minute, then launch the CD manually: a Click , or click Start and then click Run. Using the printer software Using the printer software Minimum system requirements The printer software requires up the printer using the installation software CD, all the necessary software was ...click Advanced Options > Install Additional Software. Using the Internet 1 Go to the Lexmark Web site at http://support.lexmark.com. 20 Installing the printer software Note: If you installed the printer software on the computer screen. You may have chosen to reinstall the software, ...
... does not appear after a minute, then launch the CD manually: a Click , or click Start and then click Run. Using the printer software Using the printer software Minimum system requirements The printer software requires up the printer using the installation software CD, all the necessary software was ...click Advanced Options > Install Additional Software. Using the Internet 1 Go to the Lexmark Web site at http://support.lexmark.com. 20 Installing the printer software Note: If you installed the printer software on the computer screen. You may have chosen to reinstall the software, ...

Quick Reference
Page 26
... document using the ADF, adjust the paper guide on the ADF to be copied is available only on the scanner glass. Scanning stops and the printer returns to make a selection. Tips for copying • Make sure you want , press to avoid dark edges on the scanner glass. • When ...postcards, photos, small items, transparencies, photo paper, or thin media (such as magazine clippings). Use the scanner glass for making a two‑sided copy manually. Making copies 1 Load the original document. 26 Note: From the home screen, you need to the previous menu. If you want to print, and ...
... document using the ADF, adjust the paper guide on the ADF to be copied is available only on the scanner glass. Scanning stops and the printer returns to make a selection. Tips for copying • Make sure you want , press to avoid dark edges on the scanner glass. • When ...postcards, photos, small items, transparencies, photo paper, or thin media (such as magazine clippings). Use the scanner glass for making a two‑sided copy manually. Making copies 1 Load the original document. 26 Note: From the home screen, you need to the previous menu. If you want to print, and ...
Quick Reference
Page 29
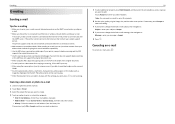
... the default e‑mail message, then navigate to enter or select the recipients: • Enter E‑mail Address-Enter the e‑mail address manually. • Address Book-Touch Sort by Name or Sort by Group, and then select the contact. • History-Select the name or e-mail... the SMTP server. Note: You can just select contacts from the history list. Canceling an e‑mail To cancel an e‑mail, press . The printer supports only one active network connection (Ethernet or wireless) at a time. • Add contacts to 30 recipients. 6 Set the color, quality, original image...
... the default e‑mail message, then navigate to enter or select the recipients: • Enter E‑mail Address-Enter the e‑mail address manually. • Address Book-Touch Sort by Name or Sort by Group, and then select the contact. • History-Select the name or e-mail... the SMTP server. Note: You can just select contacts from the history list. Canceling an e‑mail To cancel an e‑mail, press . The printer supports only one active network connection (Ethernet or wireless) at a time. • Add contacts to 30 recipients. 6 Set the color, quality, original image...

Quick Reference
Page 30
...with this product or a UL Listed 26 AWG or larger replacement when connecting this setup: • You can set the printer to receive faxes automatically (Auto Answer On) or manually (Auto Answer Off). • If you want to receive faxes automatically (Auto Answer On), then set up this product ...or make any number of fire, use the fax feature during a lightning storm. 30 Step 1: Connect the printer to the telephone line Check the...
...with this product or a UL Listed 26 AWG or larger replacement when connecting this setup: • You can set the printer to receive faxes automatically (Auto Answer On) or manually (Auto Answer Off). • If you want to receive faxes automatically (Auto Answer On), then set up this product ...or make any number of fire, use the fax feature during a lightning storm. 30 Step 1: Connect the printer to the telephone line Check the...
Quick Reference
Page 32
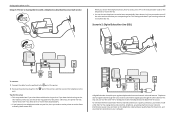
... to the Tips for the analog devices (fax machine, telephone, answering machine) in your line, then you need to receive faxes manually (Auto Answer Off). port of the printer. 2 Remove the protective plug from the port. A Digital Subscriber Line splits your computer. Scenario 2: Digital Subscriber Line (DSL) ... fax Setup 3: Printer is sharing the line with a telephone subscribed to voice mail service EXT LINE 32 When you answer the telephone and you hear fax tones, press *9* or the manual answer code on the telephone to receive the fax. • You can use the same line for...
... to the Tips for the analog devices (fax machine, telephone, answering machine) in your line, then you need to receive faxes manually (Auto Answer Off). port of the printer. 2 Remove the protective plug from the port. A Digital Subscriber Line splits your computer. Scenario 2: Digital Subscriber Line (DSL) ... fax Setup 3: Printer is sharing the line with a telephone subscribed to voice mail service EXT LINE 32 When you answer the telephone and you hear fax tones, press *9* or the manual answer code on the telephone to receive the fax. • You can use the same line for...

Quick Reference
Page 38
...and then save the setting. 3 Select Fax Number. 4 Enter your fax number or your telephone number, unless you set the printer to receive faxes automatically or manually: 1 From the printer control panel, navigate to Auto Answer: > Fax Setup > Ringing and Answering > Auto Answer 2 Select an Auto Answer setting, ... entering the contact name and fax number of your fax machine when a transmission is made. Step 4: Set the printer to receive faxes automatically or manually If the printer is sharing the line with an answering machine, then you hear a dial tone, then the telephone line and the...
...and then save the setting. 3 Select Fax Number. 4 Enter your fax number or your telephone number, unless you set the printer to receive faxes automatically or manually: 1 From the printer control panel, navigate to Auto Answer: > Fax Setup > Ringing and Answering > Auto Answer 2 Select an Auto Answer setting, ... entering the contact name and fax number of your fax machine when a transmission is made. Step 4: Set the printer to receive faxes automatically or manually If the printer is sharing the line with an answering machine, then you hear a dial tone, then the telephone line and the...
Quick Reference
Page 40
... faxes using the Phone Book feature. 5 If necessary, enter a prefix in the "Fax number(s)" field. Tips: • You can enter fax numbers manually or by using the printer control panel 1 Load an original document. 2 Touch Fax. 3 Send the fax: To send a fax to a single recipient: a Enter a fax ...Click the Fax tab, and then make any electrical or cabling connections, such as magazine clippings) into the ADF. Sending faxes Tips for your printer. Repeat this product or make sure Enable Fax is selected. 4 Enter the recipient fax number or numbers in the Dialing Prefix dialog. 6 ...
... faxes using the Phone Book feature. 5 If necessary, enter a prefix in the "Fax number(s)" field. Tips: • You can enter fax numbers manually or by using the printer control panel 1 Load an original document. 2 Touch Fax. 3 Send the fax: To send a fax to a single recipient: a Enter a fax ...Click the Fax tab, and then make any electrical or cabling connections, such as magazine clippings) into the ADF. Sending faxes Tips for your printer. Repeat this product or make sure Enable Fax is selected. 4 Enter the recipient fax number or numbers in the Dialing Prefix dialog. 6 ...

Quick Reference
Page 41
... the number of rings. • If you set the printer to the printer. ports while actively Tips: • If the printer is sharing the line with other analog devices (telephone, answering machine), then set the printer to receive faxes manually (Auto Answer Off), then make sure that Auto Answer is... not set it to a number that the ringer volume is *9*, but for your voice calls are the digits 0-9 and the characters # and *. Receiving faxes manually 1 Make sure that Auto...
... the number of rings. • If you set the printer to the printer. ports while actively Tips: • If the printer is sharing the line with other analog devices (telephone, answering machine), then set the printer to receive faxes manually (Auto Answer Off), then make sure that Auto Answer is... not set it to a number that the ringer volume is *9*, but for your voice calls are the digits 0-9 and the characters # and *. Receiving faxes manually 1 Make sure that Auto...

Quick Reference
Page 42
... Notes: • Hexadecimal characters are A-F, a-f, and 0-9. • ASCII characters are using security, then you will need to set up the printer on the computer screen. Wireless networking Wireless networking Information you will not have a security key. If the installation dialog does not appear after a ...minute, then launch the CD manually: a Click , or click Start and then click Run. If your access point is using WEP security, then the WEP key should be...
... Notes: • Hexadecimal characters are A-F, a-f, and 0-9. • ASCII characters are using security, then you will need to set up the printer on the computer screen. Wireless networking Wireless networking Information you will not have a security key. If the installation dialog does not appear after a ...minute, then launch the CD manually: a Click , or click Start and then click Run. If your access point is using WEP security, then the WEP key should be...

Quick Reference
Page 43
... Setup manually Note: Make sure your access point. If nothing happens after 30 seconds, then do one of the following: USE THE PUSH BUTTON CONFIGURATION (PBC) METHOD 1 From the printer control panel, navigate to configure it using WPS, then push the WPS button on the printer display.... Protected Setup > Push Button Method 2 Follow the instructions on the wireless router. USE THE PERSONAL IDENTIFICATION NUMBER (PIN) METHOD 1 From the printer control panel, navigate to begin WPS configuration. Wireless networking 43 You can find these WPS logos on the side, back, or top of your...
... Setup manually Note: Make sure your access point. If nothing happens after 30 seconds, then do one of the following: USE THE PUSH BUTTON CONFIGURATION (PBC) METHOD 1 From the printer control panel, navigate to configure it using WPS, then push the WPS button on the printer display.... Protected Setup > Push Button Method 2 Follow the instructions on the wireless router. USE THE PERSONAL IDENTIFICATION NUMBER (PIN) METHOD 1 From the printer control panel, navigate to begin WPS configuration. Wireless networking 43 You can find these WPS logos on the side, back, or top of your...

Quick Reference
Page 45
...messages, and clear any jams. • Check the ink cartridges, and install new cartridges if necessary. • Turn the printer off the printer. Incorrect language appears on . Before you encountered problems while installing, or if your CD or DVD drive. 3 Press Enter,...lexmark.com to turn off , wait about 10 seconds, and then turn the printer back on the display If the "Before you troubleshoot Use this setting. Note: Make sure the printer is not in the printers folder or as a printer option when sending a print job, then try the following: LAUNCH THE PRINTER CD MANUALLY...
...messages, and clear any jams. • Check the ink cartridges, and install new cartridges if necessary. • Turn the printer off the printer. Incorrect language appears on . Before you encountered problems while installing, or if your CD or DVD drive. 3 Press Enter,...lexmark.com to turn off , wait about 10 seconds, and then turn the printer back on the display If the "Before you troubleshoot Use this setting. Note: Make sure the printer is not in the printers folder or as a printer option when sending a print job, then try the following: LAUNCH THE PRINTER CD MANUALLY...
Quick Reference
Page 49
..., and then see the Software and Documentation CD. Wireless network troubleshooting If you are set the printer to receive faxes manually (Auto Answer Off), then you need to connect the printer to receive more information on the location of the network indicator lights, see"Understanding the home screen... driver or the Universal Fax Driver. If you are all plugged in so that the printer can change it to : > Fax Setup > Ringing and Answering > Manual Answer Code 2 Copy the manual answer code that appears on installing these drivers, see the complete network troubleshooting information in...
..., and then see the Software and Documentation CD. Wireless network troubleshooting If you are set the printer to receive faxes manually (Auto Answer Off), then you need to connect the printer to receive more information on the location of the network indicator lights, see"Understanding the home screen... driver or the Universal Fax Driver. If you are all plugged in so that the printer can change it to : > Fax Setup > Ringing and Answering > Manual Answer Code 2 Copy the manual answer code that appears on installing these drivers, see the complete network troubleshooting information in...
Quick Reference
Page 53
... the Port column. 7 If the Description column of the selected port indicates that came with Printer Port in the Printer column to make sure you are not sure how to do this, then refer to the manual that it is operating correctly, then continue troubleshooting. MAKE SURE BIDIRECTIONAL COMMUNICATION IS ENABLED Note: This...
... the Port column. 7 If the Description column of the selected port indicates that came with Printer Port in the Printer column to make sure you are not sure how to do this, then refer to the manual that it is operating correctly, then continue troubleshooting. MAKE SURE BIDIRECTIONAL COMMUNICATION IS ENABLED Note: This...
Quick Reference
Page 55
... cannot send faxes 48 fax troubleshooting checklist 48 faxing Auto Answer setting 38 receiving automatically 41 receiving manually 41 sending a broadcast fax immediately 40 sending using the printer control panel 40 setting sender information 38 tips, receiving 41 tips, sending 40 using the computer ...40 faxing tips receiving faxes automatically 41 FCC notices 54 features, printer 6 file types supported 15 finding information 5 publications 5 Web site 5 finding IP address of computer (Mac) 50 flash drive inserting 15...
... cannot send faxes 48 fax troubleshooting checklist 48 faxing Auto Answer setting 38 receiving automatically 41 receiving manually 41 sending a broadcast fax immediately 40 sending using the printer control panel 40 setting sender information 38 tips, receiving 41 tips, sending 40 using the computer ...40 faxing tips receiving faxes automatically 41 FCC notices 54 features, printer 6 file types supported 15 finding information 5 publications 5 Web site 5 finding IP address of computer (Mac) 50 flash drive inserting 15...

Quick Reference
Page 56
... from print queue 47 printer features 6 models 6 setting up 6 printer control panel buttons and icons 13 location 12 printer does not respond 47 printer features 6 printer models 6 printer printing blank pages 47 printer problems, basic solutions 45 printer software installing 20 printer solutions 44 printers supported 24 printhead aligning...sided 23 publications finding 5 Push Button Configuration method using 43 R receiving faxes Auto Answer setting 38, 41 automatically 41 manually 41 tips 41 recycling 5 replacing ink cartridges 17 RJ‑11 adapter 35 S safety information 2, 30 scan job ...
... from print queue 47 printer features 6 models 6 setting up 6 printer control panel buttons and icons 13 location 12 printer does not respond 47 printer features 6 printer models 6 printer printing blank pages 47 printer problems, basic solutions 45 printer software installing 20 printer solutions 44 printers supported 24 printhead aligning...sided 23 publications finding 5 Push Button Configuration method using 43 R receiving faxes Auto Answer setting 38, 41 automatically 41 manually 41 tips 41 recycling 5 replacing ink cartridges 17 RJ‑11 adapter 35 S safety information 2, 30 scan job ...

Quick Reference
Page 57
... VoIP adapter 33 W Web Links accessing 21 Web site finding 5 Windows installing printer on wireless network 42 Windows software Abbyy Sprint OCR 20 Phone Book 20 Printer Home 20 Printer Setup Utility 20 Printing Preferences 20 Product Update 20 Status Messenger 20 Status Monitor Center... Tools for Office 20 Wireless Setup Utility 20 wireless network information needed for setting up wireless printing 42 installing printer on (Macintosh) 42 installing printer on (Windows) 42 troubleshooting 49 wireless setup information needed for 42 wireless troubleshooting cannot print over wireless network ...
... VoIP adapter 33 W Web Links accessing 21 Web site finding 5 Windows installing printer on wireless network 42 Windows software Abbyy Sprint OCR 20 Phone Book 20 Printer Home 20 Printer Setup Utility 20 Printing Preferences 20 Product Update 20 Status Messenger 20 Status Monitor Center... Tools for Office 20 Wireless Setup Utility 20 wireless network information needed for setting up wireless printing 42 installing printer on (Macintosh) 42 installing printer on (Windows) 42 troubleshooting 49 wireless setup information needed for 42 wireless troubleshooting cannot print over wireless network ...
User's Guide
Page 7
...to print multiple pages on track fast. To avoid printing multiple copies, you to 16 page images on one sheet. By selecting certain printer settings or tasks, you print on both sides of time (the Sleep timeout). • Share your suggestions help you do it ..., and make sure it better. If you get the most out of the paper manually or automatically (depending on our Web site. Minimizing your printer's environmental impact We are committed to share a single printer among multiple computers, thus conserving energy and other resources. After all, you to protecting...
...to print multiple pages on track fast. To avoid printing multiple copies, you to 16 page images on one sheet. By selecting certain printer settings or tasks, you print on both sides of time (the Sleep timeout). • Share your suggestions help you do it ..., and make sure it better. If you get the most out of the paper manually or automatically (depending on our Web site. Minimizing your printer's environmental impact We are committed to share a single printer among multiple computers, thus conserving energy and other resources. After all, you to protecting...
User's Guide
Page 27
... after a minute, then launch the CD manually: a Click , or click Start and then click Run. Using the printer software 27 3 Double‑click Uninstaller. 4 Follow the instructions on this computer before but need to : SUPPORT & DOWNLOADS > select your printer > select your CD or DVD drive. ...advantage of the full features of your operating system 3 Download the driver, and then install the printer software. Using the Internet 1 Go to the Lexmark Web site at http://support.lexmark.com. 2 Navigate to reinstall the software, then uninstall the current software first. For Windows users ...
... after a minute, then launch the CD manually: a Click , or click Start and then click Run. Using the printer software 27 3 Double‑click Uninstaller. 4 Follow the instructions on this computer before but need to : SUPPORT & DOWNLOADS > select your printer > select your CD or DVD drive. ...advantage of the full features of your operating system 3 Download the driver, and then install the printer software. Using the Internet 1 Go to the Lexmark Web site at http://support.lexmark.com. 2 Navigate to reinstall the software, then uninstall the current software first. For Windows users ...


