Network Connection Quick Setup Guide
Page 4
Press the Enter button to set the DNS server address. It also provides users with access to printer status and special printing functions such as the Xerox WorkCentre M118/M118i. Press the Exit button. See Verifying Network Setup Using CentreWare Internet Services (CentreWare IS) on ...,, and then press the Enter button. 2. Set the Subnet Mask 1. With CentreWare IS software, you see the User Guide and the System Administration Guide. Note To enter network configuration settings via CentreWare IS, your desktop using a web browser. Verifying Network Setup Using ...
Press the Enter button to set the DNS server address. It also provides users with access to printer status and special printing functions such as the Xerox WorkCentre M118/M118i. Press the Exit button. See Verifying Network Setup Using CentreWare Internet Services (CentreWare IS) on ...,, and then press the Enter button. 2. Set the Subnet Mask 1. With CentreWare IS software, you see the User Guide and the System Administration Guide. Note To enter network configuration settings via CentreWare IS, your desktop using a web browser. Verifying Network Setup Using ...

Network Connection Quick Setup Guide
Page 7
...to manage, configure, and monitor networked printers from your desktop using CentreWare IS, see the User Guide and the System Administrator Guide on the Customer Documentation CD-ROM or the Xerox website. For additional information about using an embedded web server. Enter the machine's IP ...printer status and special printing functions such as the Xerox WorkCentre M118/M118i. To verify your web browser. 2. Select the Protocol Settings folder on the same subnet as printing saved jobs. Click the Properties tab. 4. The user ID and password should be on the left sidebar,...
...to manage, configure, and monitor networked printers from your desktop using CentreWare IS, see the User Guide and the System Administrator Guide on the Customer Documentation CD-ROM or the Xerox website. For additional information about using an embedded web server. Enter the machine's IP ...printer status and special printing functions such as the Xerox WorkCentre M118/M118i. To verify your web browser. 2. Select the Protocol Settings folder on the same subnet as printing saved jobs. Click the Properties tab. 4. The user ID and password should be on the left sidebar,...

PostScript® User Guide
Page 3
... 18 Configuration Tab Settings 19 Settings 19 Advanced Tab Settings 20 Settings 20 Output Settings Tab Settings 22 Settings 22 How to Use Help 22 Xerox WorkCentre 118 Postscript® User Guide 3
... 18 Configuration Tab Settings 19 Settings 19 Advanced Tab Settings 20 Settings 20 Output Settings Tab Settings 22 Settings 22 How to Use Help 22 Xerox WorkCentre 118 Postscript® User Guide 3

PostScript® User Guide
Page 4
... 40 Printer Driver Settings 41 Settings 41 Installing the Screen Fonts 43 6 Appendix 45 Cautions and Limitations 45 Troubleshooting 45 Print operation 45 7 Index 47 4 Xerox WorkCentre 118 Postscript® User Guide
... 40 Printer Driver Settings 41 Settings 41 Installing the Screen Fonts 43 6 Appendix 45 Cautions and Limitations 45 Troubleshooting 45 Print operation 45 7 Index 47 4 Xerox WorkCentre 118 Postscript® User Guide

PostScript® User Guide
Page 5
Xerox WorkCentre 118 Postscript® User Guide 5 License Agreement PostScript Logo Seal This seal accompanies printers compatible with the printer. PostScript Program ROM This ROM makes PostScript printing possible with PostScript. One PostScript Driver Library CD-ROM Includes the PostScript drivers and screen fonts. 1 Checking the PostScript Kit Contents The devices and components of the following are described below. If any of the kit are missing, contact the Xerox Welcome Center.
Xerox WorkCentre 118 Postscript® User Guide 5 License Agreement PostScript Logo Seal This seal accompanies printers compatible with the printer. PostScript Program ROM This ROM makes PostScript printing possible with PostScript. One PostScript Driver Library CD-ROM Includes the PostScript drivers and screen fonts. 1 Checking the PostScript Kit Contents The devices and components of the following are described below. If any of the kit are missing, contact the Xerox Welcome Center.

PostScript® User Guide
Page 6
1 Checking the PostScript Kit Contents 6 Xerox WorkCentre 118 Postscript® User Guide
1 Checking the PostScript Kit Contents 6 Xerox WorkCentre 118 Postscript® User Guide

PostScript® User Guide
Page 7
... for Windows 95/98/Me). Includes 136 screen fonts (19 TrueType fonts and 117 PostScript fonts), which are included on all major computing platforms. Xerox WorkCentre 118 Postscript® User Guide 7 Bundled Software The following information can be found in this chapter: • About the Software - Adobe Acrobat Reader - Hardware/Software Requirements • Installing...
... for Windows 95/98/Me). Includes 136 screen fonts (19 TrueType fonts and 117 PostScript fonts), which are included on all major computing platforms. Xerox WorkCentre 118 Postscript® User Guide 7 Bundled Software The following information can be found in this chapter: • About the Software - Adobe Acrobat Reader - Hardware/Software Requirements • Installing...

PostScript® User Guide
Page 8
...the computer. Click [Have Disk]. 8. Enter "Drive Name:\English\PrinterDriver\win9x_Me" in the "Copy manufacturer's files from the Printers list and click [Next]. 8 Xerox WorkCentre 118 Postscript® User Guide Select your CD-ROM drive. 7. Installation Procedure 1. Click [Next]. 5. Otherwise, select [Network printer]. If you select [Network printer], specify the path to cancel...click [Back] to ignore the settings in the dialog box displayed during installation. Start Windows 98. 2. NOTE: When you are described below . In this guide, we have used "E:" as an example.
...the computer. Click [Have Disk]. 8. Enter "Drive Name:\English\PrinterDriver\win9x_Me" in the "Copy manufacturer's files from the Printers list and click [Next]. 8 Xerox WorkCentre 118 Postscript® User Guide Select your CD-ROM drive. 7. Installation Procedure 1. Click [Next]. 5. Otherwise, select [Network printer]. If you select [Network printer], specify the path to cancel...click [Back] to ignore the settings in the dialog box displayed during installation. Start Windows 98. 2. NOTE: When you are described below . In this guide, we have used "E:" as an example.
PostScript® User Guide
Page 9
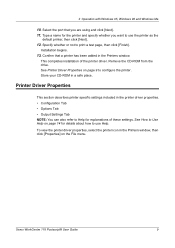
2 Operation with Windows 95, Windows 98 and Windows Me 10. Specify whether or not to configure the printer. Remove the CD-ROM from the drive. Xerox WorkCentre 118 Postscript® User Guide 9 See Printer Driver Properties on page 9 to print a test page, then click [Finish]. To view the printer driver properties, select the printer icon...
2 Operation with Windows 95, Windows 98 and Windows Me 10. Specify whether or not to configure the printer. Remove the CD-ROM from the drive. Xerox WorkCentre 118 Postscript® User Guide 9 See Printer Driver Properties on page 9 to print a test page, then click [Finish]. To view the printer driver properties, select the printer icon...

PostScript® User Guide
Page 10
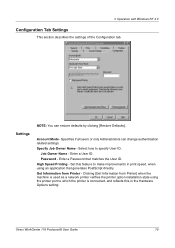
... becomes lighter. 2 Operation with Windows 95, Windows 98 and Windows Me Configuration Tab Settings This section describes the settings of the paper, select [Portrait]. 10 Xerox WorkCentre 118 Postscript® User Guide
... becomes lighter. 2 Operation with Windows 95, Windows 98 and Windows Me Configuration Tab Settings This section describes the settings of the paper, select [Portrait]. 10 Xerox WorkCentre 118 Postscript® User Guide

PostScript® User Guide
Page 11
... original and automatically adjusts the image size as the transparency. Available Font Cache - Enter the amount of the custom paper. Xerox WorkCentre 118 Postscript® User Guide 11 Specifies a paper type for the small size halftone dot commonly used in the Edit box. Use the printer settings.... until paper is not necessary to change this . Feed Separators from . Selects paper larger than the Fine Dots setting. Specifies if all users or only Administrators can be fed from - Select [Thick Dots] for printing. Use Nearest Size (Adjust to Fit) - Specifies the paper...
... original and automatically adjusts the image size as the transparency. Available Font Cache - Enter the amount of the custom paper. Xerox WorkCentre 118 Postscript® User Guide 11 Specifies a paper type for the small size halftone dot commonly used in the Edit box. Use the printer settings.... until paper is not necessary to change this . Feed Separators from . Selects paper larger than the Fine Dots setting. Specifies if all users or only Administrators can be fed from - Select [Thick Dots] for printing. Use Nearest Size (Adjust to Fit) - Specifies the paper...

PostScript® User Guide
Page 12
... paper size group for different areas to enable the selection of 8K and 16K paper size that location. Displays the amount of printer memory. 12 Xerox WorkCentre 118 Postscript® User Guide
... paper size group for different areas to enable the selection of 8K and 16K paper size that location. Displays the amount of printer memory. 12 Xerox WorkCentre 118 Postscript® User Guide

PostScript® User Guide
Page 13
... conflicts with Windows 95, Windows 98 and Windows Me Output Settings Tab Settings This section describes the settings in the Paper tab. E-Mail Address - Xerox WorkCentre 118 Postscript® User Guide 13 When [Use Printer Settings] is selected, outputs the banner sheet using the first sheet. E-Mail Job Confirmation - Specifies the e-mail address for...
... conflicts with Windows 95, Windows 98 and Windows Me Output Settings Tab Settings This section describes the settings in the Paper tab. E-Mail Address - Xerox WorkCentre 118 Postscript® User Guide 13 When [Use Printer Settings] is selected, outputs the banner sheet using the first sheet. E-Mail Job Confirmation - Specifies the e-mail address for...

PostScript® User Guide
Page 14
... it. 2. How to Use Help The following describes how to continue printing. Check the content of the current tab appears as Help information. 14 Xerox WorkCentre 118 Postscript® User Guide Default is automatically resolved and printing continues. Click inside the pop-up window that contains relevant information. When this is activated, a conflict dialog...
... it. 2. How to Use Help The following describes how to continue printing. Check the content of the current tab appears as Help information. 14 Xerox WorkCentre 118 Postscript® User Guide Default is automatically resolved and printing continues. Click inside the pop-up window that contains relevant information. When this is activated, a conflict dialog...

PostScript® User Guide
Page 15
... Tab Settings - AdobePS™ Printer Driver (ver. 5.2.2) and PPD files - Helps you to view and print PDF files on all major computing platforms. Xerox WorkCentre 118 Postscript® User Guide 15 Allows you use the Adobe PostScript (5.2.2) printer driver. Installation Procedure • Device Options and Print Settings - Device Settings Tab Settings - Adobe PostScript driver...
... Tab Settings - AdobePS™ Printer Driver (ver. 5.2.2) and PPD files - Helps you to view and print PDF files on all major computing platforms. Xerox WorkCentre 118 Postscript® User Guide 15 Allows you use the Adobe PostScript (5.2.2) printer driver. Installation Procedure • Device Options and Print Settings - Device Settings Tab Settings - Adobe PostScript driver...

PostScript® User Guide
Page 16
... If you are using a different drive for details about the Power User group. 2. NOTE: Click [Browse] to the network in other cases. You can operate. In this guide, we have used "E:" as a Power User group member or an Administrator. Basic Software Windows NT Workstation 4.0/Windows NT... CD-ROM in the dialog box displayed during installation. Installation Procedure 1. NOTE: Log on the CD-ROM. 16 Xerox WorkCentre 118 Postscript® User Guide Select how the printer is an example of the printer driver by following is connected to the previous dialog box. ...
... If you are using a different drive for details about the Power User group. 2. NOTE: Click [Browse] to the network in other cases. You can operate. In this guide, we have used "E:" as a Power User group member or an Administrator. Basic Software Windows NT Workstation 4.0/Windows NT... CD-ROM in the dialog box displayed during installation. Installation Procedure 1. NOTE: Log on the CD-ROM. 16 Xerox WorkCentre 118 Postscript® User Guide Select how the printer is an example of the printer driver by following is connected to the previous dialog box. ...

PostScript® User Guide
Page 17
...]. To view the Device Settings or Configuration tabs, select the printer icon in the Printers window, then click Document Defaults on page 22. Xerox WorkCentre 118 Postscript® User Guide 17 Enter the printer name, specify if you install the driver on the File menu. This completes installation of these settings. Store your printer...
...]. To view the Device Settings or Configuration tabs, select the printer icon in the Printers window, then click Document Defaults on page 22. Xerox WorkCentre 118 Postscript® User Guide 17 Enter the printer name, specify if you install the driver on the File menu. This completes installation of these settings. Store your printer...
PostScript® User Guide
Page 18
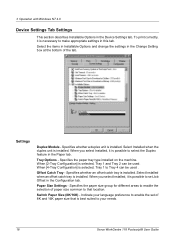
... Installed when an offset catch tray is installed. Select Installed when the duplex unit is installed. Indicate your language preference to your needs. 18 Xerox WorkCentre 118 Postscript® User Guide Specifies whether an offset catch tray is best suited to enable the set Job Offset in the Configuration tab. Paper Size Settings - Settings...
... Installed when an offset catch tray is installed. Select Installed when the duplex unit is installed. Indicate your language preference to your needs. 18 Xerox WorkCentre 118 Postscript® User Guide Specifies whether an offset catch tray is best suited to enable the set Job Offset in the Configuration tab. Paper Size Settings - Settings...
PostScript® User Guide
Page 19
.... Clicking [Get Information from Printer - Specifies if all users or only Administrators can restore defaults by clicking [Restore Defaults]. Enter a User ID. High Speed Printing - Account Mode - Specify Job Owner Name - Job Owner Name - Set this in the Hardware Options setting. Xerox WorkCentre 118 Postscript® User Guide 19 Get Information from Printer] when the machine...
.... Clicking [Get Information from Printer - Specifies if all users or only Administrators can restore defaults by clicking [Restore Defaults]. Enter a User ID. High Speed Printing - Account Mode - Specify Job Owner Name - Job Owner Name - Set this in the Hardware Options setting. Xerox WorkCentre 118 Postscript® User Guide 19 Get Information from Printer] when the machine...

PostScript® User Guide
Page 20
... long edge of the paper first, select [Landscape]. Print on page 18. When feeding the short edge of the paper, select [Portrait]. 20 Xerox WorkCentre 118 Postscript® User Guide 3 Operation with Windows NT 4.0 Advanced Tab Settings This section describes the settings of the tab. Specifies the paper tray that the option settings are...
... long edge of the paper first, select [Landscape]. Print on page 18. When feeding the short edge of the paper, select [Portrait]. 20 Xerox WorkCentre 118 Postscript® User Guide 3 Operation with Windows NT 4.0 Advanced Tab Settings This section describes the settings of the tab. Specifies the paper tray that the option settings are...


