Network Connection Quick Setup Guide
Page 4
... computer, launch your network setup using an embedded web server. Set the Subnet Mask 1. It also provides users with access to enter the remaining numbers. 4. Click the Properties tab. 4. Repeat Step 2 to printer status and special printing functions such as the Xerox WorkCentre M118/M118i. For additional information about using a web browser. Enter the machine's IP address in the browser's Address field (http://xxx.xxx.xxx.xxx). 3. Press the Enter button to accept the subnet...
... computer, launch your network setup using an embedded web server. Set the Subnet Mask 1. It also provides users with access to enter the remaining numbers. 4. Click the Properties tab. 4. Repeat Step 2 to printer status and special printing functions such as the Xerox WorkCentre M118/M118i. For additional information about using a web browser. Enter the machine's IP address in the browser's Address field (http://xxx.xxx.xxx.xxx). 3. Press the Enter button to accept the subnet...

Network Connection Quick Setup Guide
Page 7
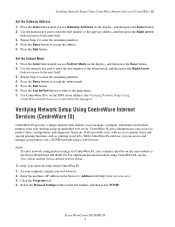
... Apply New Settings button at the bottom of the page. 6. Xerox WorkCentre M118/M118i 5 Select the Protocol Settings folder on the same subnet as printing saved jobs. It also provides users with access to [ip address] dialog box, and then click the OK button. ■ Default user ID: admin ■ Default password: x-admin. Verifying Network Setup Using CentreWare Internet Services (IS) Verifying Network Setup Using CentreWare Internet Services (IS) CentreWare IS provides a simple interface that enables you to manage, configure, and monitor networked printers...
... Apply New Settings button at the bottom of the page. 6. Xerox WorkCentre M118/M118i 5 Select the Protocol Settings folder on the same subnet as printing saved jobs. It also provides users with access to [ip address] dialog box, and then click the OK button. ■ Default user ID: admin ■ Default password: x-admin. Verifying Network Setup Using CentreWare Internet Services (IS) Verifying Network Setup Using CentreWare Internet Services (IS) CentreWare IS provides a simple interface that enables you to manage, configure, and monitor networked printers...

Quick Reference Guide
Page 13
... odors. - This is damaged. A wall panel circuit breaker, fuse, or other than those specified herein may result in device. Any part of the equipment is a safety feature. Laser Safety Information CAUTION: Use of controls, adjustments or performance of your building. 12 Xerox CopyCentre/WorkCentre 118 Quick Reference Guide Z This equipment must be connected to a correctly grounded power outlet. Operational Safety Information To ensure the...
... odors. - This is damaged. A wall panel circuit breaker, fuse, or other than those specified herein may result in device. Any part of the equipment is a safety feature. Laser Safety Information CAUTION: Use of controls, adjustments or performance of your building. 12 Xerox CopyCentre/WorkCentre 118 Quick Reference Guide Z This equipment must be connected to a correctly grounded power outlet. Operational Safety Information To ensure the...

Quick Reference Guide
Page 30
... mode. Xerox CopyCentre/WorkCentre 118 Quick Reference Guide 29 Allows you to specify the fax number or e-mail address using Speed Dial codes. 9 Changes the language displayed on User Guide. Refer to move the cursor in to cancel this mode. NOTE: Press the button before setting the recipient or functions. Indicates that data is not loaded into the feeder, you can also use the direct send feature. Also allows you to the machine as the Key Operator, and change the default settings...
... mode. Xerox CopyCentre/WorkCentre 118 Quick Reference Guide 29 Allows you to specify the fax number or e-mail address using Speed Dial codes. 9 Changes the language displayed on User Guide. Refer to move the cursor in to cancel this mode. NOTE: Press the button before setting the recipient or functions. Indicates that data is not loaded into the feeder, you can also use the direct send feature. Also allows you to the machine as the Key Operator, and change the default settings...

Quick Reference Guide
Page 105
... size of the print page buffer. • Add on . Select print language. 104 Xerox CopyCentre/WorkCentre 118 Quick Reference Guide S10027 During document scanning, the document feeder cover opened . Instruct the machine to print again. If an error cannot be resolved, contact the Xerox Welcome Center. 016-726 The print language could not be processed because of insufficient print page buffer. S10026 During document scanning, the document glass cover opened . Also, check that the DNS server is not set correctly. Open the document feeder cover and remove...
... size of the print page buffer. • Add on . Select print language. 104 Xerox CopyCentre/WorkCentre 118 Quick Reference Guide S10027 During document scanning, the document feeder cover opened . Instruct the machine to print again. If an error cannot be resolved, contact the Xerox Welcome Center. 016-726 The print language could not be processed because of insufficient print page buffer. S10026 During document scanning, the document glass cover opened . Also, check that the DNS server is not set correctly. Open the document feeder cover and remove...

Quick Reference Guide
Page 106
... PDF file using ContentsBridge Utility. A password entered for optimized speed in ContentsBridge as follows and try again. The machine could not print the PDF file because it to print it contains features not supported in the print driver. • Increase the size of copies has been reached. Enter the correct password. Change the print mode in the print driver and try again. Contact the Key Operator. Set for the direct print is not registered in the document security settings...
... PDF file using ContentsBridge Utility. A password entered for optimized speed in ContentsBridge as follows and try again. The machine could not print the PDF file because it to print it contains features not supported in the print driver. • Increase the size of copies has been reached. Enter the correct password. Change the print mode in the print driver and try again. Contact the Key Operator. Set for the direct print is not registered in the document security settings...

System Administration Guide
Page 22
... view the machine Serial Number. 22 Xerox CopyCentre/WorkCentre 118 System Administration Guide Print Meter Prints information on the total printed pages and total number of sheets used in PostScript when the PostScript kit has been installed. Press the button, and then select the required option by selecting [T] or [S] using the button. • PCL Form List - Prints a list of jobs with errors are printed in the PDF print mode. • PCL Settings - Prints a report which provides the various settings in the machine. Billing...
... view the machine Serial Number. 22 Xerox CopyCentre/WorkCentre 118 System Administration Guide Print Meter Prints information on the total printed pages and total number of sheets used in PostScript when the PostScript kit has been installed. Press the button, and then select the required option by selecting [T] or [S] using the button. • PCL Form List - Prints a list of jobs with errors are printed in the PDF print mode. • PCL Settings - Prints a report which provides the various settings in the machine. Billing...

System Administration Guide
Page 25
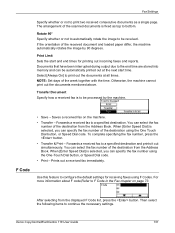
... the document feeder; You can press the button only for sending. Refer to Setups chapter of the User Guide. 11 (Green light) Indicates whether the machine is data stored in the machine. 5 6 Allows you to log in a telephone number when transmitting a fax. 8 Allows you to specify the fax number or e-mail address using Speed Dial codes. 9 Changes the language displayed on the screen. 10 Allows you to select options displayed on the screen. Xerox CopyCentre/WorkCentre 118 System Administration Guide...
... the document feeder; You can press the button only for sending. Refer to Setups chapter of the User Guide. 11 (Green light) Indicates whether the machine is data stored in the machine. 5 6 Allows you to log in a telephone number when transmitting a fax. 8 Allows you to specify the fax number or e-mail address using Speed Dial codes. 9 Changes the language displayed on the screen. 10 Allows you to select options displayed on the screen. Xerox CopyCentre/WorkCentre 118 System Administration Guide...

System Administration Guide
Page 37
... machine has been installed on the machine and verify that the print driver is available for use. Print the document on the network correctly, submit a test print from the client computers, activate the IP Filter. Make sure that it prints correctly. 4. Xerox CopyCentre/WorkCentre 118 System Administration Guide 37 set as the [TCP/IP Settings] screen. Perform the following steps. 1. The installation process is located in the same layer as Auto Load. • Printer Type - NetWare Setup Use...
... machine has been installed on the machine and verify that the print driver is available for use. Print the document on the network correctly, submit a test print from the client computers, activate the IP Filter. Make sure that it prints correctly. 4. Xerox CopyCentre/WorkCentre 118 System Administration Guide 37 set as the [TCP/IP Settings] screen. Perform the following steps. 1. The installation process is located in the same layer as Auto Load. • Printer Type - NetWare Setup Use...

System Administration Guide
Page 65
... [Network/Port] screen. First, enable the SMB port. 1. Xerox CopyCentre/WorkCentre 118 System Administration Guide 65 When using the control panel or CentreWare Internet Services. Select [Print Settings] and then press the button. 6. Press the button. 3. Select [System Settings]. 4. SMB Installation SMB Installation This section describes the installation procedure for using the numeric keypad and then select [Confirm]. 5. NOTE: CentreWare Internet Services can also be submitted to configure the machine. Set the IP address on the computer. Test Print A print job should...
... [Network/Port] screen. First, enable the SMB port. 1. Xerox CopyCentre/WorkCentre 118 System Administration Guide 65 When using the control panel or CentreWare Internet Services. Select [Print Settings] and then press the button. 6. Press the button. 3. Select [System Settings]. 4. SMB Installation SMB Installation This section describes the installation procedure for using the numeric keypad and then select [Confirm]. 5. NOTE: CentreWare Internet Services can also be submitted to configure the machine. Set the IP address on the computer. Test Print A print job should...
System Administration Guide
Page 67
... client computer. Test Print Make sure that the machine has been installed on the network correctly by submitting a test print from the client computers, activate the IP Filter. Repeat the test for all workstations that it prints correctly. 4. Open a document on the machine and verify that will be sending jobs to the machine from a client workstation. Xerox CopyCentre/WorkCentre 118 System Administration Guide 67 The [Filter] screen is located in CentreWare Utilities...
... client computer. Test Print Make sure that the machine has been installed on the network correctly by submitting a test print from the client computers, activate the IP Filter. Repeat the test for all workstations that it prints correctly. 4. Open a document on the machine and verify that will be sending jobs to the machine from a client workstation. Xerox CopyCentre/WorkCentre 118 System Administration Guide 67 The [Filter] screen is located in CentreWare Utilities...

System Administration Guide
Page 83
Select [Print Settings] and then press the button. 5. Select [Port Status] by selecting [T] or [S] and then press the button. Xerox CopyCentre/WorkCentre 118 System Administration Guide 83 Enter the password using the numeric keypad and then select [Confirm]. 4. Continue with the optional PostScript Kit, and install the print drivers for the machine on page 91. 1. Enable the USB port. Press the button on page 84. Select [Enable] by selecting [T] or [S] and then press the button. 8. If necessary, you...
Select [Print Settings] and then press the button. 5. Select [Port Status] by selecting [T] or [S] and then press the button. Xerox CopyCentre/WorkCentre 118 System Administration Guide 83 Enter the password using the numeric keypad and then select [Confirm]. 4. Continue with the optional PostScript Kit, and install the print drivers for the machine on page 91. 1. Enable the USB port. Press the button on page 84. Select [Enable] by selecting [T] or [S] and then press the button. 8. If necessary, you...

System Administration Guide
Page 88
... [Manual], press the button and then go to enter the IP address in the same layer as a printer. Test Print To make sure that it prints correctly. 88 Xerox CopyCentre/WorkCentre 118 System Administration Guide If you wish to filter access to the HTML documentation in step 4, use the following steps. 1. NOTE: Press the button to move to the previous section. Press the button. 6. The [Filter] screen is located in...
... [Manual], press the button and then go to enter the IP address in the same layer as a printer. Test Print To make sure that it prints correctly. 88 Xerox CopyCentre/WorkCentre 118 System Administration Guide If you wish to filter access to the HTML documentation in step 4, use the following steps. 1. NOTE: Press the button to move to the previous section. Press the button. 6. The [Filter] screen is located in...

System Administration Guide
Page 93
Network Communication Setup Use this procedure to set up for CentreWare Internet Services. Select [Print Settings] and then press the button. 6. Select [Port Status] by selecting [T] or [S] and then press the button. 8. Connect the machine to enable CentreWare Internet Services. Enter the password using the numeric keypad and then select [Confirm]. 5. Network Communication Setup This requires the machine to use CentreWare Internet Services. Test Access To make sure that CentreWare Internet Services has been set up correctly, you should access CentreWare...
Network Communication Setup Use this procedure to set up for CentreWare Internet Services. Select [Print Settings] and then press the button. 6. Select [Port Status] by selecting [T] or [S] and then press the button. 8. Connect the machine to enable CentreWare Internet Services. Enter the password using the numeric keypad and then select [Confirm]. 5. Network Communication Setup This requires the machine to use CentreWare Internet Services. Test Access To make sure that CentreWare Internet Services has been set up correctly, you should access CentreWare...

System Administration Guide
Page 133
... Service 127 NetWare 112 SMB 117 UNIX 119 Windows 121 S Symbol Set 30 T TCP/IP (LPD or Port9100 71 Information Checklist 71 Network Communication Setup 73 TCP/IP (LPD or Port9100) Environments .... 72 Test Print 75 Workstation Setup 75 U UNIX TCP/IP 39 -C Option 54 HP-UX 46 Information Checklist 39 Network Communication Setup 41 Printer Status 52 Printing 48 Solaris 44 Xerox CopyCentre/WorkCentre 118 Quick...
... Service 127 NetWare 112 SMB 117 UNIX 119 Windows 121 S Symbol Set 30 T TCP/IP (LPD or Port9100 71 Information Checklist 71 Network Communication Setup 73 TCP/IP (LPD or Port9100) Environments .... 72 Test Print 75 Workstation Setup 75 U UNIX TCP/IP 39 -C Option 54 HP-UX 46 Information Checklist 39 Network Communication Setup 41 Printer Status 52 Printing 48 Solaris 44 Xerox CopyCentre/WorkCentre 118 Quick...

User Guide
Page 16
.... Z This equipment must be connected to a location outside of your building. 16 Xerox CopyCentre/WorkCentre 118 User Guide This plug will fit only into the equipment. - This equipment is a safety feature. A wall panel circuit breaker, fuse, or other than those specified herein may result in device. Any part of procedures other safety device has been tripped. - Operational Safety Information To ensure...
.... Z This equipment must be connected to a location outside of your building. 16 Xerox CopyCentre/WorkCentre 118 User Guide This plug will fit only into the equipment. - This equipment is a safety feature. A wall panel circuit breaker, fuse, or other than those specified herein may result in device. Any part of procedures other safety device has been tripped. - Operational Safety Information To ensure...

User Guide
Page 130
... savings • Date and time format • Fax connection approvals Set required country code referring to Country Code List on page 213. NOTE: Before changing the country code, be specified separately. The phone line and network cable are disconnected to confirm the appropriate country code. 130 Xerox CopyCentre/WorkCentre 118 User Guide Enter the required country code using numeric keypad on the [Common Setting] screen using the button. 2. Refer to the country code list to avoid processing any new job. - Refer to clear the displayed...
... savings • Date and time format • Fax connection approvals Set required country code referring to Country Code List on page 213. NOTE: Before changing the country code, be specified separately. The phone line and network cable are disconnected to confirm the appropriate country code. 130 Xerox CopyCentre/WorkCentre 118 User Guide Enter the required country code using numeric keypad on the [Common Setting] screen using the button. 2. Refer to the country code list to avoid processing any new job. - Refer to clear the displayed...

User Guide
Page 143
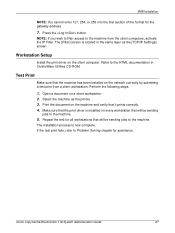
... button. 3. Print Settings Specify whether or not to output the banner sheet. Print Area Specify whether or not to 4) outputs the banner sheet. If you want to output it, specify whether to print reports/lists single-sided or double-sided. Printer Settings Use this feature to specify the default settings of 1 to automatically print information (Job History Report) about processed print jobs. Perform the necessary operations. Specify which tray (Tray 1 to extend the print area. Specify the date for the printer...
... button. 3. Print Settings Specify whether or not to output the banner sheet. Print Area Specify whether or not to 4) outputs the banner sheet. If you want to output it, specify whether to print reports/lists single-sided or double-sided. Printer Settings Use this feature to specify the default settings of 1 to automatically print information (Job History Report) about processed print jobs. Perform the necessary operations. Specify which tray (Tray 1 to extend the print area. Specify the date for the printer...

User Guide
Page 150
... length to be printed when receiving a fax. If [Tray Mode] is not printed. • Minimum Size - If you select [Adjust Width], the machine selects from paper sizes whose widths are equal to or shorter than the received documents. Multiple-Up 150 Xerox CopyCentre/WorkCentre 118 User Guide 9 Setups NOTE: When the memory full error occurs, the settings for each tray when receiving a fax. When this occurs, documents will be split into multiple pages depending on received documents. Print Date/Time Select whether or...
... length to be printed when receiving a fax. If [Tray Mode] is not printed. • Minimum Size - If you select [Adjust Width], the machine selects from paper sizes whose widths are equal to or shorter than the received documents. Multiple-Up 150 Xerox CopyCentre/WorkCentre 118 User Guide 9 Setups NOTE: When the memory full error occurs, the settings for each tray when receiving a fax. When this occurs, documents will be split into multiple pages depending on received documents. Print Date/Time Select whether or...
User Guide
Page 151
... time. Prints out a received fax immediately. For more information about F code,Refer to continue the necessary settings. Xerox CopyCentre/WorkCentre 118 User Guide 151 Print Limit Sets the start time. You can select the fax number of the destination from the Address Book. You can select the fax number of the destination from the displayed F Code list, press the button. After selecting from the Address Book. The arrangement of the received document and loaded paper differ, the machine automatically rotates the image...
... time. Prints out a received fax immediately. For more information about F code,Refer to continue the necessary settings. Xerox CopyCentre/WorkCentre 118 User Guide 151 Print Limit Sets the start time. You can select the fax number of the destination from the Address Book. You can select the fax number of the destination from the displayed F Code list, press the button. After selecting from the Address Book. The arrangement of the received document and loaded paper differ, the machine automatically rotates the image...


