
Network Connection Quick Setup Guide
Page 1
... of the following methods: ■ DHCP: Use this method to an operational Ethernet port on the network. It includes procedures for connecting the Xerox WorkCentre M118/M118i on an Ethernet TCP/IP network. Xerox WorkCentre® M118/M118i Network Connection Quick Setup Guide 701P42575 This guide includes instructions for: ■ Navigating Display Screens on page 2 ■ Network...
... of the following methods: ■ DHCP: Use this method to an operational Ethernet port on the network. It includes procedures for connecting the Xerox WorkCentre M118/M118i on an Ethernet TCP/IP network. Xerox WorkCentre® M118/M118i Network Connection Quick Setup Guide 701P42575 This guide includes instructions for: ■ Navigating Display Screens on page 2 ■ Network...

Network Connection Quick Setup Guide
Page 2
... screen. Use the Right Arrow and Left Arrow buttons to navigate screens or to move from one entry field to verify the network setup. Network Setup Using DHCP When the machine starts up after power on the machine. 2. On the control panel, press the Machine Status button. ...until you see System Settings on page 4. Note If the IP address starts with the DHCP server for the network setup to scroll through menus. 2. c. Xerox WorkCentre M118/M118i 2 Use the Select buttons to obtain its network configuration information. Use the Enter button to accept the currently selected ...
... screen. Use the Right Arrow and Left Arrow buttons to navigate screens or to move from one entry field to verify the network setup. Network Setup Using DHCP When the machine starts up after power on the machine. 2. On the control panel, press the Machine Status button. ...until you see System Settings on page 4. Note If the IP address starts with the DHCP server for the network setup to scroll through menus. 2. c. Xerox WorkCentre M118/M118i 2 Use the Select buttons to obtain its network configuration information. Use the Enter button to accept the currently selected ...

Network Connection Quick Setup Guide
Page 3
... Address on the machine. 2. If there is an incorrect IP address in the field, press the Clear button to select System Settings. Xerox WorkCentre M118/M118i 3 When the machine is 11111. The default password is Ready, press the Log In/Out button. 3. Press the the Enter button...and then press the Enter button. 4. Press the Exit button. Press the Select button to obtain its network configuration. Network Setup Using a Static IP Address Network Setup Using a Static IP Address When the machine is powered on, it automatically uses DHCP to select Confirm. Turn DHCP Off ...
... Address on the machine. 2. If there is an incorrect IP address in the field, press the Clear button to select System Settings. Xerox WorkCentre M118/M118i 3 When the machine is 11111. The default password is Ready, press the Log In/Out button. 3. Press the the Enter button...and then press the Enter button. 4. Press the Exit button. Press the Select button to obtain its network configuration. Network Setup Using a Static IP Address Network Setup Using a Static IP Address When the machine is powered on, it automatically uses DHCP to select Confirm. Turn DHCP Off ...
Network Connection Quick Setup Guide
Page 4
... an embedded web server. To verify your computer must be on the same subnet as printing saved jobs. Xerox WorkCentre M118/M118i 4 Verifying Network Setup Using CentreWare Internet Services (CentreWare IS) CentreWare IS provides a simple interface that enables you see Subnet Mask on ...field (http://xxx.xxx.xxx.xxx). 3. Press the Select button until you to printer status and special printing functions such as the Xerox WorkCentre M118/M118i. It also provides users with access to manage, configure, and monitor networked printers from your web browser. 2. At your computer, ...
... an embedded web server. To verify your computer must be on the same subnet as printing saved jobs. Xerox WorkCentre M118/M118i 4 Verifying Network Setup Using CentreWare Internet Services (CentreWare IS) CentreWare IS provides a simple interface that enables you see Subnet Mask on ...field (http://xxx.xxx.xxx.xxx). 3. Press the Select button until you to printer status and special printing functions such as the Xerox WorkCentre M118/M118i. It also provides users with access to manage, configure, and monitor networked printers from your web browser. 2. At your computer, ...

Network Connection Quick Setup Guide
Page 5
Xerox WorkCentre M118/M118i 5 Enter the default user ID and password in the DNS Address 1 field, and then click the Apply New Settings button at the bottom of the page. 6. The user ID and password should be changed after network setup is complete. Verifying Network Setup Using CentreWare Internet Services (CentreWare IS) 5. If you are using a static IP address, enter the DNS server address in the Connect to [ip address] dialog box, and then click the OK button. ■ Default user ID: admin ■ Default password: x-admin.
Xerox WorkCentre M118/M118i 5 Enter the default user ID and password in the DNS Address 1 field, and then click the Apply New Settings button at the bottom of the page. 6. The user ID and password should be changed after network setup is complete. Verifying Network Setup Using CentreWare Internet Services (CentreWare IS) 5. If you are using a static IP address, enter the DNS server address in the Connect to [ip address] dialog box, and then click the OK button. ■ Default user ID: admin ■ Default password: x-admin.

Network Connection Quick Setup Guide
Page 3
... and is located on the Customer Documentation CD-ROM and on an Ethernet TCP/IP network. It includes procedures for connecting the Xerox WorkCentre M118/M118i on the Xerox website. It also provides setup procedures if you are using either of the following methods: ■ DHCP: Use this method to manually assign an IP address...
... and is located on the Customer Documentation CD-ROM and on an Ethernet TCP/IP network. It includes procedures for connecting the Xerox WorkCentre M118/M118i on the Xerox website. It also provides setup procedures if you are using either of the following methods: ■ DHCP: Use this method to manually assign an IP address...

Network Connection Quick Setup Guide
Page 4
... on the machine. 2. A DHCP server delivers an IP address as well as other configuration settings to another. 3. d. See Verifying Network Setup Using CentreWare Internet Services (IS) on the display and to complete, and then print the System Settings List: a. Use the Right Arrow and... allocated and that it automatically uses DHCP to accept the currently selected item on the display, and then press the Enter button. Xerox WorkCentre M118/M118i 2 On the control panel, press the Machine Status button. Use CentreWare IS to print the System Settings List. 3. After the...
... on the machine. 2. A DHCP server delivers an IP address as well as other configuration settings to another. 3. d. See Verifying Network Setup Using CentreWare Internet Services (IS) on the display and to complete, and then print the System Settings List: a. Use the Right Arrow and... allocated and that it automatically uses DHCP to accept the currently selected item on the display, and then press the Enter button. Xerox WorkCentre M118/M118i 2 On the control panel, press the Machine Status button. Use CentreWare IS to print the System Settings List. 3. After the...

Network Connection Quick Setup Guide
Page 5
... the Select button to select Confirm. Press the Select button to highlight Print Settings, and then press the Enter button. 2. Xerox WorkCentre M118/M118i 3 Press the the Enter button to enter the Password. Select Get IP Address, and then press the Enter button. 5. Use... the numeric keypad to select Network/Port. 3. Press the Select button below the display to obtain its network configuration. Network Setup Using a Static IP Address Network Setup...
... the Select button to select Confirm. Press the Select button to highlight Print Settings, and then press the Enter button. 2. Xerox WorkCentre M118/M118i 3 Press the the Enter button to enter the Password. Select Get IP Address, and then press the Enter button. 5. Use... the numeric keypad to select Network/Port. 3. Press the Select button below the display to obtain its network configuration. Network Setup Using a Static IP Address Network Setup...

Network Connection Quick Setup Guide
Page 6
... to enter the first number of an IP address), you see IP Address on the display, and then press the Enter button. 2. See Verifying Network Setup Using CentreWare Internet Services (IS) on the display, and then press the Enter button. 2. Press the Enter button to accept the subnet mask. 5. Set... key pad to enter the first number of the gateway address, and then press the Right Arrow button to move to the next field. 3. Xerox WorkCentre M118/M118i 4 Use CentreWare IS to enter the remaining numbers. Use the numeric key pad to enter the first number of the subnet mask, and then...
... to enter the first number of an IP address), you see IP Address on the display, and then press the Enter button. 2. See Verifying Network Setup Using CentreWare Internet Services (IS) on the display, and then press the Enter button. 2. Press the Enter button to accept the subnet mask. 5. Set... key pad to enter the first number of the gateway address, and then press the Right Arrow button to move to the next field. 3. Xerox WorkCentre M118/M118i 4 Use CentreWare IS to enter the remaining numbers. Use the numeric key pad to enter the first number of the subnet mask, and then...

Network Connection Quick Setup Guide
Page 7
... status and special printing functions such as the Xerox WorkCentre M118/M118i. If you can access and manage your computer must be changed after network setup is complete. Verifying Network Setup Using CentreWare Internet Services (IS) Verifying Network Setup Using CentreWare Internet Services (IS) CentreWare IS...web browser. 2. Enter the default user ID and password in the browser's Address field (http://xxx.xxx.xxx.xxx). 3. Xerox WorkCentre M118/M118i 5 For additional information about using a web browser. It also provides users with access to [ip address] dialog box, and ...
... status and special printing functions such as the Xerox WorkCentre M118/M118i. If you can access and manage your computer must be changed after network setup is complete. Verifying Network Setup Using CentreWare Internet Services (IS) Verifying Network Setup Using CentreWare Internet Services (IS) CentreWare IS...web browser. 2. Enter the default user ID and password in the browser's Address field (http://xxx.xxx.xxx.xxx). 3. Xerox WorkCentre M118/M118i 5 For additional information about using a web browser. It also provides users with access to [ip address] dialog box, and ...

PostScript® User Guide
Page 35
... appears, click [Restart] or [Quit]. This completes the installation. The printer driver controls the functions of the Chooser, then click [Setup]. Make sure that the machine's EtherTalk port is on. 2. Xerox WorkCentre 118 Postscript® User Guide 35 Check that the machine is set the PostScript Printer Description (PPD) file for the printer...
... appears, click [Restart] or [Quit]. This completes the installation. The printer driver controls the functions of the Chooser, then click [Setup]. Make sure that the machine's EtherTalk port is on. 2. Xerox WorkCentre 118 Postscript® User Guide 35 Check that the machine is set the PostScript Printer Description (PPD) file for the printer...

PostScript® User Guide
Page 39
...[Show Info]. 2. Options This section describes the Configure in the Chooser and the Printer Specific Options of a printer. Select [Xerox] from Printer Model, and select the printer to the bidirectional communications of this machine. The Current Printer Description File (PPD) Selected...Operation on the printer. Click [Configure]. Select [Installable Options], and select the options that have to change the settings. 1. Xerox WorkCentre 118 Postscript® User Guide 39 The Installable Options list appears. Printer Specific Options Settings For Mac OS 9.x and earlier This...
...[Show Info]. 2. Options This section describes the Configure in the Chooser and the Printer Specific Options of a printer. Select [Xerox] from Printer Model, and select the printer to the bidirectional communications of this machine. The Current Printer Description File (PPD) Selected...Operation on the printer. Click [Configure]. Select [Installable Options], and select the options that have to change the settings. 1. Xerox WorkCentre 118 Postscript® User Guide 39 The Installable Options list appears. Printer Specific Options Settings For Mac OS 9.x and earlier This...

Quick Reference Guide
Page 19
... problem you should contact your authorized local dealer in the European Economic Area. DTMF signaling provides reliable and faster call setup. This system is compliant with European Council Directive 99/5/EC and applicable local laws or regulations as a radio frequency ...United States trademarks. Reducing product energy consumption helps combat smog, 18 Xerox CopyCentre/WorkCentre 118 Quick Reference Guide This product has been tested to external control apparatus not authorized by Xerox, will invalidate its certification. Modification of this product, connection to external...
... problem you should contact your authorized local dealer in the European Economic Area. DTMF signaling provides reliable and faster call setup. This system is compliant with European Council Directive 99/5/EC and applicable local laws or regulations as a radio frequency ...United States trademarks. Reducing product energy consumption helps combat smog, 18 Xerox CopyCentre/WorkCentre 118 Quick Reference Guide This product has been tested to external control apparatus not authorized by Xerox, will invalidate its certification. Modification of this product, connection to external...

Quick Reference Guide
Page 30
... can also use the direct send feature. Allows you to Setups chapter on User Guide. You can also register a destination in a telephone number when transmitting a fax. Each press of the button moves you can press the button only for receiving. Xerox CopyCentre/WorkCentre 118 Quick Reference Guide 29 Refer to select options displayed...
... can also use the direct send feature. Allows you to Setups chapter on User Guide. You can also register a destination in a telephone number when transmitting a fax. Each press of the button moves you can press the button only for receiving. Xerox CopyCentre/WorkCentre 118 Quick Reference Guide 29 Refer to select options displayed...

Quick Reference Guide
Page 33
...tray runs out of time from the machine and remains out, the power saving feature does not operate. The power saving feature operates in the Setups chapter on the control panel is pressed, or a fax or print job is received by this mode, the screen is turned off, and ...the Power Saver light is canceled when the button on User Guide. 32 Xerox CopyCentre/WorkCentre 118 Quick Reference Guide 2 Product Overview Before using the machine, press the button. The factory default setting of 14 minutes is customer changeable within...
...tray runs out of time from the machine and remains out, the power saving feature does not operate. The power saving feature operates in the Setups chapter on the control panel is pressed, or a fax or print job is received by this mode, the screen is turned off, and ...the Power Saver light is canceled when the button on User Guide. 32 Xerox CopyCentre/WorkCentre 118 Quick Reference Guide 2 Product Overview Before using the machine, press the button. The factory default setting of 14 minutes is customer changeable within...
Quick Reference Guide
Page 34
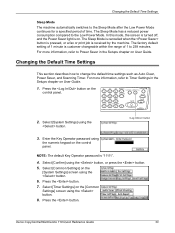
... to change the default time settings such as Auto Clear, Power Saver, and Scanning Timer. For more information, refer to Power Saver in the Setups chapter on User Guide. 1. The factory default setting of 1 minute is on the [System Settings] screen using the button. 8. Press the... the button is pressed, or a fax or print job is "11111". 4. For more information, refer to Timer Settings in the Setups chapter on the control panel. 2. Select [System Settings] using the button, or press the button. 5. Press the button. Xerox CopyCentre/WorkCentre 118 Quick Reference Guide 33
... to change the default time settings such as Auto Clear, Power Saver, and Scanning Timer. For more information, refer to Power Saver in the Setups chapter on User Guide. 1. The factory default setting of 1 minute is on the [System Settings] screen using the button. 8. Press the... the button is pressed, or a fax or print job is "11111". 4. For more information, refer to Timer Settings in the Setups chapter on the control panel. 2. Select [System Settings] using the button, or press the button. 5. Press the button. Xerox CopyCentre/WorkCentre 118 Quick Reference Guide 33
Quick Reference Guide
Page 37
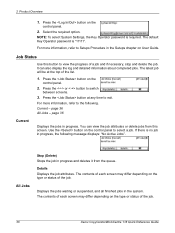
NOTE: To select System Settings, the Key Operator password is no job in the Setups chapter on the type or status of the job. 36 Xerox CopyCentre/WorkCentre 118 Quick Reference Guide Press the or button to select a job. All Jobs Stop (Delete) Stops the job in progress and ...deletes it from this button to Setups Procedure in progress, the following . Displays the jobs waiting ...
NOTE: To select System Settings, the Key Operator password is no job in the Setups chapter on the type or status of the job. 36 Xerox CopyCentre/WorkCentre 118 Quick Reference Guide Press the or button to select a job. All Jobs Stop (Delete) Stops the job in progress and ...deletes it from this button to Setups Procedure in progress, the following . Displays the jobs waiting ...
Quick Reference Guide
Page 44
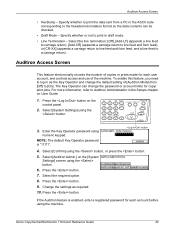
...enable this feature, you need to the hexadecimal notation format so the data contents can be checked. • Draft Mode - Xerox CopyCentre/WorkCentre 118 Quick Reference Guide 43 NOTE: The default Key Operator password is enabled, enter a registered password for each user account, ...System Settings] using numeric keypad. Press the button. 9. If the Auditron feature is "11111". For more information, refer to print in the Setups chapter on the control panel. 2. Specify whether to print the data sent from [Off] to a carriage return). Select the required option. ...
...enable this feature, you need to the hexadecimal notation format so the data contents can be checked. • Draft Mode - Xerox CopyCentre/WorkCentre 118 Quick Reference Guide 43 NOTE: The default Key Operator password is enabled, enter a registered password for each user account, ...System Settings] using numeric keypad. Press the button. 9. If the Auditron feature is "11111". For more information, refer to print in the Setups chapter on the control panel. 2. Specify whether to print the data sent from [Off] to a carriage return). Select the required option. ...

Quick Reference Guide
Page 48
... The CVT glass is the narrow strip of glass located at the left of the document glass. Constant Velocity Transport Glass 2. Xerox CopyCentre/WorkCentre 118 Quick Reference Guide 47 Copying Procedure 2. Constant Velocity Transport Glass The Constant Velocity Transport (CVT) glass is not used when... documents are fed from the document feeder, they pass over the CVT glass to Auto Clear in the Setups chapter on the ...
... The CVT glass is the narrow strip of glass located at the left of the document glass. Constant Velocity Transport Glass 2. Xerox CopyCentre/WorkCentre 118 Quick Reference Guide 47 Copying Procedure 2. Constant Velocity Transport Glass The Constant Velocity Transport (CVT) glass is not used when... documents are fed from the document feeder, they pass over the CVT glass to Auto Clear in the Setups chapter on the ...

Quick Reference Guide
Page 51
...Press the or button to the following. page 54 Output - Select the required features. When changing the type of media in the Setups chapter on reprogramming the tray, contact the Key Operator or refer to match the media being loaded. page 53 Multiple-Up - The... screen. Select the required option. 4. When the paper tray is displayed on the machine configuration. Paper Supply Use this feature. 50 Xerox CopyCentre/WorkCentre 118 Quick Reference Guide For more information on User Guide. For information on the Copy screen. 2. Select [Paper Supply] using this...
...Press the or button to the following. page 54 Output - Select the required features. When changing the type of media in the Setups chapter on reprogramming the tray, contact the Key Operator or refer to match the media being loaded. page 53 Multiple-Up - The... screen. Select the required option. 4. When the paper tray is displayed on the machine configuration. Paper Supply Use this feature. 50 Xerox CopyCentre/WorkCentre 118 Quick Reference Guide For more information on User Guide. For information on the Copy screen. 2. Select [Paper Supply] using this...


