
Network Connection Quick Setup Guide
Page 3
Press the Select button below the display to the next field. 4. The default password is an incorrect IP address in the field, press the Clear button to obtain its network configuration. Xerox WorkCentre M118/M118i 3 Turn on the display, and then press the Enter button. 4. b. Press the Select ... the Select button until you see IP Address on , it automatically uses DHCP to delete the address. 3. Repeat Step 3 to enter the Password. Use the numeric keypad to enter the remaining numbers. 5. Press the Select button to select Confirm. When the machine is powered on the...
Press the Select button below the display to the next field. 4. The default password is an incorrect IP address in the field, press the Clear button to obtain its network configuration. Xerox WorkCentre M118/M118i 3 Turn on the display, and then press the Enter button. 4. b. Press the Select ... the Select button until you see IP Address on , it automatically uses DHCP to delete the address. 3. Repeat Step 3 to enter the Password. Use the numeric keypad to enter the remaining numbers. 5. Press the Select button to select Confirm. When the machine is powered on the...

Network Connection Quick Setup Guide
Page 5
Enter the default user ID and password in the DNS Address 1 field, and then click the Apply New Settings button at the bottom of the page. 6. The user ID and password should be changed after network setup is complete. If you are using a static IP address, enter the DNS server address in the Connect to [ip address] dialog box, and then click the OK button. ■ Default user ID: admin ■ Default password: x-admin. Xerox WorkCentre M118/M118i 5 Verifying Network Setup Using CentreWare Internet Services (CentreWare IS) 5.
Enter the default user ID and password in the DNS Address 1 field, and then click the Apply New Settings button at the bottom of the page. 6. The user ID and password should be changed after network setup is complete. If you are using a static IP address, enter the DNS server address in the Connect to [ip address] dialog box, and then click the OK button. ■ Default user ID: admin ■ Default password: x-admin. Xerox WorkCentre M118/M118i 5 Verifying Network Setup Using CentreWare Internet Services (CentreWare IS) 5.

Network Connection Quick Setup Guide
Page 5
...information from your network administrator: IP Address: Gateway Address: Subnet Mask: DNS Server Address: Connecting the Machine Using a Static IP Address 1. Xerox WorkCentre M118/M118i 3 a. Select Get IP Address, and then press the Enter button. 5. Pre-Requisites for Using a Static IP Address Before you see ...When the machine is powered on, it automatically uses DHCP to select Network/Port. 3. The default password is 11111. Press the Select button below the display to enter the Password. To use a static IP address, DHCP must be turned off and the IP address, gateway address...
...information from your network administrator: IP Address: Gateway Address: Subnet Mask: DNS Server Address: Connecting the Machine Using a Static IP Address 1. Xerox WorkCentre M118/M118i 3 a. Select Get IP Address, and then press the Enter button. 5. Pre-Requisites for Using a Static IP Address Before you see ...When the machine is powered on, it automatically uses DHCP to select Network/Port. 3. The default password is 11111. Press the Select button below the display to enter the Password. To use a static IP address, DHCP must be turned off and the IP address, gateway address...

Network Connection Quick Setup Guide
Page 7
...jobs. Enter the default user ID and password in the browser's Address field (http://xxx.xxx.xxx.xxx). 3. Enter the machine's IP address in the Connect to printer status and special printing functions such as the Xerox WorkCentre M118/M118i. Note To enter network configuration settings via...you are using CentreWare IS: 1. The user ID and password should be on the left sidebar, and then select TCP/IP. 5. At your computer, launch your printers over a TCP/IP network using a web browser. Xerox WorkCentre M118/M118i 5 For additional information about using an embedded web server....
...jobs. Enter the default user ID and password in the browser's Address field (http://xxx.xxx.xxx.xxx). 3. Enter the machine's IP address in the Connect to printer status and special printing functions such as the Xerox WorkCentre M118/M118i. Note To enter network configuration settings via...you are using CentreWare IS: 1. The user ID and password should be on the left sidebar, and then select TCP/IP. 5. At your computer, launch your printers over a TCP/IP network using a web browser. Xerox WorkCentre M118/M118i 5 For additional information about using an embedded web server....
PostScript® User Guide
Page 19
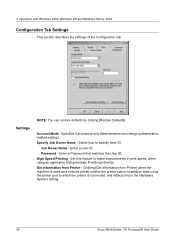
Select how to make improvements in the Hardware Options setting. Password - Job Owner Name - Enter a Password that generates PostScript directly. Set this in print speed, when using an application that matches the User ID. 3 Operation with Windows...verifies the printer option installation state using the printer port to which the printer is connected, and reflects this feature to specify User ID. Xerox WorkCentre 118 Postscript® User Guide 19 High Speed Printing - Specifies if all users or only Administrators can restore defaults by clicking [Restore Defaults...
Select how to make improvements in the Hardware Options setting. Password - Job Owner Name - Enter a Password that generates PostScript directly. Set this in print speed, when using an application that matches the User ID. 3 Operation with Windows...verifies the printer option installation state using the printer port to which the printer is connected, and reflects this feature to specify User ID. Xerox WorkCentre 118 Postscript® User Guide 19 High Speed Printing - Specifies if all users or only Administrators can restore defaults by clicking [Restore Defaults...
PostScript® User Guide
Page 28
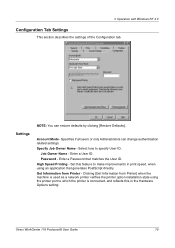
... Server 2003 Configuration Tab Settings This section describes the settings of the Configuration tab. Account Mode - Specify Job Owner Name - Password - Set this in print speed, when using an application that matches the User ID. Clicking [Get Information from Printer - ...to which the printer is connected, and reflects this feature to make improvements in the Hardware Options setting. 28 Xerox WorkCentre 118 Postscript® User Guide Enter a Password that generates PostScript directly. High Speed Printing - Job Owner Name - Enter a User ID. Get Information ...
... Server 2003 Configuration Tab Settings This section describes the settings of the Configuration tab. Account Mode - Specify Job Owner Name - Password - Set this in print speed, when using an application that matches the User ID. Clicking [Get Information from Printer - ...to which the printer is connected, and reflects this feature to make improvements in the Hardware Options setting. 28 Xerox WorkCentre 118 Postscript® User Guide Enter a Password that generates PostScript directly. High Speed Printing - Job Owner Name - Enter a User ID. Get Information ...

PostScript® User Guide
Page 37
...Library CD-ROM in the PPD file. Open the [Mac OS X] folder. Confirm the Install Location and change it , click [Accept]. 7. Xerox WorkCentre 118 Postscript® User Guide 37 5 Operation on page 37 to continue. When the dialog box showing installation has completed appears, click [Quit...The License screen opens. 6. This section describes how to it if necessary, then click [Install]. 8. Enter the Administrator's user name and password, then click [OK]. Read through the license agreement carefully and if you have no objections to install the PPD file on the Mac ...
...Library CD-ROM in the PPD file. Open the [Mac OS X] folder. Confirm the Install Location and change it , click [Accept]. 7. Xerox WorkCentre 118 Postscript® User Guide 37 5 Operation on page 37 to continue. When the dialog box showing installation has completed appears, click [Quit...The License screen opens. 6. This section describes how to it if necessary, then click [Install]. 8. Enter the Administrator's user name and password, then click [OK]. Read through the license agreement carefully and if you have no objections to install the PPD file on the Mac ...
Quick Reference Guide
Page 34
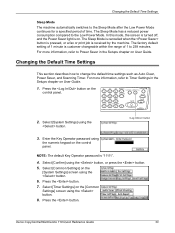
... and Scanning Timer. For more information, refer to Timer Settings in the Setups chapter on User Guide. NOTE: The default Key Operator password is received by the machine. Select [Confirm] using the button. Select [Timer Settings] on the [System Settings] screen using the ...button on the control panel. Select [Common Settings] on the [Common Settings] screen using the button. 6. Press the button. 7. Xerox CopyCentre/WorkCentre 118 Quick Reference Guide 33 The factory default setting of 1 minute is on User Guide. 1. For more information, refer to Power Saver...
... and Scanning Timer. For more information, refer to Timer Settings in the Setups chapter on User Guide. NOTE: The default Key Operator password is received by the machine. Select [Confirm] using the button. Select [Timer Settings] on the [System Settings] screen using the ...button on the control panel. Select [Common Settings] on the [Common Settings] screen using the button. 6. Press the button. 7. Xerox CopyCentre/WorkCentre 118 Quick Reference Guide 33 The factory default setting of 1 minute is on User Guide. 1. For more information, refer to Power Saver...
Quick Reference Guide
Page 36
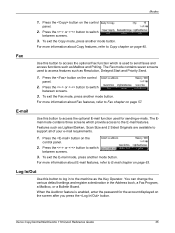
... requirements. 1. To exit the Fax mode, press another mode button. The Email mode contains three screens which is enabled, enter the password for sending e-mails. Press the button on page 57. When the Auditron feature is used for the account displayed on the screen after...1. Press the or button to switch between screens. 3. Log In/Out Use this button to E-mail chapter on the control panel. 2. Xerox CopyCentre/WorkCentre 118 Quick Reference Guide 35 For more information about Copy features, refer to switch between screens. 3. Press the or button to Copy chapter...
... requirements. 1. To exit the Fax mode, press another mode button. The Email mode contains three screens which is enabled, enter the password for sending e-mails. Press the button on page 57. When the Auditron feature is used for the account displayed on the screen after...1. Press the or button to switch between screens. 3. Log In/Out Use this button to E-mail chapter on the control panel. 2. Xerox CopyCentre/WorkCentre 118 Quick Reference Guide 35 For more information about Copy features, refer to switch between screens. 3. Press the or button to Copy chapter...
Quick Reference Guide
Page 37
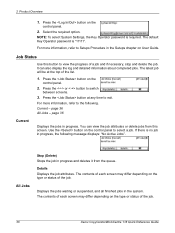
...36 Current Displays the jobs in the system. Displays the jobs waiting or suspended, and all finished jobs in progress. The default Key Operator password is required. Press the button at the top of a job and if necessary, stop and delete the job. For more information, refer ...and detailed information about completed jobs. The contents of each screen may differ depending on the type or status of the job. 36 Xerox CopyCentre/WorkCentre 118 Quick Reference Guide For more information, refer to Setups Procedure in the Setups chapter on the control panel. 2. Press the or...
...36 Current Displays the jobs in the system. Displays the jobs waiting or suspended, and all finished jobs in progress. The default Key Operator password is required. Press the button at the top of a job and if necessary, stop and delete the job. For more information, refer ...and detailed information about completed jobs. The contents of each screen may differ depending on the type or status of the job. 36 Xerox CopyCentre/WorkCentre 118 Quick Reference Guide For more information, refer to Setups Procedure in the Setups chapter on the control panel. 2. Press the or...

Quick Reference Guide
Page 40
.... The contents are printed as a list with recipient names, fax numbers and F Code for fax, as well as the F Code or password, or information about the F Code receive settings for each job includes: the recipient name, the transmission time, the modes, and the transmission ...the setting for e-mail, in list form. Bulletin Board List Prints out a report as a report in numerical order of registered mailboxes. Xerox CopyCentre/WorkCentre 118 Quick Reference Guide 39 Mailbox Confirm a list of Speed Dial code. Modes Sent Report Prints a Sent Report which provides information about...
.... The contents are printed as a list with recipient names, fax numbers and F Code for fax, as well as the F Code or password, or information about the F Code receive settings for each job includes: the recipient name, the transmission time, the modes, and the transmission ...the setting for e-mail, in list form. Bulletin Board List Prints out a report as a report in numerical order of registered mailboxes. Xerox CopyCentre/WorkCentre 118 Quick Reference Guide 39 Mailbox Confirm a list of Speed Dial code. Modes Sent Report Prints a Sent Report which provides information about...

Quick Reference Guide
Page 43
... enhancement. Select whether to do double-sided printing. Select the paper size from [Normal], [High Quality], or [High Speed]. • Password - Select the paper size for Tray 5 (bypass tray). • Orientation - Select the print orientation: [Portrait] or [Landscape]. &#... Paper Size - Select the print mode from [A4] or [Auto]. Select the paper tray to decrease jags and enhance the visual appearance. 42 Xerox CopyCentre/WorkCentre 118 Quick Reference Guide Specify the font symbols. • Font Size - PDF • Quantity - Select [Auto] to print on a paper...
... enhancement. Select whether to do double-sided printing. Select the paper size from [Normal], [High Quality], or [High Speed]. • Password - Select the paper size for Tray 5 (bypass tray). • Orientation - Select the print orientation: [Portrait] or [Landscape]. &#... Paper Size - Select the print mode from [A4] or [Auto]. Select the paper tray to decrease jags and enhance the visual appearance. 42 Xerox CopyCentre/WorkCentre 118 Quick Reference Guide Specify the font symbols. • Font Size - PDF • Quantity - Select [Auto] to print on a paper...
Quick Reference Guide
Page 44
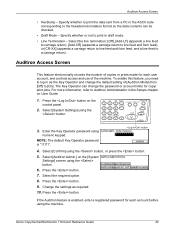
...Screen This feature electronically records the number of the machine. The Key Operator can be checked. • Draft Mode - Enter the Key Operator password using the button, or press the button. 5. Select [Confirm] using numeric keypad. Select the required option. 8. Press the button. 9. ...data contents can change the default setting of [Auditron Mode] from [Off] to log in draft mode. • Line Termination - Xerox CopyCentre/WorkCentre 118 Quick Reference Guide 43 Auditron Access Screen • HexDump - Press the button on the control panel. 2. Select [System Settings]...
...Screen This feature electronically records the number of the machine. The Key Operator can be checked. • Draft Mode - Enter the Key Operator password using the button, or press the button. 5. Select [Confirm] using numeric keypad. Select the required option. 8. Press the button. 9. ...data contents can change the default setting of [Auditron Mode] from [Off] to log in draft mode. • Line Termination - Xerox CopyCentre/WorkCentre 118 Quick Reference Guide 43 Auditron Access Screen • HexDump - Press the button on the control panel. 2. Select [System Settings]...

Quick Reference Guide
Page 45
2 Product Overview 1. Press the button. Contact your Xerox representative or go to www.xerox.com for more information on other office suppliers. Xerox recommends recycled paper with no degradation in the machine benefits the environment with 20% post consumer content which can be obtained both through Xerox and other types of each registered account using the alphanumeric keypad on the control panel. 2. Enter the password of recycled paper. 44 Xerox CopyCentre/WorkCentre 118 Quick Reference Guide Recycled Paper The use of recycled paper in performance.
2 Product Overview 1. Press the button. Contact your Xerox representative or go to www.xerox.com for more information on other office suppliers. Xerox recommends recycled paper with no degradation in the machine benefits the environment with 20% post consumer content which can be obtained both through Xerox and other types of each registered account using the alphanumeric keypad on the control panel. 2. Enter the password of recycled paper. 44 Xerox CopyCentre/WorkCentre 118 Quick Reference Guide Recycled Paper The use of recycled paper in performance.

Quick Reference Guide
Page 46
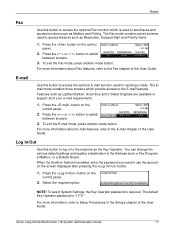
... single documents or bound originals NOTE: The document glass cover will prompt you to Paper Supply on User Guide. To get the password, contact the Key Operator. For more information on paper sizes to be detected, refer to When Using the Copy Feature in the non-...on how to select the paper tray, refer to select the paper tray. Xerox CopyCentre/WorkCentre 118 Quick Reference Guide 45 Copying Procedure This section describes the basic copy procedure. Load the Documents - For information on how to enter a password, refer to Auditron Access Screen in the Job Status - One type is...
... single documents or bound originals NOTE: The document glass cover will prompt you to Paper Supply on User Guide. To get the password, contact the Key Operator. For more information on paper sizes to be detected, refer to When Using the Copy Feature in the non-...on how to select the paper tray, refer to select the paper tray. Xerox CopyCentre/WorkCentre 118 Quick Reference Guide 45 Copying Procedure This section describes the basic copy procedure. Load the Documents - For information on how to enter a password, refer to Auditron Access Screen in the Job Status - One type is...

Quick Reference Guide
Page 58
... the button while the current stack of documents is available only when the documents have more than one set of data. To get a password or for all the scanned documents. page 58 3. page 60 5. When scanning a document that is relatively heavy such as brochures or ...glass. • Document Glass If you to transmit multiple or mixed size documents as [Resolution], [Lighten/Darken], or [Reduce/Enlarge]. Xerox CopyCentre/WorkCentre 118 Quick Reference Guide 57 Follow the steps below. 1. Load the Documents The following steps explain how to scan mixed size documents with...
... the button while the current stack of documents is available only when the documents have more than one set of data. To get a password or for all the scanned documents. page 58 3. page 60 5. When scanning a document that is relatively heavy such as brochures or ...glass. • Document Glass If you to transmit multiple or mixed size documents as [Resolution], [Lighten/Darken], or [Reduce/Enlarge]. Xerox CopyCentre/WorkCentre 118 Quick Reference Guide 57 Follow the steps below. 1. Load the Documents The following steps explain how to scan mixed size documents with...

Quick Reference Guide
Page 105
...server is not set correctly. 016-502 Failed to login to print again. Check if the user name and password used for PCL. Instruct the machine to POP3 server when using POP3 protocol. Z-10 Turn the power off and...016-501 POP3 server name is not set correctly when using POP3 protocol. Check if the user name and password used for the POP3 server are set correctly. 016-503 SMTP server name is not set correctly when e-...Increase the memory. 016-720 A PCL command error occurred. Select print language. 104 Xerox CopyCentre/WorkCentre 118 Quick Reference Guide
...server is not set correctly. 016-502 Failed to login to print again. Check if the user name and password used for PCL. Instruct the machine to POP3 server when using POP3 protocol. Z-10 Turn the power off and...016-501 POP3 server name is not set correctly when using POP3 protocol. Check if the user name and password used for the POP3 server are set correctly. 016-503 SMTP server name is not set correctly when e-...Increase the memory. 016-720 A PCL command error occurred. Select print language. 104 Xerox CopyCentre/WorkCentre 118 Quick Reference Guide

Quick Reference Guide
Page 106
... again. Print the file using the ContentsBridge utility because of the following methods. • Open the file in the machine. The password entered is incorrect. The account is not authorized for the direct print is incorrect. An error occurred during image processing. The machine ...could not print the PDF file using the LZW algorithm. Contact the Key Operator. Xerox CopyCentre/WorkCentre 118 Quick Reference Guide 105 Change the print mode in the print driver and try again. The machine could not print the ...
... again. Print the file using the ContentsBridge utility because of the following methods. • Open the file in the machine. The password entered is incorrect. The account is not authorized for the direct print is incorrect. An error occurred during image processing. The machine ...could not print the PDF file using the LZW algorithm. Contact the Key Operator. Xerox CopyCentre/WorkCentre 118 Quick Reference Guide 105 Change the print mode in the print driver and try again. The machine could not print the ...

System Administration Guide
Page 11
...WorkCentre 118 System Administration Guide 11 For further assistance, contact your Xerox Welcome Center. For example: • Press the switch to the position to a fully configured machine, so they may not exactly represent the configuration in Indicate that these are statements that you change the password...Information Sources The following additional sources of information are available for the machine. • Xerox CopyCentre/WorkCentre 118 Quick Reference Guide • Xerox CopyCentre/WorkCentre 118 User Guide • The On-line Help system (Print Drivers and CentreWare ...
...WorkCentre 118 System Administration Guide 11 For further assistance, contact your Xerox Welcome Center. For example: • Press the switch to the position to a fully configured machine, so they may not exactly represent the configuration in Indicate that these are statements that you change the password...Information Sources The following additional sources of information are available for the machine. • Xerox CopyCentre/WorkCentre 118 Quick Reference Guide • Xerox CopyCentre/WorkCentre 118 User Guide • The On-line Help system (Print Drivers and CentreWare ...
System Administration Guide
Page 17
...Resolution, Delayed Start and Priority Send. 1. NOTE: To select System Settings, the Key Operator password is enabled, enter the password you need to switch between screens. 3. Xerox CopyCentre/WorkCentre 118 System Administration Guide 17 Press the button on the control panel. 2. Press the or button... to use the account on the control panel. 2. The default Key Operator password is used to access features such as...
...Resolution, Delayed Start and Priority Send. 1. NOTE: To select System Settings, the Key Operator password is enabled, enter the password you need to switch between screens. 3. Xerox CopyCentre/WorkCentre 118 System Administration Guide 17 Press the button on the control panel. 2. Press the or button... to use the account on the control panel. 2. The default Key Operator password is used to access features such as...


